Tech Tuesday - Inside Shimano's Shadow Plus Mech and How To Adjust It
There has been a lot of buzz regarding the friction clutch inside the Shimano XTR Shadow Plus rear derailleur. The one-way clutch runs concentric with the rear derailleur cage pivot and its function is to prevent the chain from becoming slack between the cage and the chainring. The benefit of the Shadow Plus friction clutch is that rough terrain doesn't allow the chain to pull against the rear derailleur cage spring, so the chain stays taught and in control. Some riders claim that the clutch eliminates the need for a roller chain guide, although our experience shows that Shadow Plus is amazing, but not quite up to roller-guide performance.
Why Should I Need To Adjust the Clutch?
Shimano understands that some riders will want more chain control than others, so it designed in two adjustments to tune the friction clutch. The first is external - simply rotate the gold-anodized clutch lever between the engaged and disengaged position to reduce friction from the clutch. Should you want more chain control, however, you'll need to open the clutch housing and add tension to the clutch friction band. When you do open it up, you'll be surprised to see that Shimano tucked an adjustment hex-wrench inside the housing. All you need to tune the clutch is one Allen wrench to remove the housing screws - and the following step-by-step guide.
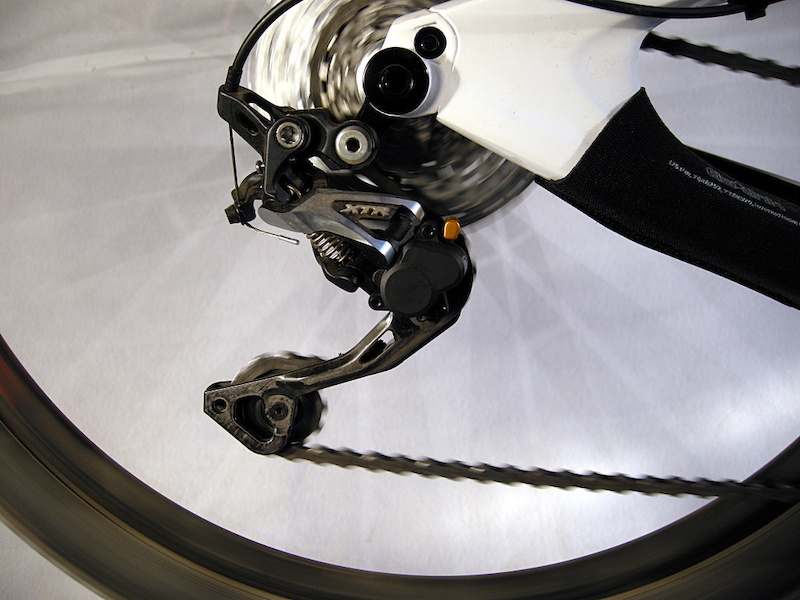
![Shimano s XTR Shadow Plus rear derailleur is similar to the standard item with the addition of a friction clutch and housing at the cage pivot. The clutch engages only when the cage swings forward.]()
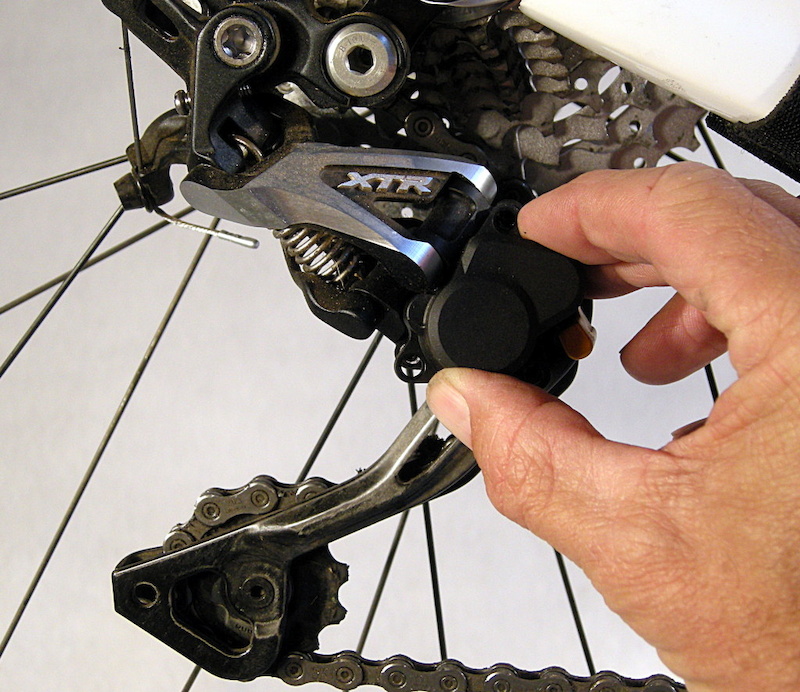
![The gold anodized aluminum clutch lever is used to release the friction in order to ease wheel removal. The lever can be set anywhere between closed and open.]()
How to Adjust the Shadow Plus Friction Clutch
![Remove the three clutch-housing screws. They are shoulder screws designed to bottom out on the aluminum derailleur chassis to protect the plastic housing. Put the housing and screws in a clean safe place.]()
![The one-way roller clutch is the larger cylinder at the lower left. The stainless steel band that encircles it is the friction brake. The adjustment wrench is stowed in the housing above the clutch. The friction adjustment nut is visible in the hex end of the tiny wrench.]()
![Pull the tiny wrench out from its stowage place.]()
![Use the adjustment wrench to tighten the small hex screw clockwise to add tension to the friction band. A fourth turn makes a noticeable difference.]()
![How the clutch-lever cam operates Flipping the gold lever upwards left rotates a cam that squeezes the brake band tighter over the clutch cylinder. Rotating the lever downwards right takes pressure off the friction band. The snail-shell design of the cam allows it to remain in position anywhere in between.]()
![With the clutch lever engaged swing the cage forward and check that there is smooth but firm resistance. If it is higher than you d like remember that you can reduce the friction by relaxing the clutch lever slightly.]()
![Backup pic]()
![Replace the housing and set the housing screws snugly in place don t over-tighten them please .]()
![Engage the clutch lever and run the rear derailleur through the gears in each chainring combination to check for excessive resistance at the shift lever or poor shifting across the cassette. Use the clutch lever to reduce friction and compare results.]()
Past Tech Tuesdays:
Visit Parktool.com to see their entire lineup of tools and lubes
Why Should I Need To Adjust the Clutch?
Shimano understands that some riders will want more chain control than others, so it designed in two adjustments to tune the friction clutch. The first is external - simply rotate the gold-anodized clutch lever between the engaged and disengaged position to reduce friction from the clutch. Should you want more chain control, however, you'll need to open the clutch housing and add tension to the clutch friction band. When you do open it up, you'll be surprised to see that Shimano tucked an adjustment hex-wrench inside the housing. All you need to tune the clutch is one Allen wrench to remove the housing screws - and the following step-by-step guide.
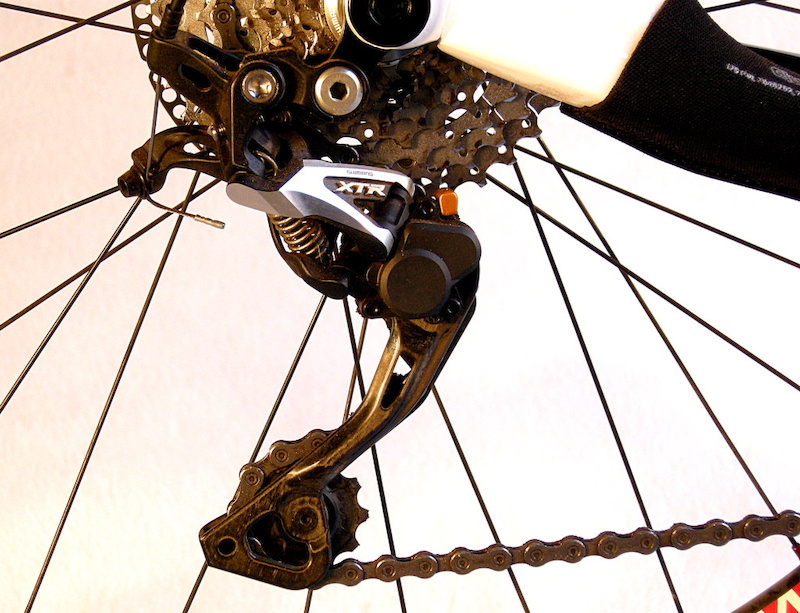
Shimano's XTR Shadow Plus rear derailleur is similar to the standard item, with the addition of a friction clutch and housing at the cage pivot. The clutch engages only when the cage swings forward.

The gold anodized aluminum clutch lever is used to release the friction in order to ease wheel removal. The lever can be set anywhere between closed and open.
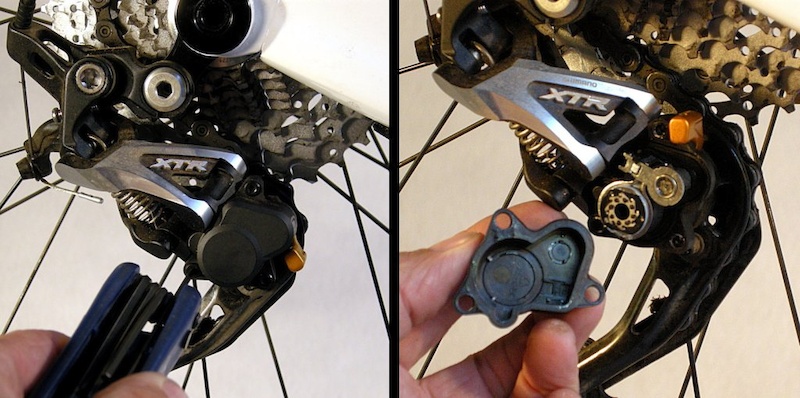
Step 1 -Remove the three clutch-housing screws. They are shoulder screws, designed to bottom out on the aluminum derailleur chassis to protect the plastic housing. Put the housing and screws in a clean, safe place.
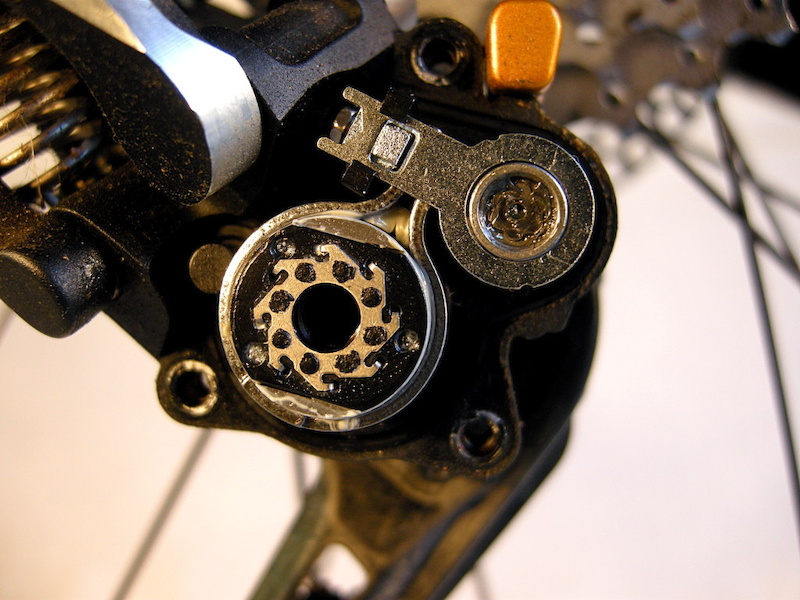
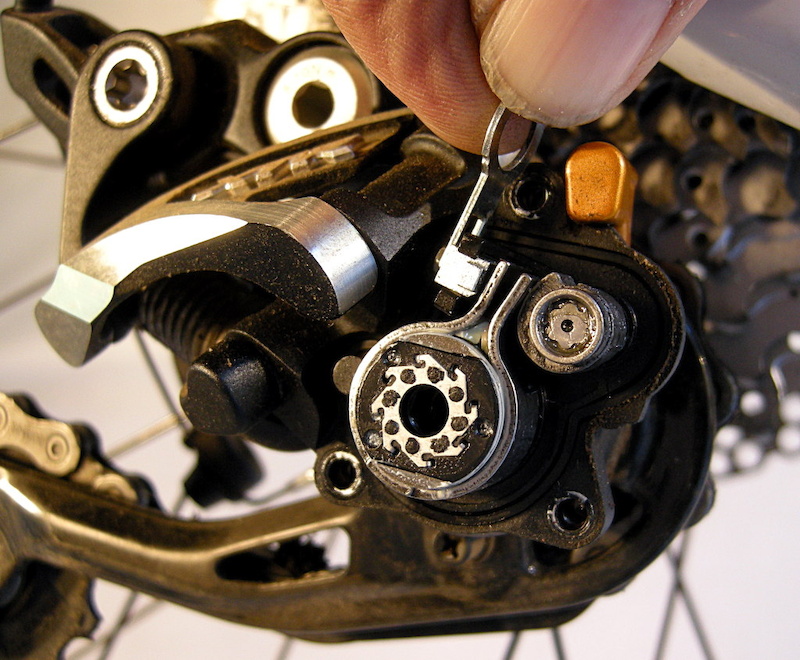
Step 2 -The one-way roller clutch is the larger cylinder at the lower left. The stainless steel band that encircles it is the friction brake. The adjustment wrench is stowed in the housing above the clutch. The friction adjustment nut is visible in the hex end of the tiny wrench.
Step 3 -Pull the tiny wrench out from its stowage place. The wrench is also a structural tension strut that reinforces the clutch mech, so its best to pop it out with the lever in 'off' position.
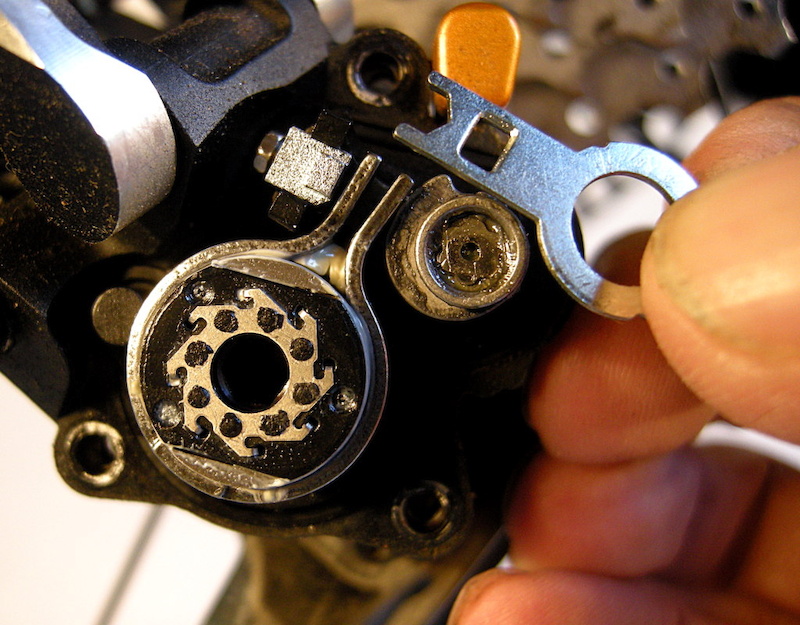
Step 4 -Use the adjustment wrench to tighten the small hex screw clockwise to add tension to the friction band. A fourth of a turn makes a noticeable difference. Note: I made my adjustments with the clutch tensioned, but It's best to work the nut with the clutch lever in the 'off' position.
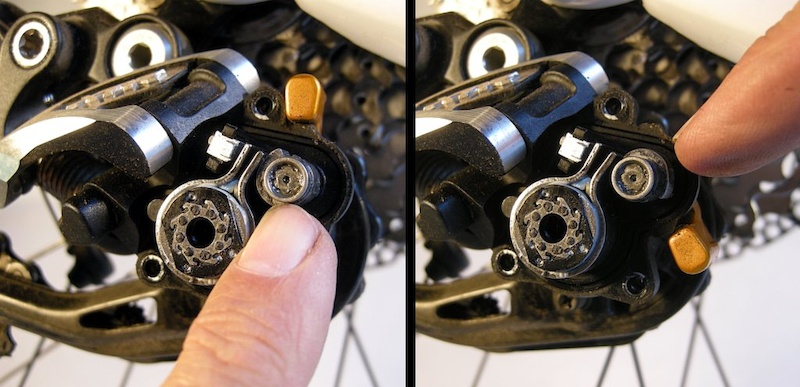
Step 5 -How the clutch-lever cam operates: Flipping the gold lever upwards (left) rotates a cam that squeezes the brake band tighter over the clutch cylinder. Rotating the lever downwards (right) takes pressure off the friction band. Shimano intended the lever to be set either 'off 'or 'on,' but the snail-shell design of the cam allows it to remain in position anywhere in between if necessary.
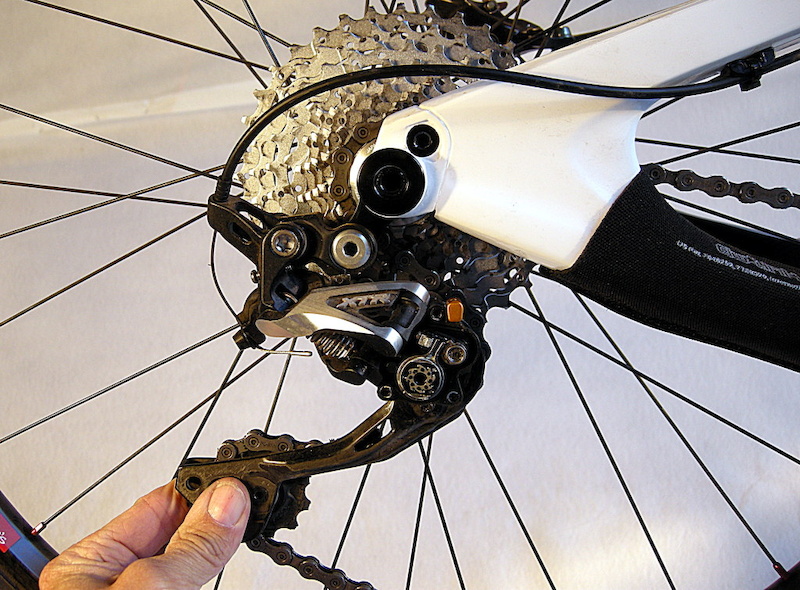
Step 6 -With the clutch lever engaged, swing the cage forward and check that there is smooth but firm resistance. If it is higher than you'd like, remember that you can reduce the friction by relaxing the clutch lever slightly.
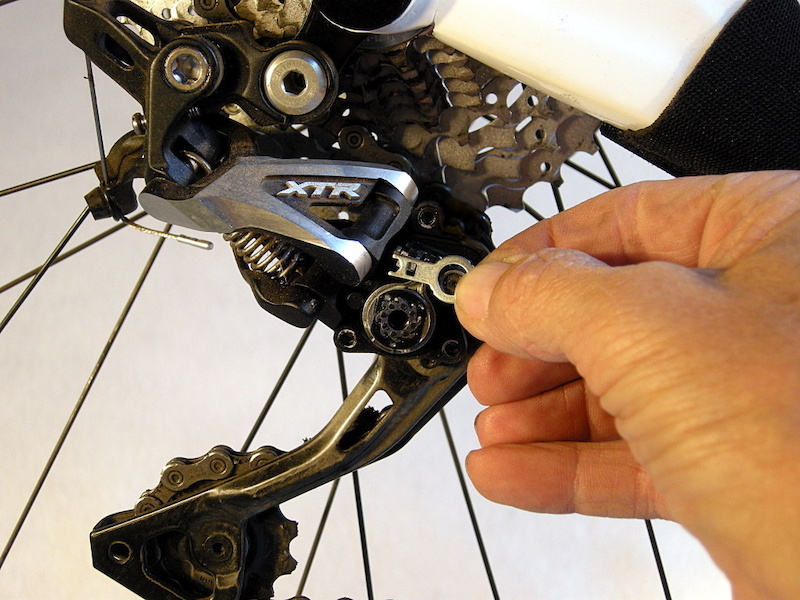
Step 7 -Replace the wrench. It snaps into place with the lever in the off position and is retained by plastic grippers on either side of the rectangular cut-out.
Step 8 -Replace the housing and set the housing screws snugly in place (don't over-tighten them please).
Step 9 -Engage the clutch lever and run the rear derailleur through the gears in each chainring combination to check for excessive resistance at the shift lever or poor shifting across the cassette. Use the clutch lever to reduce friction and compare results. Too much clutch friction can make shifting feel notchy. Before you pass judgement, however, give your clutch tune a ride test. Not happy? Pop the housing off and reduce or add tension to the friction band one-fourth turn at a time until the chain stays on over the bumps and your shifting feels Shimano smooth.
Past Tech Tuesdays:
Visit Parktool.com to see their entire lineup of tools and lubes
Author Info:

Must Read This Week
Sign Up for the Pinkbike Newsletter - All the Biggest, Most Interesting Stories in your Inbox
PB Newsletter Signup
RC
I think it was in BIKE mag, one of the editors said, of the Shadow Plus "who cares about chain slap, it's just something that normally happens.. well it turns out I do.. After using the shadow, the nearly silent running of of the bike is a welcome improvement".. or something to that effect..
norris122--same comment as bennett346, plus I had a stick get tossed into an X9 rear d 30 seconds from the parking lot and destroy it. Name brand doesn't matter for stuff like that.
oh wait.. thats french...
Shitmano would probably steam seeing that
RC
is chain slap realy a problem with a good mech an chain guide?? seems like theyre creating a problem that isnt realy a problem to sell the next gimmick???
maybe on a triple chainset hardtail
I have to say Shadow Plus is the best upgrade i've made for a very long time,i'm totaly sold on it!!!
1/ No chain drops at all since I've started using it on my 2x10 systems. The derailleur controls the chain so well that it never bounces off cogs or chainrings. My Sram XX and X0 did this occasionally and my XT Shadow did this all the time.
2/ No chain suck. If you ride in lousy conditions like many of us, you'll get chainsuck at some point. This is particularly important on carbon frames (even if they have the stainless steel armour).
3/ Very little chain slap noise and pristine chainstays. I've been running this on my SB-66 since day one and I haven't added any additional wrap on the chainstay. The paint still looks like new!
I do wonder how it'll work with the Saint derailleur on frames with lots of chain growth as the suspension cycles. I imagine that the clutch mechanism may get worn out rather quickly given how often and how far the suspension cycles on DH bikes.
I HAD to replace the cage! It had been about 6-7 months since I HAD to replace the cage the last time, so I never maintenanced the der other then replacing a part. That's a lie, I lubricated the pulleys the last time I replaced the cage. This time the der was far dirtier, so I lubed the pivots, pulleys and clutch after a thorough cleaning of the der.
I'm not sure if the little amount of grease that Shimano uses on the clutch is dark brown, but there was dark brown grease inside the clutch. So I disassembled the clutch, spayed out the clutch housing and internal components with a solvent that wont hurt plastic and PACKED the clutch barrel grooves with Slick Honey. Making sure that the clutch-band, clutch-barrel and snail-shell-cam had a layer of grease over the entire component before reinstalling. Then I put a big blob of Slick Honey in the housing cover. After reinstalling, I increased clutch-band torque with maybe a 1/16" of a turn and put the cover back on.
I later found this tutorial on breaking down the Clutch for maintenece... forums.mtbr.com/drivetrain-shifters-derailleurs-cranks/shimano-m-786-xt-shadow-plus-clutch-lubrication-893724.html
You just need to run a bash guard to help from chainring damage.
Shimano 10 speed MOUNTAIN (aka DynaSys) shifters and derailleurs are ONLY compatible with each other. Yes you can mix the SLX, XT, and XTR versions amongst themselves but that's it. They're not compatible with any of the shimano 10 speed road shifters or derailleurs (which themselves however are compatible with the shimano 7 to 9 speed road or off-road model components). Ten speed DuraAce bar-end shifters will work perfectly with 8speed Alivio derailleurs for example if you want to mix that way.
Likewise, SRAM's 10 speed shifters and derailleurs are NOT compatible with any of their 9 speed or less model shifters and derailleurs, but they are cross compatible between the road and off-road models (Red shifters will work with the 10 speed X9 derailleurs for example).