Tech Tuesday - Install American Classic's Tubeless Conversion Kit

Dec 6, 2011
by Richard Cunningham  
Today's Tech Tuesday is pretty simple. American Classic, a long-time player in the prebuilt custom wheel market, has developed a tubeless tire conversion that comes in a narrow, 25-millimeter XC width or a wider, 28-millimeter roll for all-mountain rims. The simple kit includes a roll of transparent tape long enough for two 29er wheels and a couple of valve stems. Tape and stems are sold separately, however, because the folks at American Classic understand that you may already own one or the other, considering that many bikes and wheelsets are equipped with tubeless conversion items these days. We discovered that the American Classic stems may be the best available, so buy a pair anyway and you'll be happy you did. As far as sealant goes; we recommend Stan's - there is no substitute. American Classic is working on a second-generation liquid sealant, but until we test it thoroughly, we're sticking with the milky white stuff from Stan the Man. American Classic price list

American Classic Rim Tape and valve stems
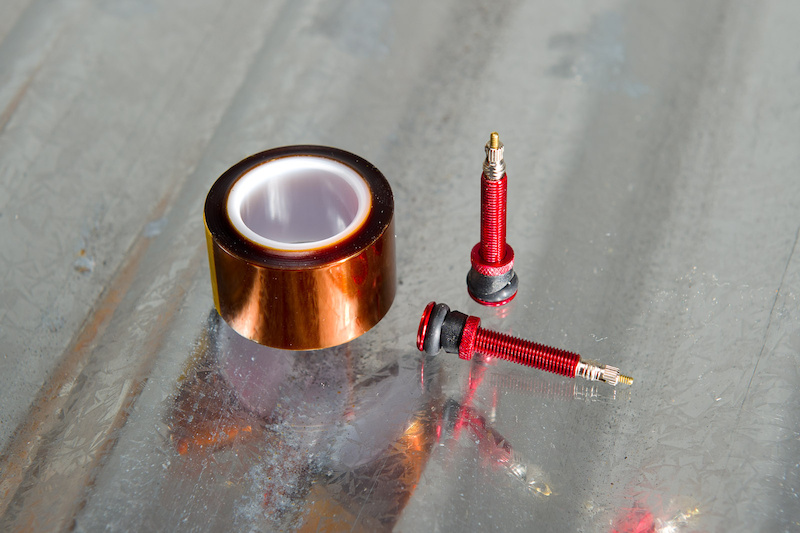
American Classic sells its tubeless components separately. Tape for two wheels runs $14.00 and a pair of stems costs $12.50. Note the hefty O-rings and profiled washers to ensure that the stems seal snugly against the rim.

What you' ll need to get started:
• One roll of American Classic tape
• Two American Classic tubeless valve stems (or alternative valve stems compatible with your rims)
• A soldering iron (or a large nail and a nearby flame)
• Four to five ounces of Stan's sealant (one little bottle each wheel)
• Tubeless ready or UST tubeless tires.
• A ready source of compresed air or a friend who can get vicious on a floor pump.
• Positive, winning attitude

American Classic Rim Tape and Valve Stems
A soldering Iron is used to cleanly pierce the layers of plastic rim tape because melting the tape does not leave a jagged edge and thus seals better than using a blade to cut the hole.

Tubeless Inflation Tips:
• Always inflate tubeless tires horizontal with the floor. This gives you the best chance of getting a complete seal started around the circumference of the rim.
• Don't give up right away with the hand pump. Often, only a slight amount of air is sneaking around the tire bead and a few more swift stokes will get it mounted.
• OK, so you don't have an air compressor. Buy a compressed air container and fill it with your hand pump (RC does this) or burn a large C02 cartridge and get your tire on with a three-dollar burst of carbon dioxide.
• Finally, try removing the valve core when initially inflating and mounting tubeless tires. This allows a greater volume of air to transfer instantly into the tire and often this is just enough of an advantage to inflate a troublesome tire with a hand pump.


How To Install American Classic's Tubeless Conversion Kit


American Classic Rim Tape and Valve Stems
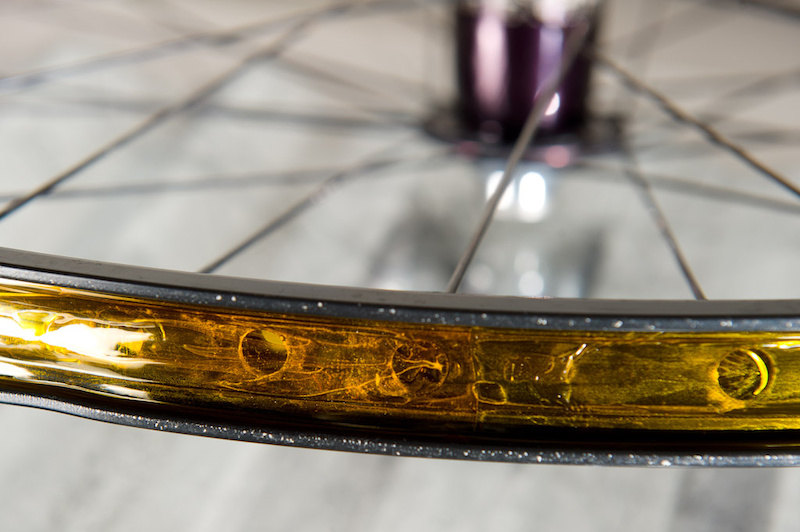
Step 1 - Begin with a clean and oil-free rim to ensure a perfect seal. Start laying the tape an inch or so before the valve hole in the rim and keep it stretched and centered between the flanges. Go around twice and then cut the tape so it overlaps an inch or so on the other side of the hole. Run a finger around the tape to seat it.
American Classic Rim Tape and Valve Stems
Step 2 - Locate the valve stem hole in the rim. Heat up your soldering iron and carefully melt a hole just large enough to fit the valve stem through. Heating up your mom's aluminum knitting needle over a gas stove will also do the trick.
American Classic Rim Tape and Valve Stems
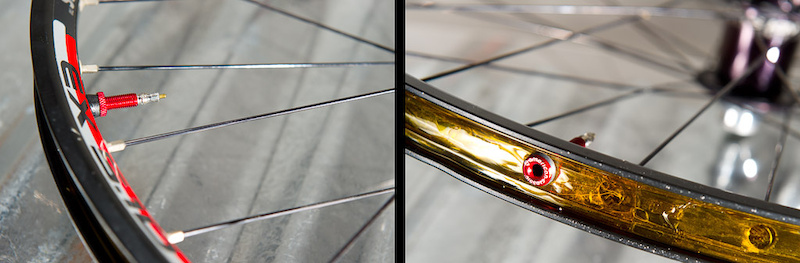
Step 3 - Slip the valve stem through the hole with the O-ring facing the tape. Align the profiled washer with the rim and tighten snugly with just your fingers. Do not over-tighten the valve stem, this distorts the O-ring and may cause it to leak air.
photo
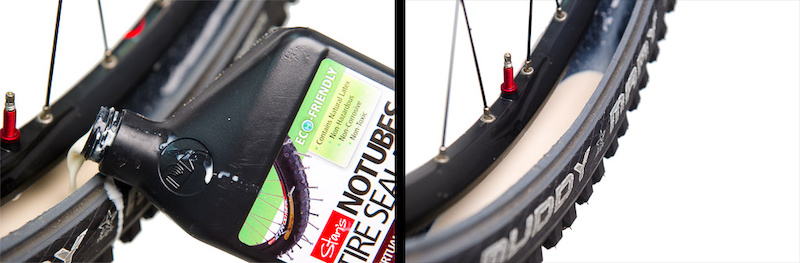
Step 4 - Mount a tubeless ready or a UST tubeless tire to the rim, but leave about eight inches of the bead exposed. Pour three or four ounces of Stan's liquid sealant into the tire and then close it up by hand. Check to ensure that the beads are outside the valve stem inside the rim and then Lay the wheel on its side and inflate. At about 40 psi, you should hear the beads pop into place.
photo
Step 5 - Once the beads pop into place, remove the air hose and spin the wheel at various angles to encourage the sealant to plug off any micro-leaks in the casing. Leave the wheels aired up to about 40 psi for a few minutes and then go ride.

Something go wrong? Find detailed instructions on how to mount tubeless tires HERE.


Got some experience with American Classic's tubeless conversion components? We'd love to hear about it in the comment section.


Past Tech Tuesdays:
TT #1 - How to change a tube.
TT #2 - How to set up your SRAM rear derailleur
TT #3 - How to remove and install pedals
T #4 - How To Bleed Your Avid Elixir Brakes
TT #5 - How To Check And Adjust Your Headset
TT #6 - How To Fix A Broken Chain
TT #7 - Tubeless Conversion
TT #8 - Chain Wear
TT #9 - SRAM Shift Cable Replacement
TT #10 - Removing And Installing a Headset
TT #11 - Chain Lube Explained
TT #12 - RockShox Totem and Lyric Mission Control Damper Mod
TT #13 - Shimano XT Crank and Bottom Bracket Installation
TT #14 - Straightening Your Derailleur Hanger
TT #15 - Setting Up Your Front Derailleur
TT #16 - Setting Up Your Cockpit
TT #17 - Suspension Basics
TT #18 - Adjusting The Fox DHX 5.0
TT #19 - Adjusting The RockShox BoXXer World Cup
TT #20 - Servicing Your Fox Float Shock
TT #21 - Wheel Truing Basics
TT #22 - Shimano Brake Pad Replacement
TT #23 - Shimano brake bleed
TT #24 - Fox Lower Leg Removal And Service
TT #25 - RockShox Motion Control Service
TT #26 - Avid BB7 Cable Disk Brake Setup
TT #27 - Manitou Dorado Fork Rebuild
TT #28 - Manitou Circus Fork Rebuild
TT #29 - MRP G2 SL Chain Guide Install
TT #30 - Cane Creek Angleset Installation
TT #31 - RockShox Maxle Lite DH
TT #32 - Find Your Tire Pressure Sweet Spot
TT #33 - Three Minute Bike Preflight Check
TT #34 - MRP XCG Install
TT #35 - Stem Choice and Cockpit Setup
TT #36 - Handlebars - How Wide Affects Your Ride
TT #37 - Repairing A Torn Tire
TT #38 - Coil spring swap
TT #39 - Trailside help: Broken Shift Cable
TT #40 - Installing a Fox Float Air-Volume Spacer
TT #41 - Replace the Seals on Your 2011 RockShox Boxxer World Cup Fork
TT #42 - Clean and Lubricate Your Fox F32 Dust Wiper Seals
TT #43 - Thread Locker Basics
TT #44 - Install a SRAM X.0 Two-By-Ten Crankset
TT #45 - VPP Suspension Bearing Service
TT #46 - Rotor Straightening
TeT #47 - Finding and fixing that creak
TT #48 - Bleed and Service Magura Marta Disc Brakes
TT #49 - Cup and Cone Hub Basics
TT #50 - Install and Adjust Pedal Cleats
TT #51 - Cup and Cone Hub Rebuild
TT #52 - Converting Mavic Crossmax SX Axles
TT #53 - Cassette Removal and Installation
TT #54 - Cane Creek AngleSet Installation

Visit Parktool.com to see their entire lineup of tools and lubes

Author Info:
RichardCunningham avatar

Member since Mar 23, 2011
974 articles
Report
Must Read This Week
Sign Up for the Pinkbike Newsletter - All the Biggest, Most Interesting Stories in your Inbox
PB Newsletter Signup

62 Comments
  • 8 0
 When pouring in the stans, I was advised to use the red conical applicator spout, invert the bottle holding it closed with your finger tip, then release to pour the fluid from the 'bottom' of the bottle (as it's upside down) rather than pouring off the fluid from the top.. this, i was told, ensures you're getting a better mixture of the beads and fluid. It seemed like a good tip as even after a ridiculous amount of shaking, the fluid pouring through the spout from the inverted bottle was visiibly chunkier/thicker than just pouring the fluid off the top. Anyways.. just a tip from a source i trust.. and given the countless little self-sealed slices in my Minions without any pressure loss, a tip I'll stick with and pass on.
  • 3 0
 i have never rely known the difference in tube and tubeless wheels ( other than one had tube and the other one dosent ) are you even saving any weight? and could you run the liquid solution in a tube tire to increase puncture resistance?
  • 1 0
 the inner tube extends and contracts as you change the psi so it is possible to have leaks... other than that tubelčess has less roling resistance as far as i know...
  • 1 0
 Inner tubes also lend structural support to the tire casing, which is why tires designed specifically for running tubeless often have stiffer/heavier casings, as well as an inner layer of rubber coating designed to hold the air in better. Tubeless conversion kits like this relying on sealant are only lighter than tubes when using them with tires not designed to be setup tubeless.
  • 4 0
 Deeeight is not exactly correct. UST tubeless tires have an extra layer of sealing rubber inside the carcass to enable them to be ridden wihtout sealing fluid. This is why UST tires are heavier than a comparble tube-type. "Tubeless Ready," or tires named similarly, are-standard casing tires designed to run tubeless with sealant. Tubeless ready tires are comparable in weight to standard tires and quite popular among tubeless users. The tube presses the bead against the rim, which reinforces that junction when running lower pressures. But before tube guys get excited, the downside of tubes is that they get caught between the sidewalls and the rim when the tire is collapsed (big sharp bumps) and the tire carcass shears a hole in the tube (pinch flat), so you can't run lower pressures to take advantage of this fact. In an apples-to-apples comparison, a tubeless tire can be run harder than a tube tire in the rocks and roots. Also, the interference between the tube and tire makes a tube tire less flexible so it will roll slower and react harsher to bumps.
RC
  • 1 0
 You're not exactly correct either RC. UST's aren't simply a standard for having a sealing layer inside the casing to hold the air in. There is also the interface at the bead lock between the tire and rim which is different and stronger than with tube-type tires. That's why some companies offer UST tires, tubeless ready tires, and tube type tires (Hutchinson for example has all three). UST tires and rims fit much tighter together than Tubeless-Ready tires on taped/sealed rims and can easily be inflated with a compact handpump. Also while TLR tires are lighter than UST tires, they are with few exceptions still heavier than tube-type tires, which is what most choose to convert using sealant.
  • 3 0
 Top tip for really hard to seat tyres: Put a tube in first and inflate to seat both beads. Then unseat one bead to remove the tube. Add your valve and sealant, get the unseated side on the rim, and and apply liberal amounts of detergent+water mix as a bead lubricant. Now place the wheel and tyre on top of a stack of old tyres with the seated bead facing down. Have an assistant pump like mad while you press down hard on the hub. This last step is key, pressing down on the hub folds the tyre up around the rim and helps to push the unseated bead in to place. Miraculously, it doesn't seem to unseat the other side.
  • 2 0
 Why is Stan's such a popular sealant, compared to competitors like Caffelatex? I'm not sure how reliable Caffelatex is at sealing big holes, but I find that it makes initial sealing much easier, in my limited experience with the 2. I also inject it into tubes on my non-tubeless bikes and it seals up those tiny holes that are hard to find when trying to patch, which can leak a lot of air overnight. Its works without needing a removable valve core, since it doesn't rely on large crystals to plug up holes. Very useful if you live in the SW US and find 5+ goatheads buried into your tires and dual flats, which usually go flat the moment you stop to wait for your buddies or take a break.
  • 2 0
 I first went tubeless with caffelatex. My first puncure was a pinhole that took a lot of effort to seal. then I got a small 2-3mm tear that never sealed. Both punctures resulted in a sealant shower. After that whole ordeal I decided to try stans in non tubeless tires at that. I have had many punchures that sealed immediatly and I am very happy with the set up.That is just my personal experience and it is my opinion that it out performs its competitors hands down.
  • 2 0
 Because caffelatex sucks in comparison. If you don't want to pay the price for the notubes sealant mix your own. Its just liquid latex based. You can do the windshield washer fluid mixed with latex mould builder from a crafts store, or you get liquid latex based floor sealant pre-mixed in large jugs at many large hardware/home reno stores. Either works equally well. As to the "crystals" used to plug holes. Make your own. Use beach sand or grind up some mica flakes, or craft store glitter.
  • 6 0
 gheetto tubeless.
  • 3 0
 This came just in time for a new bike next year. tup But why aren't there videos anymore? Mike Levaay was hilarious and quite good at explaining how to do it.
  • 1 0
 Tubeless for the win! running UST wheels with regular tires. Crossmark F and Small block 8 R. Ran out of stans after one wheel, used acrylic and whole wheat flour in the other. the flour filled the pinholes in my sidewall that were leaking before with stans. tires lose about 1-2 psi a week.
  • 1 0
 So, as someone who has never tried tubeless, but has tubeless ready rims and tires..
Does the liquid eventually gum up into a solid barrier inside? or does it always stay in its liquid form to plug any unexpected punctures?

If it gums up, is a puncture repair basically just pouring more in and sloshing it around under pressure until it plugs the hole?
  • 2 0
 it gums up and eventually dries up. fresh stans has to be re inserted every few weeks or so to ensure proper seal and protection against punctures.
  • 3 0
 @simooo Depends on the climate to be honest. Ran Stans for well over 3 months in the UK and Morzine during the summer without needing to change it, in fact got about 6 months in total out of one top up of Stans... If it's hot and dry it's going to gum up quicker, in the UK you'll manage a whole winter season no issue without a top up, in the summer you might need one top up if it's super hot but in the UK chances are you'll only need one top up a year. gotta run tubeless mate, had 4 small punctures in Morzine in both wheels, carried on riding for a week, rode at home without losing any pressure for another month, back out to Morzine with the same tyres, same punctures, no top ups of Stans for a long weekend, carried on riding back in the UK for another 2 months before changing the rear tyre. Lost a total of 5psi over that entire period with 4 un-repaired punctures! Awesome!!!
  • 2 0
 I'm with cydaps.. stan's can last up to 6 months, especially if it's a UST Tire.. (UST tires have air tight sidewalls, non UST tires may leak through sidewalls, so sealant is Required.. although if you're smart, you'll put sealant into a UST tire anyway, just in case)

I use 1" Guerilla duct tape from Home depot, $2.50. it's thicker, to prevent burping and get a tighter seal.. I wrap it two times around the wheel. (get two rolls for 2 wheels).
here's a link to my budget, slightly ghetto method.
www.facebook.com/video/video.php?v=2517657694375


I love the the Red Ano stems though, gonna get some of those!
  • 1 0
 here in the UK you can run a Stan's setup for 6+ months before bothering to remount the setup with fresh Stan's solution

its often only when you get a puncture that won't seal, or you want to install a brand new tire, that you notice your Stan's solution has dried out, or done the weird thing of making a "spiky starfish" (for want of a better description...) where it all coagulates into a strange spiked ball !
  • 1 0
 I don't see the point of the sealant... My front 823/Minion UST combo has has the same air in it for over 2 seasons, I haven't touched it once. The rear one has a slow leak because for some reason one of those stupid little rubber nubbies was too close to the bead when they cast it but it still holds air for at least a week anyways. All I did was use water to slide the rubber on the rim and then blew it up. No sealant at all.
  • 1 0
 UST tires/rims don't need sealant because they're designed to hold air without any. The UST concept predates the whole tubeless sealant conversion industry. Sealants are for getting tires which were never meant to hold air inside the casing, to hold air...
  • 1 0
 What this article didnt mention is how to decide on which tape width, I mean it appears to be obvious that the wider the rim, the wider the tape must be. But what if there are some newbies around, with older rims, that dont say which internal width they have???

RC, you shouldnt entirely forget neophites.
  • 2 2
 starting to get some repeat tech tuesdays...we already had one tubless conversion how-to before, doubles for setting up your cockpit, and there are two cane creek angleset installation how-tos. are ideas really becoming that scarce? at least double check if its been done already.
  • 1 0
 Will it work without tubeless tires?
I've got the Mary's and I'm thinking about upgrading to tubeless
  • 2 0
 Yes, it will work without tubeless tires.
  • 1 0
 okay cool !
what about the rims? what do they have to do?
I have to admit I have no idea on tubeless stuff Wink
  • 2 0
 Any rim will work as long as they are not too wide or too narrow. I may be wrong but I believe that AC makes rim strips in more than one width to accommodate different rims.
  • 4 3
 I see something wrong with the equation, when pouring goo into one's tire is seemingly the solution so, I'll stick to tubes.
  • 7 0
 Give it a try before you hate. I never had intentions of trying tubeless till I bought a pair of wheels that were already tubeless compatible. Decided to give it a go and now I'm hooked! Haven't had a flat since (not that it's the solution to all flats, but small punctures are easily taken care of).
  • 3 0
 If you have proper tubeless tyres you can get away without the goo (OK not always, sometimes they'll leak), you just don't get self sealing punctures.

Try it anyway, you can't beat the satisfaction of hearing it pop onto the bead after you've given it loads with a trackpump!
  • 1 5
flag lenmerderdenfer (Dec 6, 2011 at 5:46) (Below Threshold)
 "Hate" is a very strong word. Also, I know that this can be done without glue but, I will still stick to tubes. The terrain I pound down requires quick and easy fixes. For me, patches are a no brainer when needed.
  • 1 0
 lenmerderdenfer,
patches take forever to dry, and what about the "terrain you ride" "requires" a fast fix? everywhere i ride i would like the fastest fix possible, i dont ever want to sit around and twiddle my thumbs.

"Leave the wheels aired up to about 40 psi for a few minutes and then go ride."
easy
  • 1 0
 30 ... seconds! OMFG! ... blow ... blow!
  • 6 1
 the Fastest fix is not getting a flat in the first place! Tubeless for the win! =)

Seriously though, give it a try. I've gone from semi frequent flats to 2 flats in 2 years.. I ride hard in really rocky areas. I won't go back to tubes. the only tubes I use, are when i'm giving them out to people who punctured their non-tubeless set ups.. that's when they tell me "tubeless is too much hassle".. as they are fixing their tube.. I chuckle each time. I'd rather take the time to set it up at my house, than fix tubes on the trail, while everyone waits..

you may want to bump up your sidewall a little though if you're using XC tires.. Maxxis Exo-protect is perfect for AM riding.. single wall is okay, but you have to inflate a bit more to get the rigidity out of the casing.. double case for DH, of course.

good luck and have some flat free fun! cheers
  • 3 0
 In response to shrockie... Take note PB people, this is how one makes an argument. You make very a good point and case. I hear what you are saying. Thanks for the input dude!
  • 2 0
 It took me forever to go tubeless as well. I was skeptical about the effort and mess. However, now that I have, I will never go back to tubes! I ride over some of sharpest and rocky terrain there is here in Arizona. I would get pinch flats running over 28psi when I had tubes. Now I run 18psi in the front and 20psi in the rear, and I have had zero issues in the last 6 months! Not to mention the added grip due to the tires conforming better. Anywhere where tubes works, tubeless will work better.
  • 2 0
 Happy to help, lenmerderdenfer. It took me a while to switch, but now i'm totally sold..

here's a link to a video showing how I set up my rims, and how to mount the tire (separate vid in the link).. a compressor is a HUGE help to mount them.. but can also be done with an air tank.. (empty metal tank, that's filled with a floor pump, so you get a fast release of air into the tire from the tank with high pressure in it..)

www.facebook.com/video/video.php?v=2517657694375

once you're converted, you'll be happy that you can reduce the air pressure in your tires some.. Pinch flats/ snake-bikes happen pretty easily with tubes, when the rim hits a rock the tube is easily pierced.. but, when you're tubeless, it takes a lot more effort to pinch through the sidewall of the tire, because of the fiber reinforcement. so, what used to result in a flat, ends up being a non issue..

with the lower pressure, you'll have better traction, because more tread is on the ground, and it will be a smoother ride, because the tire can deform over the rocks, rather than bouncing over them with higher pressure.. total win win..

good luck and have fun out there!~ PM me if you need any help. cheers, Joel
  • 1 0
 Well mon amie, in france you have no "Goatheads/Toritos" (USA/Northern Mexico) en.wikipedia.org/wiki/File:Trte_003_lhp.jpg
but we do in Northern Mexico, and having to patch inner tube 10 to 15 times after each single ride, would make you a blind convert to tubeless...
  • 2 0
 £15 for a roll of insulation tape? Im in the wrong business.
  • 2 0
 It's because it's Kapton tape, resistant from abs. zero to 400C. Same material used on the outer layer of space suits. No joke.
  • 1 0
 get a roll of tesa thin dubbleside tape works just fine for crosscountry rims....
  • 1 0
 Guerrilla duct tape 1" wide. $2.50 home depot. "handy roll".. gorillaglue.com/tapes.aspx
  • 3 1
 my favourite part was the video... oh wait
  • 1 0
 are tubeless tires required? i know this is a stupid question but i always wondered. sorry for my stupidity.
  • 1 0
 no but tubeless tiers have thicker walls.
  • 1 0
 UST/ Tubless tires, as saso said, have thicker walls that are air tight. with UST you don't "Need" stan's because they're air tight, but it's a good idea... you don't Have to use UST tires, but it's a good idea of DH because they are more durable.

For AM or XC, any tire works.. some single ply tires take a little more effort to seal.. the sidewalls leak air.. you need to shake the stan's around on the inside to seal all of the holes. here's a link to a video, there's another link inside for mounting.
www.facebook.com/video/video.php?v=2517657694375

enjoy and good luck. I've had 2 flats in 2 years.
  • 1 0
 The soldering iron bit seems a little silly. A sharp awl should do the trick just fine.
  • 1 0
 "Find detailed instructions on how to mount tubeless tires HERE." This link aint working...
  • 1 0
 How well does the compare to Stan's?
  • 1 0
 I have stan's wheels, near as I can tell stan's buys their hubs from american classic and AC buys their rim tech from stans, the AC valves look like stans valves......the AC tape looks cool
  • 1 0
 The American Classic AM wheels are made by Spank with Spank technologies. Spank makes their own conversion like this...wonder if they make this for AC too.
  • 1 0
 To set the record straight, we have our own rim and valve technology designed by Bill Shook and they are made by American Classic. We do not purchase from Spanks or Stan's. Best regards Smile
  • 1 0
 Is it possible to have no sealant with tubeless rims and tubeless tires?
  • 3 0
 Yes UST tires and Rim combos. Some of us like a little sealant still though for the small punctures that can happen out on the trail.
  • 2 0
 Im pretty sure it'll work without a sealant, but could be difficult to set. Also, you have no protection from micro punctures and leaks between bead and rim. Use sealant. Ive never used a ust tire, but have a ust rim; works pretty well with regular tires in my experience.
  • 1 2
 To stop "leaks between bead and rim" I use.....inner tubes !
  • 1 1
 Why ? Why run tubless ?

I got 15 inner tubes for £10 off ebay.

Seems like a right f*ck on.
  • 2 0
 In many cases, its lighter. Its more puncture resistant (especially with thorn bush or cactus needle type punctures) and it reduces the rolling resistance because you no longer have any frictional losses from the tube/tire interface shifting as the wheel revolves.
  • 1 0
 To build on Deeeight; tubeless for lower air pressure. Lower air means more tire contacts the ground. Lower air also means the tire can flex and roll through bumps, rather than having to bounce over them, for a faster and smoother ride.

at lower pressures, you'll get a lot of pinch flats, if you use tubes. however, with tubeless, the thin walled tube holding the air is gone.. it's now the tire.. The tire's sidewalls have fiber reinforcement so they won't split nearly as easily..

In short; Better traction, smoother ride, faster rolling and more riding because you're not stopping to fix flats. I've given out 15 tubes to riders needing a fix in the 2 years I've run tubeless.. I much prefer handing out tubes to people, than having to fix them myself. You can build a lot of goodwill with the £10 you spent by helping folks out.. as they fix their flats, you can also talk about how happy your are that you switched to tubeless.. =)

here's an easy and cheap method.. not sure if you have the same tape over there though.. best of luck, happy riding. www.facebook.com/video/video.php?v=2517657694375
  • 1 0
 this is sweet!
  • 2 1
 Video please
  • 1 0
 Use YouTube.
  • 1 0
 YouTube-less


Copyright © 2000 - 2024. Pinkbike.com. All rights reserved.
dv56 0.052423
Mobile Version of Website