Tech Tuesday - Bleed and Service Magura Marta Disc Brakes
Hydraulic brakes work best when there is no air in the system and the pads are fresh. Magura brakes are quite easy to bleed, and while the pads are not top-loading like Shimano and Formula, Marta caliper pistons are magnetized to encourage the pads to snap into place. Once you read through these instructions and give it a go, you will not shy away from servicing disc brakes like so many riders do. Pinkbike's guest mechanic is Roller Derby flat track racer Babs the Barbarian.
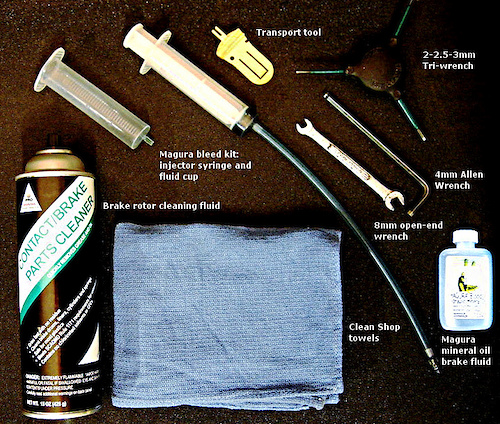
![all of the bits you ll need]()
What you’ll need:
• 2, 2.5, 3, and 4-millimeter Allen wrenches
• 8-millimeter open-end wrench
• Magura Blood mineral oil
• Magura bleed kit
• Plastic transport tool
• Rubber band
• Electric contact cleaner
• A couple of clean shop towels
• Work-stand is helpful
• Spare brake pads (may not be necessary)
Tips:
Two opposing forces are at work when bleeding brakes: the absolute requirement for cleanliness of the brake pads and rotors and that the slightest amount of oil can contaminate them – and the fact that the stuff that will be leaking all over the place while you bleed the hydraulic system is in fact, mineral oil. Magura begins its bleed process by pulling the wheels off the bike and then removing the brake pads. In this way, you’ll have the time to clean your hands, the brake caliper and nearby frame components before you introduce the Rotor and pads back to the system.
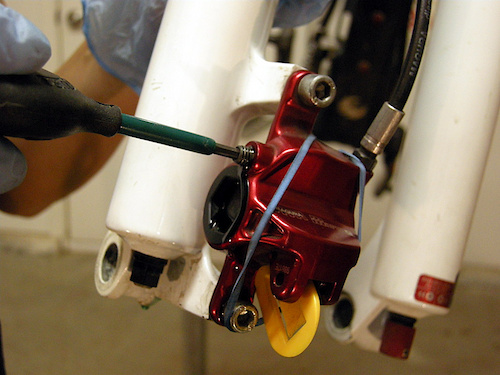
![space out brake pads]() Step one: remove the wheels, place the frame in a bike stand and use the plastic transport tool or a clean screwdriver to spread the brake pads as wide as they will go.
Step one: remove the wheels, place the frame in a bike stand and use the plastic transport tool or a clean screwdriver to spread the brake pads as wide as they will go.
![remove pads]() Step two: Remove the pad retaining screw from the caliper body and then remove the brake pads by squeezing them together at the ears where the pad retaining screw engages them and pulling them downward. Put these items aside in a safe, oil-free environment.
Step two: Remove the pad retaining screw from the caliper body and then remove the brake pads by squeezing them together at the ears where the pad retaining screw engages them and pulling them downward. Put these items aside in a safe, oil-free environment.
![insert transport tool as spacer]() Step three: Use the back side of the plastic transport tool to space the caliper pistons inside the caliper. Use a rubber band to retain the spacer while you work. Avid and Magura transport tools are interchangeable, in case you don’t have the Magura item.
Step three: Use the back side of the plastic transport tool to space the caliper pistons inside the caliper. Use a rubber band to retain the spacer while you work. Avid and Magura transport tools are interchangeable, in case you don’t have the Magura item.
![unscrew caliper bleed plug]() Step four: Prepare the bleed syringe (the one with a hose and fitting) with about 20 CCs of mineral oil and set it aside. Unscrew caliper bleed plug.
Step four: Prepare the bleed syringe (the one with a hose and fitting) with about 20 CCs of mineral oil and set it aside. Unscrew caliper bleed plug.
![remove bleed hose and insert plug]() Step five: Screw in bleed hose and tighten slightly with the 8-millimeter open-end wrench. Easy does it, you only need an oil/air-tight seal.
Step five: Screw in bleed hose and tighten slightly with the 8-millimeter open-end wrench. Easy does it, you only need an oil/air-tight seal.
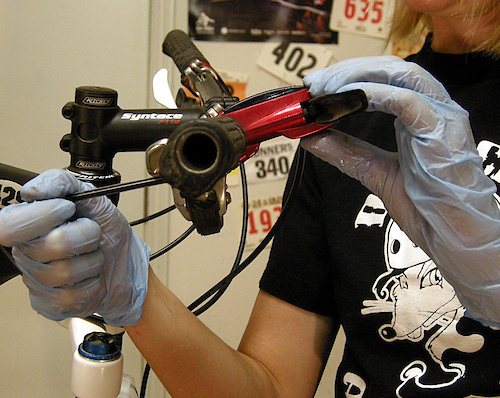
![set lever angle]() Step six: loosen the brake lever clamp slightly and angle the brake master cylinder about 15-degrees upward to encourage bubbles to exit near the bleed screw.
Step six: loosen the brake lever clamp slightly and angle the brake master cylinder about 15-degrees upward to encourage bubbles to exit near the bleed screw.
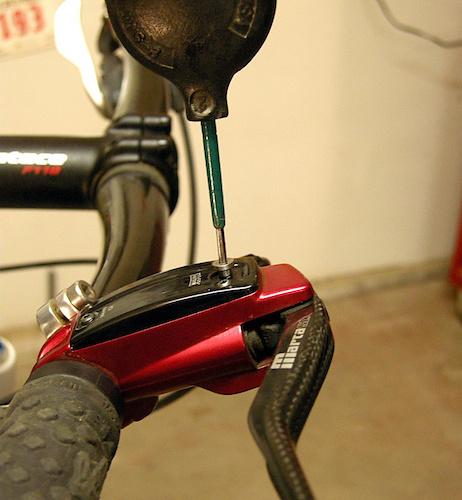
![unplug reservoir and insert bleed cup]() Step seven: Unscrew the bleed screw on the master cylinder and slide in the plastic bleed cup until you feel it snap past the 0-ring seal. Fill the cup with about 10 CCs of mineral fluid.
Step seven: Unscrew the bleed screw on the master cylinder and slide in the plastic bleed cup until you feel it snap past the 0-ring seal. Fill the cup with about 10 CCs of mineral fluid.
![Inject fluid]() Step eight: Inject mineral oil from the caliper through the master cylinder slowly. Watch the fluid in the upper cup. Stop injecting fluid when the bubbles cease.
Step eight: Inject mineral oil from the caliper through the master cylinder slowly. Watch the fluid in the upper cup. Stop injecting fluid when the bubbles cease.
![Set cup]() Step nine: Slowly, suck about 10 CCs of fluid back from the caliper and repeat step 8, but this time pull the brake lever in a few times as you inject fluid to free any trapped air bubbles up top.
Step nine: Slowly, suck about 10 CCs of fluid back from the caliper and repeat step 8, but this time pull the brake lever in a few times as you inject fluid to free any trapped air bubbles up top.
![unscrew hose and plug]() Step ten: Have the caliper bleed-port screw in position on the Allen wrench and handy. Use the 8-millimeter open-end wrench to loosen the caliper bleed hose, unscrew the hose fitting and then, quickly plug the dripping hole with the bleed-port screw.
Step ten: Have the caliper bleed-port screw in position on the Allen wrench and handy. Use the 8-millimeter open-end wrench to loosen the caliper bleed hose, unscrew the hose fitting and then, quickly plug the dripping hole with the bleed-port screw.
![Plug master cylinder reservoir]() Step eleven: The only tricky step is reversing step seven: Remove the bleed cup and put your finger over the tip to prevent mineral oil from pouring over the brake lever and onto the floor. Empty the plastic cup, and then screw in the bleed port cap. Wipe off overflow from the lever assembly.
Step eleven: The only tricky step is reversing step seven: Remove the bleed cup and put your finger over the tip to prevent mineral oil from pouring over the brake lever and onto the floor. Empty the plastic cup, and then screw in the bleed port cap. Wipe off overflow from the lever assembly.
![clean caliper]() Step twelve: Use electric contact cleaner or similar to clean al oil residue from caliper and surrounding area and then use a fresh pair of gloves or clean hands thoroughly before you reassemble caliper and brake pads.
Step twelve: Use electric contact cleaner or similar to clean al oil residue from caliper and surrounding area and then use a fresh pair of gloves or clean hands thoroughly before you reassemble caliper and brake pads.
![Replace brake pads]() Step thirteen: Replace your brake pads or reinstall your original pads if they look like these new ones. Slide one pad in at a time until the magnets click the pad into place and screw in the pad retainer to the caliper body, Tighten securely.
Step thirteen: Replace your brake pads or reinstall your original pads if they look like these new ones. Slide one pad in at a time until the magnets click the pad into place and screw in the pad retainer to the caliper body, Tighten securely.
![Job well done]() Step fourteen: Replace the wheels and pump the brake levers until the pads come up to the rotors and they feel firm when you squeeze them. If the lever doesn’t feel firm when the pads contact the rotors, there are probably air-bubbles in the system and you will need to re-bleed that particular brake. If you did the job step by step, however, you should be gold the first time.
Step fourteen: Replace the wheels and pump the brake levers until the pads come up to the rotors and they feel firm when you squeeze them. If the lever doesn’t feel firm when the pads contact the rotors, there are probably air-bubbles in the system and you will need to re-bleed that particular brake. If you did the job step by step, however, you should be gold the first time.
Past Tech Tuesdays:
Technical Tuesday #1 - How to change a tube.
Technical Tuesday #2 - How to set up your SRAM rear derailleur
Technical Tuesday #3 - How to remove and install pedals
Technical Tuesday #4 - How To Bleed Your Avid Elixir Brakes
Technical Tuesday #5 - How To Check And Adjust Your Headset
Technical Tuesday #6 - How To Fix A Broken Chain
Technical Tuesday #7 - Tubeless Conversion
Technical Tuesday #8 - Chain Wear
Technical Tuesday #9 - SRAM Shift Cable Replacement
Technical Tuesday #10 - Removing And Installing a Headset
Technical Tuesday #11 - Chain Lube Explained
Technical Tuesday #12 - RockShox Totem and Lyric Mission Control Damper Mod
Technical Tuesday #13 - Shimano XT Crank and Bottom Bracket Installation
Technical Tuesday #14 - Straightening Your Derailleur Hanger
Technical Tuesday #15 - Setting Up Your Front Derailleur
Technical Tuesday #16 - Setting Up Your Cockpit
Technical Tuesday #17 - Suspension Basics
Technical Tuesday #18 - Adjusting The Fox DHX 5.0
Technical Tuesday #19 - Adjusting The RockShox BoXXer World Cup
Technical Tuesday #20 - Servicing Your Fox Float Shock
Technical Tuesday #21 - Wheel Truing Basics
Technical Tuesday #22 - Shimano Brake Pad Replacement
Technical Tuesday #23 - Shimano brake bleed
Technical Tuesday #24 - Fox Lower Leg Removal And Service
Technical Tuesday #25 - RockShox Motion Control Service
Technical Tuesday #26 - Avid BB7 Cable Disk Brake Setup
Technical Tuesday #27 - Manitou Dorado Fork Rebuild
Technical Tuesday #28 - Manitou Circus Fork Rebuild
Technical Tuesday #29 - MRP G2 SL Chain Guide Install
Technical Tuesday #30 - Cane Creek Angleset Installation
Technical Tuesday #31 - RockShox Maxle Lite DH
Technical Tuesday #32 - Find Your Tire Pressure Sweet Spot
Technical Tuesday #33 - Three Minute Bike Preflight Check
Technical Tuesday #34 - MRP XCG Install
Technical Tuesday #35 - Stem Choice and Cockpit Setup
Technical Tuesday #36 - Handlebars - How Wide Affects Your Ride
Technical Tuesday #37 - Repairing A Torn Tire
Technical Tuesday #38 - Coil spring swap
Technical Tuesday #39 - Trailside help: Broken Shift Cable
Technical Tuesday #40 - Installing a Fox Float Air-Volume Spacer
Technical Tuesday #41 - Replace the Seals on Your 2011 RockShox Boxxer World Cup Fork
Technical Tuesday #42 - Clean and Lubricate Your Fox F32 Dust Wiper Seals
Technical Tuesday #43 - Thread Locker Basics
Technical Tuesday #44 - Install a SRAM X.0 Two-By-Ten Crankset
Technical Tuesday #45 - VPP Suspension Bearing Service
Technical Tuesday #46 - Rotor Straightening
Technical Tuesday #47 - Finding and fixing that creak
Visit Parktool.com to see their entire lineup of tools and lubes
What you’ll need:
• 2, 2.5, 3, and 4-millimeter Allen wrenches
• 8-millimeter open-end wrench
• Magura Blood mineral oil
• Magura bleed kit
• Plastic transport tool
• Rubber band
• Electric contact cleaner
• A couple of clean shop towels
• Work-stand is helpful
• Spare brake pads (may not be necessary)
Tips:
Two opposing forces are at work when bleeding brakes: the absolute requirement for cleanliness of the brake pads and rotors and that the slightest amount of oil can contaminate them – and the fact that the stuff that will be leaking all over the place while you bleed the hydraulic system is in fact, mineral oil. Magura begins its bleed process by pulling the wheels off the bike and then removing the brake pads. In this way, you’ll have the time to clean your hands, the brake caliper and nearby frame components before you introduce the Rotor and pads back to the system.


Past Tech Tuesdays:
Technical Tuesday #1 - How to change a tube.
Technical Tuesday #2 - How to set up your SRAM rear derailleur
Technical Tuesday #3 - How to remove and install pedals
Technical Tuesday #4 - How To Bleed Your Avid Elixir Brakes
Technical Tuesday #5 - How To Check And Adjust Your Headset
Technical Tuesday #6 - How To Fix A Broken Chain
Technical Tuesday #7 - Tubeless Conversion
Technical Tuesday #8 - Chain Wear
Technical Tuesday #9 - SRAM Shift Cable Replacement
Technical Tuesday #10 - Removing And Installing a Headset
Technical Tuesday #11 - Chain Lube Explained
Technical Tuesday #12 - RockShox Totem and Lyric Mission Control Damper Mod
Technical Tuesday #13 - Shimano XT Crank and Bottom Bracket Installation
Technical Tuesday #14 - Straightening Your Derailleur Hanger
Technical Tuesday #15 - Setting Up Your Front Derailleur
Technical Tuesday #16 - Setting Up Your Cockpit
Technical Tuesday #17 - Suspension Basics
Technical Tuesday #18 - Adjusting The Fox DHX 5.0
Technical Tuesday #19 - Adjusting The RockShox BoXXer World Cup
Technical Tuesday #20 - Servicing Your Fox Float Shock
Technical Tuesday #21 - Wheel Truing Basics
Technical Tuesday #22 - Shimano Brake Pad Replacement
Technical Tuesday #23 - Shimano brake bleed
Technical Tuesday #24 - Fox Lower Leg Removal And Service
Technical Tuesday #25 - RockShox Motion Control Service
Technical Tuesday #26 - Avid BB7 Cable Disk Brake Setup
Technical Tuesday #27 - Manitou Dorado Fork Rebuild
Technical Tuesday #28 - Manitou Circus Fork Rebuild
Technical Tuesday #29 - MRP G2 SL Chain Guide Install
Technical Tuesday #30 - Cane Creek Angleset Installation
Technical Tuesday #31 - RockShox Maxle Lite DH
Technical Tuesday #32 - Find Your Tire Pressure Sweet Spot
Technical Tuesday #33 - Three Minute Bike Preflight Check
Technical Tuesday #34 - MRP XCG Install
Technical Tuesday #35 - Stem Choice and Cockpit Setup
Technical Tuesday #36 - Handlebars - How Wide Affects Your Ride
Technical Tuesday #37 - Repairing A Torn Tire
Technical Tuesday #38 - Coil spring swap
Technical Tuesday #39 - Trailside help: Broken Shift Cable
Technical Tuesday #40 - Installing a Fox Float Air-Volume Spacer
Technical Tuesday #41 - Replace the Seals on Your 2011 RockShox Boxxer World Cup Fork
Technical Tuesday #42 - Clean and Lubricate Your Fox F32 Dust Wiper Seals
Technical Tuesday #43 - Thread Locker Basics
Technical Tuesday #44 - Install a SRAM X.0 Two-By-Ten Crankset
Technical Tuesday #45 - VPP Suspension Bearing Service
Technical Tuesday #46 - Rotor Straightening
Technical Tuesday #47 - Finding and fixing that creak
Visit Parktool.com to see their entire lineup of tools and lubes
Author Info:

Must Read This Week
Sign Up for the Pinkbike Newsletter - All the Biggest, Most Interesting Stories in your Inbox
PB Newsletter Signup
-After step 4: When filling the caliper syringe with oil, clamp the syringe tube and pull the piston so that the tiny air bubbles trapped in the liquid move to the surface. Repeat 4-5 times. I even go as far as letting the caliper syringe (the full one) stand up for 15 minutes so that the invisible air bubbles move to the top. Next step is to release the clamp and push the air out of the syringe. This gives you an air-free liquid (or at least there will not be much left in there).
-After that, you need to clamp the brake lever to the handlebar with a rubber band.Pull the caliper syringe to get air out. (be patient and careful not to pull too hard or air will enter the syringe directly at the top). Pull the master cylinder syringe to get air out too. Release the brake lever clamp.
-After step 10 (putting the caliper screw back on): it is really important to PULL the master cylinder syringe to get air out again.
-Final step is to add a few drops of liquid to the master cylinder so that when you screw the bleed screw liquid overflows.
Hope that helps.
Probably wouldnt hurt to put in a little extra effort when getting out all the air, but the extra steps you describe are not required (by manufacturer) on Magura brakes.
I know most manuals don't describe these extra steps but this is the way I do it now, had a lot of issues before when bleeding brakes the "easy way" described above, but now that I take the time to do the extra steps, no more fuss.
Easy as that!
El Warpo: The reason for plugging the bottom first is that the bleed cup is full of fluid, so the system will not lose any fluid as long as it is being replenished from the top. Once you have plugged the caliper, the system is then fully charged when you plug the lever reservoir.
RC
1.) Uninstall Magura brake from bicycle.
2.) Throw away Magura brake.
3.) Install much better braking system (i.e.: Shimano, Avid, Formula)
4.) ???
5.) Profit!
But seriously though, getting a different brake will save you many many headaches, and also preserve the mental well being of the mechanics at your LBS.
And if you say that your costumers need to bring back their brakes every week to re-bleed them, that means that they are not bled right in the first place. If you bleed them right, they will work fine for a long long time.