Tech Tuesday - Pedal Pin Retrofit
When it comes time to replace those worn out platform pedals of yours it is often due to ratty pins that no longer hold your feet in place, not a damaged body or bent axles. For this reason it seems odd to me that riders are so willing to shell out their hard earned money for brand new pedals when a few dollars worth of hardware can completely rejuvenate their current ones, and in some cases improve their grip beyond what they offered when new. Sure, some of it can be put down to simply wanting new pedals, but a tap, some hex screws, and a bottle of Loc Tite will allow many others to spend that money on other necessities (or vices).
What is a tap? A tap is a special tool that cuts female threads (a die is used to cut male threads) into metal, allowing you to thread in a bolt. They are made of extremely hard steel, with cutting edges that are designed to slice through softer materials. There are two main shapes of taps: a flat topped version that is usually used on blind holes (holes that don't go completely through) because it can cut threads into nearly the full length of the hole, and the tapered taps that are more common in the bicycle world. A tapered tap is much easier to work with because its tapered tip allows for easy starting and a degree of self centering. Grooves in the side of the tap allow the metal shavings to escape, with this being encouraged by reversing the tap every few turns to break the shavings into smaller pieces. It is generally a good idea to use some type of cutting fluid to ease the job, although chain lube also does the trick.
![Tech Tuesday]()
For a tap to work it will need the correct size hole, otherwise you risk breaking the tap off - you can't go about using any tap in any hole! Every tap has a corresponding drill bit size that is used to create a hold that is just slightly smaller than the threads on the tap. This allows the tap to do as little work as possible to cut the threads, lessening the chance of it snapping while you turn it in. Complete tap sets can be bought with the included drill bits, while separate taps will usually have the matching drill bit size labeled on their packaging. An adjustable tap handle is your best friend when using a tap, allowing you to applying even and downward pressure as you thread it in. Taps are made from extremely hard steel, but they are very brittle because of this and care must be taken during their use. Using an adjustable wrench will only make the job harder on yourself and increase the chance of damaging the hole or the tap itself.
![Tech Tuesday]()
Some helpful pointers before you begin:
• You'll need a 4 x 0.7mm tap and 1/8'' drill bit for this job. Using a larger 5mm tap will force you to also use larger diameter screws that won't provide as much bite as 4mm hardware will.
• You need to be aware of how much material you have surrounding each hole. If you don't have enough you'll substantially weaken the pedal body and increase the chances of it breaking once you've cut in a larger hole.
• You won't be able to install new pins in any holes that don't pass right through the body (these are called 'blind holes'). If the manufacturer hasn't threaded a pin through completely it is for a good reason - most likely because the pedal body would be weakened too much. Likewise, pedals that use set screws and blind holes throughout shouldn't be modified beyond install longer setscrews.
• Be sure that the head of your new 4mm screws will clear any edges of the pedal body when it is full tightened down. Pay special attention to the corners where they might make contact as they are turned in.
• Using some blue (medium strength) Loc Tite on your new pins means that they will stay put without you having to over tighten them into the soft pedal bodies that are made of either aluminum, or even softer magnesium.
• Removing the old pins can be the most time consuming part of this job. Vice grips can be used to back out pins that no longer have tool access, or a file can be employed on aluminum pins to create flat edges for a tool to hold on to.
• 4mm metric screws can be bought in 5, 10 and 15mm lengths that will allow you to tune the pedal to have more or less grip. For example, using 10mm pins on the pedal's leading and trailing edges with 5mm pins at the center will create more concave. Pins can also be cut to length, or even have their tips sharpened.
• There is no standard when it comes to pedal pin threads, but many will be very close to the 4mm size required. Because of this it isn't always required that you use 1/8'' drill bit to ream the hole prior to running the tap through. Even if the existing threads match up it is helpful to run the tap through to clean the entry point.
• This job will void any warranty that your pedals may have had, including the axles as well. Don't expect any favours from your shop or the pedal manufacturer, you'll be 100% on your own after you've installed the new pins.
![Tech Tuesday]()
What's needed:
• 4 x 0.7mm tap
• 1/8'' drill bit (optional)
• Tap handle
• Blue Loc Tite
• Tool to remove old pins (hex key, pliers, vice grips)
• Metric 4mm socket screws (5, 10 and 15mm are best)
![Tech Tuesday]()
![Tech Tuesday]()
![Tech Tuesday]()
![Tech Tuesday]()
![Tech Tuesday]()
![Tech Tuesday]()
Anything to add to our pedal pin upgrade? Put those ideas down below!
Past Tech Tuesdays:
Visit Parktool.com to see their entire lineup of tools and lubes
What is a tap? A tap is a special tool that cuts female threads (a die is used to cut male threads) into metal, allowing you to thread in a bolt. They are made of extremely hard steel, with cutting edges that are designed to slice through softer materials. There are two main shapes of taps: a flat topped version that is usually used on blind holes (holes that don't go completely through) because it can cut threads into nearly the full length of the hole, and the tapered taps that are more common in the bicycle world. A tapered tap is much easier to work with because its tapered tip allows for easy starting and a degree of self centering. Grooves in the side of the tap allow the metal shavings to escape, with this being encouraged by reversing the tap every few turns to break the shavings into smaller pieces. It is generally a good idea to use some type of cutting fluid to ease the job, although chain lube also does the trick.
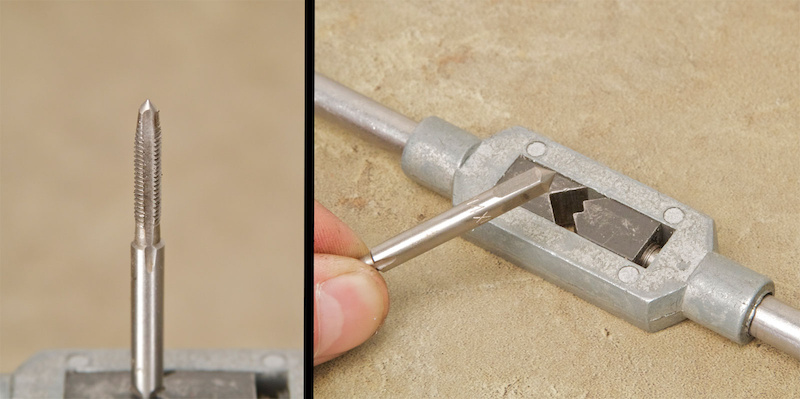
You need a 4 x 0.7mm tapered tap and a tap handle to do this job, with both items being relatively inexpensive and available at your local hardware store. Never use an adjustable wrench in place of a tap handle... you'll only make the job harder!
For a tap to work it will need the correct size hole, otherwise you risk breaking the tap off - you can't go about using any tap in any hole! Every tap has a corresponding drill bit size that is used to create a hold that is just slightly smaller than the threads on the tap. This allows the tap to do as little work as possible to cut the threads, lessening the chance of it snapping while you turn it in. Complete tap sets can be bought with the included drill bits, while separate taps will usually have the matching drill bit size labeled on their packaging. An adjustable tap handle is your best friend when using a tap, allowing you to applying even and downward pressure as you thread it in. Taps are made from extremely hard steel, but they are very brittle because of this and care must be taken during their use. Using an adjustable wrench will only make the job harder on yourself and increase the chance of damaging the hole or the tap itself.
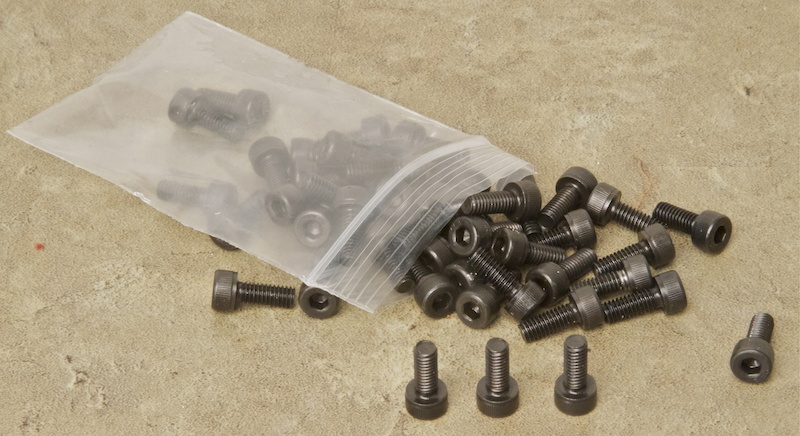
We used 4 x 10mm screws on our pedals, but you can use different heights to create more or less concave and tune the pedal's grip. Using thin washers under each head allows you to make small adjustment to pin height as well.
Some helpful pointers before you begin:
• You'll need a 4 x 0.7mm tap and 1/8'' drill bit for this job. Using a larger 5mm tap will force you to also use larger diameter screws that won't provide as much bite as 4mm hardware will.
• You need to be aware of how much material you have surrounding each hole. If you don't have enough you'll substantially weaken the pedal body and increase the chances of it breaking once you've cut in a larger hole.
• You won't be able to install new pins in any holes that don't pass right through the body (these are called 'blind holes'). If the manufacturer hasn't threaded a pin through completely it is for a good reason - most likely because the pedal body would be weakened too much. Likewise, pedals that use set screws and blind holes throughout shouldn't be modified beyond install longer setscrews.
• Be sure that the head of your new 4mm screws will clear any edges of the pedal body when it is full tightened down. Pay special attention to the corners where they might make contact as they are turned in.
• Using some blue (medium strength) Loc Tite on your new pins means that they will stay put without you having to over tighten them into the soft pedal bodies that are made of either aluminum, or even softer magnesium.
• Removing the old pins can be the most time consuming part of this job. Vice grips can be used to back out pins that no longer have tool access, or a file can be employed on aluminum pins to create flat edges for a tool to hold on to.
• 4mm metric screws can be bought in 5, 10 and 15mm lengths that will allow you to tune the pedal to have more or less grip. For example, using 10mm pins on the pedal's leading and trailing edges with 5mm pins at the center will create more concave. Pins can also be cut to length, or even have their tips sharpened.
• There is no standard when it comes to pedal pin threads, but many will be very close to the 4mm size required. Because of this it isn't always required that you use 1/8'' drill bit to ream the hole prior to running the tap through. Even if the existing threads match up it is helpful to run the tap through to clean the entry point.
• This job will void any warranty that your pedals may have had, including the axles as well. Don't expect any favours from your shop or the pedal manufacturer, you'll be 100% on your own after you've installed the new pins.
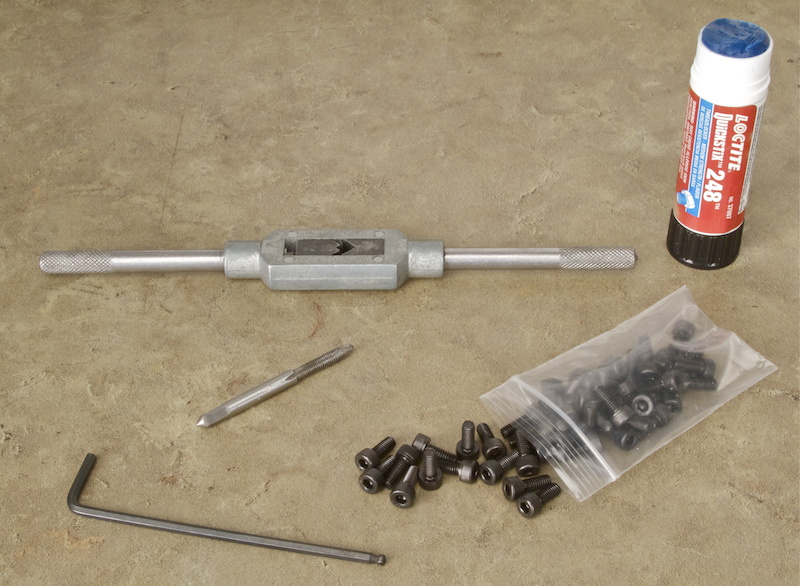
What's needed:
• 4 x 0.7mm tap
• 1/8'' drill bit (optional)
• Tap handle
• Blue Loc Tite
• Tool to remove old pins (hex key, pliers, vice grips)
• Metric 4mm socket screws (5, 10 and 15mm are best)
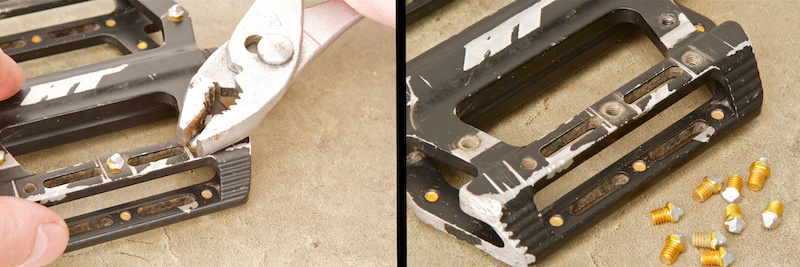
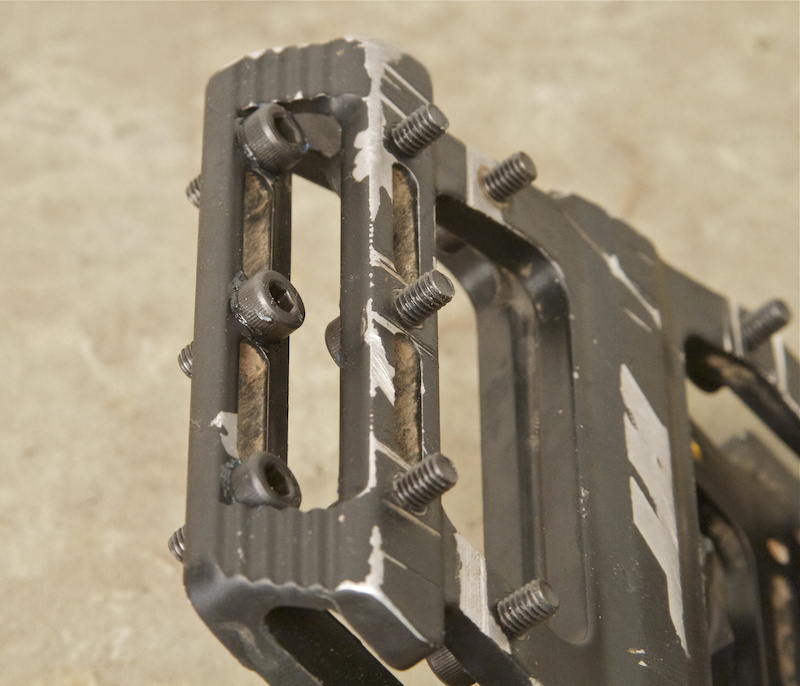
Step 1 - You'll first need to remove the pedal's original pins before using the tap. Depending on how damaged they are, this could be the trickiest part of the job. The HT pedal shown above uses aluminum pins, many of which have had their wrench flats damaged. We used pliers to turn them out, having to file tool flats onto some to allow the tool to grip. Damaged pins can also be turned out with vice grips. Pins that are threaded in from the opposite side and have had their tops bent over may require you to cut off their tips before backing them out.
Step 2 - Drilling isn't required on our pedals because the HT pedals shown above use a pedal pin size that is close to 4mm, meaning that we could jump right to using the tap. This is the case with a lot pedal bodies, but not so if your's uses smaller diameter set screws for pins. If needed, gently clamp the pedal body in a vice and run a 1/8'' drill bit through the holes. Apply a few drops of cutting fluid or chain lube to the tap before starting before the next step.
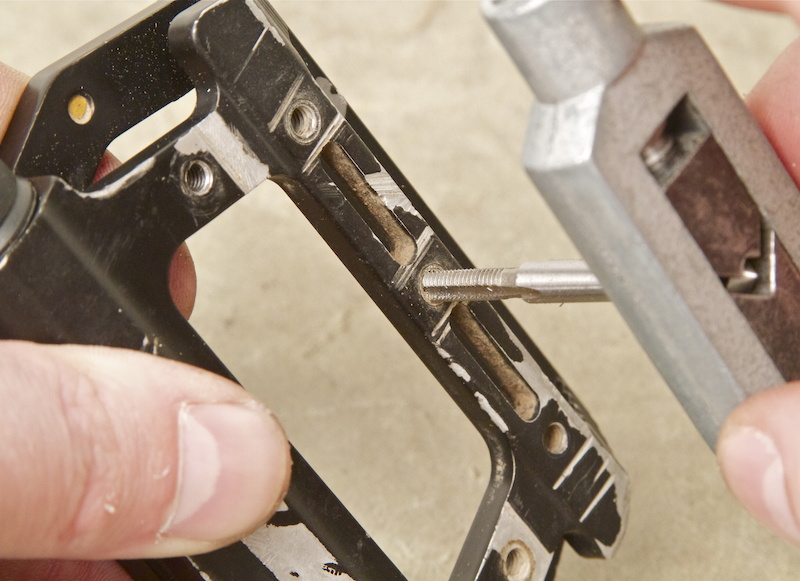
Step 3 - With the pedal body still gently clamped in the vice, secure the 4 x 0.7mm tap in your adjustable tap handle and apply downward pressure as you turn it clockwise into the hole, being sure that it is threading in perfectly straight. Because the pedal body is relatively thin you aren't required to clear the metal shavings - most will simply be pushed out the other side as you thread the tap through. Remember that the tap is tapered, meaning that you'll want to thread it fully into the hole to be sure that all of the threads have been cut.
Step 3 - With the pedal body still gently clamped in the vice, secure the 4 x 0.7mm tap in your adjustable tap handle and apply downward pressure as you turn it clockwise into the hole, being sure that it is threading in perfectly straight. Because the pedal body is relatively thin you aren't required to clear the metal shavings - most will simply be pushed out the other side as you thread the tap through. Remember that the tap is tapered, meaning that you'll want to thread it fully into the hole to be sure that all of the threads have been cut.
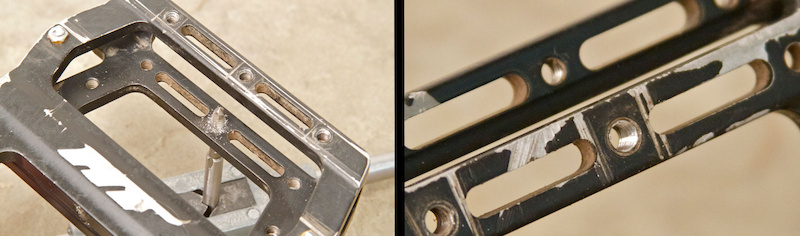
Step 4 - Blow or brush away any metal shavings from the opposite side and back the tap out by turning it counterclockwise. Inspect your hole; it should be clean and free of any burrs. Repeat this process for each location where you want to install your new 4mm pins into, Clean the tap and apply a touch of cutting lubricant to it before starting each hole.
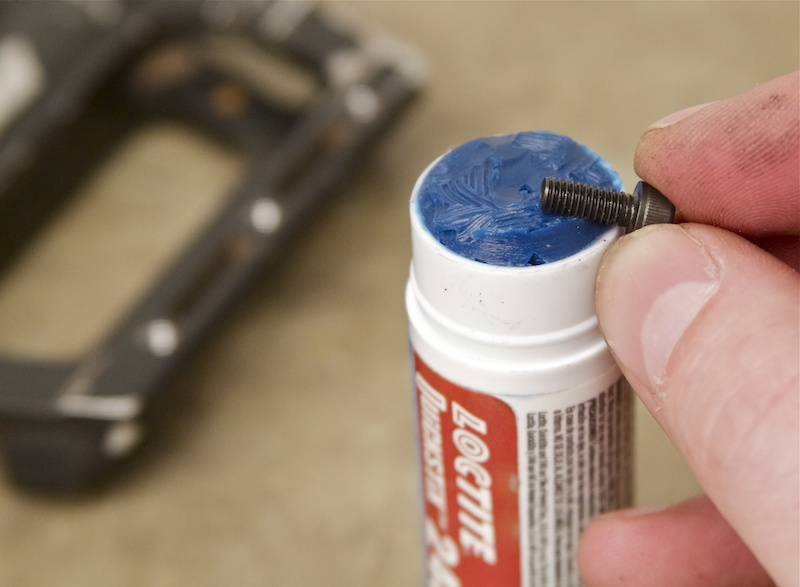
Step 5 - Apply a dap of removable Loc Tite to the threads of each of your new pins before installing them. Otherwise, expect them to come loose in short order.
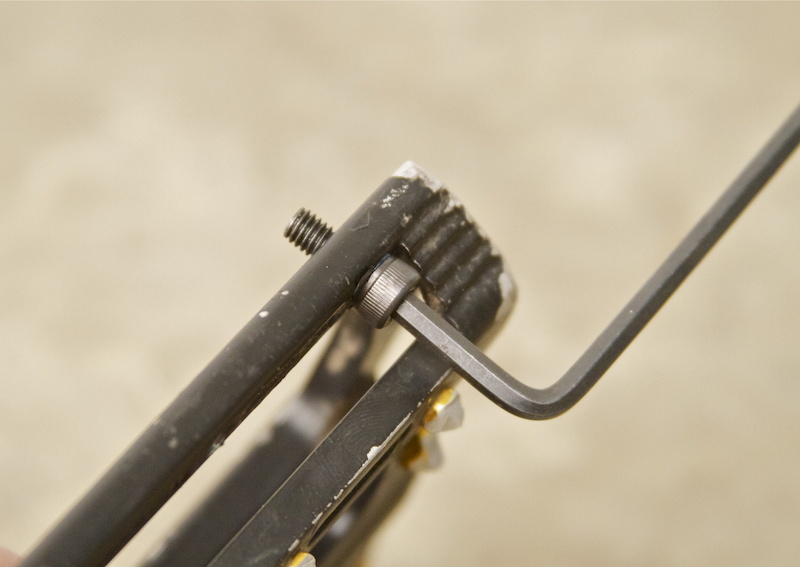
Step 6 - Carefully thread each new pin into its hole. Pay special attention to make sure that the head of the bolt clears the pedal body on all sides. Snug the pins down tightly, but there is no need to go overboard. Keep in mind that pedal bodies are often made of either a soft aluminum or magnesium metal and that you've just removed material around a critical area of the body.
Drilling, tapping and installing pins into each hole is a time consuming job, but you've done it right of the finished product scares you into wearing shin pads!
Past Tech Tuesdays:
Visit Parktool.com to see their entire lineup of tools and lubes
Author Info:

Must Read This Week
Sign Up for the Pinkbike Newsletter - All the Biggest, Most Interesting Stories in your Inbox
PB Newsletter Signup
Brings a rusty bolt wound, tetanus can take.
^^*)
Words of wisdom for day to day life.
Spend a little extra and buy stainless steel screws instead of the cheap-ass Chinese made Home Depot ones that rust out in 10 minutes. Get them at a wholesale fastener distributor supply store; like Ababa Bolt.
Yes, yes I have.
in my opinion they're the nicest ones! grips like on clips!
You can still cutted screw screws into plastic pedals))
superstar.tibolts.co.uk/product_info.php?cPath=42&products_id=127
They just sell them for a lot less
+1 for the body weight fluctuate thing.