Ask Pinkbike: Dropper Post Remotes, XT Brake Rub, Enduro Training, and Bearing Replacement

Here at Pinkbike we get inundated with all kinds of questions, ranging from the basic "Can I have stickers" to more in-depth, soul-searching types of queries like if you should pop the question or what to name your first child. Ask Pinkbike is an occasional column where we'll be hand-picking and answering questions that have been keeping readers up at night, although we'll likely steer clear of those last two and keep it more tech oriented.
Remote Question
Question: Pinkbike user GeorgeAlbery asked this question in the All-Mountain, Enduro and Cross-Country forum: I'm wondering if there are any dropper seatpost remotes out there to replace the one that's supplied with the Giant seatpost? I'm not running a 1x setup, so I can't use a remote that has its trigger below the handlebar.
 | Unlike some droppers, the Giant seatpost's cable is clamped up at the remote, which means that you'll have to use a remote that does the same. This rules out remotes from 9point8, KS, older Crankbrothers, X-Fusion, Specialized, and Thomson, all of which see the cable end seated in a bore at the remote and the cable clamped at the post itself. The 2x/3x-compatible remote for Fox's new Transfer dropper post is pretty slick and can be purchased separately, and the remote that controls Crankbrothers' new Highline dropper can also be made to work in conjunction with a front shifter. The remote for Thomson's internally routed dropper would also work. All of those options clamp the cable at the remote, just like the Giant seat post. Another one to check out is the Triggy aftermarket remote from BikeYoke, the same company that makes a neat cable conversion kit for Reverb seatposts. - Mike Levy |
 |
 While shown here under the handlebar, the Highline's remote can also mount up top to clear a front shifter. The same can be said of the remote for Fox's new Transfer dropper post. While shown here under the handlebar, the Highline's remote can also mount up top to clear a front shifter. The same can be said of the remote for Fox's new Transfer dropper post. |
XT Brake Pads Rub After Adjustment
Question: backyardrails asks in the All Mountain, Enduro & Cross-Country forum: I have 2015 Shimano XT brakes with 160mm rotors. After adjusting the caliper on the stand, the front rotor will start rubbing and grinding after a session of hard braking. Any ideas?
| I am assuming that when you adjusted your brakes, the rotors ran almost perfectly true and there was no contact with the brake pads. Two sources could be causing your brake rub: the first is natural heat expansion and the second is uneven piston creep. Rotors all expand when heated, and the spokes are designed to relieve that stress so the braking surface maintains trueness. Sometimes, however, the rotor will get roasting hot and the expansion will temporarily warp the braking surface. It should, however, straighten out when the rotor returns to normal temperature. If there is a noticeable warp in the rotor, normal braking heat can quickly exaggerate that warp and you will get noise right away. The solution to both is to make sure that your rotors are true and ignore the temporary rubbing after a hard descent. Uneven piston creep seems to be Shimano's nemesis. All brake caliper pistons ride on flexible rectangular seals. The flex action allows the piston to push on the brake pad without sliding inside the bore. When the brakes are released, the seal springs back and retracts the piston. When the brake pads wear beyond the limit of the seal's ability to stretch, the seal slides inside the bore and "self-adjusts" a little closer to the brake pad. In a perfect world, the pistons on either side of the caliper self-adjust in equal increments, but sometimes only one side will creep towards the rotor, which quickly develops into an off-centered brake pad situation and constant rubbing. Loosen the caliper bolts. Reset your brake pistons all the way back to their stops using a plastic pad spreader (screwdrivers can crack the pistons). Put the wheel in and then pump the lever slowly until the pads clamp the rotor securely. While squeezing the lever firmly, gently tighten the caliper bolts. That should allow the pistons to find a place where they will work in harmony. Fine tune the adjustment until the brake doesn't rub and give it a test run. If only one pad moves over and the rub returns, you'll probably need to replace the caliper. - RC |
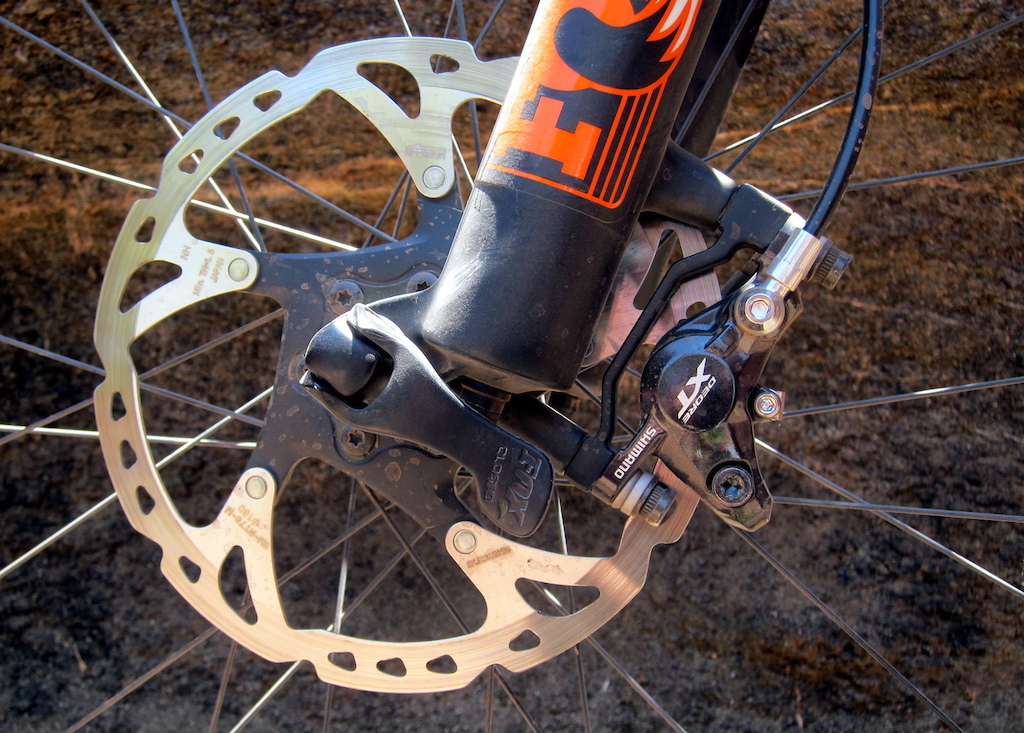
Shimano XT brakes are well-known for being both powerful and reliable. That said, their caliper pistons have been known to self-adjust at uneven rates.
Increasing confidence for DH and Enduro Racing?
Question: aerosxl asks in the All-Mountain, Enduro, and Cross-Country forum: I have decided that I'd like to give enduro and DH mtb racing a try next season, and with that I'm starting to think about what equipment and training I'll need to start getting/doing. I'm fairly set on bike, gear, etc, but I was wondering if anybody could give me some help with training, especially seeing as I don't live near enough to the mountains where the races are on to make it worth training there regularly. What's the best way to get the on-the-bike confidence and skills I need without regularly riding the same types of trails I'll be racing on?
| Even if you don't have gnarly trails out your back door there are a few steps you can take to help those first races go as smoothly as possible. The first is to make sure that your base fitness is up to par. Although the actual time spent on the clock at an enduro race isn't that long, the practicing and the transfers between stages can take a toll, and it's hard to be full of confidence when you're so tired you can barely hang onto your grips. Those base miles don't need to be on super-crazy terrain either - in fact, it's probably better if they come from XC or road riding, the type of riding where you can build your lungs and legs without as much risk of injury. Once those base miles are under your belt you'll be in an even better position to start working on building your skills in more challenging terrain. You'll also want to add in interval training to start developing the power needed out on the race course. But back to the skills training: Think about what area you feel needs the most improvement. Is it cornering? Find an awkward corner and practice riding through it multiple times until you feel like you have it dialed. See what happens when you go approach it from different angles - coming in high and exiting low, or sneaking through on an inside line. You'll start to feel faster, and over time the secrets to maintaining speed will start to unveil themselves. Having someone take a video of you can help too - that way you can see what you actually look like and assess what needs work (spoiler: unfortunately, you probably don't resemble Richie Rude as much as you think). The same goes for improving your jumping or other technical riding skills - start small, and gradually work your way into more difficult features. Of course, attending a skills clinic or hiring a coach are great ways for riders of all abilities to become even more proficient, and if that's in your budget I'd highly recommend it. As you test the waters of racing you'll be exposed to a wide variety of terrain, and this, more than anything will help to build your confidence. If you can, get to the venue a couple days early and explore the local trails to get a feel for what to expect. It takes time, and plenty of practice, but eventually you'll be able to drop into a section of trail you've never ridden before and feel fairly confident that you can tackle just about anything that might arise. Good luck, and above all, remember to have fun. - Mike Kazimer |
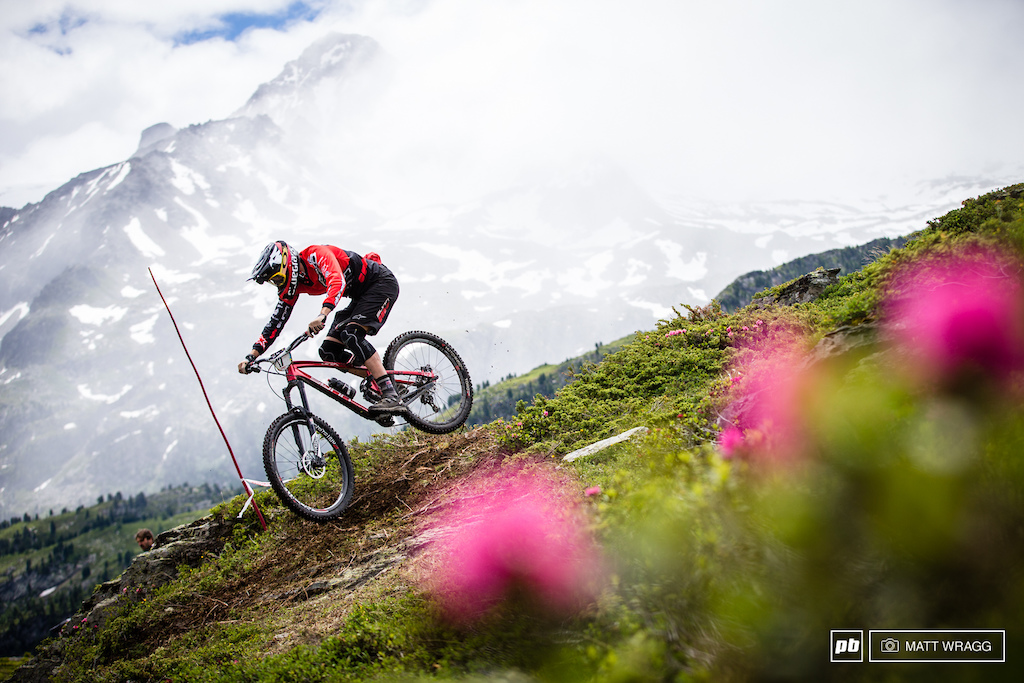
Not too many people are lucky enough to have mountains like this in their backyard, but the skills learned in grassy fields and parking lots still work here.
Bearing Replacement Tool?
Question: Pinkbike user arthurgardner asked this question via email:I have a Nukeproof Pulse Comp 2015 DH bike and I need to replace the frame and shock bearings. I have no idea what tool to buy. Help would really be appreciated.
| This could get expensive, so if you only need to change your frame bearings once every 12 months or so, then my first piece of advice would be to pay your local bike shop to do the job for you while you sit back and relax. If you spend more time on the bike and don't mind greasy hands, then investing in the right tool for the job could pay off in the long run, saving on shop labor rates and also time to and fro the shop. If you want to take the investment plunge, there are a number of tools on the market that should last you for many years and multiple bikes. Since you're in the UK, the Rapid Racers Press and Extraction Tool made in Blighty could be your first port of call. Prices start at 59.99 GBP for the basic tool, then 22 - 26 GBP per adaptor to match the bearing sizes on your bike. You'll also need to purchase the new bearings from a supplier like mbbearings.co.uk, which will cost 53.99 GBP. Unior also make a Universal Bearing Press that should cover most eventualities that Mike Levy reviewed earlier this year which retails at 169.99 GBP. For the budget minded, Wheel Manufacturing's Economy Bearing Press is a good option, at only $35 USD, plus the cost of the necessary presses, although international shipping does make that less of a deal. Finally, if saving on cash is your highest priority, and you aren't worried about potentially losing some paint from your pride and joy, then a hammer, flathead screwdriver, threaded rod and some sockets from Dad's old wrench set and will get the job done, although it's not as elegant or efficient of a solution as purchasing a dedicated bearing press. - Paul Aston |
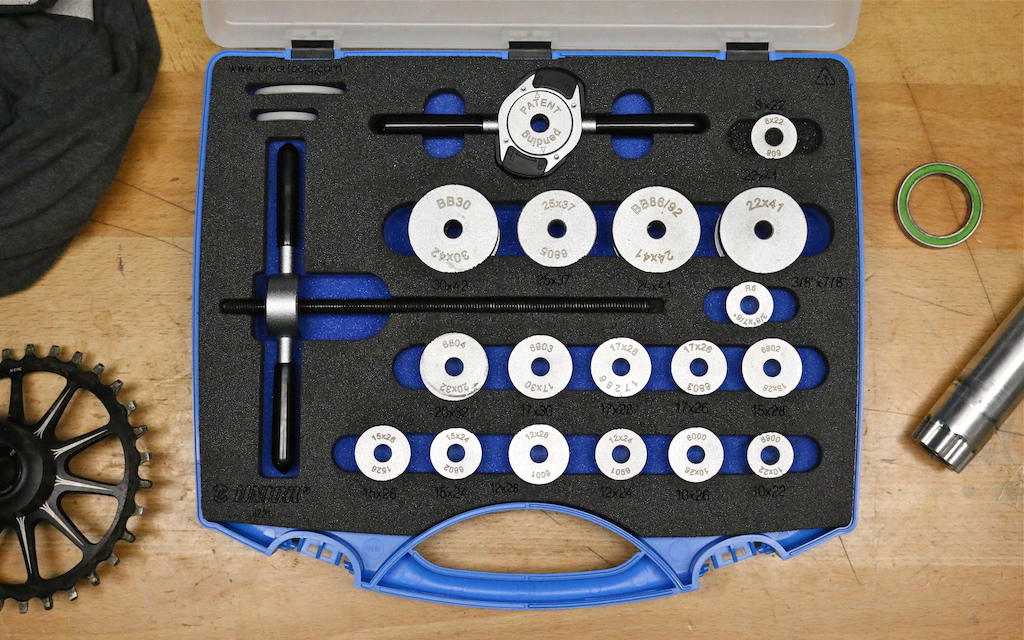
Investing in something like this press and extraction tool from Unior could pay off in the long term.
Have some unresolved tech questions? Jump in the Pinkbike Forum and we'll look to answer it for next time.
Author Info:

Must Read This Week
Sign Up for the Pinkbike Newsletter - All the Biggest, Most Interesting Stories in your Inbox
PB Newsletter Signup
I advanced the pistons that would move, then sprayed with brake cleaner and scrubbed with an old toothbrush. There was a bunch of grimy build up, which I assume was powdered brake pad and trail dirt mixed. I then used a tire lever to retract the pistons and hold them back so sufficient pressure could build in the caliper to advance the stuck ones. In the case of the Saints I ended up cutting some custom bleed blocks out of wood since there wasn't enough room to get a tool in there to hold a pair of pistons.
Once the pistons were cleaned up, I gave another round of brake cleaner and compressed air, then lubed with 100% silicon. With a bleed, new pads, sanded and cleaned rotors, all 3 sets performed like new. I sold the Formulas so not sure how they're holding up, though the Saints have performed flawlessly all season in all conditions.
Pretty sure I referenced this article, though there might also be a Tech Tuesday somewhere about cleaning pistons. www.bikeradar.com/us/gear/article/how-to-service-hydraulic-disc-brake-calipers-video-43227
This works with most system.
Hell yeah! I do this once a month for good measure when I clean my brake pads....
I've seen the bleed block mod on the Shimano site, I'll post it up for you when I find it!
www.youtube.com/watch?v=HGfvO-ztoT4
Go forth and be resourceful.
Only monkeys use a hammer and punch... The bearing gets cocked and you have just f*cked up your frame. The next best thing is a blind hole puller set. Uses a slide hammer. They are really cheap on ebay.
As for gently removing bearings, wooden dowels are your best friend. Again, you can carve the wood to perfectly fit the bearing. The most important thing to remember while carving your bearing tools is to be mindful to concentrate all the forces only on the outer race.
I made my headset remover from a broken hockey stick that I carved to make as much contact as possible. I gently tap it around with a dead-blow mallet.
These are just bearing tools you can make a home with scrap. Just because it is home-made does not mean it has to be a bodged up jurry-rigged saftey trap either, I am proud of my "Artisan Tools". Sometimes old time tech works just as nice.
www.summitracing.com/parts/ptm-pp1694r8?seid=srese1&cm_mmc=pla-google-_-shopping-_-srese1-_-pit-posse-motorsports&gclid=Cj0KEQjwt-G8BRDktsvwpPTn1PkBEiQA-MRsBfl5M2ds7YF73sJnpYK0YLno8g63tFbIm54JmGmJr9IaAj0o8P8HAQ
Granted it works and is done all the time but it is not good practice and in extreme cases can crack the housing.
Large bearings on vehicle gearboxes mean the casings are often ruined by well meaning mechanics with a hammer and punch.
www.youtube.com/watch?v=oGRKqkoV4Fw
I have done it several times and it removes the bearing with minimal damage, certainly less that a slide hammer will do, the bearing can often be reused as the force is applied evenly and not just to the centre of the bearing.
little trick to finishing mid pack in amateur consistently: ride within your limits and keep it smooth like Smokey Robinson. fastest way to a last place and a ruined day is a DNF.
Also, for you doing well may be what makes the day fun and that's totally cool. I understand enjoying being competitive and striving to do your best, it's just not my personality type.
Getting fit: get on a program, just don't fool yourself, there's no point training like a headless chicken, doing stuff you cannot be sure of. For 100-150$ you get a quality program from Dee Tidwell, James Wilson, or Dane Delozier at Revo. Or ask about some good local dude. If you have a work and family skip volume training and go to much more effective intervals and sprints. Never forget doing body weight and dumb bell/ kettlebell combo drills for cardio. When you ride your bike you use all of your body, not just legs and lowerr back. MOST IMPORTANTLY strength training will make your body more durable. World Cup racers would never make it to the Finals day if their bodies weren't able to withstand many crashes during the week of practice. A crash that takes out an amateur with a sore body part is a bruise for a trained body
Forget the road bike unless you really have the rest dialled.
I am currently using this configuration with a Fox Transfer and the KS lever. Zero issues.
www.amazon.com/Odyssey-Knarps-Cable-Ends-Silver/dp/B0017GM1CG
Actually there's a better one... here's an example made by KS as it happens...
www.ebay.com/itm/KS-Kind-Cable-Clamp-AND-Set-Screw-for-LEV-LEV-DX-LEV-27-2-Post-Dropper-Seatposts-/281959920908?hash=item41a61ef50c:g:LI8AAOSwzJ5XbL9B
You can get those styles of set screw cable anchors in the perpendicular style as above in the link, and inline barrel where the cable goes lengthwise thru them and is held with a bolt that goes thru the side of the cylinder. Amp/Rockshox cable disc brakes used that type for example. Check any good fasterner supply store.
Changed the broken Gravitydropper lever with a KS one, works fine
Only tweak I made on this installation: after cutting the cable I loosened the end slightly and pulled the cable so that the sharp metal cable strands are even with the end of the clamp.
Thanks to the neg-propers anyway.
m.fotos.mtb-news.de/p/2038653
m.fotos.mtb-news.de/p/2038652
m.fotos.mtb-news.de/p/2038651
So?
Though i'd love Waki to explain it, i will not let you down.
The post i have is the I-beam version. I can't see a way how to mount the cable the other way round.
Here the cable is routed through the posts head from the front side and sealed with a Black plastic cap (hardly visible in the picture, sorry). It exits the head at the back and gets clamped into the remote.
However, i have no idea about the part number of the remote. Maybe Waki knows.