Improve Your Videos - Make A Dolly!
Do you like to make videos, but are too broke to pay for all the filming equipment that you'd like to use? You’re in luck! Inside PB user Reilly Kin shows you how to build a simple and inexpensive camera dolly!
All right, the first thing you could do is to get a high paying job that allows you to buy the best gear possible... but that isn't always an option. So if you’re broke but still motivated, like myself, you can easily put together your own camera dolly. Some of you less familiar with video gear may be wondering just what a dolly is. Have you ever watched a video where some shots from the camera seem to be moving - or rather gliding - and you can't seem to figure it out? That motion is in fact created by using a dolly! If you aren't sure what motion I'm talking about, check it out in the video below. It's pretty amazing how such small movement can end up making the shot incredibly different, and better, than a shot without camera movement.
Camera dolly example shots:
I had been wanting to purchase a camera dolly for a while and I had been searching the internet without much luck, and if I ever did come across anything it would have cost me an arm and a leg. Luckily, a friend of a friend shared his ideas with me on how he made his own at home. I didn't copy his idea exactly, but they're nearly the same, and I figured I would share the love with you guys and push you in the direction of building your own as well. Homemade dollys are not a new thing, there are many out there, but this will show you just how easy it is to put your own together.
![photo]()
The first thing I did was crush the piggy bank and make my way to the local hardware store for some supplies. I grabbed some nuts and bolts, washers, screws, PVC pipes, and anything else that I thought I would need! I'm actually not sure what they are called, but I also grabbed a few feet of a V shaped metal plate that I've used in the photos below. All in, I didn't have to spend much money to get the supplies needed, but it will vary depending on where you live and how easy it is to source. After getting all of that stuff I went to the local sports store to pick up some roller blade wheels - eight of them would be needed. As it turns out, these were the most expensive part of the whole project! If you have any extras laying around, use those. I just didn't want to use worn down wheels because I'm picky.
![photo]()
The great thing about this project is that you don't need the best supplies to make it work well. I managed to scavenge up some 2 x 4's and random wood for the top of the dolly (where the camera sits). I then cut the metal V shaped plate in half lengthwise in order to make the two pieces that I would need to mount my wheels to. Keep in mind that you can make these as big or as small as needed depending on what you'll be putting on the dolly.
![photo]()
The two short 2 x 4 pieces needed to have each side of their bottoms cut at a 45 degree angle to fit into the metal plate snugly. It may seem kind of pointless to have the dolly raised up like this, but I've found that the extra few inches of height lets the dolly avoid brush from below that may have otherwise gotten in the way. Want your dolly higher? Then simply use longer 2 x 4's!
![photo]()
After that it was time to mount the wheels to the metal plates. Four wheels to each side, two across from each other at each end of the metal plate. Again, I didn't do anything fancy here, simply using long bolts and plenty of washers to space the wheels to the correct width that would allow them to fit properly on the PVC piping that I'm using for rails. Wider pipe requires more washers, thinner pipes means that the wheels can be closer together. By using washers that only contact on the wheel's bearing you won't foul them up and they will still turn free when the bolt and nut are snugged up. Be sure that everything spins nice after you've tightened everything up.
![photo]()
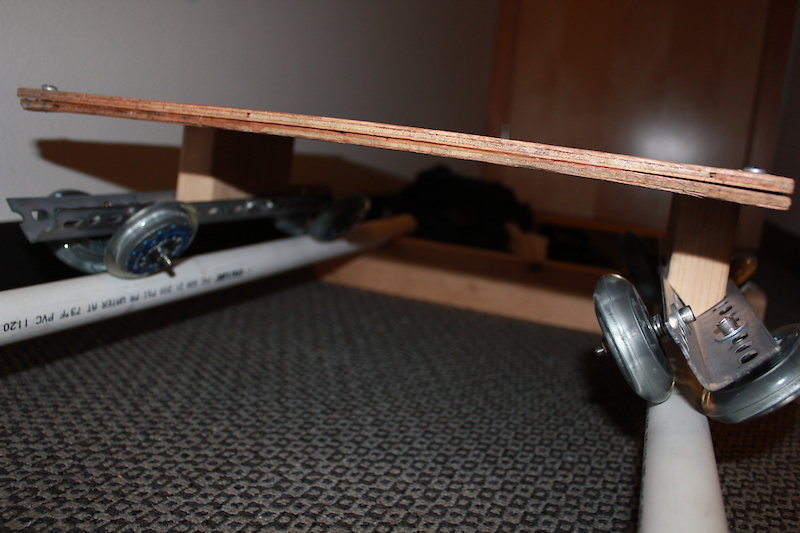
The next step was to mount what I just created to the top of the dolly. A few screws later it was good to go! My final project looked like a table on wheels, which is exactly what it should resemble.
![photo]()
Now you're down to the last stretch, and probably the most annoying part while filming; the poles, tracks, PVC pipe, whatever you want to call them. PVC pipe works great, but you'll need to keep in mind that if you don't have thick enough walled piping, it will bend under the slightest pressure, making the dolly's journey harder. One way to combat this is to make the poles shorter, allowing for less sag in the middle. You'll want to use thick pipe if you plan on doing any long dolly shots, otherwise you'll spend a lot of time moving dirt or rocks to make sure that the pipes are not sagging in the middle of the run.
![photo]()
A major problem that I had at first was that the PVC pipes would roll around if I was using them on uneven ground - not ideal when trying to get a rad shot. I tried everything from using sticks, dirt, plants, and rocks to brace them, but none of it worked. So I ended up giving them to my genius friend Kyle and he came up with an idea to create a frame for the poles, or something to mount them too. What he did was drill through the PVC and mount then to a separate 2x4 using a bolt and a nut. He made sure they were mounted the same distance apart as the wheels were, and I no longer have any problems with the poles moving! Another benefit of having the poles mounted to a frame is that the dolly is even further out of reach of those pesky bushes
![photo]()
![photo]()
I hope this helps people be creative and improve their videos! If you have anymore hints, tips, or questions, put them down below in the comments.
Like my facebook page here!
All right, the first thing you could do is to get a high paying job that allows you to buy the best gear possible... but that isn't always an option. So if you’re broke but still motivated, like myself, you can easily put together your own camera dolly. Some of you less familiar with video gear may be wondering just what a dolly is. Have you ever watched a video where some shots from the camera seem to be moving - or rather gliding - and you can't seem to figure it out? That motion is in fact created by using a dolly! If you aren't sure what motion I'm talking about, check it out in the video below. It's pretty amazing how such small movement can end up making the shot incredibly different, and better, than a shot without camera movement.

I had been wanting to purchase a camera dolly for a while and I had been searching the internet without much luck, and if I ever did come across anything it would have cost me an arm and a leg. Luckily, a friend of a friend shared his ideas with me on how he made his own at home. I didn't copy his idea exactly, but they're nearly the same, and I figured I would share the love with you guys and push you in the direction of building your own as well. Homemade dollys are not a new thing, there are many out there, but this will show you just how easy it is to put your own together.

You don't need the best supplies to make a camera dolly that functions well. This may look ghetto, but it works great!
The first thing I did was crush the piggy bank and make my way to the local hardware store for some supplies. I grabbed some nuts and bolts, washers, screws, PVC pipes, and anything else that I thought I would need! I'm actually not sure what they are called, but I also grabbed a few feet of a V shaped metal plate that I've used in the photos below. All in, I didn't have to spend much money to get the supplies needed, but it will vary depending on where you live and how easy it is to source. After getting all of that stuff I went to the local sports store to pick up some roller blade wheels - eight of them would be needed. As it turns out, these were the most expensive part of the whole project! If you have any extras laying around, use those. I just didn't want to use worn down wheels because I'm picky.

The 2 x 4 pieces are attached to the metal plate with a number of screws and washers. Inexpensive and effective.
The great thing about this project is that you don't need the best supplies to make it work well. I managed to scavenge up some 2 x 4's and random wood for the top of the dolly (where the camera sits). I then cut the metal V shaped plate in half lengthwise in order to make the two pieces that I would need to mount my wheels to. Keep in mind that you can make these as big or as small as needed depending on what you'll be putting on the dolly.

Wheels mounted to metal, metal mounted to wood.
The two short 2 x 4 pieces needed to have each side of their bottoms cut at a 45 degree angle to fit into the metal plate snugly. It may seem kind of pointless to have the dolly raised up like this, but I've found that the extra few inches of height lets the dolly avoid brush from below that may have otherwise gotten in the way. Want your dolly higher? Then simply use longer 2 x 4's!

After repeating the step of mounting the wheels you should have something that looks like this. One is a good start, but you need two of these for it to actually work and stay balanced.
After that it was time to mount the wheels to the metal plates. Four wheels to each side, two across from each other at each end of the metal plate. Again, I didn't do anything fancy here, simply using long bolts and plenty of washers to space the wheels to the correct width that would allow them to fit properly on the PVC piping that I'm using for rails. Wider pipe requires more washers, thinner pipes means that the wheels can be closer together. By using washers that only contact on the wheel's bearing you won't foul them up and they will still turn free when the bolt and nut are snugged up. Be sure that everything spins nice after you've tightened everything up.

Bolt, metal plate, washers, wheels, nut - in that order.
The next step was to mount what I just created to the top of the dolly. A few screws later it was good to go! My final project looked like a table on wheels, which is exactly what it should resemble.

The hard part is done.
Now you're down to the last stretch, and probably the most annoying part while filming; the poles, tracks, PVC pipe, whatever you want to call them. PVC pipe works great, but you'll need to keep in mind that if you don't have thick enough walled piping, it will bend under the slightest pressure, making the dolly's journey harder. One way to combat this is to make the poles shorter, allowing for less sag in the middle. You'll want to use thick pipe if you plan on doing any long dolly shots, otherwise you'll spend a lot of time moving dirt or rocks to make sure that the pipes are not sagging in the middle of the run.

The PVC pipes mounted to a wooden frame that keeps them from rolling around.
A major problem that I had at first was that the PVC pipes would roll around if I was using them on uneven ground - not ideal when trying to get a rad shot. I tried everything from using sticks, dirt, plants, and rocks to brace them, but none of it worked. So I ended up giving them to my genius friend Kyle and he came up with an idea to create a frame for the poles, or something to mount them too. What he did was drill through the PVC and mount then to a separate 2x4 using a bolt and a nut. He made sure they were mounted the same distance apart as the wheels were, and I no longer have any problems with the poles moving! Another benefit of having the poles mounted to a frame is that the dolly is even further out of reach of those pesky bushes
My homemade dolly done up and ready for a shoot.

Depending on what shot you're looking for, you can either put your camera right on the dolly or use it with your tripod.
I hope this helps people be creative and improve their videos! If you have anymore hints, tips, or questions, put them down below in the comments.
Like my facebook page here!
Author Info:

Must Read This Week
Sign Up for the Pinkbike Newsletter - All the Biggest, Most Interesting Stories in your Inbox
PB Newsletter Signup
jacobgibbinsdotcodotuk.blogspot.com/2010/11/diy-camera-dolly-how-to.html
1) You can easily add length to your rails for a longer video sequence by adding additional pipe lengths. Use a smaller pipe for that fits the inside of the pipe and then push the rail pipe over it so the two pipes but together for a smooth joint the wheels will roll over. I used a lathe to round a 2 by 2 piece of wood down to the right diameter to fit inside the pipe.
2) You can make your 2 by 4’s cross rails more versatile by attaching two band clamps to each end then cut a short piece of pvc pipe say 24 inches long through the band clamps down to the ground. This way you can go over uneven terrain with your pipe. The 2 x4 cross rails will keep the right distance between the rails and you can bring a level to make sure the parallel tracks are level. Attach some nylon line to the dolly and pull it along the track to take the shot.
I liked your design for the wheels & dolly seems solid enough …… just wanted to make some rails that work over any length so I can take a longer shot and not be concerned about bushes and still keep the whole rig light.
www.pinkbike.com/photo/5323650
Anyone have any ideas for a real simple light weight one that might fit in a large backpack
www.pinkbike.com/photo/6091034
Using the wood structure in ANY damp environment will warp the top layer of plywood, causing the dolly wheels to sit at different angles.
PVC pipe will crack under ANY pressure.
There are absolutely NO places to attach a proper ball head or even a tripod of any professional kind.
Spend the money on a real slider or dolly, it's an investment for all of your productions and will work far better and longer than this cheap wood product.
mini rant over. i made this article for the kids that dont have the money to buy a real dolly, but might have $15 to spend on parts so they can make theyre own. you can criticize all you want, but its cheap and it works.
Did you know that as we speak, there's this thing called atmospheric pressure/ air pressure that is working against us 24/7.
Your statement is faaaaalse fool.
pics of it there fairly easy to work out how its made