Tech Tuesday - Replace Plastic Zip-Ties With Safety Wire
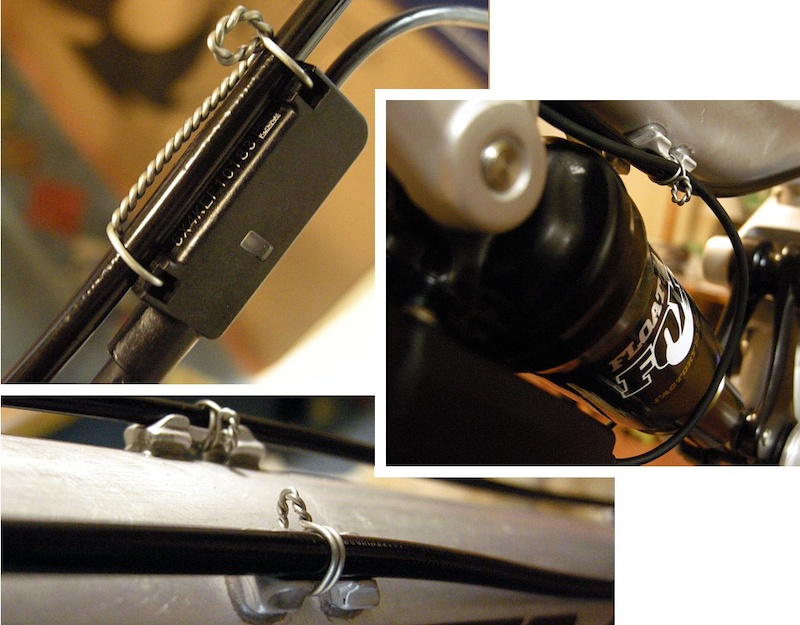
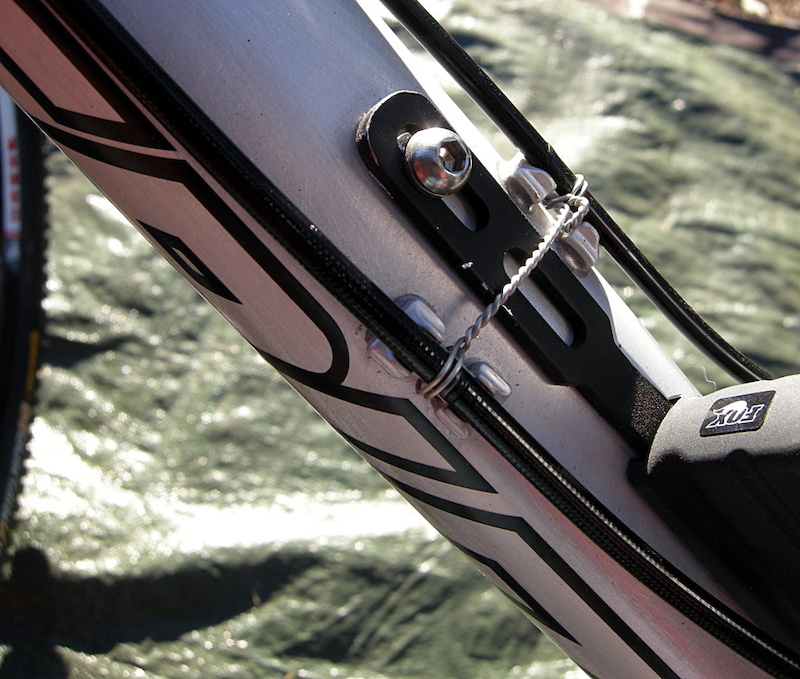
Safety wire replaced plastic tie-wraps on Pinkbike's iCD test bike. The short loops are used to conceal the sharp ends of the wire. It is worth noting that the cut-ends of plastic Zip-ties can also be dangerously sharp.
Safety wire is normally used to keep bolts and parts from falling off of important things like aircraft engines or racing car suspensions, and it is a required application in many forms of motor competition. The wire is very pliable, which makes it easy to use and also helps it to resist fatigue failure. The special pliers that are used to twist and manipulate the wire are not necessary, but are extremely helpful. A professional safety wire tool costs nearly $100 USD, but cheap Chinese safety wire pliers that retail for 12 to 28 dollars at tool outlets and online motorcycle stores will do fine for cycling applications. A small roll of wire runs about $1.25, with a one-pound roll costing around 25 bucks, so this Tech Tuesday is quite affordable.
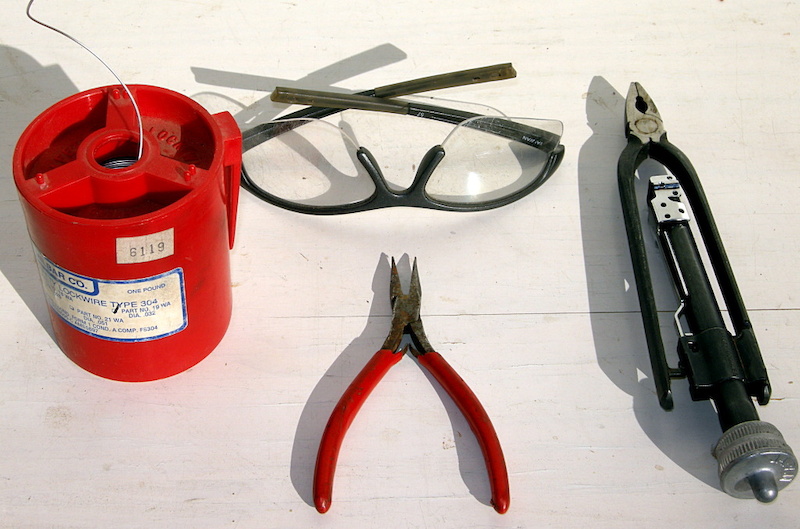
• .032 or .041-inch stainless-steel safety wire
• Safety-wire pliers
• Small needle-nose pliers
• Safety glasses
Words of caution
Cut wire can be sharp, so anytime you are working with it, you should treat the cut ends as if they were needles or knives. Clipping short strands of steel wire can send bits flying into your eyes or to unknown places where only your mom's new vacuum cleaner or your girlfriend's tender feet will find them. Work where you can easily find and dispose of the cast-off wires and bits, and use safety glasses at all times.
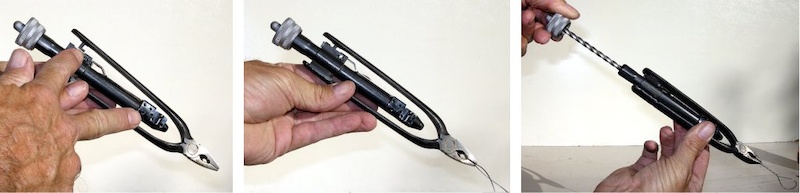
Step One: How safety wire pliers operate. A sliding latch (left) along the center of the pliers engages the handle to lock the jaws. Squeezing the handles together while sliding the latch towards the rear of the pliers latches them, (middle) and squeezing the handles again releases the spring-loaded mech. Pull the knob at the end of the tool and a twisted rod spins the pliers to wind up the wire.

Step Two: Cut about eight inches of wire to make looping it through the guide easier. Feed two loops of wire through the guide and around the housing. Use two pliers and work the loops so they are snug against the housing and tightly spaced. Avoid crossing the wires - it looks better that way.
Step Three: Pull the wires together and swing them towards the inside of the bike. Latch the jaws of the tool over both wires about 3/4 inch (20mm) away from the guide. Release the tool while pulling the shuttle knob to twist the wire (right). Repeat until the wires are snugly wrapped around the housing. Don't overdo it though, about ten twists per inch seems right.

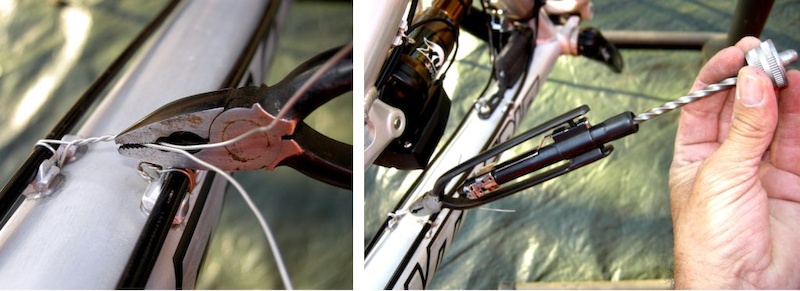
Step Four: Cut the twisted wire 3/4 to 5/8 inches (20 to 16mm) from the guide and, using the small needle-nose pliers, roll the twisted end into a nice looking 'pigtail' loop. Finally, ensure that the pigtail is lined up straight and that the sharp, cut-end of the loop is set flush against the wrapped wires.
Alternative Suggestions
Many frames have sets of two or three guides running parallel to each other, so you may want to group them together in one continuous length for a different effect. You can also use this technique to join hoses or housings at specific distances apart to route them cleanly in front of the handlebar, or where they pass to the rear suspension.

Double wrap the guide farthest from you and be sure to begin with enough wire. Next, pull the two wires tightly across to the next guide. Grasp the wires with the tool slightly farther away from the inside edge of the next guide to allow for twisting. Twist the wires until the first guide is snug and then double-wrap the second. Use pliers to snug up the loops towards the inside of the frame and then twist the second guide tight.
Clip the wires and then finish the job with a well-tucked pigtail.
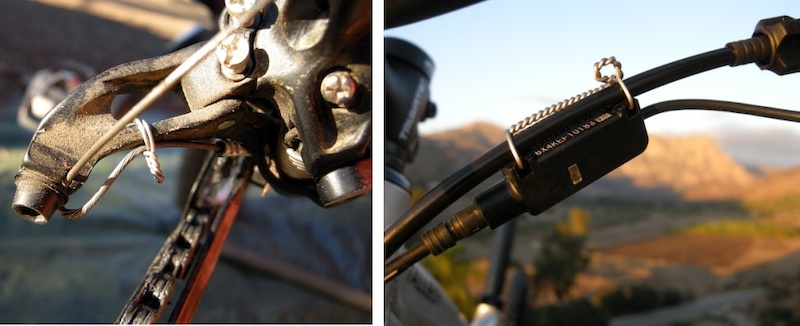
Safety wire used to tuck the cable in place on an XTR rear derailleur, and to locate Fox's iCD mode indicator on the shift-cable housing.
Watch a how to use safety wire pliers video. (Ghetto alert!)

 Member since Mar 23, 2011
 60345 views
41252 views
A bike without zip ties is an incomplete bike
Wire is heavier, scratches paint, cuts hands, and makes you look like a nut with too much time on your hands.
i find this a nice practical example of "devolution"... its everywhere,..
Perhaps that's still a better use for the wire, than to replace zip ties on bikes.. i'm okay with the zip ties, actually.. always good to toss around new ideas. Not all ideas are good ones, but it's important not to be too critical of them, that just puts a damper the development process.. another thing I learned in product development...
( I like your creative thinking and problem solving, Richard. Your idea for seating tubeless tires using another tire as the 'tank' was a pretty creative and workable inexpensive solution for those that don't have a compressor.)
DONT FIX IT IF ITS NOT BROKE.
I have experimented with epoxying or Gorilla gluing cables to frames, and it does look extremely clean. Just clean away a small area of paint from the frame and put a small small dot of glue on it, zip-tie it, then take off the zip-tie when it's dry. I liked that it was clean looking and a little more aero(good for time trial bikes). I didn't like people asking me about it all the time -"What's holding your cables on Protour?"
Probably wouldn't recommend the Protour Technique for carbon frames, and it could even void your warranty, but it does at least look cleaner than zip-ties or RC's wired-up contraptions. I never had one come off, but they could, especially in a crash. If it does, just zip-tie it with one of the 20 zip-ties you carry while riding, then glue it back later.
Installation steps:
Buy Zip Ties. (~£1.50 for 100 approx. Pretty much any colour you like, dozens of sizes to suit task.)
Wrap one around the cable and through the cable guide making sure the tail faces in towards the frame.
Trim neatly with basic pliers or a scalpel.
Now, did that need an alternative, much less one that needs a specialist tool?
No.
the 3 vote options above are pretty much "NO" hahaha
Oh, wait a minute...
You can get low profile cable ties for your frame, fastener mount ties for screwing a cable tie to a frame,
Open up the 'additional ties' menu on this page. www.mcmaster.com/#cable-ties/=jyfepr
link to stainless steel, nylon coated ties
www.mcmaster.com/#stainless-steel-ties/=jyfgec
"Nah, ran out of ideas"
"How about you Richard? Must be something you can find in those old MBA articles"
RC
Snipping a metal wire for removal creates a sharp end. Pulling out the wire can be a bit tricky with it being curved. Very easy to drag the sharp end over a painted surface or slice into a cable/hose.
As has been mentioned above a zip tie can break away if you catch your cable/hose on a branch, reducing the chance of destroying that cable/hose.
And speaking as a guy that is borderline obsessive about the aesthetics of my bikes, a simple black zip tie is much less of an eye sore then a twisted cable (even if that cable twisting is done fancy).
Come on PinkBike, what is next : Toilet paper melted with plastic to be used as Mudguards ????
I would love to see the hydroforming process, welding, and just more of the industrial side of the process. I love to see how things are made. Potential future materials? Carbon zipties?
Zip ties require no skills almost everyone knows what one is and how to use them and you only need pliers which almost everyone has.
and i dont want my bike getting scratched due to the wire rubbing.
Hold one end of the wire in a vice and pull the other end with pliers, (you would be surprised how much the wire stretches) than continue as shown above.
lol
Cut wire can be sharp, so anytime you are working with it, you should treat the cut ends as if they were needles or knives. Clipping short strands of steel wire can send bits flying into your eyes" BRILLIANT IDEA. :-O
www.transitionbikes.com/Store_Detail.cfm?Token={ts_2012-10-30_14:00:23}-50f7c383f1a988d4-FA7208E6-B0C2-955A-326FF0DE36B9E449&P=2222&o=7
reusable (environment friendly) and does the job.
Safety wire on my Bike - No Thanks!
www.douamaini.ro/wp-content/uploads/2007/12/maner-legat-cu-sarma-4.jpg
Mind you i did find the statement "I had the tools and talent" very, very funny.
Please; it's just a bike, not a F16. Get a Job that takes up more of your time.
Do you think this guy has a lot of friends????
Instead i used wire twist ties from the grocery store.
As for the people saying it wont break if you catch a cable on something,m: if you hang up a cable enough to break a ziptie then you've most likely hung it up enough that you're gonna have issues regardless of if the fastener snaps or not.
And to everyone saying it will cut your housings, it's fairly simple, dont do it that tight....
Zippy's... for the win.
-CF-
:/
We need more people that try to change the "statu quo" for the better.
This would F*ck shit up in a crash.
Horrible idea!!!