Tech Tuesday - RockShox BoXXer Seal Replacement
BoXXer Seal Replacement
Tech Tuesday's focus on RockShox's BoXXer continues with a closer look at how to replace the fork's seals. Just like the BoXXer TLC how-to, this job doesn't actually require you to jump into a full-on damper rebuild thanks to the damping oil being sealed within the right side stanchion tube. This means that dropping the fork lowers off for cleaning and seal replacement can be done by just about any rider who possesses even the smallest amount of technical knowhow. Can you work on your bike without rounding out hex bolts? If so, pick yourself up one of RockShox's seal installation tool and you should be good to go. Next Tech Tuesday delves into changing the fork's damping oil, but today's seal swap should be easily handled by most readers.
How often should you replace your fork's seals? That depends on both how often you get out and your riding conditions, but it pays to keep an eye on the seals - if you've wiped them clean and they still leave a ring of oil and gunk on the stanchions it is likely time to replace them. If you are the guy who has fork oil running down the backside of your fork lowers, this Tech Tuesday is for you. Keep in mind that RockShox gives a 25 hour service interval (It sounds frequent, but it assumes that you are riding in nasty conditions) between dropping the lowers for cleaning, which is also a good time to install new seals. Riding your fork for with worn out seals can quickly escalate the repair job from a simple seal replacement to it needing new bushings, or even damaged stanchions that require replacement from being eaten at by grime that passed through the tired seals.
![photo]()
Some helpful pointers
• We've used a BoXXer World Cup in the photos below, but the same basic steps can be applied to the current R2C2 and R2 models, as well as the older Team and Race versions. Note that other BoXXer models may use a different adjuster knob assembly at the bottom of the damping side leg, requiring a slightly different removal method.
• You'll be removing the high and low speed rebound knob assembly before pulling off the lowers - be careful not to lose the washer, c-clip, or small 2mm hex bolt.
• More grease and lube oil on top of what is recommended will not keep your fork running smoother for longer. In fact, the extra lube will likely be forced out through the fork seals and cause a large, dust attracting mess.
• As with any repair, if you don't have the right tools, or don't feel comfortable doing the job, you are much better off taking the fork to your local shop instead.
• We are not pictured wearing Nitrile gloves in the photos below, but it is certainly a good idea to wear some. This is especially true if you work in a shop and will be getting your hands oily on a regular basis. Eye protection is also recommended, especially when spraying any cleaning solvents.
• As always, follow RockShox's torque values - Maxle: 50in/lbs, crown bolts: 65in/lbs, foot bolts (damper and spring side): 65in/lbs
![Tech Tues]()
![Tech Tues]()
![Tech Tues]()
![Tech Tuesday]()
![Tech Tues]()
![Tech Tues]()
![Tech Tuesday]()
![Tech Tues]()
![Tech Tuesday]()
![photo]()
![photo]()
![photo]()
![photo]()
![photo]()
![photo]()
![photo]()
![photo]()
![Tech Tuesday]()
![Tech Tuesday]()
![Tech Tuesday]()
![Tech Tues]()
![Tech Tuesday]()
![Tech Tuesday]()
![Tech Tuesday]()
Next up: damper service
Past Tech Tuesdays:
Visit Parktool.com to see their entire lineup of tools and lubes
Tech Tuesday's focus on RockShox's BoXXer continues with a closer look at how to replace the fork's seals. Just like the BoXXer TLC how-to, this job doesn't actually require you to jump into a full-on damper rebuild thanks to the damping oil being sealed within the right side stanchion tube. This means that dropping the fork lowers off for cleaning and seal replacement can be done by just about any rider who possesses even the smallest amount of technical knowhow. Can you work on your bike without rounding out hex bolts? If so, pick yourself up one of RockShox's seal installation tool and you should be good to go. Next Tech Tuesday delves into changing the fork's damping oil, but today's seal swap should be easily handled by most readers.
How often should you replace your fork's seals? That depends on both how often you get out and your riding conditions, but it pays to keep an eye on the seals - if you've wiped them clean and they still leave a ring of oil and gunk on the stanchions it is likely time to replace them. If you are the guy who has fork oil running down the backside of your fork lowers, this Tech Tuesday is for you. Keep in mind that RockShox gives a 25 hour service interval (It sounds frequent, but it assumes that you are riding in nasty conditions) between dropping the lowers for cleaning, which is also a good time to install new seals. Riding your fork for with worn out seals can quickly escalate the repair job from a simple seal replacement to it needing new bushings, or even damaged stanchions that require replacement from being eaten at by grime that passed through the tired seals.
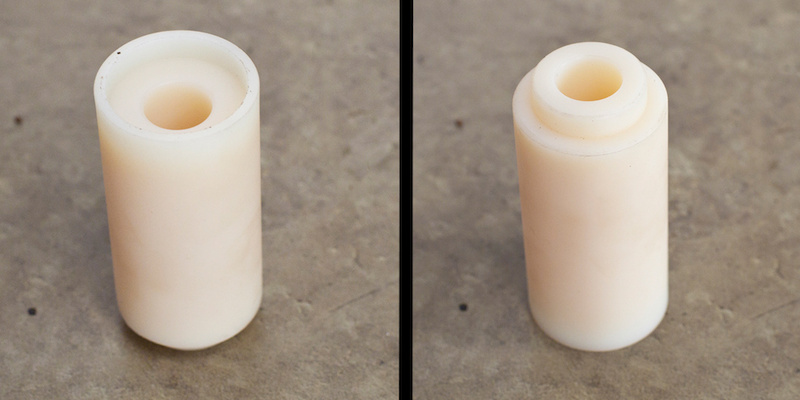
Replacing your BoXXer's seals isn't too challenging, but having the right tool is crucial. RockShox's 35mm seal installation tool (there are versions for other fork models as well) features a raised section on one end for the oil seal to sit over, and a recessed portion at the opposite end to cradle the dust wiper. It works by letting you apply pressure to the stiff out edges of both seals without damaging the fragile lips of either one. The tool is not expensive and is well worth the money if you plan on doing this job more than once or twice per season. Don't want to spend the money on the correct tool for the job? While we don't recommend it, using large sockets can work as well, so long as you are very careful not to damaging the sealing surface or lip of both seal types.
Some helpful pointers
• We've used a BoXXer World Cup in the photos below, but the same basic steps can be applied to the current R2C2 and R2 models, as well as the older Team and Race versions. Note that other BoXXer models may use a different adjuster knob assembly at the bottom of the damping side leg, requiring a slightly different removal method.
• You'll be removing the high and low speed rebound knob assembly before pulling off the lowers - be careful not to lose the washer, c-clip, or small 2mm hex bolt.
• More grease and lube oil on top of what is recommended will not keep your fork running smoother for longer. In fact, the extra lube will likely be forced out through the fork seals and cause a large, dust attracting mess.
• As with any repair, if you don't have the right tools, or don't feel comfortable doing the job, you are much better off taking the fork to your local shop instead.
• We are not pictured wearing Nitrile gloves in the photos below, but it is certainly a good idea to wear some. This is especially true if you work in a shop and will be getting your hands oily on a regular basis. Eye protection is also recommended, especially when spraying any cleaning solvents.
• As always, follow RockShox's torque values - Maxle: 50in/lbs, crown bolts: 65in/lbs, foot bolts (damper and spring side): 65in/lbs
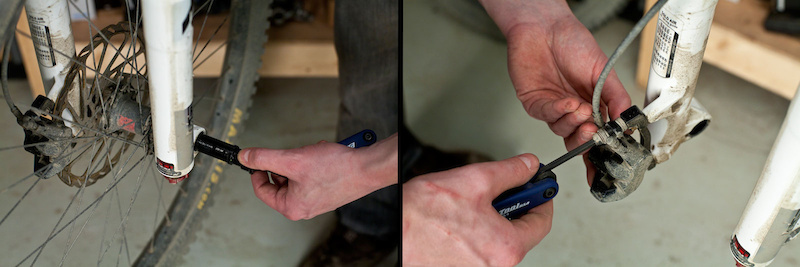
Step 1 - Remove the Maxle by turning the non-drive side 6mm hex until it no longer clicks, then use the same 6mm hex key on the drive side to turn it out of the fork and remove the front wheel. Give the Maxle a quick wipe and put it somewhere where it won't pick up any dirt. The brake caliper is taken off easier once the front wheel is out of the way, but be sure to keep track of any washers that may be present.
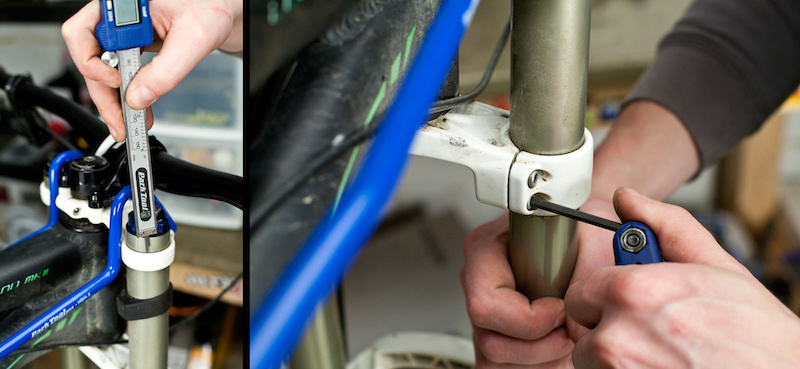
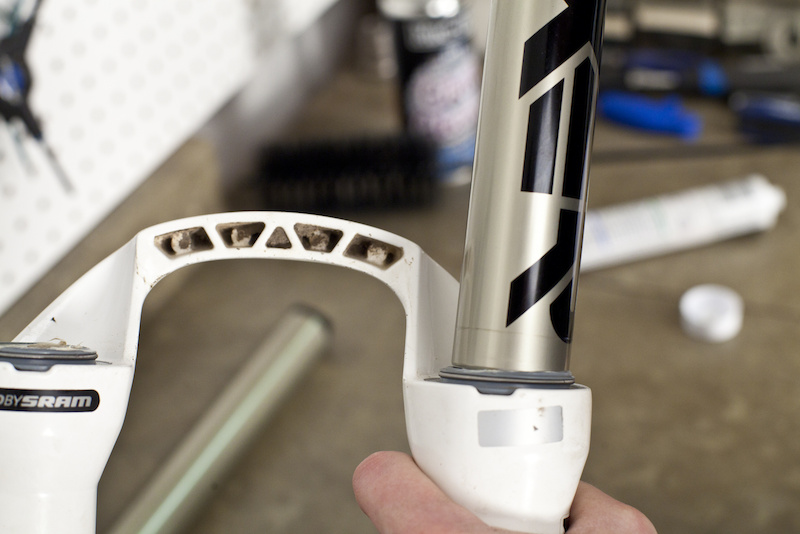
Step 2 - Take a quick measurement with a ruler or tape of how high the stanchion tubes sit above the top crown. The goal is to reinstall your fork to the exact same hight after you've serviced it. Write down the measurement, and then loosen all four lower crown bolts, as well as both upper crown bolts, with a 4mm hex key.
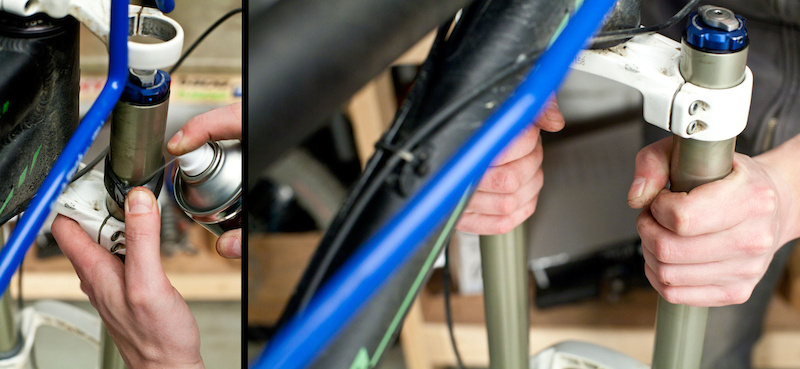
Step 3 - Use one hand to pry an edge of the fork bumpers away from the stanchion tube while giving them a quick squirt of isopropyl alcohol with the other. This will free them up enough to slide them up and off of the top of the stanchion tubes. You can now carefully slide the fork out of the crowns and off of the bike.
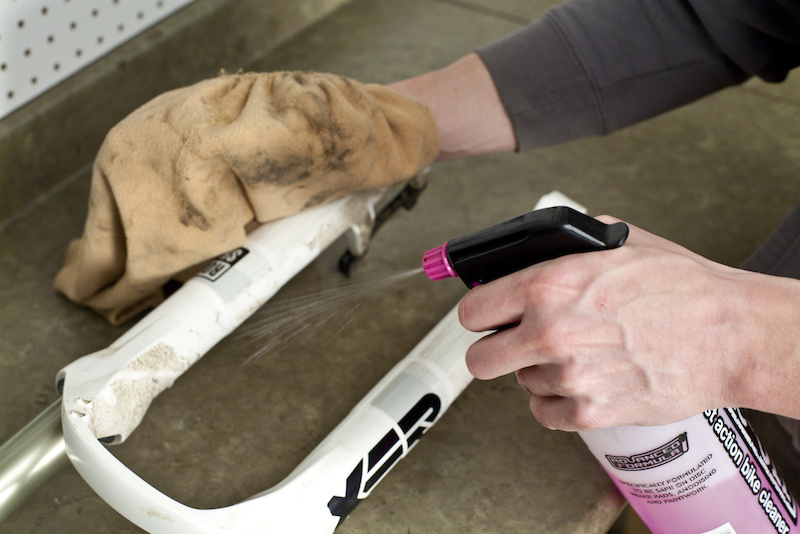
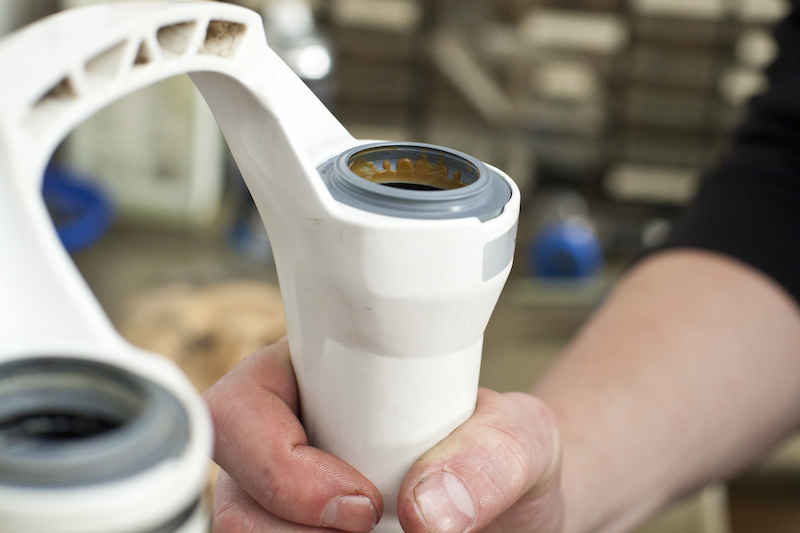
Step 4 - Give the fork a good cleaning once you have it off of the bike and inspect the lowers for any damage. Because you are not servicing either the damper or spring side you do not have to release the fork's air pressure (this only applies to the World Cup model. At this point RockShox recommends gently clamping the upper section of the one stanchion tube in a bike repair stand, but we far prefer to do the job on a workbench instead.
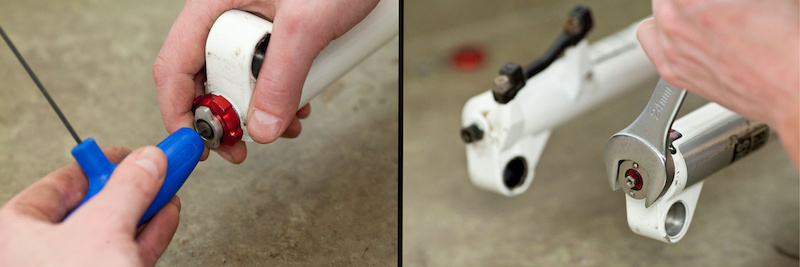
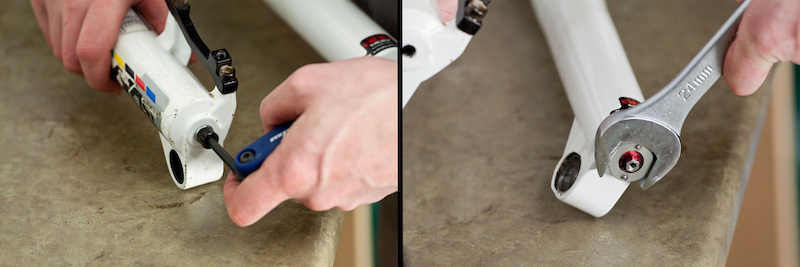
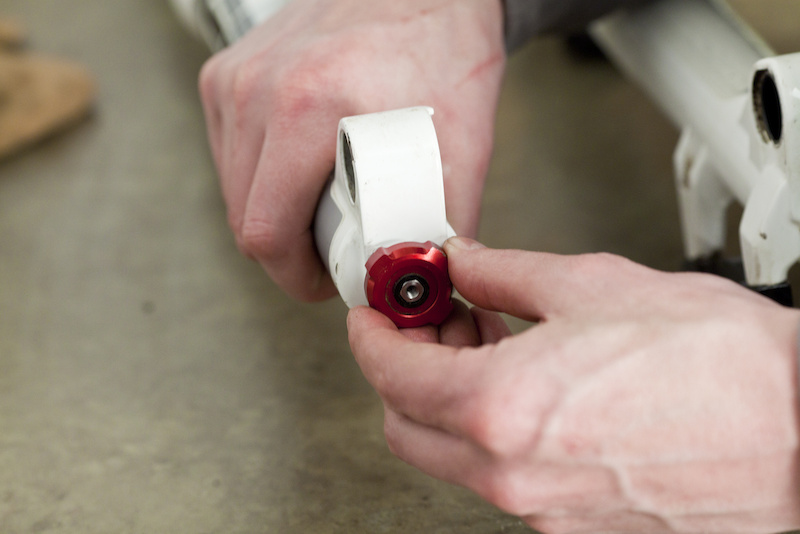
Step 5 - It is now time to remove the high and low speed rebound adjuster knobs to allow access to the damper side foot bolt. Our fork requires a 2mm hex key to loosen the bolt holding the outer knob in place, but other model year forks may use a c-clip instead. If your's requires a 2mm hex key, be careful to ensure that it is fully engaged to prevent rounding out the aluminum bolt as you loosen it. If your fork has a c-clip, use a pick and small sized flat blade screwdriver to push it out. The c-clip may pop free suddenly and go flying, so go slow. Pull the outer knob off, making sure to also note the thin black washer under it, and place it in a safe spot.
Use a 24mm open ended wrench to turn the large aluminum foot bolt counter clockwise until it is free, then thread it back in three to four turns after you've removed the crush washer and retainer. Proper thread engagement is key because you will be striking the bolt to free the damper shaft's press fit into the bottom of the lower leg.
Use a 24mm open ended wrench to turn the large aluminum foot bolt counter clockwise until it is free, then thread it back in three to four turns after you've removed the crush washer and retainer. Proper thread engagement is key because you will be striking the bolt to free the damper shaft's press fit into the bottom of the lower leg.
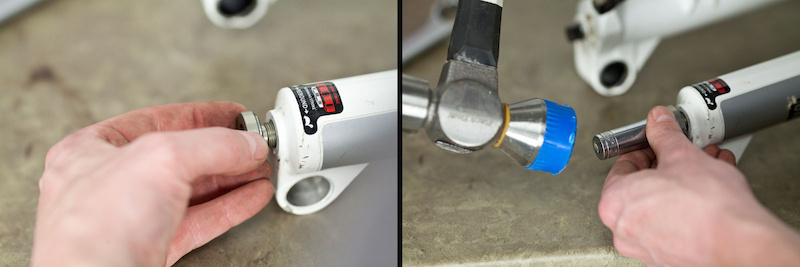
Step 6 - With the damper side foot bolt threaded in three to four turns, place the open end of a 12mm socket against it and strike the socket with a plastic mallet. It may take a few hits until you see the foot nut bottom on the outside of the lower casting, signalling that the damper shaft is likely free. You can now remove the foot bolt completely.
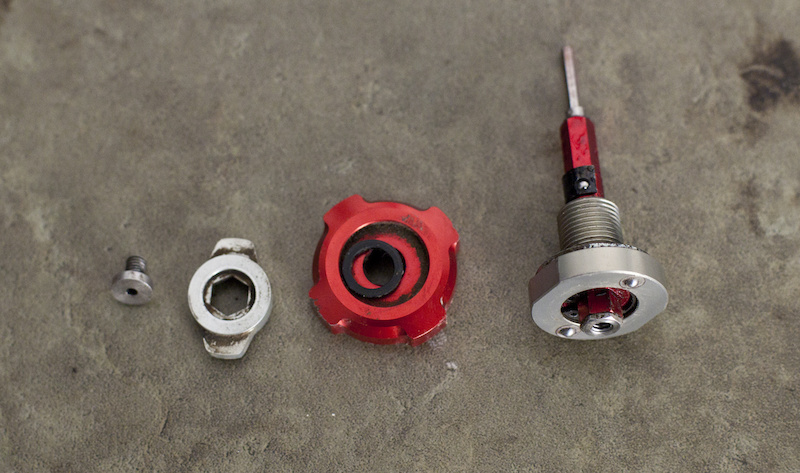
Step 7 - Take a minute to properly clean the adjusters and hardware of any dirt and grime. Note that your hardware may look slightly different depending on the model year of the fork.
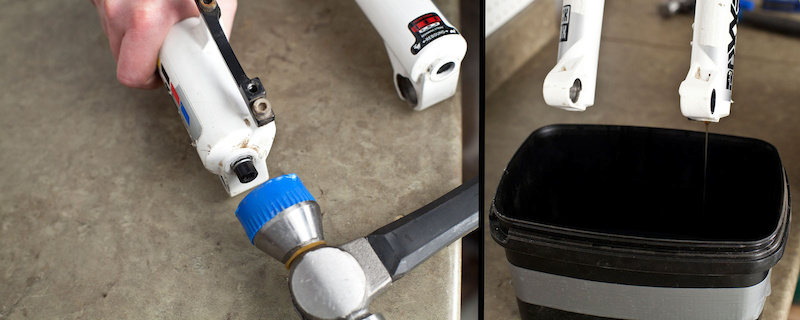
Step 8 - The next step is to loosen the spring shaft foot bolt. Use a 5mm hex key to turn it counterclockwise three to four turns, then strike the bolt with the same plastic mallet to knock the shaft free from the lower leg. Completely remove the bolt and position the fork vertically over a drain pan (an old Tupperware container is perfect) to let the old lubrication oil drain out of the foot nut holes in the lower leg assembly. Cycling the stanchion tubes up and down a few inches will encourage it to drain out as well.
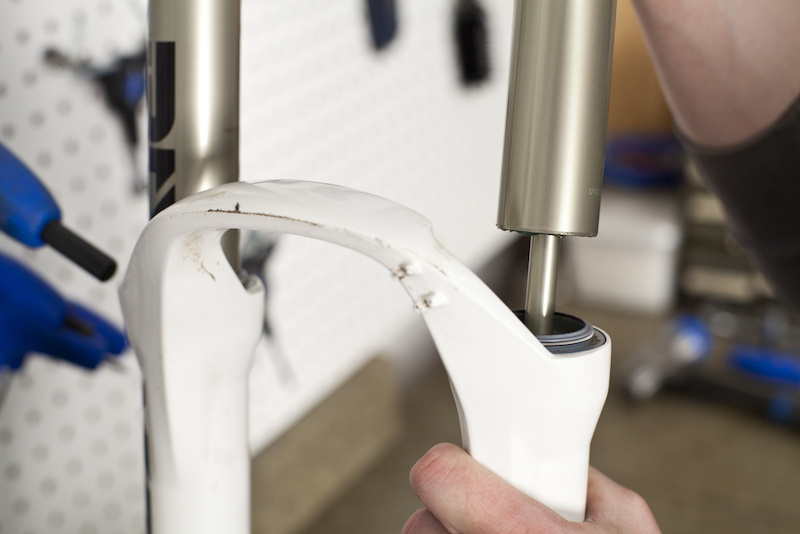
Step 9 - With the fork still upright and over the drain pan, pull both stanchion tubes up and out of the lower legs and set them down on a clean section of the work bench. At this point most of the oil should have drain out of the fork legs, but place them on top of a rag to catch any drips.
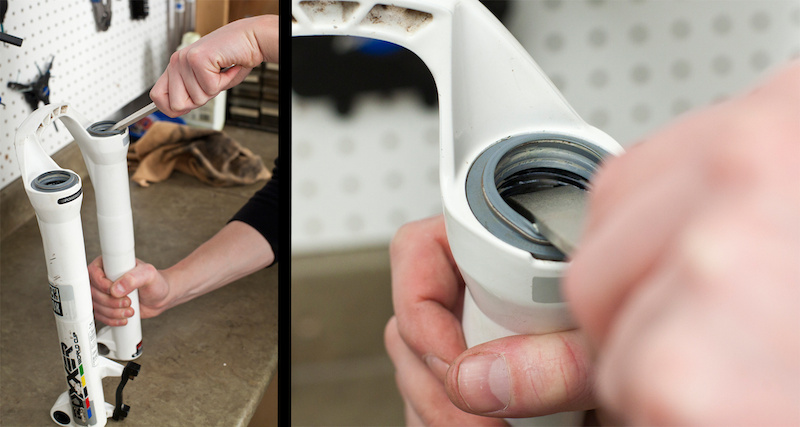
Step 10 - With the stanchions out, it is now time to remove the old seals. You can use either a large, flat blade screwdriver or a long tire lever, but we far prefer the tire lever because its rounded tip is less likely to cause damage if you are not lined up correctly. It takes quite a bit of force to pry the seals out, so a long, steel tire lever is ideal. Place the tip of the lever underneath the black oil seal (you will be prying out both seals at once), making sure that it doesn't catch the top of the upper bushing that sits just below. Holding the same side of the lower legs as the seals that you are removing, apply leverage to pop the seal up and out of the casting. Be careful of the seals popping it with a lot of force - they can sometimes go flying! Perform the same steps on the opposite side.
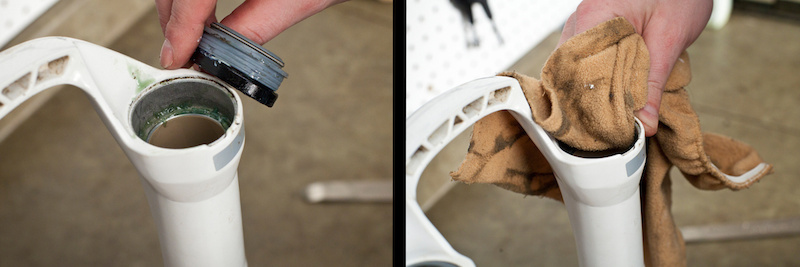
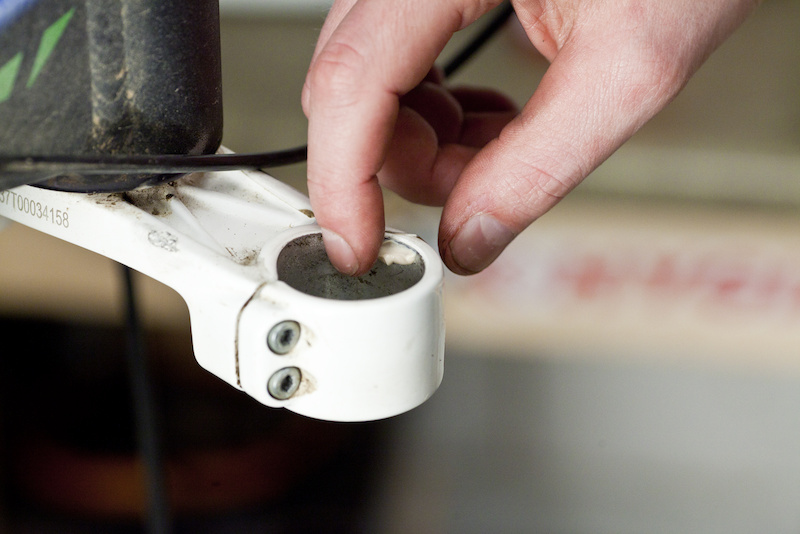
Step 11 - Place the old seals aside and give the seal bores a good cleaning. Make sure that the recessed edges at the top of each seal bore are free of any dirt that may keep the new dust seals from fully seating.
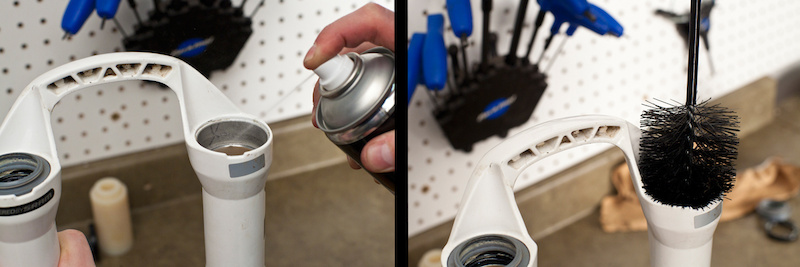
Step 12 - You'll have an easier time cleaning the inside of the fork lowers now that the seals have been removed. Spay isopropyl alcohol down into the fork and scrub them with either a rag on the end of a dowel (don't use a screw driver), or a brush on a long handle. Double check to make sure that the bottom out bumpers are still seated correctly at the bottom of each fork leg.
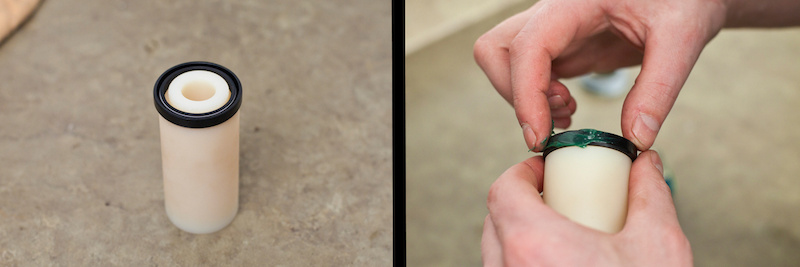
Step 13 - It's now time to install the new seals, starting with the black oil seal. Place the oil seal on the RockShox tool with the grooved edge facing up - you'll see the silver spring seal if the correct side is facing up. Spread a thin layer of grease along the seal's outer edge to help ease installation.
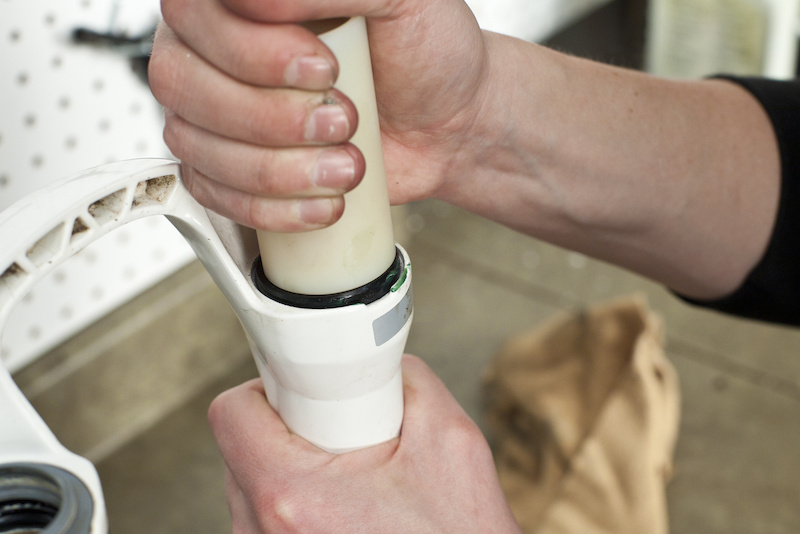
Step 14 - Align the oil seal so that it is evenly placed over the seal bore, and only then applying EVEN downward pressure so that the seal does not go in at an angle. Push until the top oil seal is flush with the top of the seal bore. Repeat on the other leg.

Step 15 - Flip the installation tool over, remove the seal spring from the dust wiper, and place the seal face down into the recess of the tool. Look closely to make sure that the dust wiper lip is not caught at any point. Apply a thin coating of grease to the outer edge to help it slide into place easier.
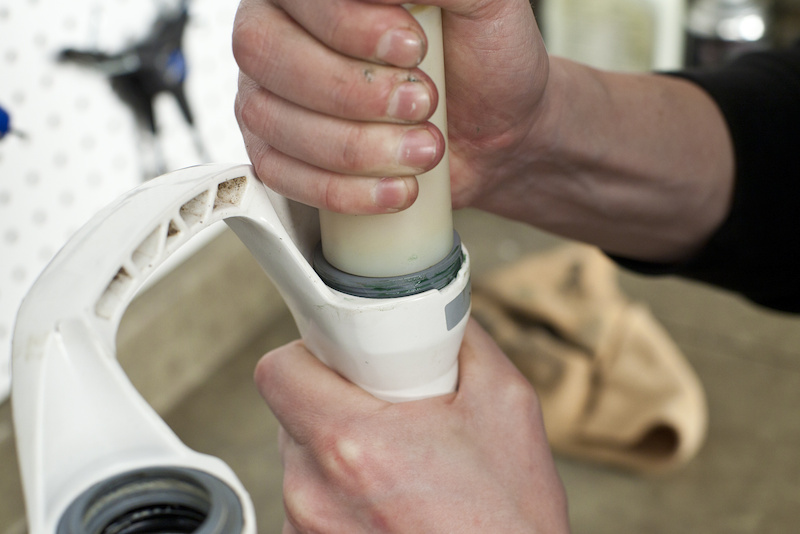
Step 16 - You are now going to push the grey dust wiper down into the seal bore, which will seat the oil seal as well. Align it evenly over the bore and apply even pressure so that it doesn't start to enter at an angle. You are pushing in both the dust and oil seals at this point, so it will likely take some force to fully seat them into the seal bore. Hold the lower leg steady with your other hand as you do this on each leg.
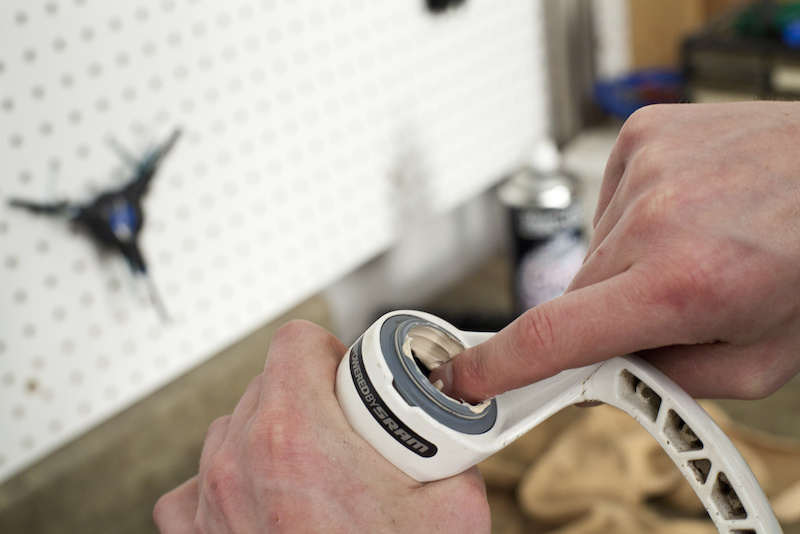
Step 17 - When installed correctly the outer edge of the dust wiper will site flush with the top of the seal bore as shown in the photo above. Take a few seconds to inspect your installation job, making sure that the dust seal is sitting flat within the seal bore. It may take another push with the tool in order to completely seat the seal. Re-install the steel spring seal onto the dust wiper when you're positive that everything is sitting flat and even. Repeat on the opposite side and then wipe away any assembly grease that may be present before moving on.
Step 18 - The new dust seals come with a small amount of grease on their inside surface, but it's good to add some fresher, and slipperier, grease to the fresh seals before reinstalling the stanchion tubes. Applying massive globs isn't going to help anything - it will just get displaced down into the bottom of the fork lowers. Instead, apply a thin coating to both the inner oil seal and the inside lip of the dust seal. A dab of grease spread around the upper bushing will help as well. Most grease with a Teflon element to it is fine to use, but stay away from Lithium based option as they are said to be corrosive to the fork's seals.
Step 19 - The next step is to reinstall the stanchion tubes into the fork lowers. Remember that the damping side leg is on the riders right, while the spring side leg is on the left. The very bottom of the stanchion tubes feature a slight taper to them that helps you to slide them past the dust seal without causing any damage, although you still needs to be very careful at this point. It can help to start the insertion at a slight angle, setting one portion of the stanchion tube past the seal only a few mm before the rest. Keep an eye on the entire circumference of the seal as you insert the stanchion, making sure that the bottom of the tube doesn't pull the seal lip in and tear it. Slide both tubes in until the damper and spring rods bottom on the casting, then pull them back out a few inches to allow the lube oil to be put in. Inspect the seals once both stanchion tubes are in.

Step 20 - With both stanchions in, tip the bottom of the fork up so it sits at 45 degrees. Use a syringe to push 10ml of 15wt fork oil in through the shaft holes (where the foot nuts tighten into the damper and spring shafts) in the bottom of the fork casting. Although different weight fork fluid will work just fine, you don't want to use much more than the recommended 10ml of fluid because it will only make a mess as it is forced past the fork seals. If you don't have a measured syringe you can think of 10ml as being two teaspoons worth of fluid.
Step 21 - With the bottom of the fork still at an up angle, compress the stanchion tubes enough so that both the damper and spring rods bottom within the fork lowers. Thread the spring side foot bolt in place after putting a dab of grease on bolt threads (this will allow you to unthread it easier down the road), tightening it to 65in/lbs. Bottom the damper side stanchion, holding it down as you thread the greased damper side foot bolt assembly clockwise, tightening it to 65in/lbs with a 24mm open ended wrench. Do not over-tighten the foot damper side foot bolt; it is aluminum and can be damaged if overdone.
Step 22 - Reinstall the ending stroke rebound knob, washer, and beginning stroke rebound knob onto the rebound adjuster shaft. You may have to push down on the rebound assembly to access the retaining clip groove, or to get the outer knob to fully engage the hex fitting. If your adjusters are held in place with a 2mm hex bolt, thread it back in place carefully.

Step 23 - Thoroughly clean the outside of the fork, paying special attention the assembly grease buildup around the seals - any extra grease will only attract grit and cause a mess. Compress both stanchion tubes a few times, re-wiping the seal area each time until no grease residue remains after you compress the stanchions.
Step 24 - Give the inside clamping surface of the crowns a wipe and a thin coating of grease before reinstalling the fork tubes, then you can slide them up into place to the correct height (you took the measurement at the beginning, right?). Reinstall your brake caliper, front wheel, and double check all bolts before hitting the trails.
Past Tech Tuesdays:
Visit Parktool.com to see their entire lineup of tools and lubes
Author Info:

 Member since Oct 18, 2005
Must Read This Week
How to Watch the 2024 Mountain Bike World Cup [Update: Staylive Offering Access in New Zealand, South Africa & More]
60101 views
60101 views
[UPDATED] Final Elite XC Results & Overall Standings from the Mairiporã XC World Cup 2024
41074 views
41074 views
Sign Up for the Pinkbike Newsletter - All the Biggest, Most Interesting Stories in your Inbox
PB Newsletter Signup
I looked at the previous tech tuesday and havent you already done this exact one as your TT #41 and TT #66 just titled it differently.
I could not remove the oil seals and dust whipers with a tire lever. Broke two of them so i switched to a flat blade screwblade.
Good review though.
www.sram.com/sites/default/files/techdocs/gen.0000000003511_front_fork_oil_chart_2012_0.pdf
The Clamp should hold the tube with friction. With grease, there will be less friction => NOT GOOD
Clean it, and it will be ok.
Then tried to remove seals and they would not budge ! Did as said above and put loads of force and ended up tearing the oil seal ! This is no biggie because not expensive, but when I do buy some new seals, How do I get the old ones out ? Is it possible they are stuck/jammed in there or have I missed something ?
How to change bearings would be very cool because I have never done this before and have no clue what I have to consider.
www.youtube.com/watch?v=9y-MX_b_nIk