Tech Tuesday - Specialized Command Post Blacklite Maintenance

Jun 20, 2012 at 16:18
by Mike Levy  
What's needed:
• Adjustable strap wrench
• Hex keys
• Shock pump
• Isopropyl alcohol
• Grease
• Clean, lint free rag
Some helpful pointers:
• Don't even think about taking the post apart before releasing all of the air pressure - you will lose an eye if you don't... or not. But let the pressure out of the post before removing the upper tube in order to prevent flying parts and possible injury.
• A strap wrench, which only cost about $10 USD at the hardware store, is required to loosen the upper seal head. Don't even think about using vice grips or anything else to do the job.
• Make sure to measure your seat height (or make a mark on the post where it enters the frame) so you know exactly where to clamp your post when you're finished the job.
• There is nothing but sticky grease holding the twin brass keys in place - make sure that they don't fall off when you pull the upper assembly out of the lower tube.
• Even though the cable tension shouldn't be affected during this job, be sure to check it once you're done the rebuild. Does the post lock in place firmly? Can you easily find the middle height position?


Specialized Command Post Blacklite service
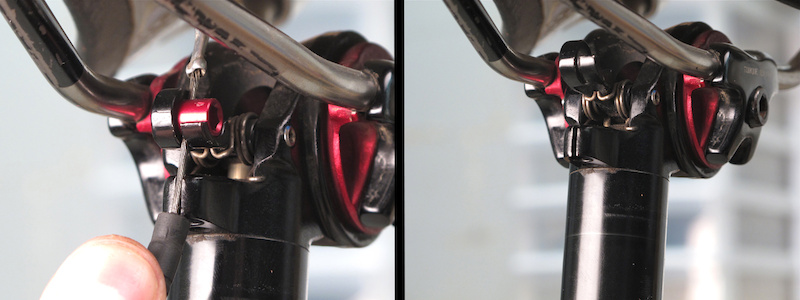
Step 1 - The Blacklite post employs a slotted cable stop on its head that allows you to remove the actuation cable without having to loosen the clamp bolt. Pull straight down on the housing just below where it enters the stop, then pull the cable out through the slot. Undo the seat post clamp bolt, or QR lever, and slide the post out of the bike.
Specialized Command Post Blacklite service
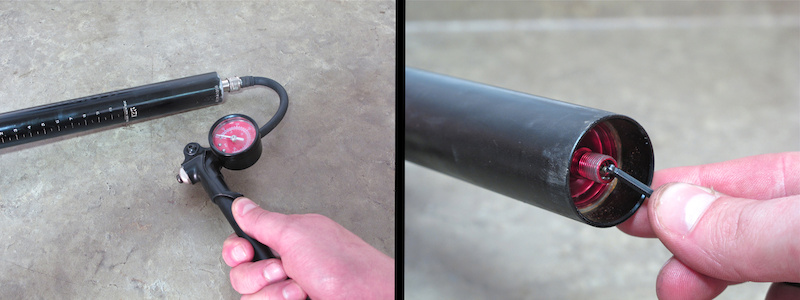
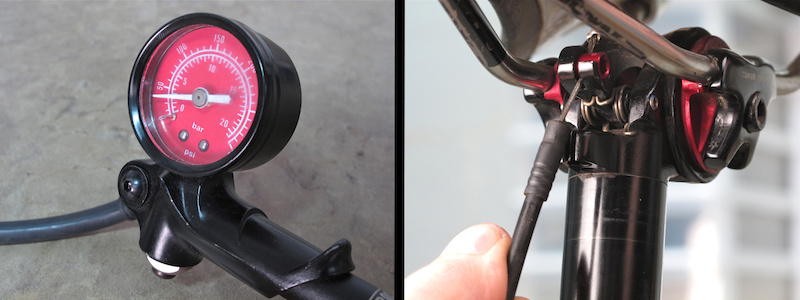
Step 2 - You absolutely MUST remove the air pressure from within the post before taking it apart, but take a pressure reading with a shock pump before doing so. This will allow you to refill it to the same pressure that it was using before you disassembled it (never go above 40 PSI). With it at full extension, depress the schrader air valve located at the bottom of the post with a small hex key - you should hear the ''pppphhhh'' sound of the air escaping.
Specialized Command Post Blacklite service
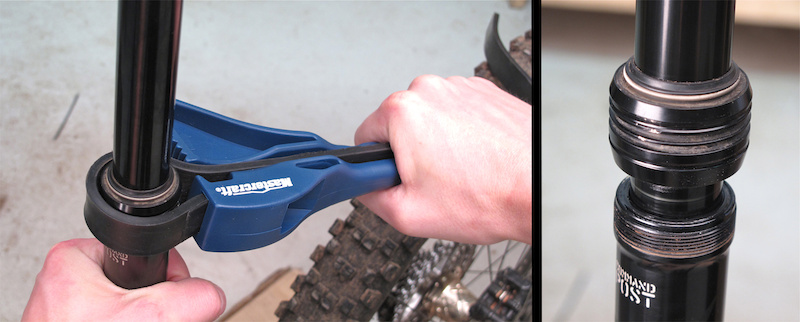
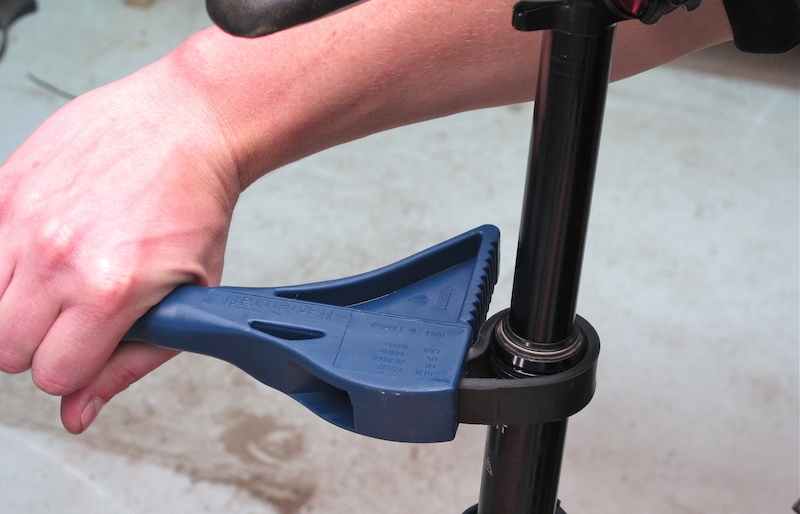
Step 3 - You are now going to use the bike itself as a clamp to hold the post's out tube while you loosen the seal head. Slide the post back into the bike and clamp it in place, but do not reattach the actuation cable. Wrap your strap wrench around the seal head and turn it counterclockwise a few turns to loosen it. You should now be able to completely unthread it by hand. Slide it up the post's stanchion tube.
Specialized Command Post Blacklite service
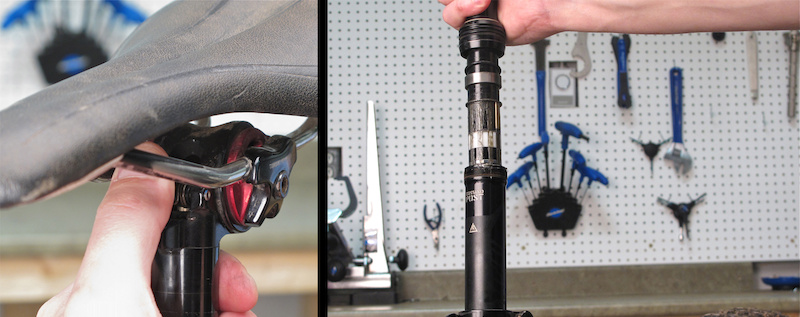
Step 4 - With the seal head undone you can now remove the post's upper assembly, but you'll have to activate the locking collet mechanism to do so. Pull down on the activation arm with your thumb to free the upper tube, allowing you to slide it straight up and out of the lower tube.
Specialized Command Post Blacklite service
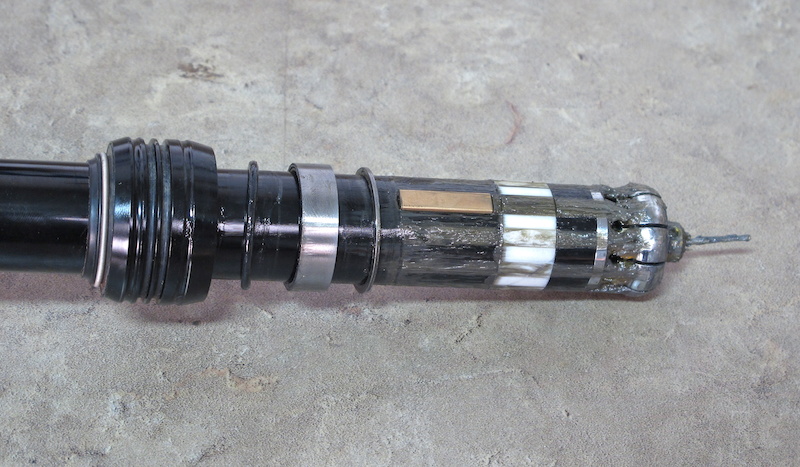
Step 5 - Our Blacklite test post has been in solid use for over a full year now, not seeing any maintenance whatsoever until this Tech Tuesday, which explains the contamination inside. It requires a good cleaning and new grease in order to move smoothly once again. The large O-ring just under the seal head is the top out bumper. Check it for splitting.
Specialized Command Post Blacklite service
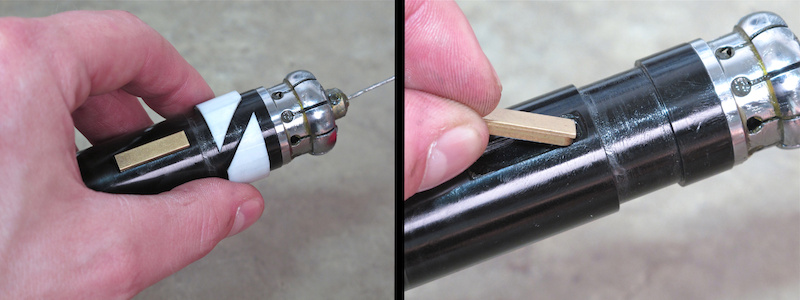
Step 6 - Slide off the split bushing and both brass keys, giving both of them, and their locations, a good cleaning. Place both brass keys back into their slots. Check the upper seal head's condition by sliding it up and down on the stanchion - it should move relatively freely but still feel tight. Now is also the time to clean the Blacklite's lower tube that is still clamped into the bike.
Specialized Command Post rebuild
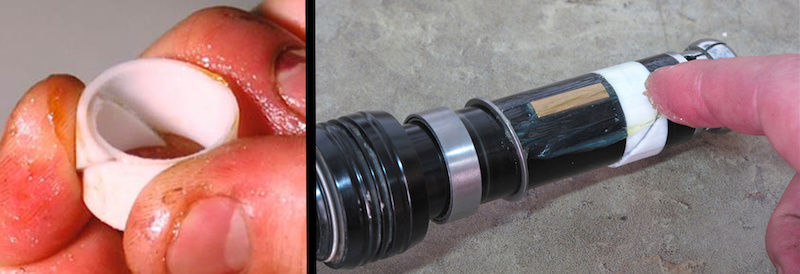
Step 7 - Preload the split bushing by squeezing it together gently before placing it back into its groove. This will help keep it from popping off when you slide the upper assembly back into the lower tube.

It's time to apply a thin coating of grease to the post's locking collet, lower bushing and brass keys, as well as spread it over the stanchion tube. Something with similar consistency to Slick Honey, a durable but light and slippery grease, will work well. Thicker grease acts on the post's return speed, slowing the rebound down, and a thinner grease will have the opposite effect.
Specialized Command Post Blacklite service
Step 8 - Slide the seal head and upper bushing up the stanchion tube and then reinstall the freshly greased upper assembly back into the lower tube. Do this by depressing the activation arm on the post's head with your thumb, relaxing the locking collet to let you slide it into the lower tube. Be sure that the brass keyways are lined up correctly, with the saddle inline with the bike's top tube and the 'Command Post' badge on the lower tube facing straight forward.

Pay special attention to the split lower bushing that mush push past the opening of the upper tube - its edge can easily catch, pulling it out of place. Slide the upper bushing down until it's fully seated in the top of the tube.
Specialized Command Post Blacklite service
Step 9 - Pull the seal head down the stanchion and turn it clockwise with your hand to tighten. Give it a good cleaning with isopropyl alcohol before using your strap wrench to snug up firmly.
Specialized Command Post Blacklite service
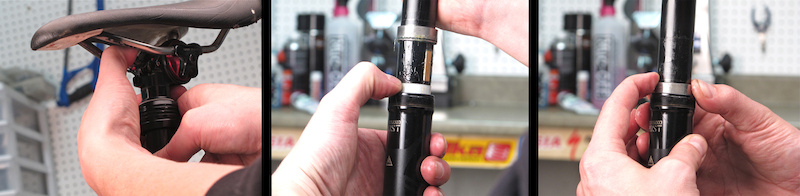
Step 10 - With the seal high tight, loosen the seat post clamp bolt and remove the entire post from the bike in order to add air via the schrader valve. More air will result in faster return speeds, while less air will slow the rebound down, but never exceed 40 PSI.

Step 11 - Put the post back into the bike and reattach the actuation cable by first putting the anodized red cable clamp barrel in its cradle, then pulling down to get enough slack to slide the housing end in place in the cable stop. Double check the post's action before hitting the trails, making sure that the cable tension in correct.


Past Tech Tuesdays:
TT #1 - How to change a tube.
TT #2 - How to set up your SRAM rear derailleur
TT #3 - How to remove and install pedals
TT #4 - How To Bleed Your Avid Elixir Brakes
TT #5 - How To Check And Adjust Your Headset
TT #6 - How To Fix A Broken Chain
TT #7 - Tubeless Conversion
TT #8 - Chain Wear
TT #9 - SRAM Shift Cable Replacement
TT #10 - Removing And Installing a Headset
TT #11 - Chain Lube Explained
TT #12 - RockShox Totem and Lyric Mission Control Damper Mod
TT #13 - Shimano XT Crank and Bottom Bracket Installation
TT #14 - Straightening Your Derailleur Hanger
TT #15 - Setting Up Your Front Derailleur
TT #16 - Setting Up Your Cockpit
TT #17 - Suspension Basics
TT #18 - Adjusting The Fox DHX 5.0
TT #19 - Adjusting The RockShox BoXXer World Cup
TT #20 - Servicing Your Fox Float Shock
TT #21 - Wheel Truing Basics
TT #22 - Shimano Brake Pad Replacement
TT #23 - Shimano brake bleed
TT #24 - Fox Lower Leg Removal And Service
TT #25 - RockShox Motion Control Service
TT #26 - Avid BB7 Cable Disk Brake Setup
TT #27 - Manitou Dorado Fork Rebuild
TT #28 - Manitou Circus Fork Rebuild
TT #29 - MRP G2 SL Chain Guide Install
TT #30 - Cane Creek Angleset Installation
TT #31 - RockShox Maxle Lite DH
TT #32 - Find Your Tire Pressure Sweet Spot
TT #33 - Three Minute Bike Preflight Check
TT #34 - MRP XCG Install
TT #35 - Stem Choice and Cockpit Setup
TT #36 - Handlebars - How Wide Affects Your Ride
TT #37 - Repairing A Torn Tire
TT #38 - Coil spring swap
TT #39 - Trailside help: Broken Shift Cable
TT #40 - Installing a Fox Float Air-Volume Spacer
TT #41 - Replace the Seals on Your 2011 RockShox Boxxer World Cup Fork
TT #42 - Clean and Lubricate Your Fox F32 Dust Wiper Seals
TT #43 - Thread Locker Basics
TT #44 - Install a SRAM X.0 Two-By-Ten Crankset
TT #45 - VPP Suspension Bearing Service
TT #46 - Rotor Straightening
TT #47 - Finding and fixing that creak
TT #48 - Bleed and Service Magura Marta Disc Brakes
TT #49 - Cup and Cone Hub Basics
TT #50 - Install and Adjust Pedal Cleats
TT #51 - Cup and Cone Hub Rebuild
TT #52 - Converting Mavic Crossmax SX Axles
TT #53 - Cassette Removal and Installation
TT #54 - Cane Creek AngleSet Installation
TT #55 - American Classic Tubeless Conversion
TT #56 - Wider Rims Are Better and Why Tubeless Tires Burp Air
TT #57 - Pedal Pin Retrofit
TT #58 - Bleed RockShox Reverb Remote Lines
TT #59 - Cutting Carbon
TT #60 - Silence That Squeaky Disc Brake
TT #61 - Five Minute Wheel True
TT #62 - Removing Bike Rack Rattle
TT #63 - Inside Shimano's Shadow Plus Mech and How To Adjust It
TT #64 - Steerer tube length
TT #65 - Marzocchi 44 Rebuild
TT #66 - RockShox BoXXer TLC
TT #67 - Ghetto Tubeless Tire Inflator
TT # 68 - RockShox BoXXer Seal Replacement
TT #69 - Ghetto Dropper Post
TT #70 - FSA Orbit Option Install
TT #71 - How to Bleed Formula Disc Brakes
TT #72 - Crankbrothers Kronolog Cable Replacement
TT #73 - Three Ways to Save A Leaky Tubeless Tire
TT #74 - Chain Length Basics
TT #75 - Tech Tuesday: DH Helmet vs. Motocross Helmet
TT #76 - RockShox Vivid Air Tuning 2012
TT #77 - Cartridge Bearing Service and Re-Grease
TT #78 - Bleeding Hayes Prime Brakes
TT #79 - BB30 Bottom Bracket Overhaul


Author Info:
mikelevy avatar

Member since Oct 18, 2005
2,032 articles

44 Comments
  • 33 1
 could you do something about replacing bike pivot bearings.?
  • 4 1
 yeah, please Big Grin
  • 27 0
 Could they just have a surveey at the bottom what they should do next? Seems like that would be very useful. Then whatever got picked would be well impacting everyone that voted for it
  • 8 1
 DAOPB9 Tons of people use dropper posts and the blacklite is one of the best around so theres alot of them out there. As far as the write up goes it needs to be mentioned that you should NEVER try to remove the seal head wiper without the proper removal tool. The seal will expand into the bushing groove and you'll hear a loud sucking sound.....that sound you hear will be you life because once that seal sits into that groove its not gonna want to come out.
  • 1 0
 i ended up doing that exact thing last night oops! ended up getting it out. pretty sure i messed something up on the internals cause the return rate is even worse now. but i also used the Park Tool polylube not lick honey so that might have something to do with it as well. gonna try again tonight with the slick honey.
  • 1 0
 I just did that.... I can't get the seal back on.
  • 2 1
 Oh no, I just did that...white bushing and guides removed, pulled the head seal too far down and now it's stuck and I can't pull it back up no matter how hard I push. What now ? Frown
  • 1 0
 Pulled the head seal too far down in an attempt to clean all components - anybody have a suggestion for getting it back up? It's stuck good, tried everything!
  • 1 0
 Update: I was able to 'fix it' (had to get a new seal head + the shim kits to properly reinstall new one at the end) by building a made up shim that was narrow and RAMPED so I could jam it back into the grove. Went to hardware store and I used a plastic 1" or so table hole cover (similar to what you use for cable covers on your desk) that had a lip I cut out and sanded down to the right thickness. The shim ramp up is critical to get the seal (hard plastic) to go over the bottom groove - took a lot of hammering in my case as it wasn't such a good fit so it ended up damaging the seal but I got it off. then bought a new seal kit and proper shims (Spec took forever to send those!).

In the end you might be better off just sending it in if you don't like to tinker.
  • 6 0
 Thank You, Thank You, Thank You, Thank You, Thank You, Thank You, I needed this one TT!
  • 3 0
 Here's my 2 cents. Got a CP on my enduro. Rocked it hard for 2 seasons. Got chronic upgrade syndrome (CUS), and scored a Reverb. Gave GF the CP. She rocked it for another season, and sold her bike to a buddy who it's still working prefect for. My reverb in ONE season has required a bleed, then complete rebuild due to it sagging 2" unintentionally. Rebuild worked for a week then failed mid-ride. SRAM replaced it, but it was off my bike for 2 weeks. My vote- KISS. Sure the reverb is super adjustable and more smooth, but the reliability sucks comparatively. Command Post gets my stamp of thrash approval.
-Seth
  • 3 0
 CUS.. what type of profession deals with that? I think a few of us on here including me need help.
  • 2 0
 When I received mine, it had 60 psi in it. I called Specialized (at the time I was working for a dealer) and told them, spoke to an engineer for the command posts, and he said there's no problem with them going up to about 70, the manual was printed wrong. Just FYI! Not that you'd ever want a post ramming up your arsehole at 90mph.
  • 1 0
 No, don't do that. Keep it at 40.
And for a video, check this out: www.youtube.com/watch?v=K0X3sLMo-TA&feature=BFa&list=PLF743802EEFDFCA3F
  • 3 0
 I think it should be noted that you need to check/fill the pressure when the post is fully extended. If you check the pressure when the post is compressed the pressure will be much higher compared to full extension.
  • 2 0
 Great point. The 40psi max is with the post fully extended.And like stinky-d-lux mentioned, don't pull the seal head off. A good quick service can be performed without removal, which lessens the chance to damage the seal.
Slick Honey is what is normally used for lube, but for cold weather (below freezing) an oil can be used- just be careful to invert the post when inflating the post so oil doesn't get in your shock hose.
  • 1 0
 Did this last night after seeing this tech Tuesday. Took me about 15 to 20 minutes and my seat is buttery smooth. My post was still in good shape when i took it apart, but this procedure has made it even better. A tip i have (even though it's listed in the manual, it wasn't mentioned in this post unless i missed it) : Make sure the post is fully extended when you put air back in it. The first time i had it compressed all the way and added air. I thought i had broken my post because it wouldn't go up. When pulled it fully up it registered 2 psi. I added 38 more psi and now it operates like it should. I've tried lower pressures but this causes the post to not want to go from the middle position to the upper position. I was told by a Specialized rep these posts are meant to be run at 40 psi even though they say you can go lower. Best dropper post on the market in my opinion. I'd love to see a cable that's mounted on the bottom part of the post so it doesn't move when the seat does and a two bolt design so the seat doesn't tilt if i slam it hard but these are easy to get over because of the reliability of this post.
  • 1 0
 you just described the kind shock lev
  • 2 0
 Am I right that this procedure is the same for the normal Command Post?
If so, then soon I can do the maintanace on mine based on this TT.
Thanks for covering this topic Pinkbike! Smile
  • 1 1
 Yu no work?
  • 3 0
 Yes Jezso, a normal Command Post is pretty much the same. The pinch bolt that holds the cable is oriented at the top, not the side. The seal head nut is fitted for a wrench, not round like the Blacklight. You could probably use the same strap tool to get it off, or a large crescent wrench.
  • 4 0
 The original Command Post will work much better if you get the new lever, which is stronger, smoother, and uses a regular derailleur cable instead of the proprietary cable that came with the original. I also noticed it works a little smoother if you use the Dura-Ace PTFE derailleur cable. Made me think of experimenting with a Gore cable but those don't always seem to be reliable.
  • 1 0
 Where would you buy that?
  • 2 0
 I just tried this on my old command post using this exact method. Worked great! Had to use thick fox fluid bc I didnt have any grease but its working way better than it did before. Will do it again in a month or so when I get the grease but it works on the old command post fyi
  • 1 0
 Very well covered.

Any way we can get a solid fox 40 service with fit cartridge service too. I have searched for a good solid how to vid (being I'm a bit more of a visual learner) and came up fruitless. As a down hill rider I'm kinda suprised to see that there has not been anything on here coving the 40.
  • 1 0
 A tip, if you want to change the speed that it comes up and hits your ass use a different weight oil. I heard this somewhere and tried it on my old joplin, using heavier oil for a slower return and then didnt have to service it for 2 years and it was flawless. If you want it faster I dont see why you couldnt use lighter weight oil either.
  • 1 0
 This write-up goes a little more in depth and descibes what you need to do the seals, among other useful insights:
http://www.bluetoad.com/article/For+411%3A+Rebuilding+The+Specialized+Command+Post/320421/0/article.html
  • 1 0
 Thank you so much for this article, especially the double-reminder to go buy a strap wrench. I was just about to get creative with paper-towels and a plumbing wrench when I decided to do one more search. Sure enough I got one for $9 at home depot.

Turns out my rebuild was not necessary, the inside after a year of riding was beautiful. The issue I was having was post releasing in climbs. Turns out it is due to cable flex from how I routed it through the rear shock.

Thanks again, this article saved me from making a problem.
  • 2 0
 Thank you!!!! This just happened to be my next planned maintenance project, and this guide is exactly what I needed! Perfect timing.
  • 1 0
 I have broken 3 strap wrenches trying to remove the seal head collar?

Anyone have any tips on removing this? It's from a 2013 and should not be that old. It was never services before so I didn't over tighten it.
  • 1 0
 one of the 2 I own had same issue - I had to bring it to the shop for them to force open it and it was really hard too. I wanted to make sure collect was intact before buying a used one (as I broke a colette before)
  • 3 0
 PErfect - -i run these and have wondered if i should take it apart! I know i can now - Thanks
  • 2 0
 I dont own one of these posts but its great to see what goes on inside them. thanks for the info Smile
  • 3 3
 Eh he hem (sarcastic throat clearing sound) i think were missing something. let me give you a hint it starts with a V and ends in IDEO.
  • 1 0
 I just did this. Super basic if you familiarize yourself with the steps and follow protocol. It's basic. Thanks
  • 4 3
 Thanks Mike, the "Two three guys maybe" are stoked you covered this.
  • 2 0
 sweet just what i needed
  • 1 0
 whoa that was pretty easy. this saved me from spending $300!
  • 1 1
 this really saved my ass
Below threshold threads are hidden


Copyright © 2000 - 2024. Pinkbike.com. All rights reserved.
dv65 0.031097
Mobile Version of Website