Stories posted under Pinkbike Community blogs are not edited, vetted, or approved by the Pinkbike editorial team. These are stories from Pinkbike users.
If a blog post is offensive or violates the Terms of Services, please report the blog to Community moderators.
Reverb Basic Rebuild
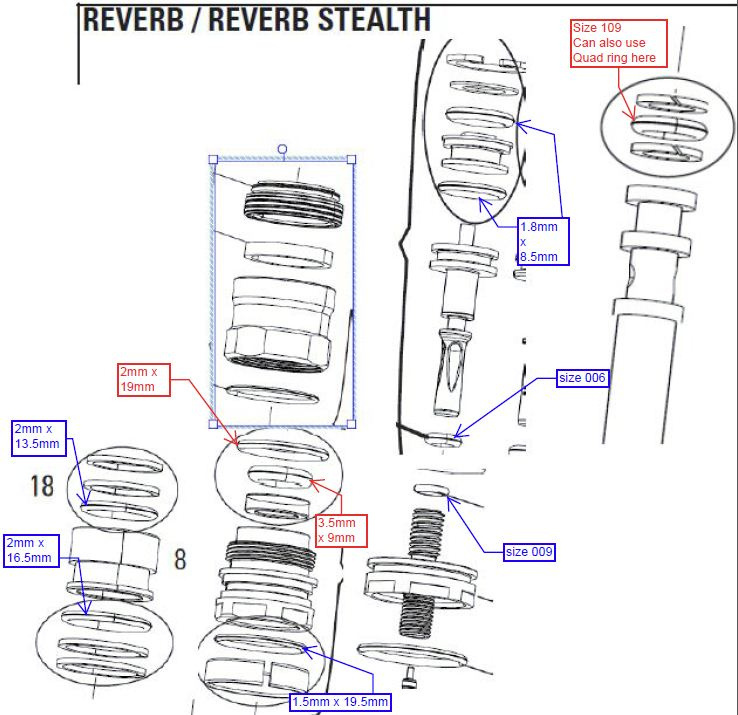
2 x 19 mm seals, "Size 109 Quad Seals" and 3.5 x 9mm seals seem to be the most common culprit for losing air pressure.
The o-rings on the brass fittings on the hoses can be had at any online o-ring shop or local dealer for like 10 cents. Just measure the thickness of the o-ring and the inner diameter. I use The O-ring Store, Online distributor of O-rings, Seals, and Kits, We make getting your O-rings easy!. Just get Buna-N 70 o-rings.
![You can see the location of the 2mmx19mm o-ring here. It is the usual cause of air slowly leaking out of the post.]()
Laterilus from MTBR probably made the most comprehensive post about rebuilding the Reverb, as seen here:
or all of you having difficulties with the post sagging a little bit and hearing a 'hissing' noise when the post goes bad, it is always going to be the same inner seals just about every time. It comes with the territory of hydraulic posts. It isn't super hard to service this post. For those of you that don't like dealing with the hassle of taking the post into the shop and having them send it to SRAM, you can fix it yourself and do it very cheaply. Also, I wouldn't bother with buying the 'super' rebuild kit other than 1 time. The majority of the stuff that comes in the large rebuild kit is worthless. It is a bunch of parts that will never go bad. Too bad the large rebuild kit doesn't come with a new top cap since that bushing will eventually go bad. The basic rebuild kit has all the o-rings that go bad the most and the charger bushing (the bushing you can easily replace).
I'm surprised at one of the posts here that said their bike shop couldn't service the post. That's pretty weak considering SRAM released the videos showing you how to service the internals on this post last year:
https://www.youtube.com/watch?v=XxgUK3gC_Fk
https://www.youtube.com/watch?v=w65kpbuxKP4
https://www.youtube.com/watch?v=rbHc4V6Ei14 - most important video
https://www.youtube.com/watch?v=KAmhSLir8hY
I have a 2 year old Reverb that I have probably serviced 6-7 times now. I weigh 240lbs geared up. This post has no problem holding up my weight. The o-rings are just going to go bad eventually, but they are easy to replace and very inexpensive. The basic service kit is only $8. If you don't want to buy that and go even cheaper, you can get all of the o-rings online. I use theoringstore.com, however, you eventually need to buy the basic service kit to get that charger bushing as that will eventually wear out.
You have to make sure you keep the inner seal head torqued down very tight. Mine has come uncrewed at times then you lose air pressure. I recently rebuilt mine again because my inner seal head unscrewed and blew out this seal. This time, I put some blue loctite on the threads and everything seems to be holding pretty good now. The o-ring seal size is 2mm thick by 19mm inner diameter. It is a perfect fit. You can get them cheap at the oringstore.com. I've measured up all the o-rings inside the reverb and have come up with a fairly good fit for most of them. You can also get the inner seal head o-rings (and charger bushing, which consequently doesn't last but about a half to 3/4 of a season for me) in the reverb 'light' rebuild kit for $8. That's actually a pretty good deal considering these are the parts that wear out the most. The post creeping and the 'sweating' of oil and grease around the schraeder valve definitely sound like inner seal head issues. You might want to change out all the o-rings on the inner seal head while you are on the inside of the post. A full post bleed wouldn't hurt either.
Lastly, some folks talk about using 'upgraded' brass keys in their posts from TFT tuned. I'm sure they do a great job with their service, but wow, it is expensive! My guess is that they are just taking out some of the excess slop by using one of the larger diameter pins that are included in the large rebuild kit (another reason to eventually buy this just one time). For example, I have the 380mm, 30.9 post with 125mm extension. It uses the #3 brass key. That key is 2.65mm in diameter. The #4 is 2.67mm in diamter and the #5 is 2.70mm. Have too much side to side play? Just install one of the larger diameter keys. Done and done.
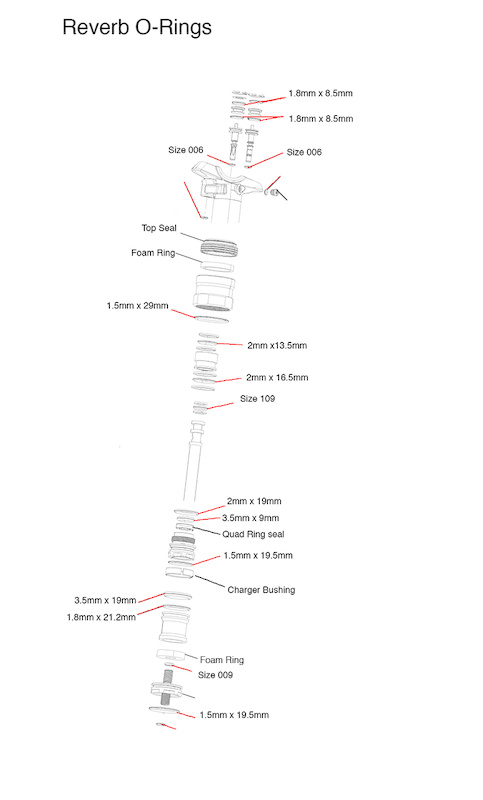
Oh, and if you want to get your own o-rings, I made a picture that I use so I know what to order (I measured all of these o-rings at one time or another). The ones in red are the most important and go out the quickest. The ones in blue I replace maybe once a year. If I didn't mark an o-ring that you see, it really isn't all that important. Just eventually replace it when it looks grungy. I replace the dynamic ones (the ones that need to move a lot) with quad rings. (Still doing research on what he means by this)
![Laterilus said Oh and if you want to get your own o-rings I made a picture that I use so I know what to order I measured all of these o-rings at one time or another . The ones in red are the most important and go out the quickest. The ones in blue I replace maybe once a year. If I didn t mark an o-ring that you see it really isn t all that important. Just eventually replace it when it looks grungy.]()
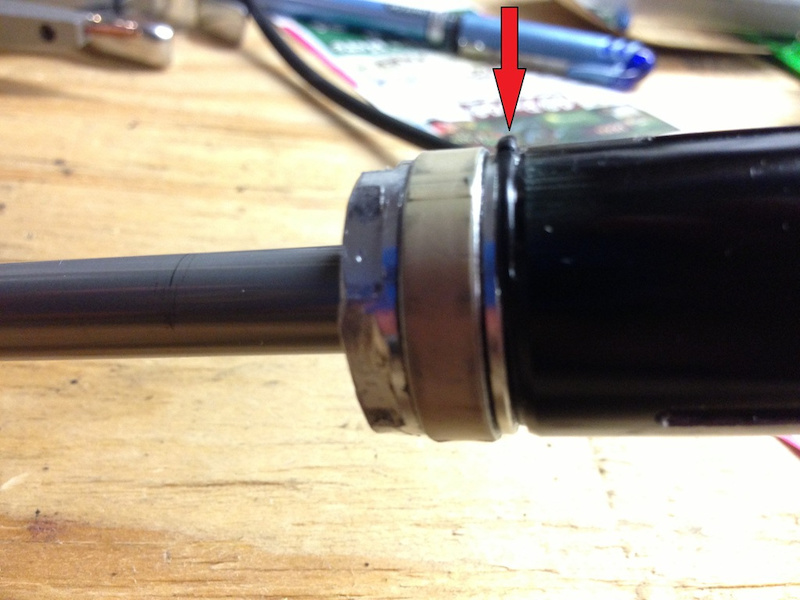
Oh, and one more thing, make sure to put some blue locktite on the inner sealhead threads when reinstalling it or else it will come unscrewed. The o-ring will bulge out (as in the picture) and you will have the typical sagging/hissing issue.
![Laterilus said Oh and one more thing make sure to put some blue locktite on the inner sealhead threads when reinstalling it or else it will come unscrewed. The o-ring will bulge out as in the picture and you will have the typical sagging hissing issue.]()
If your really picky about the amount of sag your post has, there is way to remove that sag:
Here's how I finally fixed it. Assuming that the sag was air, I decided to try to get rid of it:
1) Depressurise the cylinder and, using the remote, fully depress the seatpost. Depressurise the seatpost again! You really don't want any air left in it or you'll get a face full of oil and metal when you remove the top circlip!
2) Clamp the post into a vice, taking care not to scratch it. I had no aluminium jaws, so used cardboard - worked ok
3) Very carefully, remove the small circlip at the top of the post. Even when pressure is removed, it comes out with a pop - be ready to catch the bits!
4) Remove the circlip, retaining washer and small metal top cap
5) You should now be able to see the main valve. Using needle-nosed pliers, remove it using the spike on the top.
6) You can now peer down into the main oil cylinder. I then carefully added enough oil to reach just past the bottom of the piston. (see below)
7) Replace the piston - it needed a firm wiggle to get it properly seated and pushed down.
 Replace the small metal cap, washer and circlip.
9) Re-bleed the actuator circuit, as you've just emptied half of the oil out of it
Hopefully, you're fixed!
MTBR User "Hillridge" explains getting rid of sag another way:
I did learn last time that if this failure happens, it's possible to fix the resulting sag without a full teardown, bleed and rebuild, I didn't even have to take the seat off! You will need the IFP height tool, or something similar though.
1 )Drop the post slightly to get the IFP midway through its travel
2) Tear things down to the point where the post is upside down and the piston has been removed
3) Use the IFP tool to reset the IFP height
4) top off the oil in the piston tube. You can't fill it because it has little holes near the end, so you just need enough to have it come out these holes.
5) Put the piston back in just enough to block those holes. You may have to hold the actuation lever down to let a tiny bit of oil flow and move the IFP slightly
6) Dump out any oil that has overflowed, then put everything back together making sure to clean and loctite that stupid seal head
7) Go ride until it breaks again
I had to repeat this three times until I found the correct amount of oil to have in the cylinder. Once done, however, the post feels like new and I'm well chuffed. Obviously, you can change any seals you come across, but I didn't bother. I'm going to see how I get on with it over the coming weeks.
This process is miles and miles from the one in the SRAM videos and, ultimately, sucks as it's hard to get all of the air out this way, but it's easy (takes me 10 mins) and needs no specialist tools other than the bleed kit (which you *do* need to bleed the actuator circuit and will need if you remove the top cap like I did).
The o-rings on the brass fittings on the hoses can be had at any online o-ring shop or local dealer for like 10 cents. Just measure the thickness of the o-ring and the inner diameter. I use The O-ring Store, Online distributor of O-rings, Seals, and Kits, We make getting your O-rings easy!. Just get Buna-N 70 o-rings.
Laterilus from MTBR probably made the most comprehensive post about rebuilding the Reverb, as seen here:
or all of you having difficulties with the post sagging a little bit and hearing a 'hissing' noise when the post goes bad, it is always going to be the same inner seals just about every time. It comes with the territory of hydraulic posts. It isn't super hard to service this post. For those of you that don't like dealing with the hassle of taking the post into the shop and having them send it to SRAM, you can fix it yourself and do it very cheaply. Also, I wouldn't bother with buying the 'super' rebuild kit other than 1 time. The majority of the stuff that comes in the large rebuild kit is worthless. It is a bunch of parts that will never go bad. Too bad the large rebuild kit doesn't come with a new top cap since that bushing will eventually go bad. The basic rebuild kit has all the o-rings that go bad the most and the charger bushing (the bushing you can easily replace).
I'm surprised at one of the posts here that said their bike shop couldn't service the post. That's pretty weak considering SRAM released the videos showing you how to service the internals on this post last year:
https://www.youtube.com/watch?v=XxgUK3gC_Fk
https://www.youtube.com/watch?v=w65kpbuxKP4
https://www.youtube.com/watch?v=rbHc4V6Ei14 - most important video
https://www.youtube.com/watch?v=KAmhSLir8hY
I have a 2 year old Reverb that I have probably serviced 6-7 times now. I weigh 240lbs geared up. This post has no problem holding up my weight. The o-rings are just going to go bad eventually, but they are easy to replace and very inexpensive. The basic service kit is only $8. If you don't want to buy that and go even cheaper, you can get all of the o-rings online. I use theoringstore.com, however, you eventually need to buy the basic service kit to get that charger bushing as that will eventually wear out.
You have to make sure you keep the inner seal head torqued down very tight. Mine has come uncrewed at times then you lose air pressure. I recently rebuilt mine again because my inner seal head unscrewed and blew out this seal. This time, I put some blue loctite on the threads and everything seems to be holding pretty good now. The o-ring seal size is 2mm thick by 19mm inner diameter. It is a perfect fit. You can get them cheap at the oringstore.com. I've measured up all the o-rings inside the reverb and have come up with a fairly good fit for most of them. You can also get the inner seal head o-rings (and charger bushing, which consequently doesn't last but about a half to 3/4 of a season for me) in the reverb 'light' rebuild kit for $8. That's actually a pretty good deal considering these are the parts that wear out the most. The post creeping and the 'sweating' of oil and grease around the schraeder valve definitely sound like inner seal head issues. You might want to change out all the o-rings on the inner seal head while you are on the inside of the post. A full post bleed wouldn't hurt either.
Lastly, some folks talk about using 'upgraded' brass keys in their posts from TFT tuned. I'm sure they do a great job with their service, but wow, it is expensive! My guess is that they are just taking out some of the excess slop by using one of the larger diameter pins that are included in the large rebuild kit (another reason to eventually buy this just one time). For example, I have the 380mm, 30.9 post with 125mm extension. It uses the #3 brass key. That key is 2.65mm in diameter. The #4 is 2.67mm in diamter and the #5 is 2.70mm. Have too much side to side play? Just install one of the larger diameter keys. Done and done.
Oh, and if you want to get your own o-rings, I made a picture that I use so I know what to order (I measured all of these o-rings at one time or another). The ones in red are the most important and go out the quickest. The ones in blue I replace maybe once a year. If I didn't mark an o-ring that you see, it really isn't all that important. Just eventually replace it when it looks grungy. I replace the dynamic ones (the ones that need to move a lot) with quad rings. (Still doing research on what he means by this)
Oh, and one more thing, make sure to put some blue locktite on the inner sealhead threads when reinstalling it or else it will come unscrewed. The o-ring will bulge out (as in the picture) and you will have the typical sagging/hissing issue.
If your really picky about the amount of sag your post has, there is way to remove that sag:
Here's how I finally fixed it. Assuming that the sag was air, I decided to try to get rid of it:
1) Depressurise the cylinder and, using the remote, fully depress the seatpost. Depressurise the seatpost again! You really don't want any air left in it or you'll get a face full of oil and metal when you remove the top circlip!
2) Clamp the post into a vice, taking care not to scratch it. I had no aluminium jaws, so used cardboard - worked ok
3) Very carefully, remove the small circlip at the top of the post. Even when pressure is removed, it comes out with a pop - be ready to catch the bits!
4) Remove the circlip, retaining washer and small metal top cap
5) You should now be able to see the main valve. Using needle-nosed pliers, remove it using the spike on the top.
6) You can now peer down into the main oil cylinder. I then carefully added enough oil to reach just past the bottom of the piston. (see below)
7) Replace the piston - it needed a firm wiggle to get it properly seated and pushed down.
9) Re-bleed the actuator circuit, as you've just emptied half of the oil out of it
Hopefully, you're fixed!
MTBR User "Hillridge" explains getting rid of sag another way:
I did learn last time that if this failure happens, it's possible to fix the resulting sag without a full teardown, bleed and rebuild, I didn't even have to take the seat off! You will need the IFP height tool, or something similar though.
1 )Drop the post slightly to get the IFP midway through its travel
2) Tear things down to the point where the post is upside down and the piston has been removed
3) Use the IFP tool to reset the IFP height
4) top off the oil in the piston tube. You can't fill it because it has little holes near the end, so you just need enough to have it come out these holes.
5) Put the piston back in just enough to block those holes. You may have to hold the actuation lever down to let a tiny bit of oil flow and move the IFP slightly
6) Dump out any oil that has overflowed, then put everything back together making sure to clean and loctite that stupid seal head
7) Go ride until it breaks again
I had to repeat this three times until I found the correct amount of oil to have in the cylinder. Once done, however, the post feels like new and I'm well chuffed. Obviously, you can change any seals you come across, but I didn't bother. I'm going to see how I get on with it over the coming weeks.
This process is miles and miles from the one in the SRAM videos and, ultimately, sucks as it's hard to get all of the air out this way, but it's easy (takes me 10 mins) and needs no specialist tools other than the bleed kit (which you *do* need to bleed the actuator circuit and will need if you remove the top cap like I did).
Author Info:

 Member since Dec 16, 2007
Must Read This Week
[UPDATED] Final Elite XC Results & Overall Standings from the Mairiporã XC World Cup 2024
42291 views
42291 views
Sign Up for the Pinkbike Newsletter - All the Biggest, Most Interesting Stories in your Inbox
PB Newsletter Signup
Sucks how almost every company tries to rip you on service kits (can't even get the basic service kits for the post anywhere I normally look, only the 50 euro ones!)
Any idea where to find the inner seal head bushing without paying a fortune for the whole service package??