Tech Tuesday - Service and Re-Grease a Cartridge-Bearing Headset
Today's Tech Tuesday details how to clean and repack sealed cartridge bearings in a typical headset. The technique can be used to service almost any sealed cartridge bearing - say, in a hub, a bottom bracket, or a suspension pivot. In this feature, we remove the bearings to service them, but as long as you have clear access to the seals and can safely and thoroughly clean the working area in and around the bearings, you can remove the seals and repack the bearings while they are in place.
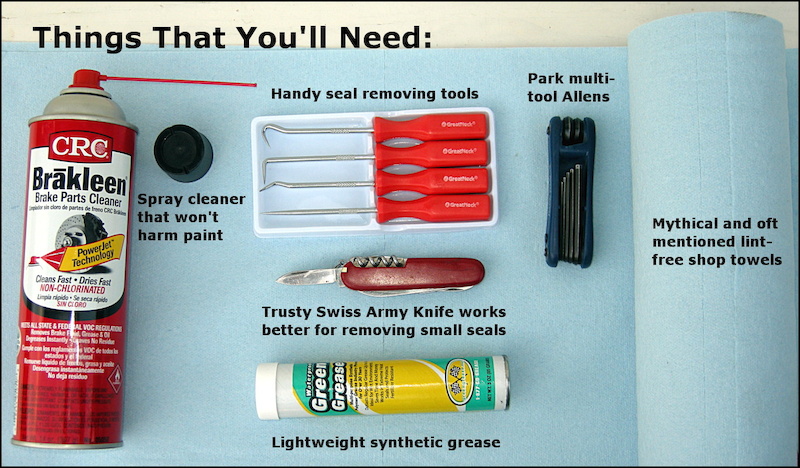
![Things that you ll need]()
A Little Warning
Before you start hacking into your bike's bearings, consider that there is a chance that you will introduce abrasive dirt or dust into a perfectly clean and smooth-running part, should you not take precautions - or accidentally drop something at the wrong time. The takeaway from this Tech Tuesday is that cartridge bearings are easy to re-grease, especially the ones in modern headsets. Slug-poppers in the Pacific Northwest can burn through sealed bearings in half a season, so this trick can be a big help there. If you live in a dry climate, however, where many never bother to look at their bike's key moving parts, then give your bearings a spin before you begin surgery. If they run smoothly, leave well enough alone.
How to Service and Re-Grease a Sealed-Bearing Headset
![Photo 1 remove the stem and fork]()
![Photo 2 - if the lower race didn t come off with the fork remove it now. Remove the upper bearing and wipe the head tube sockets clean.]()
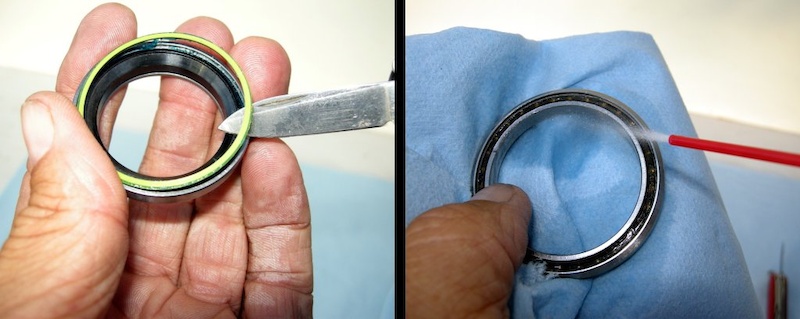
![Photo 3 - Use solvent or spray degreaser to clean all the headset parts.]()
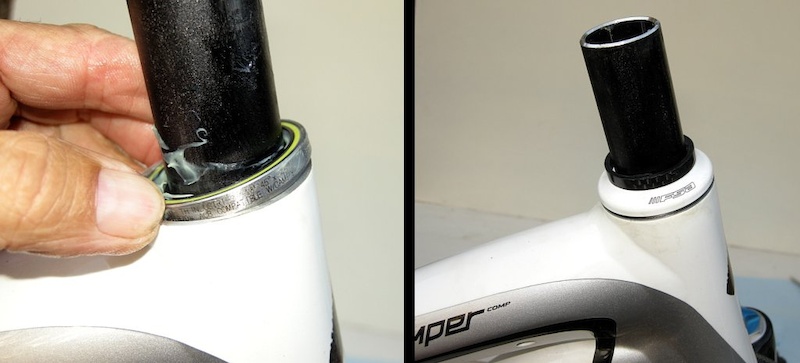
![Photo 4 - CAREFULLY find the outer edge of the seal and pry it out of its groove.NEVER touch the inner lip of the seals with a tool.]()
![Photo 5 - Repeat the previous steps with the upper bearing and then use solvent or spray degreaser to remove all grease and grime from the bearing. Spin the bearing to help free up the gunk.]()
![Photo 6 - Dry the bearings and then pack them full of lightweight synthetic grease. Spin the bearing to get the grease around the balls. Wipe the seal clean and then gently snap in back into place with thumb pressure.]()
![Photo 7 - Pack and replace the seal of the upper bearing and then use your greasy fingers to apply a thin coat on the head tube sockets.]()
![Photo 8 - The inner diameter of the lower race is tapered in one side to mate with the fork s crown race fitting. Make sure that the taper faces down and slide the lower bearing onto the fork s steerer tube.]()
![Photo 10. Before you slide the steerer tube into the frame make sure that the brake hoses and shift housings are all headed in the right direction.]()
![Photo 11 - Slide the upper bearing over the steerer tube and into the frame then slip the headset wedge and cap over it to hold the assembly in place. There should always be one spacer between the cap and the stem.]()
![Step 12 - To adjust the headset screw the cap bolt in until it is snug and then back it out one fourth turn. Torque the stem clamp bolts to the recommended value and then recheck all bolts again before you ride.]()
Past Tech Tuesdays:
A Little Warning
Before you start hacking into your bike's bearings, consider that there is a chance that you will introduce abrasive dirt or dust into a perfectly clean and smooth-running part, should you not take precautions - or accidentally drop something at the wrong time. The takeaway from this Tech Tuesday is that cartridge bearings are easy to re-grease, especially the ones in modern headsets. Slug-poppers in the Pacific Northwest can burn through sealed bearings in half a season, so this trick can be a big help there. If you live in a dry climate, however, where many never bother to look at their bike's key moving parts, then give your bearings a spin before you begin surgery. If they run smoothly, leave well enough alone.
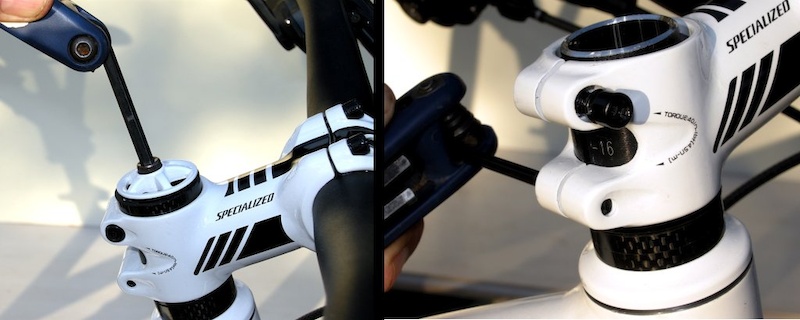
Step 1 - Remove front wheel before you get started. Unscrew the stem cap, loosen the stem's pinch bolts and then slide fork out of the frame. (I straddle the fork over the down tube).

Step 2 - If the lower race didn't come off with the fork, remove it now. Remove the upper bearing and wipe the head tube sockets clean.
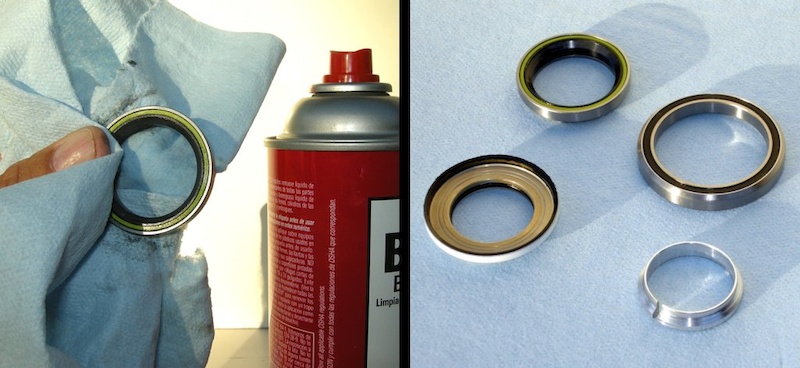
Step 3 - Use solvent or spray degreaser to clean all the headset parts. Wear safety glasses when working with solvents.
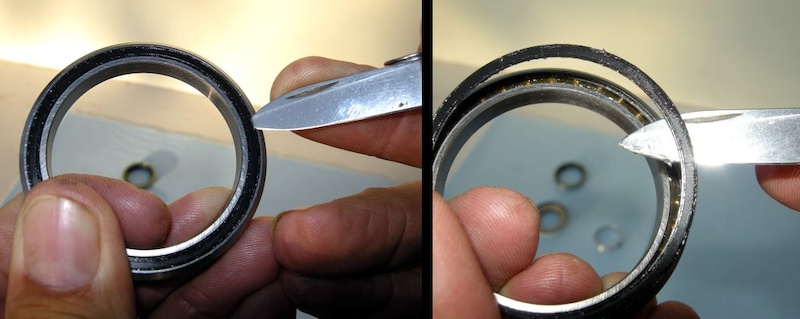
Step 4 - CAREFULLY, find the outer edge of the seal and pry it out of its groove.NEVER touch the inner lip of the seals with a tool.
Step 5 - Repeat the previous steps with the upper bearing and then use solvent or spray degreaser to remove all grease and grime from the bearing. Spin the bearing to help free up the gunk.
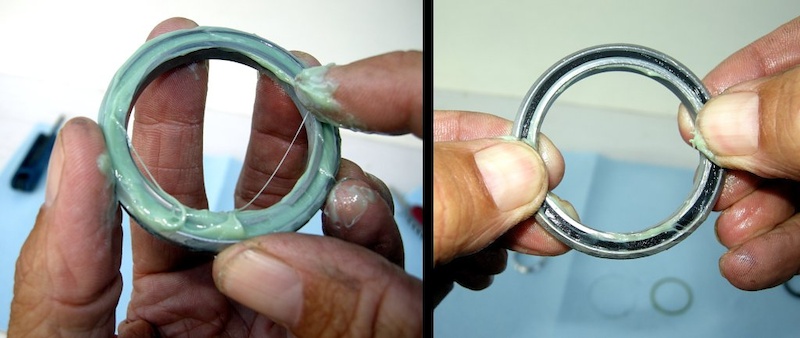
Step 6 - Dry the bearings and then pack them full of lightweight synthetic grease. Spin the bearing to get the grease around the balls. Wipe the seal clean and then gently snap it back into place with thumb pressure. Leave some excess grease, so that the seal forces it into the bearing as it snaps into place.
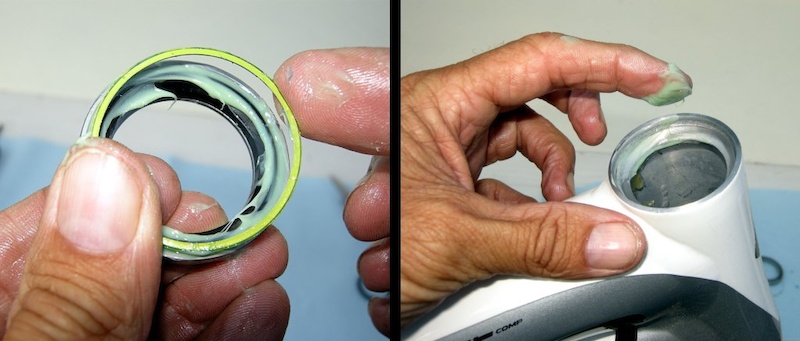
Step 7 - Grease and replace the seal of the upper bearing and then, while you are at it, use your greasy fingers to apply a thin coat on the head tube sockets.
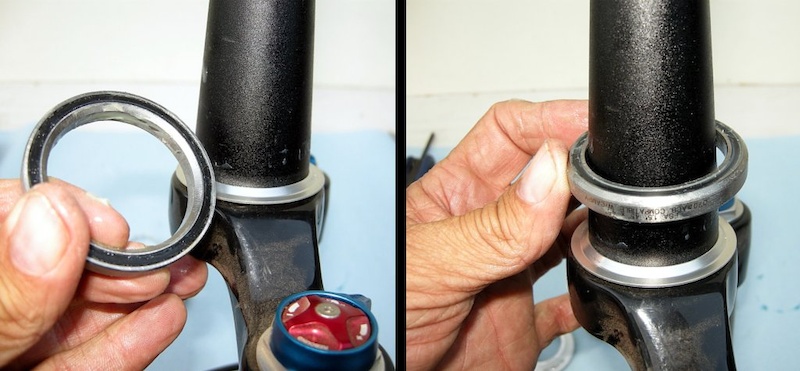
Step 8 - The inner diameter of the lower race is tapered on one side to mate with the fork's crown-race fitting. Make sure that the taper faces down and then slide the lower bearing onto the fork's steerer tube.

Step 9 - Before you slide the steerer tube into the frame, make sure that the brake hoses and shift housings are all headed in the right direction.
Step 10 - Slide the upper bearing, curved-side-facing-down, over the steerer tube and into the frame, then slip the bearing's wedge-collar (if it has one) and the dust-cap over it to hold the fork in place. There should always be one spacer between the cap and the stem.
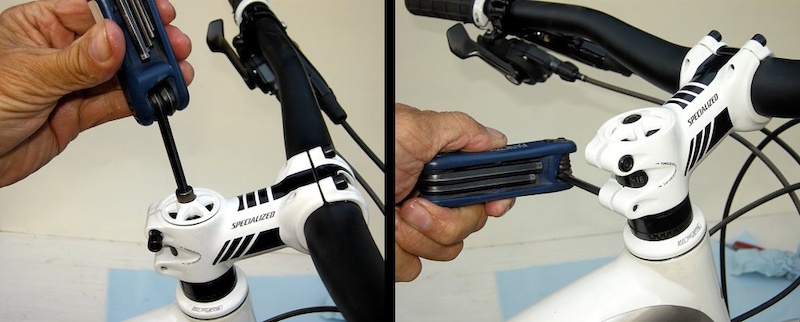
Step 11 - To adjust the headset, screw the cap bolt in until it is snug and then back it out one fourth turn. There should be no play in the headset, but it should spin smoothly. Torque the stem clamp bolts to the recommended value and then recheck all bolts again before you ride.
Past Tech Tuesdays:
Author Info:

 Member since Mar 23, 2011
Must Read This Week
Sign Up for the Pinkbike Newsletter - All the Biggest, Most Interesting Stories in your Inbox
PB Newsletter Signup
I found even bearings that have seized will almost always come good after this - or at least they will be good enough to run until you can source more bearings. People thinking that their headsets were cactus on the Mechanics Forum have followed these steps and saved themselves the cost of a new headset.
For seized bearings I don't use the degreaser - I just put Tri-Flo in and work the inner bearing with any taper (like the handle of a toothbrush) jammed into the inner race - back and forth and trying to move the inner race more and more. Once its free I get thicker grease in there that pushes out the Tri-Flo.
In extreme situations you can pry out the plastic ring that separates the bearings (the dark plastic ring shown on the right in Step 5) and move all the bearings to one side and the inner race will drop out and so will all the bearings. Good luck getting it all back together - you must get all balls one one side of the outer race and carefully insert the inner race at an angle so the groove slides onto the left-most and right-most bearings. This is only for the extremely patient or bored.
Any grease is better than no grease or dirty grease.
Rode is some hellish mud yesterday and some dirt got into the lower bearing(unsealed). Took the headset apart to find the bearing brown with dirt and old grease. Cleaned them up to sparkly, then repacked them and put it all back together.
Butter.
safety glasses and protective gloves are very important when handling solvents and greases, you really don't want those substances in your eyes or on your skin! especially if doing this on a regular basis as you can quickly develop allergies and contact dermatisis
as a workshop manager I am always stressing this idea to my mechanics, to keep them safe at work!
always better to be safe than sorry, this gives you an idea of the PPE we wear when cutting carbon fibre in our bike workshop, with full ventilation system powered up
ap1.pinkbike.org/p4pb7457039/p4pb7457039.jpg
img123.echo.cx/img123/4545/pack3qk.jpg
This is the method I am used to for packing automotive style bearings.
Pro riders do this since ages without problems, I remember Sam Hill even used to skip the cap!
CRC's and here in this article again.
Are there any problems when using an allen key?
And one of the Bearing Manufacture NTN says "Do not touch bearings without gloves.(No skin)"in their catalogue.
I fixed it the same way like shown here... before this article came. I thought it was a ghetto move.
Now I still feel play in the headset... can you suggest something?
really. why? That's the silliest time saving suggestion ever.
isn't the water/crap that's found its way past the seals more likely to be sat between the bearing shell and cup?
Wouldn't removing and cleaning the bearings/headset cups this be part 1 of a headset service?
I'd rather keep that $30 for post ride beers and burgers.
YUP! because by the time most riders get round to repacking bearings, the bearing races and balls are pitted and no amount of repacking with fresh grease will offer any solution to the problem
the trick would be to regularly re-pack the bearings, before the damage occurs, but honestly? who can be bothered...
you make a good point about time...the whole problem with the old "loose ball" headsets like the original FSA Pig DH was the need to regularly clean and repack the bearings because the sealing was so poor it would be rusting within a month
when FSA introduced the Pig Pro DH headset with the sealed cart. bearings it was "fit and forget" in that it would see you through most of a season before needing replacement
I don't perform this service "every month or so," just once a year, or when I'm swapping out forks. I've never had an issue - even after entire seasons riding in wet conditions.
That said, I did have a housemate with a Pig Pro DH Headset that was literally seizing from rust!
I was the former and now I'm the latter, and always an environmentalist: foghorn1... word!