ZEP's How-To Mythbusters: Position and Balance for Steeps and Heavy Braking
In our previous ZEP Mythbusters articles, we addressed the myth of 'moving back to descend' and focused on why being neutral and mostly centred on the bike is key for improving your stability, balance and traction. We'll continue with the same theme here in part two, by taking a closer look at how this myth applies to steep terrain, rock rolls, and braking, and how we can use the fundamental skill of position and balance, to address it.
First, let's have a quick review of the key points from the previous article:
- A good position on the bike helps improve your stability... not letting the forces of the trail push you around.
- Being mobile to allow the bike and body to adjust to the terrain is equally important.
- The neutral and ready positions are simple reference points to then move, adjust and balance from.
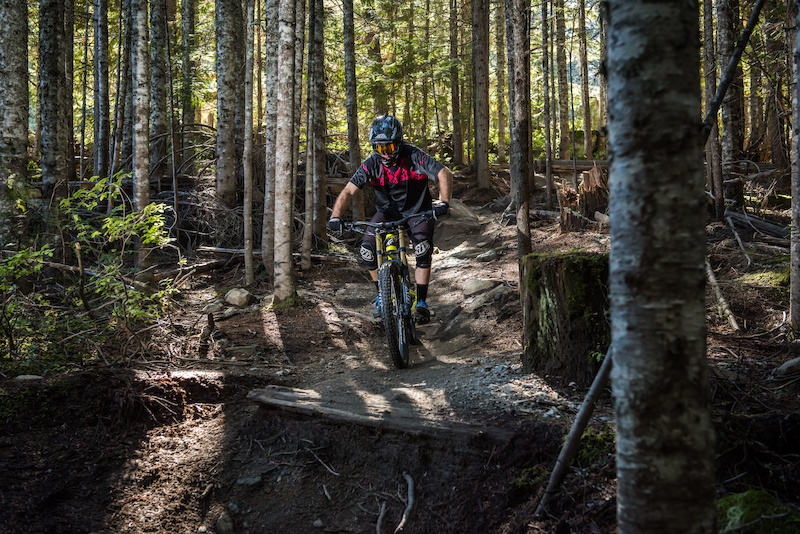
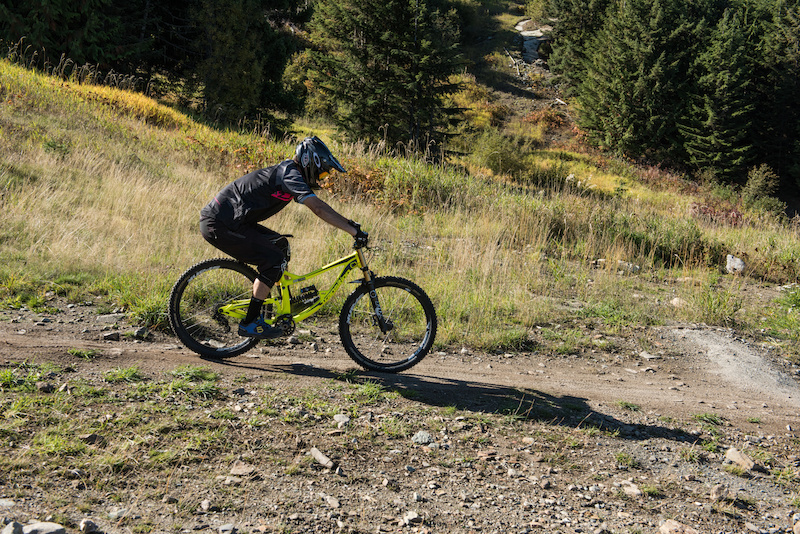
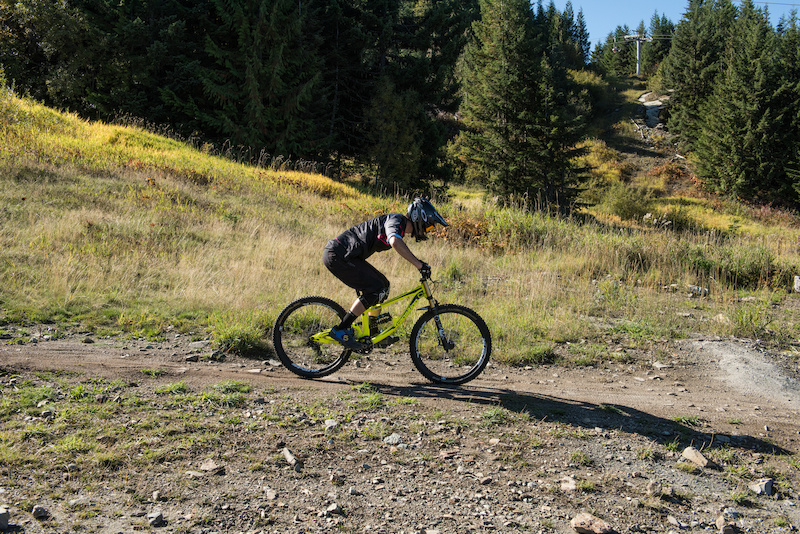
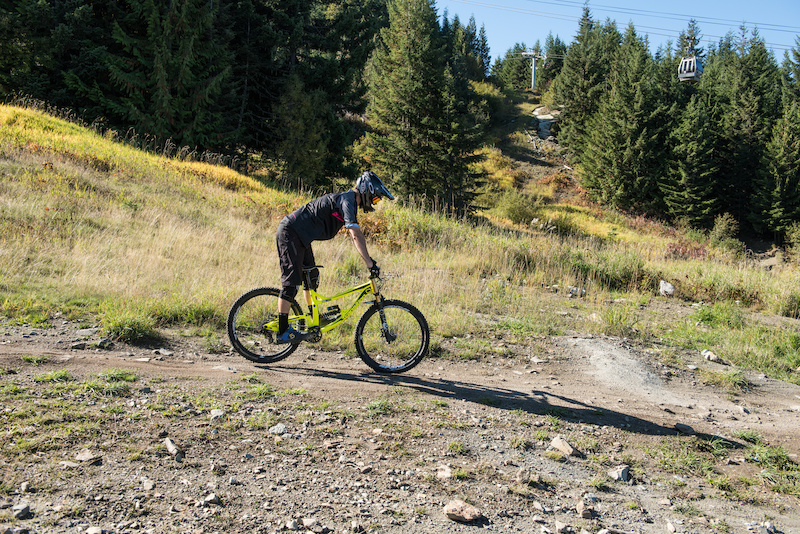
![ZEP Mountain Bike Camps]() Here, the rider is in more of a ready position: chin over stem, bending at the waist, low and wide. This centred position helps keep good traction on both wheels and allows for great range of movement in any direction when the rider needs it.
Here, the rider is in more of a ready position: chin over stem, bending at the waist, low and wide. This centred position helps keep good traction on both wheels and allows for great range of movement in any direction when the rider needs it.
STEEPS
The Myth
We've all done it. The trail gets steep and we lean back, over the rear wheel. Since we feel like we may go over the bars on steep terrain, this seems like a natural reaction to the situation. The problem comes when we start weighing up the pros and cons. Sure, it does make it harder for the rider and bike to rotate forward, flipping you over the bars, but can we achieve the same thing without the negative effects that leaning back brings with it? So what are the cons to moving back? With your weight back typically:
- Reduces front end traction.
- Compromises the front brake, since a brake can only work if the wheel has good traction.
- Reduces speed control since the rear wheel sucks at slowing you down on steep terrain.
- Reduces range of movement and therefore control, since your arms are now straight, or nearly straight.
- Makes it very difficult to steer, move, balance or adjust to the terrain, since there is less range of movement.
So, we've potentially stopped ourselves from flipping over the bars, but at the expense of lots of other really important stuff... like speed, control, and balance!
The Solution
Simply put, can we reduce the likelihood of going over the bars without bringing in these negatives either at all, or a least to a lesser extent? Yes, we can! Instead of moving back, try to get low. The position of an objects centre of mass (COM) directly affects its stability. On a slope, to make the object more stable (less likely to tip over) we can move the COM either to the back or we can move it down.
As long as the rider's COM doesn't move in front of the contact patch of the front tire, they are unlikely to start going over the bars (OTB). From a physics standpoint, this is because as long as the COM of an object doesn't move outside of its base of support (BOS), it will not tip over.
As we've talked about, riding isn't about hard and fast rules that apply all the time. It's more about understanding techniques as tools. Tools that can be adapted and tweaked as needed, based on the situation. So what's the message then? Most of the time, riders are moving too far back and moving back before they need to. Instead...
- Try getting low before moving back.
- The lower you get, the less you'll have to move back, if at all.
So, even though moving back can make it safer by helping to avoid an OTB, the idea is to try and use this as a last resort rather than a first option.
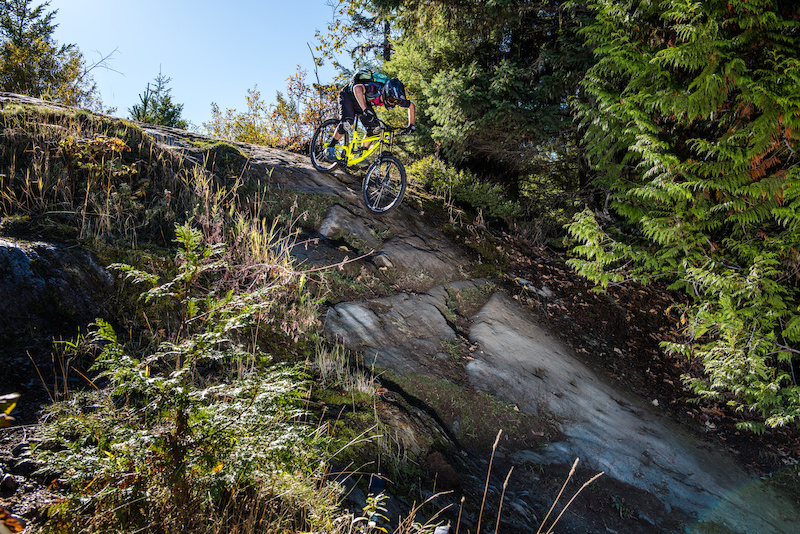
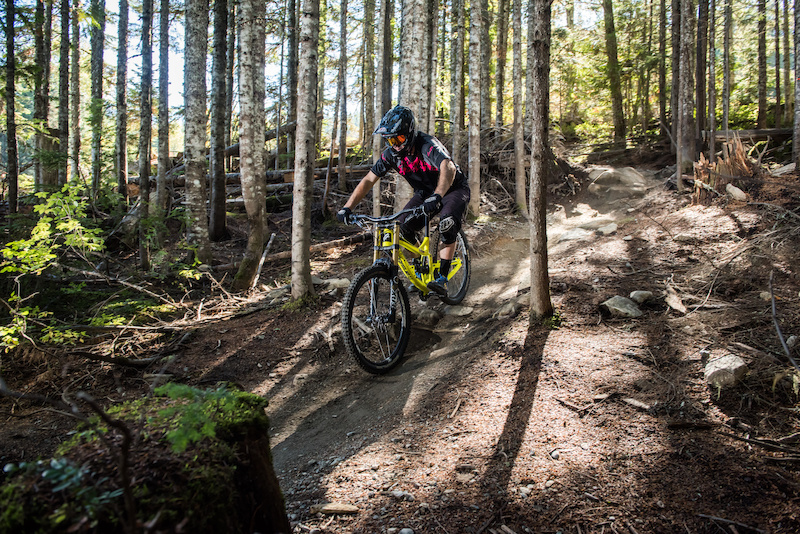
![ZEP Mountain Bike Camps]() Steeper terrain naturally makes us think we need to move back. Getting low keeps your COM between the two wheels, maintaining your stability (stopping you from going OTB), while also keeping traction and braking power on both wheels. This is key if you need to control your speed.
Steeper terrain naturally makes us think we need to move back. Getting low keeps your COM between the two wheels, maintaining your stability (stopping you from going OTB), while also keeping traction and braking power on both wheels. This is key if you need to control your speed.
At first, it can feel intimidating or even alien to not lean back on a steep trail. But don't worry, a million people have been there before you! Remember, you're not moving forward on the bike, you're just trying to stay as close to the middle as you can... at least to begin with. And, if you move a little over the back, that's probably okay, especially if you are braking or it's a rough trail. Just be aware, though, as soon as you move too far back, your front brake will no longer work and your range of movement to control the bike will be compromised. This being said, there are always exceptions and on a crazy steep trail, with the brakes applied, you may well have to move over the rear of the bike quite a lot... again, the key is to use this as a last resort in an extreme situation, rather than something you do all the time.
![Whistler local and legendary shredder Chris Kovarik kept the World Cup boys honest by taking 2nd.]()
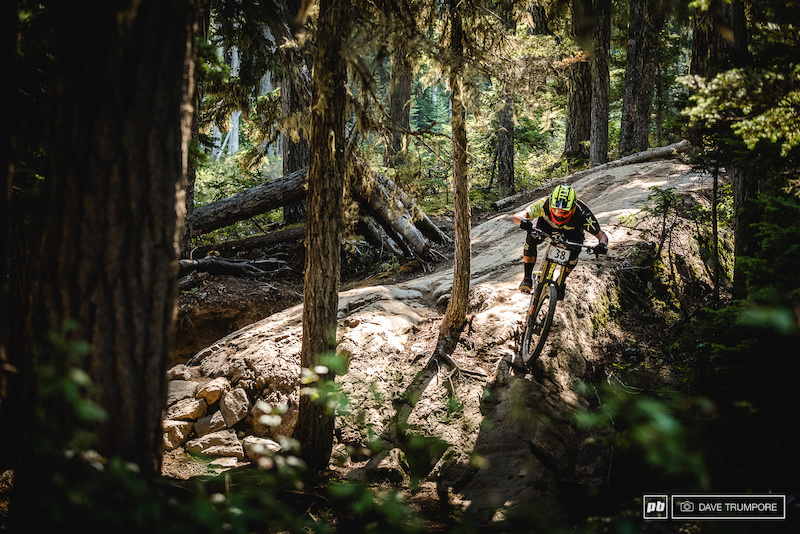
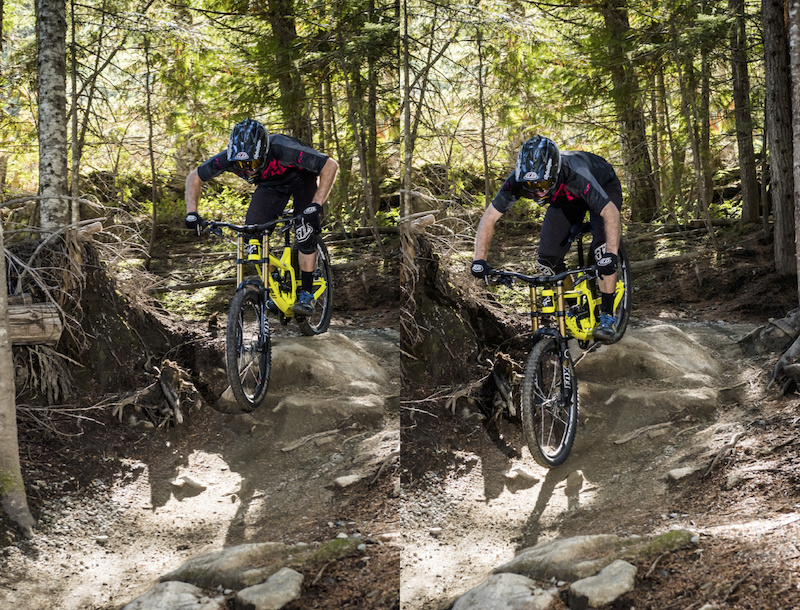
ZEP's guest coach, Chris Kovarik, tells us his thoughts... "For rock rolls or steeps, I would say from a centred position, hinge at the hips, chin over the stem, while bracing with arms slightly bent, not locked. This keeps your centre of gravity low while keeping good movement in your arms and legs over the bike. Plus, your weight is relatively close to the centre to maintain front wheel grip. Without that, you've got no front brake!".. As you can see above, Chris is low, elbows are bent and chin is close to the stem.
![Images from Chris Kovarik s Builder section by Baxter Redfern]() Again, here Chris is low helping him stay closer to the middle of the bike. This keeps him more stable, gives him plenty of range of movement to work with and maintains good traction (and therefore braking power) on both wheels. Keeping the elbows flexed is key - as soon as your arms are straight, you know your weight is most likely pretty far back on the bike
Again, here Chris is low helping him stay closer to the middle of the bike. This keeps him more stable, gives him plenty of range of movement to work with and maintains good traction (and therefore braking power) on both wheels. Keeping the elbows flexed is key - as soon as your arms are straight, you know your weight is most likely pretty far back on the bike
Other advantages with trying to stay closer to the middle on steeps include:
- If the trail suddenly drops away, you'll have the range of movement to be able to lead the bike through.
- If you need to slow down or maintain speed (not speed up), you'll have better traction for the front brake to work.
- If you need to turn or change direction, you'll have better range of movement to turn the bars and control the bike.
- If you need to pop the front wheel over a bump or dip, you'll be in a better position to make this happen.
- It also looks better!
![ZEP Mountain Bike Camps]()
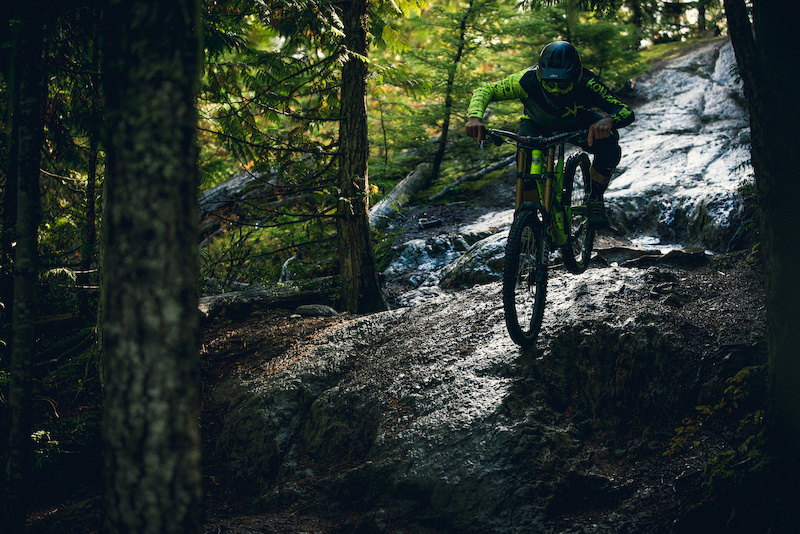
Try to come into the section as centred as you can, and as low as you feel you need. It's from that position you can then allow any other movements, balance and adjustments to happen from there. Being lower and centred before the rock, gives me good range of movement to lead the bike through with my arms, keeping stable and mobile. This range of movement is key to help separate the bike from the body so it can move underneath me, while my body remains fairly stable.
![ZEP Mountain Bike Camps]()
Here's an example where I'm low but also have the bike just ahead of me, with my chin slightly behind the stem. This can help put you in a stronger position to brace against any bumps that are trying to slow the bike down (and potentially pitch you forward), or help you brace, if you're braking on a steep rock roll. Centred enough for good traction and braking, but slightly back to help brace and stay stronger.
We have to be careful though, if we say back, people typically take this too literally and move too far, losing front end control and stability. Instead, try to see it as an adjustment of the bike moving slightly ahead of you, rather than you moving back on the bike. Semantics, I know, but these slight changes in thinking, or the language we use, can make a real difference. And again, the pros and cons come will always come into play. This slightly rearwards position may give a stronger stance to push through any fast speed impacts, or help you brace when braking on steeps, but it can still reduce front end traction. The key is to remain adaptable and mobile, and keeping making the adjustments of your body and bike underneath you, to get the best outcome for the situation you're in.
HEAVY BRAKING
So, in terms of riding steep terrain, trying to stay closer to the middle of the bike is going to help your stability, range of movement and traction on both wheels. We've talked a little bit about his this affects your braking, but let's get into this a little deeper. As some of you may know, the front brake works better for controlling speed on steeps or slowing down quickly, when compared to the rear brake. This is because when the rider is slowing down rapidly, the front of the bike becomes heavy. This is mostly due to a phenomenon called load transfer - which explains why the front wheels in a car with no suspension, still get heavier under heavy braking than the rear wheels (and therefore why the front brakes in a car are applied a lot more often and to a greater extent, than the rear brakes).
- When a rider is braking hard, the front of the bike typically gets heavier than the rear.
- Increased weight means more traction on the front wheel.
- The more traction a wheel has, the harder the brake can be applied before the wheel starts to skid.
- The harder the brake can be applied without locking the wheel, the better it will be at slowing you down.
Under heavy braking, people are nervous about going OTB, which is where the common technique of moving back kicks in. However, much like with steeps, can we achieve the same thing but without taking traction and braking power away from the front wheel? Of course we can! Instead...
- Try to get low and brace by dropping the heels and slightly tensing your muscles.
- This will help avoid an OTB by lowering the rider's centre of mass while...
- Maintaining a more centred position and therefore better traction on the front wheel, for better braking.
This is even more important on a steep slope as the bike is constantly trying to accelerate. If the rider moves back they can only use the rear brake (since the front wheel is too light and won't have enough traction), often resulting in lots of skidding and picking up speed - we've all done this one as well!
Ultimately, braking can be a very personal and situational thing. The student's ability level, confidence and experiences, along with things like the terrain surface, pitch, type of bike, their brakes and tires, are all factors that contribute to how a person brakes. The key for effective teaching and skill development in your own riding is to try and utilize a pros and cons approach, so different techniques can be introduced at different times, depending on what these factors are doing. Let's take a look at a few examples...
![ZEP Mountain Bike Camps]()
Moving the hips behind the seat can help boost confidence and maintain some balance when trying to brake more quickly; especially for novice to intermediate riders. However, it does remove weight and therefore braking power from the front of the bike. We therefore try and find a balance as soon as possible, to introduce students to braking by bracing and getting low, rather than moving back. Incidentally, the stopping distance with the same speed was a foot longer using this technique, than in the picture below.
![ZEP Mountain Bike Camps]()
Getting low and bracing requires some practice to gradually build the confidence to stay more and more centred as you learn to trust the front brake more, and learn to trust your body to brace against the forces that are pushing it forward on the bike, as you slow down. Take your time learning this! If you ever want to ride steep sections or rock rolls in control, even slowly, then practicing this technique is key. It should feel rather like you're doing a push up as a lot of the weight can go into your arms. This is good... this is you putting weight (traction) into the front wheel, ultimately helping that front brake work better. However, riders can often find a good balance between this braking technique and the one above as they find somewhere in the middle, that works best for them.
![ZEP Mountain Bike Camps]()
You can sometimes see the pro's use this technique after they cross the finish line at World Cups. Using the key points from the neutral position as a baseline, the straighter arms and legs (and dropped heels) provide very strong supports from which to maintain a close-to-centre body position, as they brake heavily. On steep terrain this position can make a rider too tall and also reduces your range of movement to control the bike.
![ZEP Mountain Bike Camps]()
Mastering your position and balance on the bike is the fundamental skill in your riding. With time and practice and seeing how it can help your other skills, like braking, you'll be able to ride faster, tackle steeper trails, or even play with features you're previously thought were scary... like doing a stoppie down the Clown Shoes drop!
As with any of these techniques, remind yourselves to view them as tools. There's not one way of doing things and each tool has its own merits and drawbacks, ultimately enabling us to apply them in different situations and to varying degrees. Choose the one you think you need in the current situation. Change it if you need to. Try using a couple of different tools and see which works best. Mountain biking, by its very nature, involves constantly changing variables and if we try to apply a one size fits all approach to teaching and learning it, we will soon come up with roadblocks, learning plateaus and most likely a lack of basic understanding. People in today's world want a simple fix. "Tell me how I should ride all the time." "What's the best body position"?
While we can give them a quick simple answer, this should be viewed as just that: a simple answer. True progression requires an open mind and a willingness to look outside your own knowledge, challenge the conventional wisdom (the world is not flat!) and try to develop your skills through a balanced and educated approach. Mountain biking isn't always easy. It's not supposed to be. Enjoy the challenge, be creative in your learning and stay open minded.
To summarize this article, the same message works well for both riding steeps and for braking. Whenever I ride into a steep trail and/or I really need to control my speed, the thought in my head is...
"If I'm close to the middle of my bike and low, I'm good to go!"
Happy riding peeps,
Paul
About the Author
Paul Howard is the Owner-Director and Head Coach of Whistler-based coaching company, ZEPtechniques, Technical Director of the international, industry leading Professional Mountain Bike Instructor Association, Technical Education Committee and 2015 Interski Team Member for the Canadian Association of Snowboard Instructors, Head Snowboard Trainer for Whistler Blackcomb SnowSchool, and has been teaching mountain biking and training mountain bike instructors around the world, since the late 90's. Paul trained approximately 100 riders and 250 instructors worldwide in the last year, alone.
About ZEP - 10th year anniversary!
ZEPtechniques is a Whistler-based mountain bike camps and instructor training company. Established in 2006, ZEP is celebrating our 10th year anniversary and offers weekend and single or multi-week, adult specific rider improvement camps, as well as private lessons, customized programs and Whistler MTB Tours. ZEP's Instructor Training services include the industry's original, multi-week mountain bike instructor training camps; training riders four days per week with evening seminars on suspension set up, bike mechanics, nutrition, as well as strength and conditioning sessions, all with industry experts. As developers of the internationally available Professional Mountain Bike Instructor (PMBI) Certifications and Directors of the PMBI Association, ZEP has long played a key role in establishing and improving the finest teaching practices and instructor certifications, within mountain biking.
ZEP is proudly supported by
Transition Bikes
ANVL Components
Fox Racing Shox
Troy Lee Designs
Five Ten
MRP
EVOC
Evolution Whistler
Vorsprung Suspension
Reel Cameras
Spun Studios
Starlight Custom Apparel
Kovarik Racing
Photos
Bike Park Photos
@davetrump
@RedfernMedia
Previous articles
Position for Descending & Cornering
Climbing in Technical Terrain
Braking in Downhill Corners
How to Learn (featuring a discussion on pedal positions in corners)
MENTIONS: @TransitionBikeCompany / @foxracingshox / @troyleedesigns / @zeptechniques / @FiveTen / @evocsports / @VorsprungSuspension
First, let's have a quick review of the key points from the previous article:
- A good position on the bike helps improve your stability... not letting the forces of the trail push you around.
- Being mobile to allow the bike and body to adjust to the terrain is equally important.
- The neutral and ready positions are simple reference points to then move, adjust and balance from.
STEEPS
The Myth
We've all done it. The trail gets steep and we lean back, over the rear wheel. Since we feel like we may go over the bars on steep terrain, this seems like a natural reaction to the situation. The problem comes when we start weighing up the pros and cons. Sure, it does make it harder for the rider and bike to rotate forward, flipping you over the bars, but can we achieve the same thing without the negative effects that leaning back brings with it? So what are the cons to moving back? With your weight back typically:
- Reduces front end traction.
- Compromises the front brake, since a brake can only work if the wheel has good traction.
- Reduces speed control since the rear wheel sucks at slowing you down on steep terrain.
- Reduces range of movement and therefore control, since your arms are now straight, or nearly straight.
- Makes it very difficult to steer, move, balance or adjust to the terrain, since there is less range of movement.
So, we've potentially stopped ourselves from flipping over the bars, but at the expense of lots of other really important stuff... like speed, control, and balance!
The Solution
Simply put, can we reduce the likelihood of going over the bars without bringing in these negatives either at all, or a least to a lesser extent? Yes, we can! Instead of moving back, try to get low. The position of an objects centre of mass (COM) directly affects its stability. On a slope, to make the object more stable (less likely to tip over) we can move the COM either to the back or we can move it down.
As long as the rider's COM doesn't move in front of the contact patch of the front tire, they are unlikely to start going over the bars (OTB). From a physics standpoint, this is because as long as the COM of an object doesn't move outside of its base of support (BOS), it will not tip over.
As we've talked about, riding isn't about hard and fast rules that apply all the time. It's more about understanding techniques as tools. Tools that can be adapted and tweaked as needed, based on the situation. So what's the message then? Most of the time, riders are moving too far back and moving back before they need to. Instead...
- Try getting low before moving back.
- The lower you get, the less you'll have to move back, if at all.
So, even though moving back can make it safer by helping to avoid an OTB, the idea is to try and use this as a last resort rather than a first option.
At first, it can feel intimidating or even alien to not lean back on a steep trail. But don't worry, a million people have been there before you! Remember, you're not moving forward on the bike, you're just trying to stay as close to the middle as you can... at least to begin with. And, if you move a little over the back, that's probably okay, especially if you are braking or it's a rough trail. Just be aware, though, as soon as you move too far back, your front brake will no longer work and your range of movement to control the bike will be compromised. This being said, there are always exceptions and on a crazy steep trail, with the brakes applied, you may well have to move over the rear of the bike quite a lot... again, the key is to use this as a last resort in an extreme situation, rather than something you do all the time.
ZEP's guest coach, Chris Kovarik, tells us his thoughts... "For rock rolls or steeps, I would say from a centred position, hinge at the hips, chin over the stem, while bracing with arms slightly bent, not locked. This keeps your centre of gravity low while keeping good movement in your arms and legs over the bike. Plus, your weight is relatively close to the centre to maintain front wheel grip. Without that, you've got no front brake!".. As you can see above, Chris is low, elbows are bent and chin is close to the stem.
Other advantages with trying to stay closer to the middle on steeps include:
- If the trail suddenly drops away, you'll have the range of movement to be able to lead the bike through.
- If you need to slow down or maintain speed (not speed up), you'll have better traction for the front brake to work.
- If you need to turn or change direction, you'll have better range of movement to turn the bars and control the bike.
- If you need to pop the front wheel over a bump or dip, you'll be in a better position to make this happen.
- It also looks better!
Try to come into the section as centred as you can, and as low as you feel you need. It's from that position you can then allow any other movements, balance and adjustments to happen from there. Being lower and centred before the rock, gives me good range of movement to lead the bike through with my arms, keeping stable and mobile. This range of movement is key to help separate the bike from the body so it can move underneath me, while my body remains fairly stable.
Here's an example where I'm low but also have the bike just ahead of me, with my chin slightly behind the stem. This can help put you in a stronger position to brace against any bumps that are trying to slow the bike down (and potentially pitch you forward), or help you brace, if you're braking on a steep rock roll. Centred enough for good traction and braking, but slightly back to help brace and stay stronger.
We have to be careful though, if we say back, people typically take this too literally and move too far, losing front end control and stability. Instead, try to see it as an adjustment of the bike moving slightly ahead of you, rather than you moving back on the bike. Semantics, I know, but these slight changes in thinking, or the language we use, can make a real difference. And again, the pros and cons come will always come into play. This slightly rearwards position may give a stronger stance to push through any fast speed impacts, or help you brace when braking on steeps, but it can still reduce front end traction. The key is to remain adaptable and mobile, and keeping making the adjustments of your body and bike underneath you, to get the best outcome for the situation you're in.
HEAVY BRAKING
So, in terms of riding steep terrain, trying to stay closer to the middle of the bike is going to help your stability, range of movement and traction on both wheels. We've talked a little bit about his this affects your braking, but let's get into this a little deeper. As some of you may know, the front brake works better for controlling speed on steeps or slowing down quickly, when compared to the rear brake. This is because when the rider is slowing down rapidly, the front of the bike becomes heavy. This is mostly due to a phenomenon called load transfer - which explains why the front wheels in a car with no suspension, still get heavier under heavy braking than the rear wheels (and therefore why the front brakes in a car are applied a lot more often and to a greater extent, than the rear brakes).
- When a rider is braking hard, the front of the bike typically gets heavier than the rear.
- Increased weight means more traction on the front wheel.
- The more traction a wheel has, the harder the brake can be applied before the wheel starts to skid.
- The harder the brake can be applied without locking the wheel, the better it will be at slowing you down.
Under heavy braking, people are nervous about going OTB, which is where the common technique of moving back kicks in. However, much like with steeps, can we achieve the same thing but without taking traction and braking power away from the front wheel? Of course we can! Instead...
- Try to get low and brace by dropping the heels and slightly tensing your muscles.
- This will help avoid an OTB by lowering the rider's centre of mass while...
- Maintaining a more centred position and therefore better traction on the front wheel, for better braking.
This is even more important on a steep slope as the bike is constantly trying to accelerate. If the rider moves back they can only use the rear brake (since the front wheel is too light and won't have enough traction), often resulting in lots of skidding and picking up speed - we've all done this one as well!
Ultimately, braking can be a very personal and situational thing. The student's ability level, confidence and experiences, along with things like the terrain surface, pitch, type of bike, their brakes and tires, are all factors that contribute to how a person brakes. The key for effective teaching and skill development in your own riding is to try and utilize a pros and cons approach, so different techniques can be introduced at different times, depending on what these factors are doing. Let's take a look at a few examples...
Moving the hips behind the seat can help boost confidence and maintain some balance when trying to brake more quickly; especially for novice to intermediate riders. However, it does remove weight and therefore braking power from the front of the bike. We therefore try and find a balance as soon as possible, to introduce students to braking by bracing and getting low, rather than moving back. Incidentally, the stopping distance with the same speed was a foot longer using this technique, than in the picture below.
Getting low and bracing requires some practice to gradually build the confidence to stay more and more centred as you learn to trust the front brake more, and learn to trust your body to brace against the forces that are pushing it forward on the bike, as you slow down. Take your time learning this! If you ever want to ride steep sections or rock rolls in control, even slowly, then practicing this technique is key. It should feel rather like you're doing a push up as a lot of the weight can go into your arms. This is good... this is you putting weight (traction) into the front wheel, ultimately helping that front brake work better. However, riders can often find a good balance between this braking technique and the one above as they find somewhere in the middle, that works best for them.
You can sometimes see the pro's use this technique after they cross the finish line at World Cups. Using the key points from the neutral position as a baseline, the straighter arms and legs (and dropped heels) provide very strong supports from which to maintain a close-to-centre body position, as they brake heavily. On steep terrain this position can make a rider too tall and also reduces your range of movement to control the bike.
Mastering your position and balance on the bike is the fundamental skill in your riding. With time and practice and seeing how it can help your other skills, like braking, you'll be able to ride faster, tackle steeper trails, or even play with features you're previously thought were scary... like doing a stoppie down the Clown Shoes drop!
As with any of these techniques, remind yourselves to view them as tools. There's not one way of doing things and each tool has its own merits and drawbacks, ultimately enabling us to apply them in different situations and to varying degrees. Choose the one you think you need in the current situation. Change it if you need to. Try using a couple of different tools and see which works best. Mountain biking, by its very nature, involves constantly changing variables and if we try to apply a one size fits all approach to teaching and learning it, we will soon come up with roadblocks, learning plateaus and most likely a lack of basic understanding. People in today's world want a simple fix. "Tell me how I should ride all the time." "What's the best body position"?
While we can give them a quick simple answer, this should be viewed as just that: a simple answer. True progression requires an open mind and a willingness to look outside your own knowledge, challenge the conventional wisdom (the world is not flat!) and try to develop your skills through a balanced and educated approach. Mountain biking isn't always easy. It's not supposed to be. Enjoy the challenge, be creative in your learning and stay open minded.
To summarize this article, the same message works well for both riding steeps and for braking. Whenever I ride into a steep trail and/or I really need to control my speed, the thought in my head is...
"If I'm close to the middle of my bike and low, I'm good to go!"
Happy riding peeps,
Paul
About the Author
Paul Howard is the Owner-Director and Head Coach of Whistler-based coaching company, ZEPtechniques, Technical Director of the international, industry leading Professional Mountain Bike Instructor Association, Technical Education Committee and 2015 Interski Team Member for the Canadian Association of Snowboard Instructors, Head Snowboard Trainer for Whistler Blackcomb SnowSchool, and has been teaching mountain biking and training mountain bike instructors around the world, since the late 90's. Paul trained approximately 100 riders and 250 instructors worldwide in the last year, alone.
About ZEP - 10th year anniversary!
ZEPtechniques is a Whistler-based mountain bike camps and instructor training company. Established in 2006, ZEP is celebrating our 10th year anniversary and offers weekend and single or multi-week, adult specific rider improvement camps, as well as private lessons, customized programs and Whistler MTB Tours. ZEP's Instructor Training services include the industry's original, multi-week mountain bike instructor training camps; training riders four days per week with evening seminars on suspension set up, bike mechanics, nutrition, as well as strength and conditioning sessions, all with industry experts. As developers of the internationally available Professional Mountain Bike Instructor (PMBI) Certifications and Directors of the PMBI Association, ZEP has long played a key role in establishing and improving the finest teaching practices and instructor certifications, within mountain biking.
ZEP is proudly supported by
Transition Bikes
ANVL Components
Fox Racing Shox
Troy Lee Designs
Five Ten
MRP
EVOC
Evolution Whistler
Vorsprung Suspension
Reel Cameras
Spun Studios
Starlight Custom Apparel
Kovarik Racing
Photos
Bike Park Photos
@davetrump
@RedfernMedia
Previous articles
Position for Descending & Cornering
Climbing in Technical Terrain
Braking in Downhill Corners
How to Learn (featuring a discussion on pedal positions in corners)
MENTIONS: @TransitionBikeCompany / @foxracingshox / @troyleedesigns / @zeptechniques / @FiveTen / @evocsports / @VorsprungSuspension
Author Info:

 Member since Mar 24, 2006
Must Read This Week
Sign Up for the Pinkbike Newsletter - All the Biggest, Most Interesting Stories in your Inbox
PB Newsletter Signup
Try to ride a Lefty, like I have from 2010. Hyper sensitive, but this thing dives like a frogman ! Well, when it's has not stiffen due to 30min steep as hell downhill… Pretty good for throwing your OTB fear out the window though…
But if you stay low and centered you have the same result going into steep sections: Going low with your hip looks like going back and when your front wheel is getting into the steep section and your are flexible in your arms your saddle will move in front of your crown juwels.
Happy trails,
Marc
When descending, weight is moved backward to avoid being too far over the front wheel. This article is focused on making sure people don't go too far back. Which is good, but let's not overstate that point.
The same is true when braking hard. We naturally shift slightly backward to maintain weight balance on the front and rear wheels. Hard braking shifts weight to the front wheel even without a change in body position. To compensate, when braking, the proper technique is to move weight slightly rearward. This is probably subconscious for most pinkbike readers.
Rather than describing how to get low vs shifting rearward, I view it as just forward/backward movement while maintaining the upper body's riding position. When the upper body angle is maintained, shifting rearward automatically lowers the riding position as well.
Not to disagree with the article, just describing the same concepts a different way I think.
Many good points. I think people got the idea that you had to lean back from watching others (in videos or real) and looked at their position relative to the bike. Then as a rider you'll look at the bike relative to yourself (at least I do). You want to push the bike around so that you (or your COM actually) are about in the middle between the two tyre contact patches (in the horizontal projection, that is) when you're at a constant speed. If you expect to decelerate because of an obstacle, loose dirt or anything push the bike forward as if you want to brace for impact. On the other hand if you expect to accelerate because of a sudden dip, dive in as if you were dropping into something steep. Possibly others will translate the same advice differently for them to work, it is probably how you're wired. Same goes with advice about how to ride turns. It is often given from an observer perspective, like get your weight to to outside, stretch the inside arm etc. Whereas for me it feels good to push tilt the bike steep and push the front end into the turn. It took a while for me to find out this was actually the same, but from a different perspective
Somewhere above I mentioned between the tyre contact patches in the horizontal projection. And that implies that you are going to shift your weight back a little as, on a descend, the tyre contact patches are behind the wheel axles as well. To illustrate, if you're on a thirty degree descend the tyre contact patches shift half your wheel radius behind the axle. That's significant. To compensate it makes sense to shift your weight an equal amount backwards as well to be in the same stable position.
It may not appeal to all, but it helped me a lot to ride MUni (mountain unicycle). It makes you very aware of how to move around to deal with sudden accelerations and decelerations. On a mountainbike you could get away just charging on but on a MUni you have to anticipate and compensate or you'll crash.
As for suspension setup, I'm still surprised people are being advised to set sag on level ground. You'll be most demanding of your suspension on the descends so instead set it on a descend. Get in a charging position (and grab the brakes to not roll down). Don't worry that this will set your suspension as if you were braking and descelerating. The mechanics for such a static position are identical to that if you're going at constant speed.
I don't agree with the statements made in the comments that a longer bike helps you ride better. I think it just helps you get away with more because even if you're a tiny bit off, you're still safely well between the wheels. Shorter bikes are just less tolerant and so you'll be more aware if you're in the wrong position. This can be a good thing actually if you're willing to learn. It can be a bad thing if you're just riding incredibly rough and steep terrain at amazing speeds and can't be bothered compensating for all the small details.
[quote=article focus]As we've talked about, riding isn't about hard and fast rules that apply all the time. It's more about understanding techniques as tools. Tools that can be adapted and tweaked as needed, based on the situation. So what's the message then? Most of the time, riders are moving too far back and moving back before they need to. Instead...
- Try getting low before moving back.
- The lower you get, the less you'll have to move back, if at all.
So, even though moving back can make it safer by helping to avoid an OTB, the idea is to try and use this as a last resort rather than a first option.[/quote]
And that gets us to one element not mentioned to reduce that couple to get you OTB and that is to reduce the braking force in critical areas. Choose your braking spots wisely. Typically just where the bike is just a bit more level (so that the parallel component of gravity is smallest and the horizontal distance between front tyre contact patch and COM is largest) and where you expect sufficient grip to brake hard. On the steeper parts release the brake and look ahead for the next point where you can apply your brakes.
Cheers!
Yes, if you lean back you will get less front wheel traction and less braking power on the front but in return you'll get more traction and braking power on the rear.
In the cons section of moving back it states that you'll get less traction and braking on the front which is correct but it also says that you'll get worse speed controll because "the rear wheel sucks at slowing you down" which while leaning back just isn't true.
If i have to brake hard on my dirtjumper i always lean back and i get quite good braking performance for only having a rear brake.
www.singletracks.com/blog/mtb-training/how-to-brake-your-mountain-bike
Do this test, described in the article.
"Don’t believe me? Here’s a little experiment for you to try: go out to a grassy slope and set up a start line which you will coast from, and a line where you will start braking. On your first pass, coast from the start line and start braking at the brake line with your rear brake only. Mark where you finally come to a stop. Repeat this same procedure with just the front brake (being careful not to endo), and then finally with both brakes at the same time.
You’ll find that with just the front brake you were able to stop in a much shorter time than you could with just the rear brake; with both brakes you’ll stop even more quickly."
I'm also not talking about only braking with the rear, I'm talking about braking with both brakes while leaning back and how braking performance shouldn't be reduced by leaning back.
www.leelikesbikes.com/fore-aft-balance-when-jumping.html
"Remember, you're not moving forward on the bike, you're just trying to stay as close to the middle as you can... at least to begin with."
That's taken directly from the article. And throughout the article the word centered/balanced is mentioned multiple times. I didn't seen anywhere instructing people to put all the weight on the front tires, more towards reversing the trend of putting more weight on the rear tire and getting everything balanced. Did you even read the article?