Tech Tuesday: Gorilla Tape Tubeless Conversion

What you'll need: One roll of Gorilla Tape (Hey Cheapskate! Don't substitute any other brand.), a pen, a box knife with a brand new blade, tubeless valve stems (we used American Classics), your favorite wheels, and a measuring device.
Tip: A roll of Stans No-Tubes tape is designed to fit standard-width rims perfectly and is a tried and true tubeless conversion. Use a Stan's kit unless you are short on cash or need a custom tubeless conversion. That said, a roll of Gorilla Tape costs about ten bucks US and will seal a lot of rims - and there is always Ghetto tubeless bragging rights to consider.
Danger! When you are working with razor-sharp knives, like the box-knife depicted in this how-to, take extra safety precautions. Move the knife slowly and deliberately and work away from your opposite hand or body when possible.
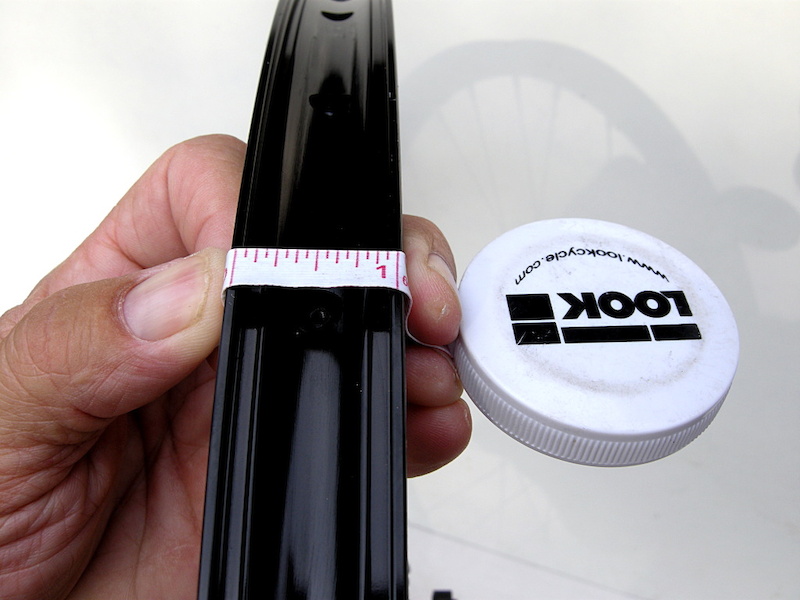
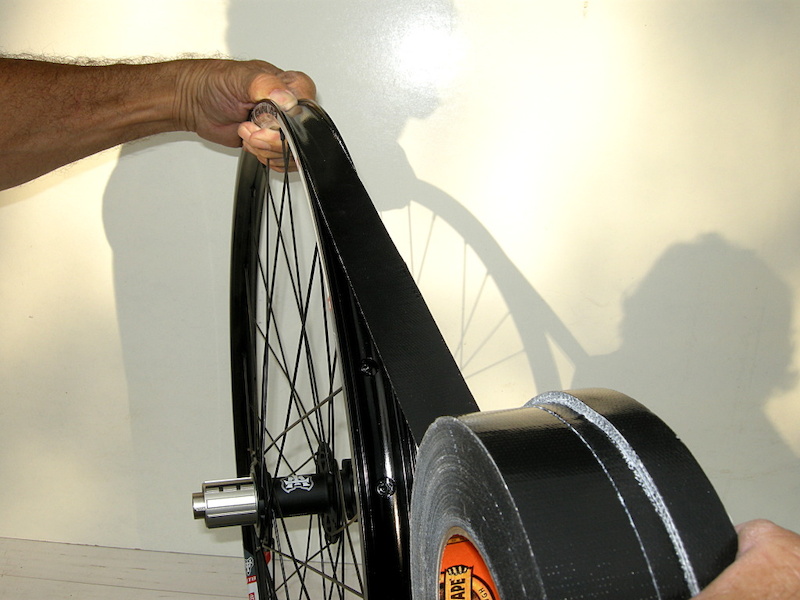
Step 1 - Clean the rims and then measure the width of the rim, outside to outside. This is how wide your sealing tape will need to be sized in order to span the ID of the rim surface and seal correctly.
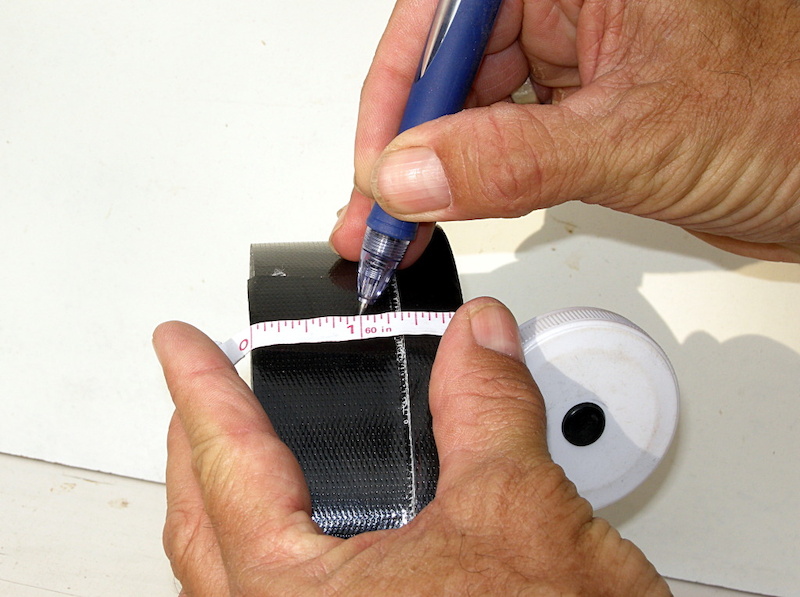
Step 2 - Measure the width you will need and then mark the tape with a pen.
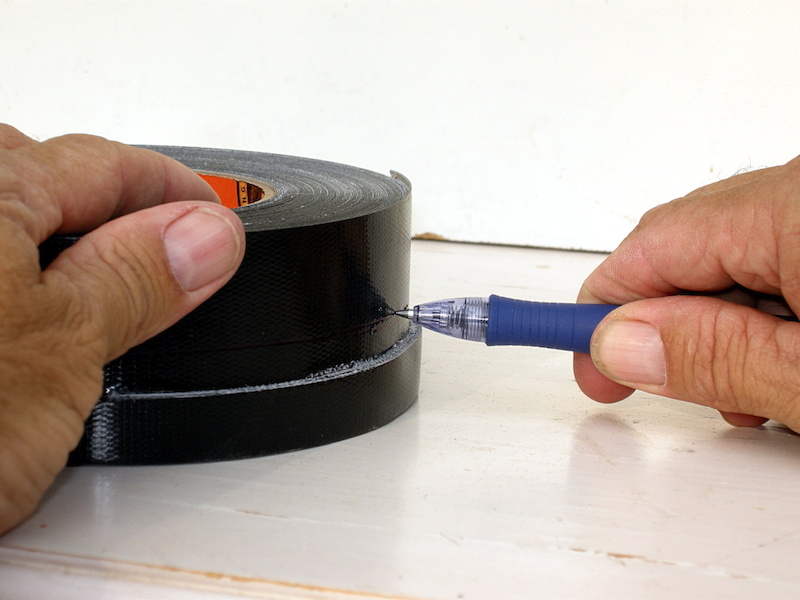
Step 3 - Brace the pen with your hand against a table so that the tip lines up with the mark on the tape and then spin the tape roll to mark the entire circumference.

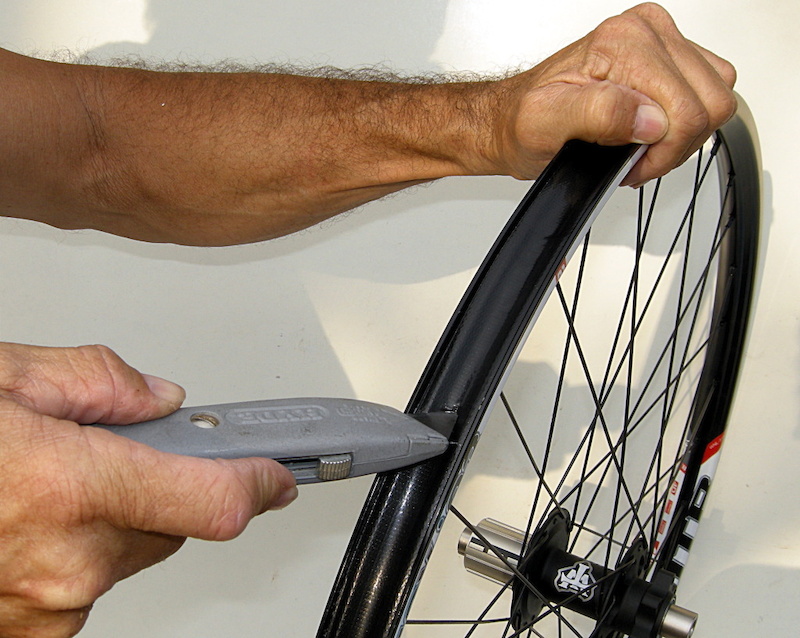
Step 4 - Find a New York Times Best Seller or piece of wood that will space the box knife blade to the line on the tape. Hold the knife securely and slide it across the book about an inch at a time to slice the tape to the proper width. Go around two or three times to ensure that you cut deep enough to provide enough length to get around the rim.
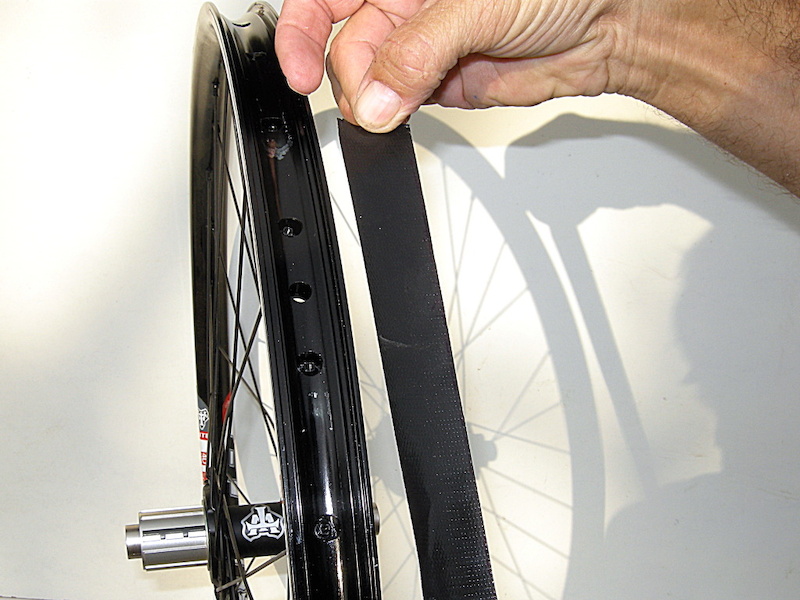
Step 5 - Line up the end of the tape about two inches beyond the valve stem hole and begin taping the rim.
Step 6 - Stretch the tape from the roll and use a subtle side to side motion to encourage the edges of the tape to settle evenly below the rim beads.
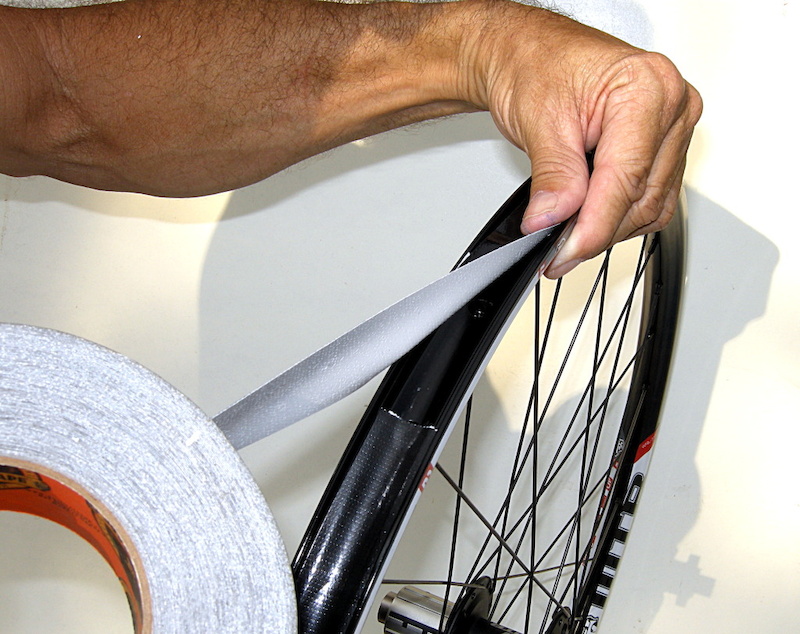
Step 7 - Overlap the tape about three inches over the valve stem hole.

Step 8 - Use your fingertips to smooth the edges of the tape below the rim beads. Then push the tape down to adhere it to the center of the rim.
Step 9 - Use tip of box knife to cut an X through the tape at the valve stem hole.
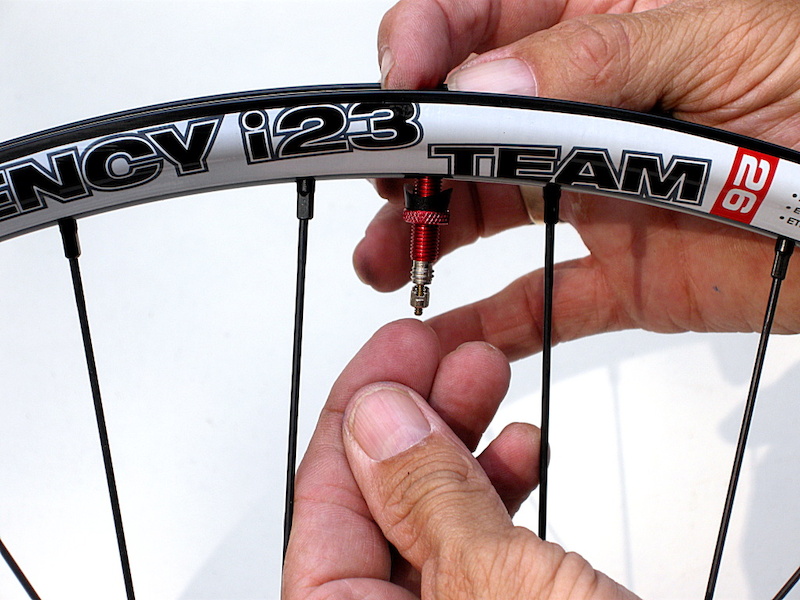
Step 10 - Insert valve stem and hand tighten the stem nut to a secure, snug fit. Repeat the steps for the next rim and you are gold.
Past Tech Tuesdays:

Classic example of: do as I say, not as I do!
im definitely ghetto tublessing my next wheels!
Inflate, stretch onto rim and then cut it around the outside edge (around the tube opposite the rim). Trim with scissors or a knife and you're done!
Dunno how it compares with gorrila tape but I've never had an issue. As the valve is pre-installed to the tube you know you won't get any leaks there though...
Guerrilla tape also comes in 1" wide rolls, I use that size so I don't have to cut it to width. Fits my AM/ DH rims nicely. What ever width you use, the thickness of the guerrilla tape is nice, helps the tires to seat easily.
about 1/2 the price of Stan's, much stickier (more adhesive), much wider (will easily fit all-mtn, fr and dh wheels) and you get more length for your ££ $$
I used to work for the UK's original Stan's distributor and we noticed their prices creeping up, they started selling to numerous other distributors in the UK whilst we were still buying, which is not good bizniz!
then we started noticing Roval tape and numerous valve cores from other companies which worked just as effectively at lower prices
The Stan's "Solution" is worth using, although after years of running their Solution I have switched to using Bontrager Super Juice the past season and found it just as capable for initial installation and long term sealing, plus on-trail repair from penetration / gash punctures, its also cheaper here in the UK
and most importantly does not gum up the tubeless valve cores and end up solidfying into a spiky "alien ball" like Stan's does after 6 months in your wheel!
There are all sorts of alternative tape solutions, I listed a bunch of them in a message below but to repeat... notubes tape was originally just fiber strapping tape. You can buy it by a roll of 50 yards for $6 and do all the wheels for several teams of riders, or a few yards to do 4 rims from Notubes for twice that. There are other tapes sold by other bicycle brands yes. The best of which for converting any width rim is the hutchinson one, as you mount the tire and then just cut a notch in the overlap on each side, and it peels away like duct tape does when you tear it. Of course the fact that Stan's did NOT invent tubeless conversions, or the use of taping rims, or rubber rim strip conversions or anything else people now think he and his notubes brand did first is probably why everyone just drinks the koolaid and goes to stan's first for their tubeless solution. The first anyone ever heard of Stan was on the save some weight forum of mtbr, and within days of his talking about his new invention, he was spamming the forum to sell his conversion kits. I and a handful of others finally had enough and told him flat out to just start a website to market his notubes idea and stop spamming the forums.
I tape the holes first myself if running Gheto 20" set up.
20" Ghetto set up will burp less than just tape, no matter what you're smoking. I can't fathom how some of you guys say you never burp. Are you running 50+PSI, riding like a girl, or just riding to the shops? I'm a light weight, and mine are always wet around the rim from sealant burping out. Rarely enough to make tyre go flat, but I still burp heaps. On the DH bike it's wet the whole way around usually.
I no how, have been doing both styles for years. I use tape with a tight tyre, and 20" with a looser tyre.
My point was why are people saying they need rim tape for a tube, but not a Ghetto set up with 20" tube, it's the same material and pressure on the same spoke holes.
I'm also saying I don't get how people say they don't burp at all. It's not because of set up, it's because of lack of rocks on tracks, riding too hard a pressure, or riding soft.
It's the same with any tubeless set up, be it UST rim and tyre, or any combo of tubeless set up.. And it's not just at dents they burp.
Mavic rims are worst, as they're small diameter compared to others. Although the 823 works well, but still burps as much as either Ghetto set up.
Choose a line- grow up and quit with the name calling, or stay a petty child and bring on with the "your mom is so fat" jokes. Just don't tell me what I've experienced. You weren't there.
However I've taken the cheap aspect 1 step further.
I use FREE threaded/locking shraeder valves from my local Motorcylce shop from torn inner tube throw aways. Just cut a 3/8" of rubber past the metal portion of the valve in a circle on the inner tube. Although harder to cut, I found the thicker street bike tubes to work better than moto/ATV tubes.
Also, it easier to just remove the core after you've taped and installed the valve and installed just the tire W/O SEALANT. At this point, you can blast a bigger shot of air from the compressor to seat the bead. The air will leave once you remove the air chuck, but the bead will still be set. Then, you can squirt your stans directly into the valve with the valve core still removed. Once filled, just install the core and air it up.
Keep in mind, Running $15 Non-tubeless tires took about a day of rechecking the air and alot of shake'n'bake to get the sealant all over, but I haven't an issue yet. Can't imagine how easy it would be with actual, but pricier TR or UST tires.
Seems like a lot, but tires and complete set-up for under $50 can't be beat IMO!
TIP 1: Make sure you clean the hell out of the inner rim surfaces, I use simple green and then clean it a second time with alcohol to remove any left over degreaser.
TIP 2: After applying the tape and making the valve hole install a tube and tire then pump it up to about 40 psi and let it sit for a couple of hours or overnight. This allows the tape to setup really nice and rim. It takes time but it helps in the long run.
Cheers!
As to the valves and people saying to cut a valve stem out of a tube, make sure its a valve stem that has a removeable core (Schwalbe and QBP presta tubes have them) so you can add more sealant later on without popping the tire bead from the rim.
I've tried most ghetto methods and there are two recurring problems:
1) If its not a UST specific rim the bead/rim interlock isn't great and the tyre burps or comes completely off the rim when cornering hard.
2) If you add a sealant into the tyre it sometimes messes with the duck tape/ gorrilla tape glue and de-bonds it. Also, depending on what tape you use, the tape material sometimes absorbs the sealant liquid!
Just get proper UST rims and tyres - ghetto is more trouble and hassle than its worth IMO!
"One roll of Gorilla Tape (Hey Cheapskate! Don't substitute any other brand.)"
Might want to read everything before knocking the method suggested. Given the fact that this is the exact same tape used by the most name branded tubeless company, I think your points are pretty much moot. This is basically a self-built stans kit, and the writer doesn't suggest using non-UST tires or rims, just that if you have extra-wide rims (given how common that is now a days this could be a fairly broad concern) this is a great way to set yourself up tubeless.
Use spongy tape (draft sealing tape for doors / windows) under the 20" tube if you have deep drop centres on the rims. You can inflate without a compressor.
www.treefortbikes.com/product/333222337028/542/Problem-Solvers-Air-Bob.html
Instant seating every time. Completely makes the entire bead seating process automatic.
I've done four wheelsets this way without a problem. I even used this stuff as a rim strip on my DH wheels that I put tubes in.
Kenda sb8 tires on Alex DC 4.5 rims
stupid dickhead...did you really just say that bullshit! f*ck canada...dont like the USA..but f*ck canada and their expensive import bike parts. f*ck THA NORF
Cheers!
And what is the stuff that white people likes?
I don't think that these are the same ones RC used, but they are the only anodized valve stems I know of.
i use an inner tube!
the method has been used for years and years and years. i find it still works brilliantly personaly.
(light hearted banter my American friends, no death threats please)
May I kindly ask for a wee bit more technical stuff, please?