Tech Tuesday: Inflate Your Air-Shock Without a Pump
Ever try to adjust the pressure in your fork or shock on the trail and accidentally release all the air? If you don't have a shock pump handy, it's probably game over. Don't bother attempting to pressurize it with a tire-pump. Air-sprung shocks and forks have such small reservoirs, that the minuscule air seepage that occurs when the pump-head is attached and removed from the valve defeats the process. Shock pumps have special inflation heads that retain an airtight seal while the head is engaging the valve stem. This allows users to precisely inflate their shocks and forks. You may have another inflation tool in your arsenal which, if used carefully, will recharge your saggy suspension in a split second.
![photo]()
What you'll need to pull this off:
• A Schrader-adaptable Co2 inflation device that can be metered.
• At least one Co2 cartridge.
• A small Allen wrench or a shaped air cap that fits inside the Schrader valve to release pressure.
![photo]()
Riders who carry Co2 inflation devices will discover that a short burst of high-pressure carbon dioxide will do the trick. The key element to this magic is that the pressure in a Co2 cartridge is so high, (over 1,000psi) that the inflation device will unseat the Schrader valve and fill the reservoir without the need to depress the stem. Follow these simple steps to get your suspension back in the game:
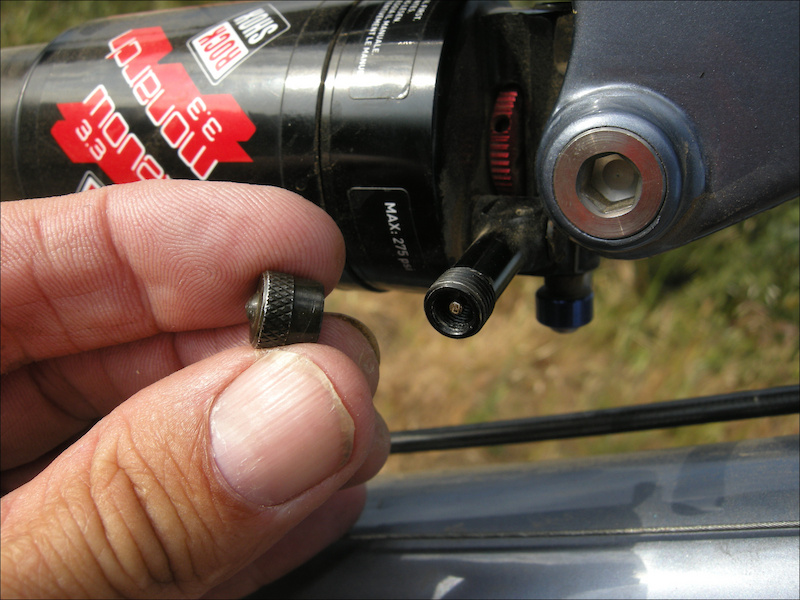
1- Check if your pressure head will adapt to your fork or shock's Schrader valve (most will) and next, ensure that the pressure head can make a tight seal. Often, suspension valves are tucked out of reach of right-angle heads, so if you choose a device, purchase a straight type, or one with a slim-profile, angle-head.
![photo]()
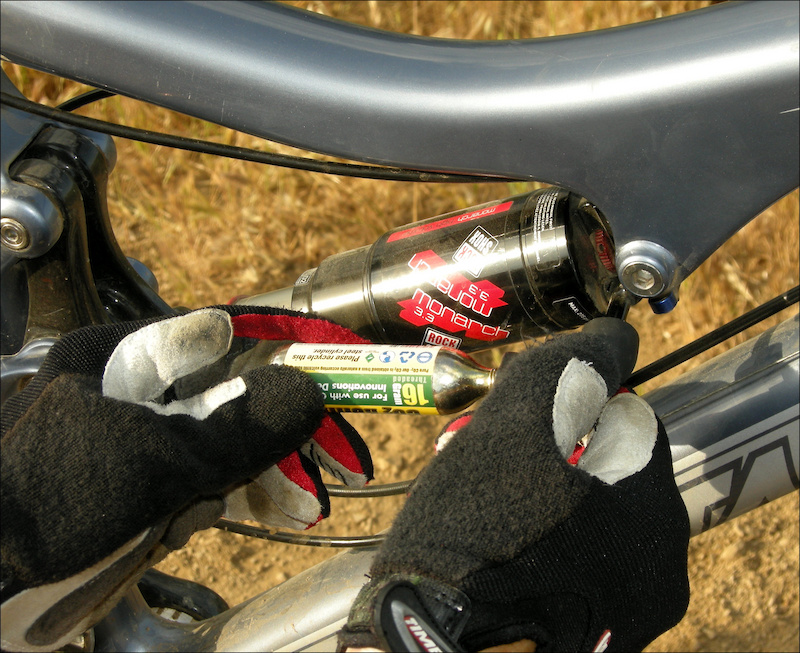
2- Load the cartridge. We prefer the simple screw-in/screw-out Genuine Innovations Microflate Nano. Have your shock or fork's air cap removed and a small Allen key or similar device handy to release pressure.
3- Press the head onto the valve (or screw it on, depending on the head) and then inflate the air-spring with a very short burst of Co2. Be conservative - your inflation device can overpressure the reservoir in the blink of an eye.
![photo]()
4- At this point, your fork or shock will be as hard as a rock. Some air caps have a small spike on the top to assist in releasing gas pressure. Hold the cap inverted on the valve stem and tap it with a finger to release pressure in small spurts. Use an Allen key to tap the valve stem if your air cap won't do. Give your fork or shock a shove every so often to check for the correct pressure and stop when it feels close. If you are a fastidious whiner type who absolutely MUST have the perfect suspension sag setup, then read step five carefully.
5- WARNING. Suspension makers will cry like babies when they read this tip. Inflating your suspension with a mega-high-pressure Co2 device is an emergency trailside measure to be executed with care. Get it right the first time because this method, in the best case, will run the air pressure to or slightly over the manufacturer's maximum values. Get your suspension close enough to ride home and call it good. Use the reminder of the gas to fix a flat - you'll have plenty left.
Got a trailside suspension tip? We'd love to hear it.
Past Tech Tuesdays:
Technical Tuesday #1 - How to change a tube.
Technical Tuesday #2 - How to set up your SRAM rear derailleur
Technical Tuesday #3 - How to remove and install pedals
Technical Tuesday #4 - How To Bleed Your Avid Elixir Brakes
Technical Tuesday #5 - How To Check And Adjust Your Headset
Technical Tuesday #6 - How To Fix A Broken Chain
Technical Tuesday #7 - Tubeless Conversion
Technical Tuesday #8 - Chain Wear
Technical Tuesday #9 - SRAM Shift Cable Replacement
Technical Tuesday #10 - Removing And Installing a Headset
Technical Tuesday #11 - Chain Lube Explained
Technical Tuesday #12 - RockShox Totem and Lyric Mission Control Damper Mod
Technical Tuesday #13 - Shimano XT Crank and Bottom Bracket Installation
Technical Tuesday #14 - Straightening Your Derailleur Hanger
Technical Tuesday #15 - Setting Up Your Front Derailleur
Technical Tuesday #16 - Setting Up Your Cockpit
Technical Tuesday #17 - Suspension Basics
Technical Tuesday #18 - Adjusting The Fox DHX 5.0
Technical Tuesday #19 - Adjusting The RockShox BoXXer World Cup
Technical Tuesday #20 - Servicing Your Fox Float Shock
Technical Tuesday #21 - Wheel Truing Basics
Technical Tuesday #22 - Shimano Brake Pad Replacement
Technical Tuesday #23 - Shimano brake bleed
Technical Tuesday #24 - Fox Lower Leg Removal And Service
Technical Tuesday #25 - RockShox Motion Control Service
Technical Tuesday #26 - Avid BB7 Cable Disk Brake Setup
Technical Tuesday #27 - Manitou Dorado Fork Rebuild
Technical Tuesday #28 - Manitou Circus Fork Rebuild
Technical Tuesday #29 - MRP G2 SL Chain Guide Install
Technical Tuesday #30 - Cane Creek Angleset Installation
Technical Tuesday #31 - RockShox Maxle Lite DH
Technical Tuesday #32 - Find Your Tire Pressure Sweet Spot
Technical Tuesday #33 - Three Minute Bike Preflight Check
Technical Tuesday #34 - MRP XCG Install
Technical Tuesday #35 - Stem Choice and Cockpit Setup
Visit Parktool.com to see their entire lineup of tools and lubes.
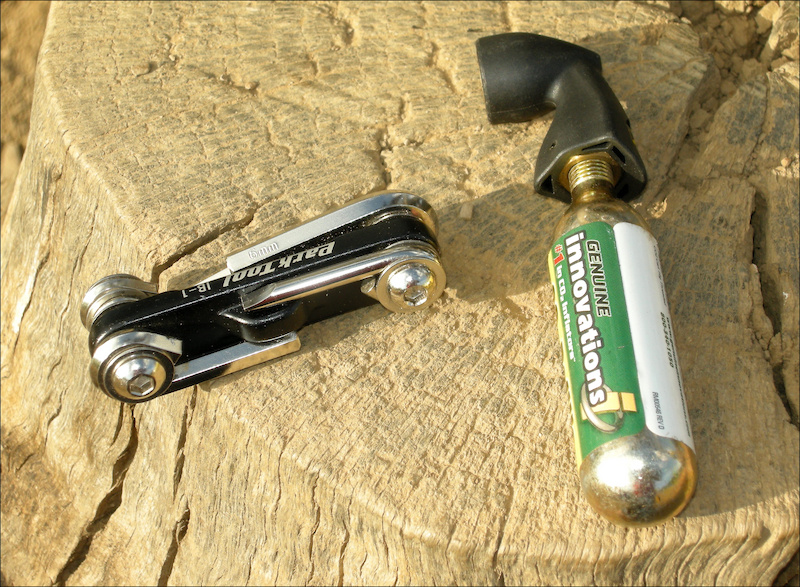
Two classics: an Innovations Co2 inflation device and a Park Mini tool.
What you'll need to pull this off:
• A Schrader-adaptable Co2 inflation device that can be metered.
• At least one Co2 cartridge.
• A small Allen wrench or a shaped air cap that fits inside the Schrader valve to release pressure.
If your air cap has a pointed top, you can use it to tap the valve stem to release gas pressure from the shock.
Riders who carry Co2 inflation devices will discover that a short burst of high-pressure carbon dioxide will do the trick. The key element to this magic is that the pressure in a Co2 cartridge is so high, (over 1,000psi) that the inflation device will unseat the Schrader valve and fill the reservoir without the need to depress the stem. Follow these simple steps to get your suspension back in the game:
1- Check if your pressure head will adapt to your fork or shock's Schrader valve (most will) and next, ensure that the pressure head can make a tight seal. Often, suspension valves are tucked out of reach of right-angle heads, so if you choose a device, purchase a straight type, or one with a slim-profile, angle-head.
Use caution when inflating the shock. Short bursts will do the trick - and don't worry about threading the inflater on the valve stem, the Co2 pressure will overpower the valve.
2- Load the cartridge. We prefer the simple screw-in/screw-out Genuine Innovations Microflate Nano. Have your shock or fork's air cap removed and a small Allen key or similar device handy to release pressure.
3- Press the head onto the valve (or screw it on, depending on the head) and then inflate the air-spring with a very short burst of Co2. Be conservative - your inflation device can overpressure the reservoir in the blink of an eye.
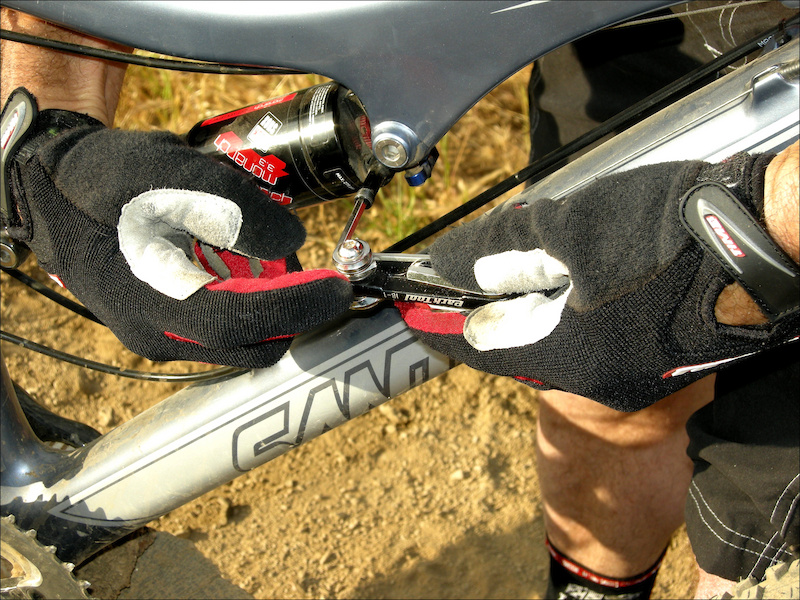
Use a small Allen wrench to access the valve tip and tap it lightly to control how much pressure you release.
4- At this point, your fork or shock will be as hard as a rock. Some air caps have a small spike on the top to assist in releasing gas pressure. Hold the cap inverted on the valve stem and tap it with a finger to release pressure in small spurts. Use an Allen key to tap the valve stem if your air cap won't do. Give your fork or shock a shove every so often to check for the correct pressure and stop when it feels close. If you are a fastidious whiner type who absolutely MUST have the perfect suspension sag setup, then read step five carefully.
5- WARNING. Suspension makers will cry like babies when they read this tip. Inflating your suspension with a mega-high-pressure Co2 device is an emergency trailside measure to be executed with care. Get it right the first time because this method, in the best case, will run the air pressure to or slightly over the manufacturer's maximum values. Get your suspension close enough to ride home and call it good. Use the reminder of the gas to fix a flat - you'll have plenty left.
Got a trailside suspension tip? We'd love to hear it.
Past Tech Tuesdays:
Technical Tuesday #1 - How to change a tube.
Technical Tuesday #2 - How to set up your SRAM rear derailleur
Technical Tuesday #3 - How to remove and install pedals
Technical Tuesday #4 - How To Bleed Your Avid Elixir Brakes
Technical Tuesday #5 - How To Check And Adjust Your Headset
Technical Tuesday #6 - How To Fix A Broken Chain
Technical Tuesday #7 - Tubeless Conversion
Technical Tuesday #8 - Chain Wear
Technical Tuesday #9 - SRAM Shift Cable Replacement
Technical Tuesday #10 - Removing And Installing a Headset
Technical Tuesday #11 - Chain Lube Explained
Technical Tuesday #12 - RockShox Totem and Lyric Mission Control Damper Mod
Technical Tuesday #13 - Shimano XT Crank and Bottom Bracket Installation
Technical Tuesday #14 - Straightening Your Derailleur Hanger
Technical Tuesday #15 - Setting Up Your Front Derailleur
Technical Tuesday #16 - Setting Up Your Cockpit
Technical Tuesday #17 - Suspension Basics
Technical Tuesday #18 - Adjusting The Fox DHX 5.0
Technical Tuesday #19 - Adjusting The RockShox BoXXer World Cup
Technical Tuesday #20 - Servicing Your Fox Float Shock
Technical Tuesday #21 - Wheel Truing Basics
Technical Tuesday #22 - Shimano Brake Pad Replacement
Technical Tuesday #23 - Shimano brake bleed
Technical Tuesday #24 - Fox Lower Leg Removal And Service
Technical Tuesday #25 - RockShox Motion Control Service
Technical Tuesday #26 - Avid BB7 Cable Disk Brake Setup
Technical Tuesday #27 - Manitou Dorado Fork Rebuild
Technical Tuesday #28 - Manitou Circus Fork Rebuild
Technical Tuesday #29 - MRP G2 SL Chain Guide Install
Technical Tuesday #30 - Cane Creek Angleset Installation
Technical Tuesday #31 - RockShox Maxle Lite DH
Technical Tuesday #32 - Find Your Tire Pressure Sweet Spot
Technical Tuesday #33 - Three Minute Bike Preflight Check
Technical Tuesday #34 - MRP XCG Install
Technical Tuesday #35 - Stem Choice and Cockpit Setup
Visit Parktool.com to see their entire lineup of tools and lubes.
Author Info:

Must Read This Week
Sign Up for the Pinkbike Newsletter - All the Biggest, Most Interesting Stories in your Inbox
PB Newsletter Signup
excellent tech tuesday in my opinion
www.blackburndesign.com/tool_toolmanator3_new.html
Or my solution: use coil forks
READ: OVERINFLATED and probably f*cked
2. I would so much rather walk out then potentially ruin a $300+ air shock.
Tech Tuesday's slipping.
I just carry along a shock pump too. It weighs less than the amount of water I go through in a ride and it's rotational weight that really makes the difference for handling anyway, right?
www.specialized.com/us/en/bc/SBCEqProduct.jsp?spid=47184&menuItemId=0&eid=0