Tech Tuesday - Install and Adjust Pedal Cleats
Installing and adjusting your pedal cleats is best done well before your important ride or race. Although the process is quite simple, you should take the time to get it right. Each new pair of shoes and sometimes a new bike can alter the feel of the pedals when you are riding in earnest. Don't skip over the heel-to-crankarm measuring step - this is the reference you'll need to make minor changes later. Another good tip is to use your normal saddle height before you start the process, and when you are checking the fit, stand up and pedal for a spell to ensure that all bases are covered.
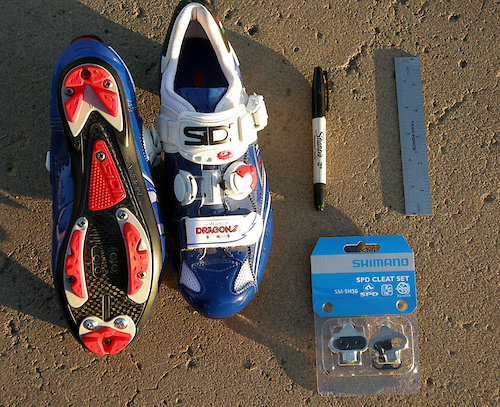
![What You ll need SPD compatible cycling shoes a sharpie marking pen a ruler or accurate measuring device and a set of cleats we are using Shimano but the same method works for all types.]() What You'll need: SPD compatible cycling shoes, a sharpie marking pen, a ruler or accurate measuring device, and a set of cleats. We are using Shimano, but the same method works for nearly all types.
What You'll need: SPD compatible cycling shoes, a sharpie marking pen, a ruler or accurate measuring device, and a set of cleats. We are using Shimano, but the same method works for nearly all types.
![The pen is pointing at the ball of the foot. You ll need to find this spot when the shoe is on.]() Step One: The first step is finding the ball of your foot.The pedal axle needs to line up with this joint to promote effective pedaling. The pen is pointing at the ball of the foot. You'll need to find this spot when the shoe is on.
Step One: The first step is finding the ball of your foot.The pedal axle needs to line up with this joint to promote effective pedaling. The pen is pointing at the ball of the foot. You'll need to find this spot when the shoe is on.
![Put on your shoes and then squeeze around the inside of the foot to locate the center of the ball of each foot.]() Step Two: Put on your shoes and then squeeze around the inside of the foot to locate the center of the ball of each foot.
Step Two: Put on your shoes and then squeeze around the inside of the foot to locate the center of the ball of each foot.
![After you locate the ball of the foot through the shoe mark the spot on the sole with a Sharpie pen.]() Step Three: After you locate the ball of the foot through the shoe, mark the spot on the sole with a Sharpie pen.
Step Three: After you locate the ball of the foot through the shoe, mark the spot on the sole with a Sharpie pen.
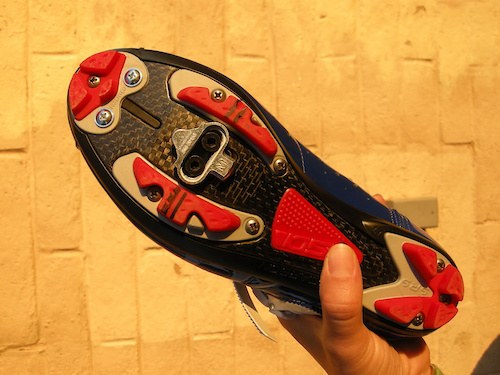
![Draw a level line across the pedal using your mark line up the cleat and screw it down snugly don t tighten it completely yet I drew in a second line below the original - if you ride technical sections or jump a lot some riders like to set the cleat back 5 millimeters to add stability to the foot.]() Step Four: Draw a level line across the pedal using your mark. Center the cleat along the line you drew and screw it down snugly (don't tighten it completely yet), I drew in a second line below the original - if you ride technical sections, or jump a lot, some riders like to set the cleat back 5 millimeters to add stability to the foot.
Step Four: Draw a level line across the pedal using your mark. Center the cleat along the line you drew and screw it down snugly (don't tighten it completely yet), I drew in a second line below the original - if you ride technical sections, or jump a lot, some riders like to set the cleat back 5 millimeters to add stability to the foot.
![Ride around for a bit and then stop at the 12 3 6 and 9-o clock posiitions of the crank rotation. Check each position for side to side play in the cleat. If your shoe is binding to one side make a note if it s to the right or left at each stop.]() Step Five: Ride around for a bit and then stop at the 12, 3, 6, and 9-o'clock posiitions of the crank rotation. Check each position for side to side play in the cleat. If your shoe is binding to one side, make a note if it's being forced to the right or left at each stop of the clock.
Step Five: Ride around for a bit and then stop at the 12, 3, 6, and 9-o'clock posiitions of the crank rotation. Check each position for side to side play in the cleat. If your shoe is binding to one side, make a note if it's being forced to the right or left at each stop of the clock.
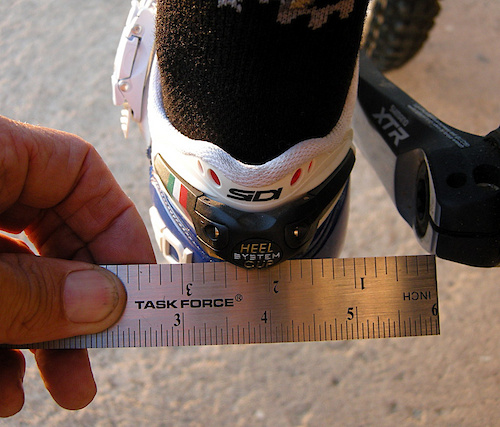
![Set the crank at the forward 9-o clock position and measure the distance from the center of the crank arm to somewhere on the heel. Use this as a reference when you adjust the angle of the cleat. Make 1 4 inch 5mm adjustments to achieve best results.]() Step Six: Set the crank at the forward, 9-o'clock position, and then measure the distance from the center of the crank arm to somewhere on the heel. Use this as a reference when you adjust the angle of the cleat. Make 1/4 inch (5mm) adjustments to achieve best results.
Step Six: Set the crank at the forward, 9-o'clock position, and then measure the distance from the center of the crank arm to somewhere on the heel. Use this as a reference when you adjust the angle of the cleat. Make 1/4 inch (5mm) adjustments to achieve best results.
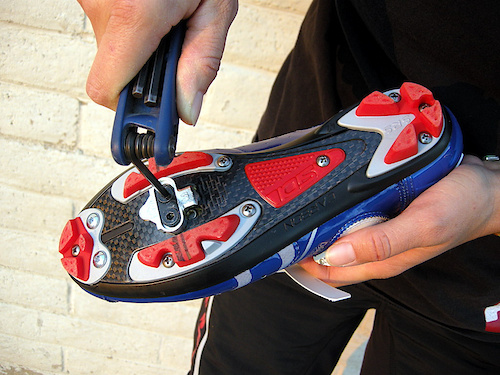
![After establishing the distance from the heel to the crank arm remove the shoe and make small angular adjustments to correct any binding in the crank circle.Ride and recheck at all four positions. If all is go tighten the cleats and ride. Remember you ll need to retighten the cleats after your first good ride.]() Step Seven: After establishing the distance from the heel to the crank arm, remove the shoe and make small angular adjustments to correct any binding in the crank circle. Ride and recheck at all four positions. If all is go, tighten the cleats and ride. Remember, you'll need to retighten the cleats after your first long day in the saddle.
Step Seven: After establishing the distance from the heel to the crank arm, remove the shoe and make small angular adjustments to correct any binding in the crank circle. Ride and recheck at all four positions. If all is go, tighten the cleats and ride. Remember, you'll need to retighten the cleats after your first long day in the saddle.
Past Tech Tuesdays:
Tech Tuesday #1 - How to change a tube.
Tech Tuesday #2 - How to set up your SRAM rear derailleur
Tech Tuesday #3 - How to remove and install pedals
Tech Tuesday #4 - How To Bleed Your Avid Elixir Brakes
Tech Tuesday #5 - How To Check And Adjust Your Headset
Tech Tuesday #6 - How To Fix A Broken Chain
Tech Tuesday #7 - Tubeless Conversion
Tech Tuesday #8 - Chain Wear
Tech Tuesday #9 - SRAM Shift Cable Replacement
Tech Tuesday #10 - Removing And Installing a Headset
Tech Tuesday #11 - Chain Lube Explained
Tech Tuesday #12 - RockShox Totem and Lyric Mission Control Damper Mod
Tech Tuesday #13 - Shimano XT Crank and Bottom Bracket Installation
Tech Tuesday #14 - Straightening Your Derailleur Hanger
Tech Tuesday #15 - Setting Up Your Front Derailleur
Tech Tuesday #16 - Setting Up Your Cockpit
Tech Tuesday #17 - Suspension Basics
Tech Tuesday #18 - Adjusting The Fox DHX 5.0
Tech Tuesday #19 - Adjusting The RockShox BoXXer World Cup
Tech Tuesday #20 - Servicing Your Fox Float Shock
Tech Tuesday #21 - Wheel Truing Basics
Tech Tuesday #22 - Shimano Brake Pad Replacement
Tech Tuesday #23 - Shimano brake bleed
Tech Tuesday #24 - Fox Lower Leg Removal And Service
Tech Tuesday #25 - RockShox Motion Control Service
Tech Tuesday #26 - Avid BB7 Cable Disk Brake Setup
Tech Tuesday #27 - Manitou Dorado Fork Rebuild
Tech Tuesday #28 - Manitou Circus Fork Rebuild
Tech Tuesday #29 - MRP G2 SL Chain Guide Install
Tech Tuesday #30 - Cane Creek Angleset Installation
Tech Tuesday #31 - RockShox Maxle Lite DH
Tech Tuesday #32 - Find Your Tire Pressure Sweet Spot
Tech Tuesday #33 - Three Minute Bike Preflight Check
Tech Tuesday #34 - MRP XCG Install
Tech Tuesday #35 - Stem Choice and Cockpit Setup
Tech Tuesday #36 - Handlebars - How Wide Affects Your Ride
Tech Tuesday #37 - Repairing A Torn Tire
Tech Tuesday #38 - Coil spring swap
Tech Tuesday #39 - Trailside help: Broken Shift Cable
Tech Tuesday #40 - Installing a Fox Float Air-Volume Spacer
Tech Tuesday #41 - Replace the Seals on Your 2011 RockShox Boxxer World Cup Fork
Tech Tuesday #42 - Clean and Lubricate Your Fox F32 Dust Wiper Seals
Tech Tuesday #43 - Thread Locker Basics
Tech Tuesday #44 - Install a SRAM X.0 Two-By-Ten Crankset
Tech Tuesday #45 - VPP Suspension Bearing Service
Tech Tuesday #46 - Rotor Straightening
Tech Tuesday #47 - Finding and fixing that creak
Tech Tuesday #48 - Bleed and Service Magura Marta Disc Brakes
Tech Tuesday #49 - Cup and Cone Hub Basics
Visit Parktool.com to see their entire lineup of tools and lubes
Author Info:
Must Read This Week
Sign Up for the Pinkbike Newsletter - All the Biggest, Most Interesting Stories in your Inbox
PB Newsletter Signup
Also, cleat angle in relation to natural foot angle wasn't addressed at all... and is very important in cleat setup. Clearly everyone's feet don't sit the same way. You can do real damage to your ankles by setting up the cleat at the wrong angle. It should mimic you natural foot position as closely as possible while taking into account crank position.
Also, cleat position should ultimately be based more on knee position than foot position.
Otherwise, awesome tutorial, and very useful!
As for overuse injuries I think: just ride flat pedals and you won't damage your ankles, further knees and hips. Even when riding in 5.10s your foot will naturally end up where it's best for it. I don't want to open can of worms so I will only say that our bodies have been evolving for hundreds of thousands of years to be better and better runners... push down and backwards, rolling foot. All muscles, all joints work, sharing load. Seated pedalling with immobilized foot, fixed to something, so it can just rotate sideways?
Racing yes - but for anything else, Barefoot pedalling FTW!!!
Shims/wedges/insoles were not addressed at all, so I didn't mention them.
Bottom line: if you have bad knees, see a professional fitter and clip in.
@Rednrook/swearmouth: Of course your foot position moves during your pedal stroke with clipless but it's pretty settled: no more 3mm on each side and 5° from the cleat area to the heel, if you didn't you would have the worst tendinitis ever in your knees (It's how the first Look road clipless pedals were designed in the 80's and then they all switched to Time). Lateral and angular floats are great in clipless pedals, you just need to find a brand that provides the correct one for your knees
@Bayou - Time added a few seasons to my knees after SPDs, but now it's been flats for a bit, but I am interested in meeting a professional fitter and seeing what can be done as trail riding was always a little better clipped in.
Yes there is a professional fitter in town... Me.
@jackhud:
That's what I was referring to... Your foot has to move a bit when you pedal. Limiting and guiding this movement is super important though.
Even after spending inordinate amount of time replicating my comfortable flats position with my cleats and physiotherapy and muscle conditioning, I still get knee pain clipped in. So flats for me from now on - dirt, tarmac, sprint races, endurance. If I was racing elite, I might care, but I'd prefer to drop a few places than to have to pop ibuprofen in order to sleep.
Plus, as suggested in the post below, I can move my foot fore/aft depending on what sort of pedalling I am doing.
I can guarantee you that foot or cleat shims, arch support or simply raising your saddle can solve the problem.
Get properly fitted.
You spent all that money on a full carbon road bike, but you won't drop $100 to get professionally fitted? Think of it this way, you wouldn't drop 2 grand on a suit without getting it tailored, why do any different for a bike, which can actually hurt you physically (not just your reputation
@ freestylAM: there is no surefire way to tell you what angle to set your cleats up at. It depends on natural foot position, toe position/shape, lateral instability in the knees and/or ankles, and shoe fit, as well as a couple of other factors (crank width, for example).
Riding in flat pedals vs cleats in technical cross country means quality VS speed.
Soft shoes like minnaars used with wide platform pedal, well fitted together with spacers to provide stable base, are great. They give you possibility to use all tiny muscles in your foot to balance your body, almost as you would stand on the ground. They also don't lock your foot in the shoe like a ski boot ( i had lots of pain in the foot when riding downhill on SPDs or all day XC rides) But a racing ballerina on non-platform pedal, like eggbeater gives you level of balance comparable to standing with these shoes on the ground and walking in them. However soft shoes+wide platform give you less float than ballerinas and eggbeaters so anyways, you move your foot less freely than on flats.
On tech terrain, steep rocky uphills when speed is low, balance is everything. Flat pedals give you this small bit of movement more, a small bit that is vital when stalling, shifting weight. Just try doing a track stand on flats and in spds and you'll feel the difference. And according to James Wilson there's more and more research confirming that stomping on pedals is as effective as turning circles by activating hamstrings, we don't run faster by pulling our foot up. You are also less likely when pedalling standing in flats to have "lazy leg syndrome" (putting a bit of load on pedal coming up)
...however:
1. if you use the "spacers to provide a stable base" as you suggested, you'll notice that most of the foots tendons (not muscles as much as you'd think) don't actually activate to maintain balance. A fully supported foot doesn't require alterations to foot shape to balance.
2. Your shoes hurt because they don't fit right. Buy better shoes, you won't have pain.
The reason ski boots and bike shoe's "lock your foot in" is because your foot does not need to change shape while pedaling. When you walk or run your metatarsal arch collapses and springs back, to give you more power. This does not happen when riding, and so most (good) bike shoes are designed to prevent metatarsal collapse. (improved power transfer and better bloodflow) As your foot does not collapse and "spread out" you don't need a shoe with as much toe room as a typical skate shoe or runner.
3. on technical terrain, especially climbs, you are pedaling at a far lower cadence than usual. As such, the more torque you can apply to the pedals the better. Thus clipping in when climbing gives you the most advantage. However, if there's truth to your claim, I'm sure we'll see all the Olympic XC athletes switching to 5.10 Freeriders within the next few days.
As a final note, I can't help reading your posts in a Hollywood-Russian accent.
@iamamodel: ...and yet you wonder why you have knee pain on long road rides... I must be missing something.
What you say about balancing is total bullocks. If you have a ballerina shoe on regular xc racing pedal your foot surely does not use any muscles for balancing because you balance with whole foot being nearly a part of whole shoe on a 1x1cm base lying 2cm under your shoe because pedal gives you rotation in all axes. When you stand on wide platform in a looser shoe you can use different areas of your foot to balance - is that why all top dhers ride in soft shoes on platforms?!
I'm sure if they had a roadie coach they would ride in ti-eggbeaters in balerinas who would tell them to spin circles. And they would strongly forbid Danny Hart to do whips because scrubbing is not aerodynamiQ!
And BTW Olympic XC - I wouldn't be suprised if someone showed up with a cyclocross bike - riding skills required to compete on these tracks are a laugh. Lots of XC racing is a fireroad challenge anyways. So I don't fkng talk about racing
@swear: I know absolutely nothing about ski boots... I was extrapolating from my education on road shoes. Turns out they're different... Who knew (LOL)
umm maybe not faster but yes we most definitely run more efficiently by pulling our feet up. Any runner that cares about distance works on getting their heels up, allowing a longer range of motion from contracted to full extension at the knee using gravity to create a pendular transfer of energy and not having to "kick" their feet forward, instead letting gravity do the work and momentum pulls their foot forward.
Somewhat of a personal preference I suppose, but there is convincing evidence that more control and measurable power can be had by having your cleat aft as much as comfortable, from the ball of the foot. It works, try it.
The ball of the foot postion is a throw-back to early days of clipless.
Finally I got fed up and adjust them so my foot position would be the same as with normal platforms, problem solved.
Now I´m really enjoying then, it feels so nice knowing my feet wont slip from the pedals (I ride a hard tail)
Still it´s a little tricky getting off the bike, but it´s OK.
sm-sh 51 : single-release cleats
51 are often black, 56 used to be gold or silver.
i know where it came from and why.
but now, 20 years after toe clips and straps are gone.
there's flats, and there's clips
flats you stand on
clips you clip into
simple see?
I call them what they're called. Customers get confused if I call them clips, because every shop in every country in the whole world calls them clipless pedals.
(and don't get me started on 'power straps')