Tech Tuesday - Steerer tube length
Length is everything: Determining the correct fork steerer tube length is one of the most crucial tasks that can be done on a bike. Too long and you'll be forced to either use an excessive amount of headset spacers (an extremely long steerer could even be considered dangerous) or recut, but if cut too short you may be have to purchase a new crown and steerer tube assembly, an expensive proposition when you consider how expensive many forks have become. So, how does one figure out the correct steerer tube length? Measuring the bike's head tube and factoring in the headset and stem's stack height, along with any additional spacers (or upper crown if the fork is a dual crown model) is one way, but we far prefer to do go with the test fit method described below.
![Tech Tuesday]()
![Tech Tuesday]()
Some helpful pointers:
• While this Tech Tuesday shows you how determine the correct steerer tube length, it doesn't take into account your preferred handlebar height position. Make sure to factor in how many spacers are required to achieve the desired bar height. If the bike or fork is new you may want to leave extra steerer tube length for more spacers than usual, allowing you to adjust the bar height and fine tune your position.
• The phrase "stack height" often refers to the total steerer tube length that is taken up by a headset, although it can also refer to the same thing in a stem. An integrated headset, with its headset bearings set into the cups that are hidden within the bike's head tube, will feature a lower stack height, while a standard headset with external bearings will take up more length.
• A new fork will come with a steerer tube that will be too long, meaning that you'll have to cut it shorter once you know the length that you require. If purchasing a used fork, you'll need to make sure that the steerer tube hasn't been cut too short by the previous owner, making it perfect for their bike but too short for yours. Always measure the steerer tube length of any used fork to be positive that it is long enough to fit your bike. Too short and the stem will not have enough clamping surface area on the steerer, making for a very dangerous situation. It is also common for manufacturers to recommend not exceeding 20mm of extra stack height on top of the height of your headset and stem. This is especially true of carbon fiber steerer tubes.
• A headset's stack height is often listed on the packaging or website, but it is always better to install and measure the steerer tube length required, as opposed to measuring the head tube, combining that with the headset's advertised stack height, and cutting the steerer based on this info. It takes longer to install all of the parts and measure, but it is much more fool-proof.
• Headset spacers come in many different sizes, including 2mm, 5mm, 10mm, 15mm, and 20mm options. This allows you to take up the correct amount of steerer tube length without adding excessive stack height.
How a headset tightens: A modern threadless headset, be it an integrated or more conventional model, tightens by compressing the upper and lower elements together tight enough to prevent rattling, but not so tight as to prevent it from turning freely. How does it work? In order for the headset to tighten, a star nut (or expanding plug for carbon steerer tubes) is pressed into the steerer tube, allowing a bolt to run through the headset's top cap above the stem and threaded into it. With the stem (and in the case of a dual crown fork, the upper crown) loose, tightening the bolt compresses everything together and eliminates and back and forth play. If the steerer tube is too long, the top cap will bottom on it, preventing the headset from being able to be fully tightened. Check out this earlier Tech Tuesday to learn more about adjusting your headset properly.
![Tech Tuesday]()
![Tech Tuesday]()
![Tech Tuesday]()
![Tech Tuesday]()
![Tech Tuesday]()
Do you have anything to add? Put it down below!
Past Tech Tuesdays:
Visit Parktool.com to see their entire lineup of tools and lubes
Your fork's steerer tube length depends on a number of different factors, including the bike's head tube length, headset stack height (including the cups, bearings, crown race and any associated parts) required headset spacers, and the stem's stack height. The steerer tube must not be so long as to protrude from the top of the stem, preventing the headset from being tightened, but also must be long enough to allow for enough clamping contact with the stem.
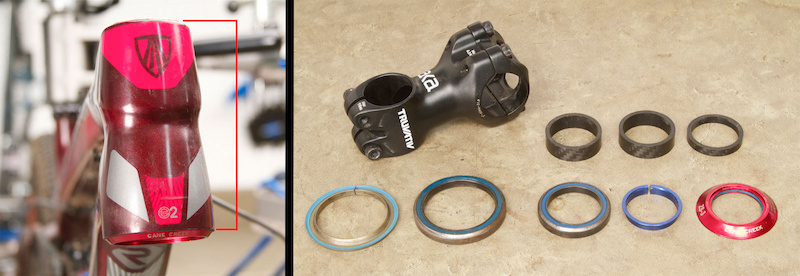
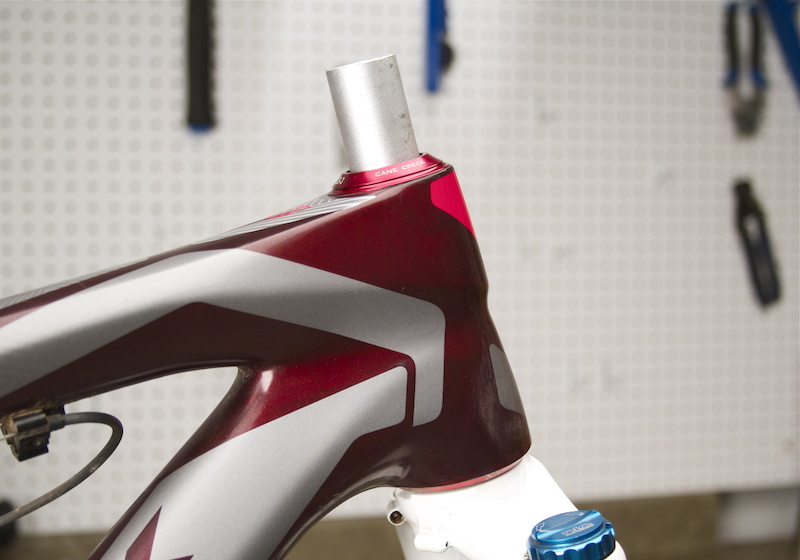
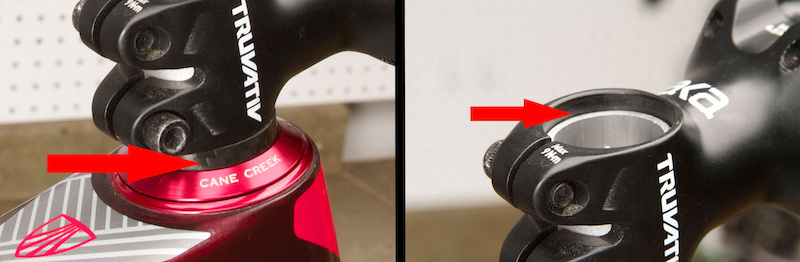
The frame shown above already has its integrated headset cups installed into the frame. Some headsets will feature minimal stack height like the Cane Creek model pictured, whereas others may take up much more steerer tube length.
The frame shown above already has its integrated headset cups installed into the frame. Some headsets will feature minimal stack height like the Cane Creek model pictured, whereas others may take up much more steerer tube length.
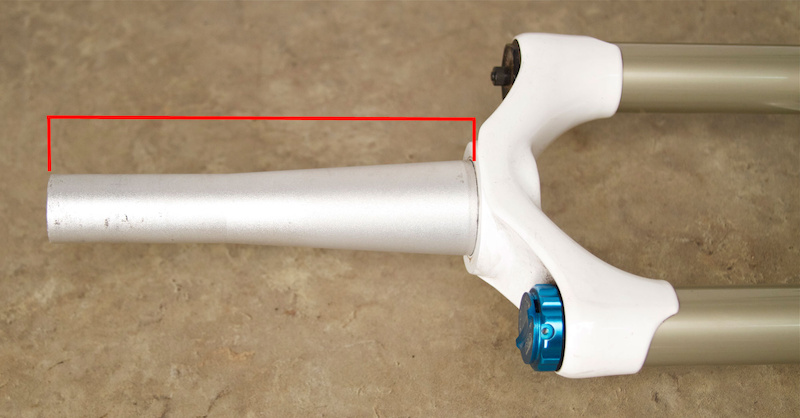
The steerer tube, in this case a tapered version on a Magura Thor fork, is highlighted above in red. This passes through your bike's head tube, along with all of the headset parts, and the stem is clamped in place at the top end.
Some helpful pointers:
• While this Tech Tuesday shows you how determine the correct steerer tube length, it doesn't take into account your preferred handlebar height position. Make sure to factor in how many spacers are required to achieve the desired bar height. If the bike or fork is new you may want to leave extra steerer tube length for more spacers than usual, allowing you to adjust the bar height and fine tune your position.
• The phrase "stack height" often refers to the total steerer tube length that is taken up by a headset, although it can also refer to the same thing in a stem. An integrated headset, with its headset bearings set into the cups that are hidden within the bike's head tube, will feature a lower stack height, while a standard headset with external bearings will take up more length.
• A new fork will come with a steerer tube that will be too long, meaning that you'll have to cut it shorter once you know the length that you require. If purchasing a used fork, you'll need to make sure that the steerer tube hasn't been cut too short by the previous owner, making it perfect for their bike but too short for yours. Always measure the steerer tube length of any used fork to be positive that it is long enough to fit your bike. Too short and the stem will not have enough clamping surface area on the steerer, making for a very dangerous situation. It is also common for manufacturers to recommend not exceeding 20mm of extra stack height on top of the height of your headset and stem. This is especially true of carbon fiber steerer tubes.
• A headset's stack height is often listed on the packaging or website, but it is always better to install and measure the steerer tube length required, as opposed to measuring the head tube, combining that with the headset's advertised stack height, and cutting the steerer based on this info. It takes longer to install all of the parts and measure, but it is much more fool-proof.
• Headset spacers come in many different sizes, including 2mm, 5mm, 10mm, 15mm, and 20mm options. This allows you to take up the correct amount of steerer tube length without adding excessive stack height.
How a headset tightens: A modern threadless headset, be it an integrated or more conventional model, tightens by compressing the upper and lower elements together tight enough to prevent rattling, but not so tight as to prevent it from turning freely. How does it work? In order for the headset to tighten, a star nut (or expanding plug for carbon steerer tubes) is pressed into the steerer tube, allowing a bolt to run through the headset's top cap above the stem and threaded into it. With the stem (and in the case of a dual crown fork, the upper crown) loose, tightening the bolt compresses everything together and eliminates and back and forth play. If the steerer tube is too long, the top cap will bottom on it, preventing the headset from being able to be fully tightened. Check out this earlier Tech Tuesday to learn more about adjusting your headset properly.
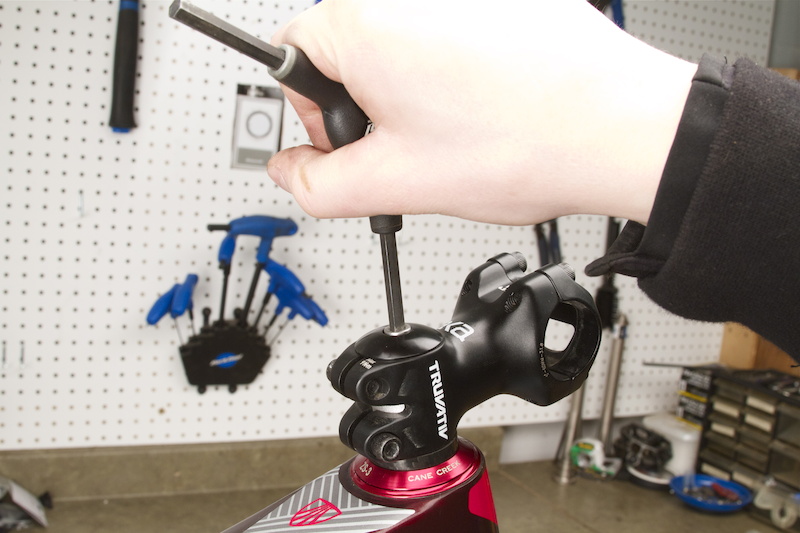
Step 1 - Install the headset into your bike's head tube (refer to the headset manufacturers instructions) and slide the fork up and into place. Take a moment to be 100% sure that the fork is fully seated into the head tube and that the upper and lower headset assemblies are seated correctly. Look for gaps between the bearings covers, or between the headset's crown race and lower bearing.
Even though some headsets use tolerances tight enough that they may hold the fork in place, it's good to either have a friend hold it up in place or support the fork's dropouts from below with a chain. The goal is to simulate a completely installed fork, allowing you to determine the amount of steerer tube required.
Even though some headsets use tolerances tight enough that they may hold the fork in place, it's good to either have a friend hold it up in place or support the fork's dropouts from below with a chain. The goal is to simulate a completely installed fork, allowing you to determine the amount of steerer tube required.
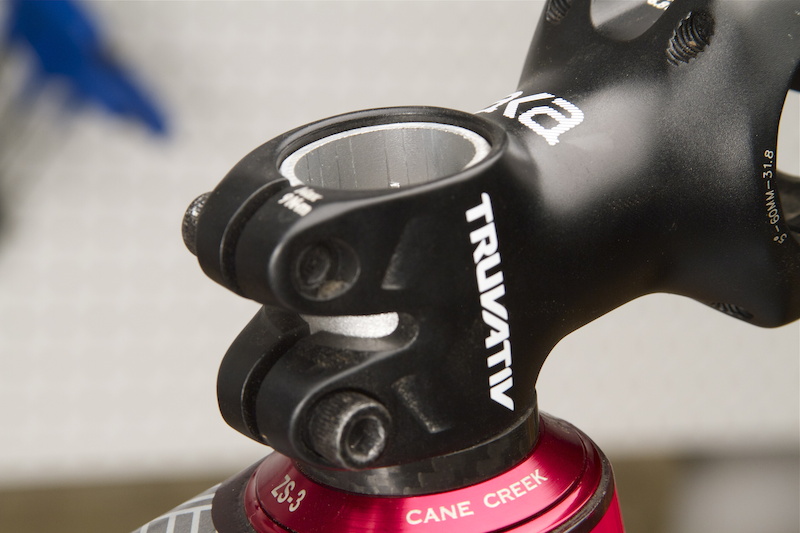
Step 2 - With the fork slid up and into place, a section of the steerer tube will protrude from the top of the head tube. Install the stem and the spacers required to achieve your desired position, leaving the clamping bolts loose. The photo above shows extra steerer tube length protruding from the top of the stem, although it isn't excessive. Riders who would prefer to run a low bar height can put a spacer atop the stem to take up that extra length (a thin 2mm spacer between the stem and upper headset bearing cap is a good idea as well). Unless a spacer is added, the headset won't tighten in the configuration shown above because the top cap will simply bottom on the exposed steerer tube, preventing it from compressing everything together.
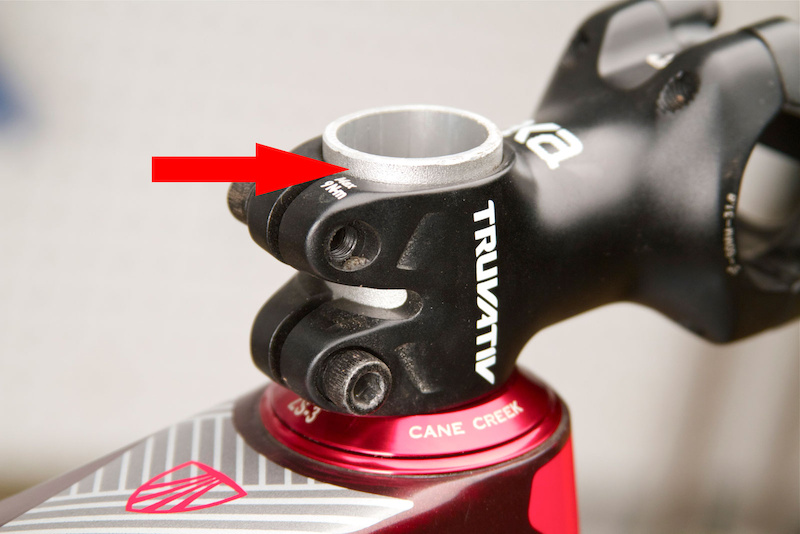
Step 3 - In order to tighten the headset we needed to add a headset spacer, in this case a 10mm tall unit. We installed it under the stem (left), thus raising the bar height slightly. Placing it on top of the stem will also take up the steerer tube length and allow you to tighten the headset, but preserve the low bar height. With the spacer installed, the stem is raised enough to take up the extra steerer tube length. Note that the top of the stem sits roughly 5mm above the top of the steerer tube, leaving enough contact area between the stem and steerer tube for a solid grip. It isn't recommended to have more then 5mm of gap between the top of the stem and the top of the steerer tube.
Step 4 - Install the headset top cap, turning the preload bolt clockwise to tighten the headset, compressing the parts together. If you are unsure of how tight to properly adjust the headset's tension you can check it our an earlier Tech Tuesday in the links below that covers the subject. Clamp down the stem's steerer tube clamping bolts to the recommended torque.
Step 5 - After checking the headset for play and ensuring that it still turns freely, leave the stem's steerer clamp bolts tight and remove the headset's top cap. Because the tightening the headset compressed all of the headset components together, you will likely find that the 5mm gap between the top of the stem and the top of the steerer tube has now shrunk down to 2mm or 3mm (as shown in the photo above) - this is perfect. You want to make sure that the steerer tube is not flush with the top of the stem, preventing you from tightening the headset down the road. If it is, add a 2mm or 5mm spacer to the top of the stem. Keep in mind that a headset will "settle in" during the first few rides, likely requiring you to re-tighten it a final time. You will need a few extra millimeters of clearance to be able to do this. Reinstall the top cap and preload bolt.
Past Tech Tuesdays:
Visit Parktool.com to see their entire lineup of tools and lubes
Author Info:

Must Read This Week
Sign Up for the Pinkbike Newsletter - All the Biggest, Most Interesting Stories in your Inbox
PB Newsletter Signup
In fact, many stems which run internal wedge setups to grip the steerer tube tightly concentrate the forces into a very small section of steerer tube and they've operated fine and safely that way for about as long as threadless headsets have been around.
I am being picky though your bang on. That little gap has been pretty much standard for ever and I would imagine every manufacturer accepts it as such
or you could get one of these :-)
bikefat.com/straitline-quickie-stem
If this wasn't the case, you'd see stem manufactures bragging about how tall there stems are.
For me this article completely fails to explain WHY this would be "one of the most crucial tasks". It explains well what to do and how. But why you do this?! Who has to do this?! When do you do this?! These are the main questions that make people read an article.
"While this Tech Tuesday shows you how determine the correct steerer tube length, it doesn't take into account your preferred handlebar height position."
Regardless of steerer tube height, THAT is something I can imagine a lot of people would like to see a tech on! Apparently knowledge about handlebar height is prerequisite for the procedures in this article. Yet there is nothing to help you with that, nor a link to some info. If there is a tech on that, I couldnt find it.
It seems that syphilis might have come from the Americas....
en.wikipedia.org/wiki/Syphilis#History
Who knew eh?
;-)
Good job England. Good job.
www.bikepro.com/products/headsets/tioga_hset.html
en.wikipedia.org/wiki/List_of_English_inventions_and_discoveries
but yes, bring on scottish independence
As for the argument of a broken sternum from the steerer, come on man your gonna be in a crash to do that and whose to say you wouldnt break your sternum on the stem or if you come off and land on your pedal or even worse hit a rock or tree or other object on the trail ?
just bolt it all up so theres as little headrock as possible. then measure how much steerer is sticking up above the point you want it at. draw a line with perminant pen all the way around (dont worry about getting it on stuff, comes off easy with white spirit) then you have your cut mark. no un nessisary measuring rubbish. you know that you wont cut it too short this way too (unless your incredibly stupid)
P.S. Aaaaaa you meant your giggly concern about pehnis
Think positive, see that as a business opportunity.