Air shocks - helpful set up hints.
Air shock technology has come a long way over the past few years. Today's suspension is less reactive to pedaling and more tunable than ever before...but, how do you set it up?
Read on for helpful hints,Bicycle suspension has become more and more complicated every year. In the store, your shock seemed great with knobs, valves and doofers offering limitless adjustability. Now, as you are in the moments before a ride trying to get the shock set up, the only thing limitless is confusion.
Shock setup is to say the least, less than intuitive...
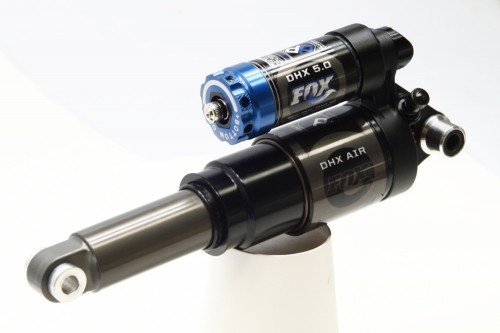
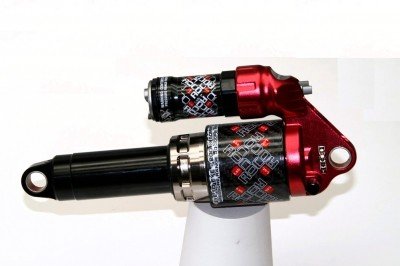
The two most widely used types of air shocks on the market are Fox and Marzocchi, although they are based on different technology, adjustment is relatively similar. In this article I will go over the adjustment of a Fox DHX-5.0 Air and a Marzocchi Roco Air TST-R. If you are using a different shock the air pressures are similar to what I will mention but it is a good idea to consult your manual.
On first inspection, the DHX and the Roco look quite similar. They both feature two air chambers, a rebound knob and an Pedaling Efficiency Switch.
![photo]()
![photo]()
That is great...but – what do they do?
The main air chamber is your main spring, this is the side mounted valve on the main body. The pressure in this valve will control the overall stiffness and sag on your bike. When setting up your shock, regardless of brand it is a good idea to start by inflating this chamber to your body weight in air pressure. (if you weigh 170lbs, inflate to 170psi) From this base there is room for adjustment. For a Marzocchi shock you will likely let out air while a Fox will require increased pressure. Adjustment from this reference point should be made to adjust for optimal sag (usually between 20 and 30 percent) based on riding type.
The Second, smaller air chamber will adjust how progressive the shock is. Simply, the more air you put in the assist valve, the harder it will be to bottom out. When setting up your bike, if unsure, make the two air-pressures equal and adjust from there. Both the DHX Air and the ROCO will have minimum and maximum air pressure recommendations on this chamber-stay within those measurements.
On the Fox shock, you will also notice a knob called the bottom out adjustment. This knob controls the air volume in the boost valve. Wound all the way in is the lowest volume setting, where the bike will ramp up (get stiffer) late in the travel. Wound out, in the high volume setting the shock will ramp up slower through the entire length of the travel creating a more even feel.
![photo]()
Rebound adjustment will control how fast the shock ‘springs back’ after being compressed. The rebound knob is a small dial found at the base of the shock on the main body. When adjusting rebound there are two requirements to think about. The rebound should be slow enough that it does not give a bucking sensation and fast enough that it has decompressed fully before the next hit. Remember; when it comes to rebound, increasing rebound damping will equate to a slower return.
The last adjustment on the shock is the Pedal Efficiency Switch. This adjustment is where you will find numerous confusing names which all pretty much mean the same thing. Fox calls their system ProPedal while Marzocchi uses TST. What are these adjustments? When engaged, the shock will have reduced pedal bob and be more efficient while climbing. To engage the switch move the pro-pedal to ‘Max’ position. On the Roco shock, rather than max/min, labels you will see CL and DS. CL is used while climbing while DS is used while descending. Simple enough? Just remember to switch them back to their ProPedal Off and DS positions for those long descents as your shock will perform better that way.
It should also be noted that there are both min. and max. pressures for all shocks. Be sure to check labels and your owner’s manual as it can be potentially dangerous to be outside the recommended pressure range.
Your shock adjustment will not be perfect out of the box. The best way to dial it in is to throw a shock pump in your bag and hit the trails. Adjust it as you go.
-Dustan
Originally posted at: norco.wordpress.com
Read on for helpful hints,Bicycle suspension has become more and more complicated every year. In the store, your shock seemed great with knobs, valves and doofers offering limitless adjustability. Now, as you are in the moments before a ride trying to get the shock set up, the only thing limitless is confusion.
Shock setup is to say the least, less than intuitive...
The two most widely used types of air shocks on the market are Fox and Marzocchi, although they are based on different technology, adjustment is relatively similar. In this article I will go over the adjustment of a Fox DHX-5.0 Air and a Marzocchi Roco Air TST-R. If you are using a different shock the air pressures are similar to what I will mention but it is a good idea to consult your manual.
On first inspection, the DHX and the Roco look quite similar. They both feature two air chambers, a rebound knob and an Pedaling Efficiency Switch.
That is great...but – what do they do?
The main air chamber is your main spring, this is the side mounted valve on the main body. The pressure in this valve will control the overall stiffness and sag on your bike. When setting up your shock, regardless of brand it is a good idea to start by inflating this chamber to your body weight in air pressure. (if you weigh 170lbs, inflate to 170psi) From this base there is room for adjustment. For a Marzocchi shock you will likely let out air while a Fox will require increased pressure. Adjustment from this reference point should be made to adjust for optimal sag (usually between 20 and 30 percent) based on riding type.
The Second, smaller air chamber will adjust how progressive the shock is. Simply, the more air you put in the assist valve, the harder it will be to bottom out. When setting up your bike, if unsure, make the two air-pressures equal and adjust from there. Both the DHX Air and the ROCO will have minimum and maximum air pressure recommendations on this chamber-stay within those measurements.
On the Fox shock, you will also notice a knob called the bottom out adjustment. This knob controls the air volume in the boost valve. Wound all the way in is the lowest volume setting, where the bike will ramp up (get stiffer) late in the travel. Wound out, in the high volume setting the shock will ramp up slower through the entire length of the travel creating a more even feel.

Rebound adjustment will control how fast the shock ‘springs back’ after being compressed. The rebound knob is a small dial found at the base of the shock on the main body. When adjusting rebound there are two requirements to think about. The rebound should be slow enough that it does not give a bucking sensation and fast enough that it has decompressed fully before the next hit. Remember; when it comes to rebound, increasing rebound damping will equate to a slower return.
The last adjustment on the shock is the Pedal Efficiency Switch. This adjustment is where you will find numerous confusing names which all pretty much mean the same thing. Fox calls their system ProPedal while Marzocchi uses TST. What are these adjustments? When engaged, the shock will have reduced pedal bob and be more efficient while climbing. To engage the switch move the pro-pedal to ‘Max’ position. On the Roco shock, rather than max/min, labels you will see CL and DS. CL is used while climbing while DS is used while descending. Simple enough? Just remember to switch them back to their ProPedal Off and DS positions for those long descents as your shock will perform better that way.
It should also be noted that there are both min. and max. pressures for all shocks. Be sure to check labels and your owner’s manual as it can be potentially dangerous to be outside the recommended pressure range.
Your shock adjustment will not be perfect out of the box. The best way to dial it in is to throw a shock pump in your bag and hit the trails. Adjust it as you go.
-Dustan
Originally posted at: norco.wordpress.com
Author Info:

Must Read This Week
Sign Up for the Pinkbike Newsletter - All the Biggest, Most Interesting Stories in your Inbox
PB Newsletter Signup
clean, helpful article. any coil shock or air fork crash-courses in the offing perchance?
I have a DHX Air 4.0 on my freeride bike I bought last summer. It's a single pivot frame, which means degressive characteristics. The Fox bottomed out often and did not have any mid-stroke damping. I opened the shock and filled the second main air chamber first with a piece of plastic, as it worked with silicone. Reduced Main Volume -> less pressure and more mid stroke. But it still bottomed hard. So I opened the piggy back and controlled the ifp- setting (internal floating piston). was about 33mm from the screwed cap. Removed the Cap and the ifp, filled in a bit of oil, and set the ifp to around 22 or 23 mm from end cap (which is 17mm high) (less volume, more progression). Fact is, it doesn't bottom out any more. Perfect progression. The stroke stops like 1-2mm before bottom out on big jumps. PERFECT! Mid stroke feels better, but I don't know if it's just because I spent so much work on it. ;-) I think Air shocks in general are a great addition to coil ones. But the manufacturers should offer smaller main air chambers and setup- changes without high pricing as accesoires/aftermarket items to give anyone the opportunity to get the characteristics they like. My DHX runs very nice since self-adjusting. So long ... Andy
P.S. the only reason i went on this little rant is because this article only refers to the fox and marzocchi, and i know this article was meant for the majority (those who own a fox or a marzocchi), but it would be nice to give an explanation for the minority (manitou owners) out there espescially when it's about such a great product that deserves much more publicity then it gets
A better explaination of Fox's air pressure/bottom-out resevoir volume is: When the canister is high volume (decreased bottom out), the air pressure effects the first 50% of the spring curve and when the volume is low (increased bottom-out), air pressure will effect the last 50% of the curve, adding more progression to the end of the stroke. What the article said is basically right on though.
Yes any chance of an explaination on Zokki AM range? good luck. lol
The purpose of the sag is so that when you're riding your not bottoming out OR topping out. This keeps your wheel on the ground and makes your ride a lot smoother!
To adjust sag: the easiest way is to adjust the air in the main chamber until you get the desired sag. The more adjustments your shock has the more you can fine tune your sag. Basically you have to play with it. Each frame has a different set-up due to all the different types of geometry so not all full suspension bikes would take the same adjustments for the same amount of tuning.
If I've missed something or something doesn't make sense please add-on!
As to the air vs spring shock, Its all to riders preference. I personally stick with my coil spring seems a little more reliable tried and true, that and if you ever blow out your shock atleast you got the spring to get you down the hill where as you blow out an air shock your done for and hiking down the rest of the way.