The Basics of Light for Photography
Light is the most important part of every photo we take, it's what creates everything that we see and affects how it appears. Understanding a little bit about it can really help to improve the quality of our photos and videos.
Natural Light
Light is what allows us to see. It is what shapes and colors every object we can see with out eyes, it creates depth, mood, and color. The word photography comes from “photo” or “light” and “graphy” or “writing”, so photography essentially means “light writing” .The objective of this tutorial is to learn how to see light and use it to our advantage and create interesting and exciting photos. At the end of this tutorial you should have a basic understanding of the following fundamentals of light:
1. Exposure - how bright a scene is and how it effects our image.
2. Quality - how focused or diffuse light is.
3. Color - the color of the light in an image.
4. Direction - where is the light coming from?
5. Highlight - the brightest part of the image
6. Shadow - the darkest part of the image.
7. Contrast - The difference between the bright part of an image and the dark part of an image
How we see
When we see an object we are seeing the light reflected off of it. Sunlight contains light of every color and when it illuminates an object we are seeing certain colors of light reflected by that object that then travel into our eyes. Red objects reflect red light, and green objects reflect green light. Dark objects reflect less light than bright objects. For the purposes of this lesson the most important thing we need to know is that what we see is created by light reflecting off of everything and traveling into out eyes. A photograph is created by capturing the light that is reflecting off of our scene and traveling into our camera, where it is captured by film or a digital sensor.
There is at least one entire field of physics devoted to the study of light and how it behaves, however this type of in depth study is beyond the scope of this tutorial.
Basics of Light
1. Exposure
Exposure is the overall brightness or darkness of a scene. A neutral or normal exposure is one which creates an image that looks similar to how we see it with our eyes. A typical scene during the day has about 10 stops of light in it, and the average high end DSLR captures between 5 and 7 stops. Our eyes can take in somewhere around 20 stops. What this means for us is that what we see in real life is not what we get in the camera or on the screen or in print.
![photo]()
![photo]()
![photo]()
2. Quality
As well as being light or dark, light can also be soft or hard. This is primarily a function of how large the light source is compared to the subject. A large light source close to the subject creates a very soft light with soft shadows if any, the light wraps around the subject. A small bright light far from our subject creates a hard light with hard well defined shadows.
Sunlight may at first appear to be a small light source, however it is both small and soft as the earth’s atmosphere diffuses a lot of it, and it also tends to bounce and reflect off of lighter or bright objects. Fog and cloud also do a lot to diffuse and soften sunlight. While a single ray of sunlight in the forest can be fairly hard, full late afternoon sun in a brighter location (snow, concrete parking lot, dusty dirt lot) is a lot softer. Part of this has to do with the angle the sunlight travels through the atmosphere. In the morning and evening the sun is at a low angle and travels through significantly more of the atmosphere than it does at mid day, this helps to make early and late light a lot softer than midday light. Evening light in developed areas of the world is also softer than morning light as air pollution builds during the day and helps to diffuse the sunlight further. This pollution normally dissipates a lot at night when temperatures are cooler and the world is asleep, making morning light crisper and cleaner.
![photo]()
3. Color
Sunlight varies in color greatly and this color is measured as temperature in degrees Kelvin. Normal daylight film used to be calibrated at about 5600K which produced a nice image in the middle of the day but was much warmer (towards the red side) in the morning and evening. The diffusing effect of the atmosphere also colors daylight, and normally daylight can vary from a warm 4000K in the late evening to a cool 6500K on a cloudy day. 6500K is considered to be the actual color of daylight without the effect of the atmosphere. Tungsten lightbulbs put out a light that is really orange at around 3200K and fluorescent bulbs can now vary greatly in color. Note that when you are adjusting the color of a RAW photo with the color slider it makes changes opposite to what you would think initially. Moving the slider to a lower number makes images appear cooler, while a higher number makes images appear warmer.
![photo]()
![photo]()
4. Direction
Light travels in a direction for the most part. It may be hard or soft, but the sun is a single light source and that light travels in straight lines radiating out from it. It may bounce and reflect off of things, but try to keep in mind that it has direction. Because of this things can look quite different depending on which direction we view them from, they can be front lit, back lit, or side lit. And everything in between. Remember that this applies to all light sources as well and not just the sun.
We can use natural objects to block or redirect (reflect) the light and change it’s direction, or we can place objects ourselves.
![photo]()
![photo]()
![photo]()
5. Highlight
The highlight is the brightest part of an image. When we are dealing with a single light source this is normally a reflective surface or object facing the light source.
6. Shadow
Shadow is the darkest part of an image. When we are dealing with a single light source this is normally a non-reflective object or surface facing away from the light source or in the shadow of something else.
![photo]()
![photo]()
7. Contrast
Contrast in an image is the measurement of the difference between the highlights and the shadows. If there is a lot of range between the two there is very little contrast, if there is little range between the two then an image is said to have high contrast. Images shot on a cloudy day usually are low in contrast, and images shot in the bright sun are generally high in contrast.
Things to consider when shooting
1. See the light - What does it look like?
Learn to see what the light actually looks like before you shoot. Take a look around, is it bright or dark? Where is the light coming from? Are there shadows and highlights? How is the contrast?
Take the time to evaluate the scene you are shooting and look at it from different angles, not just for composition but for light as well. If you’re shooting front lit in an area of high contrast i.e. bright highlights and dark shadows, it may be very difficult to see anything, try looking at it from a backlit angle. Look at large areas of light and shadow and see if you can use them compositionally. Plants and greenery and other translucent objects often look better backlit.
2. Control the light - Can you make the light work for you?
Can you use a scrim to block unwanted light, or a reflector to add some light? Sometimes it doesn’t take much to change average light into good light. The easiest way is usually to choose a different time of day when the light works for you. Early morning or late afternoon/evening traditionally has the best light, but sometimes there is less than an hour of the day when the light might be perfect for what you need. Light between two trees or buildings for example.
![photo]()
Read up on previous tutorials
Basic Workflow
Custom Color Profiles
Basic Composition
Natural Light
Light is what allows us to see. It is what shapes and colors every object we can see with out eyes, it creates depth, mood, and color. The word photography comes from “photo” or “light” and “graphy” or “writing”, so photography essentially means “light writing” .The objective of this tutorial is to learn how to see light and use it to our advantage and create interesting and exciting photos. At the end of this tutorial you should have a basic understanding of the following fundamentals of light:
1. Exposure - how bright a scene is and how it effects our image.
2. Quality - how focused or diffuse light is.
3. Color - the color of the light in an image.
4. Direction - where is the light coming from?
5. Highlight - the brightest part of the image
6. Shadow - the darkest part of the image.
7. Contrast - The difference between the bright part of an image and the dark part of an image
How we see
When we see an object we are seeing the light reflected off of it. Sunlight contains light of every color and when it illuminates an object we are seeing certain colors of light reflected by that object that then travel into our eyes. Red objects reflect red light, and green objects reflect green light. Dark objects reflect less light than bright objects. For the purposes of this lesson the most important thing we need to know is that what we see is created by light reflecting off of everything and traveling into out eyes. A photograph is created by capturing the light that is reflecting off of our scene and traveling into our camera, where it is captured by film or a digital sensor.
There is at least one entire field of physics devoted to the study of light and how it behaves, however this type of in depth study is beyond the scope of this tutorial.
Basics of Light
1. Exposure
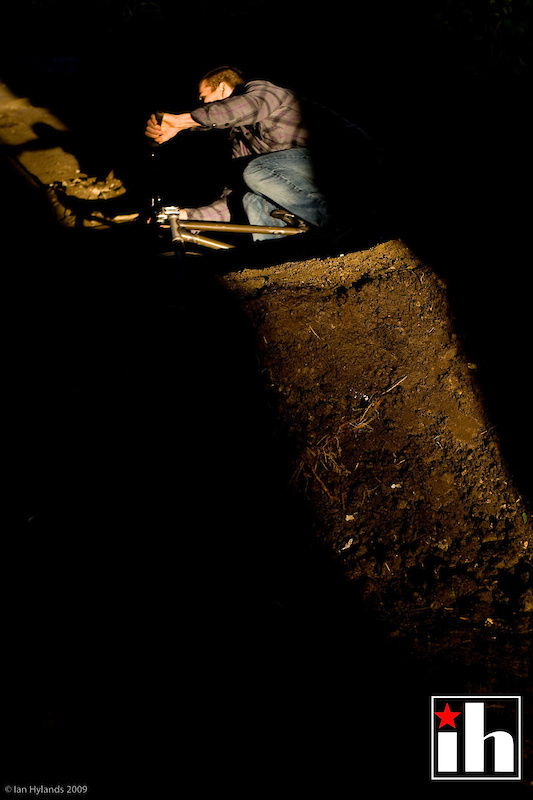
Exposure is the overall brightness or darkness of a scene. A neutral or normal exposure is one which creates an image that looks similar to how we see it with our eyes. A typical scene during the day has about 10 stops of light in it, and the average high end DSLR captures between 5 and 7 stops. Our eyes can take in somewhere around 20 stops. What this means for us is that what we see in real life is not what we get in the camera or on the screen or in print.
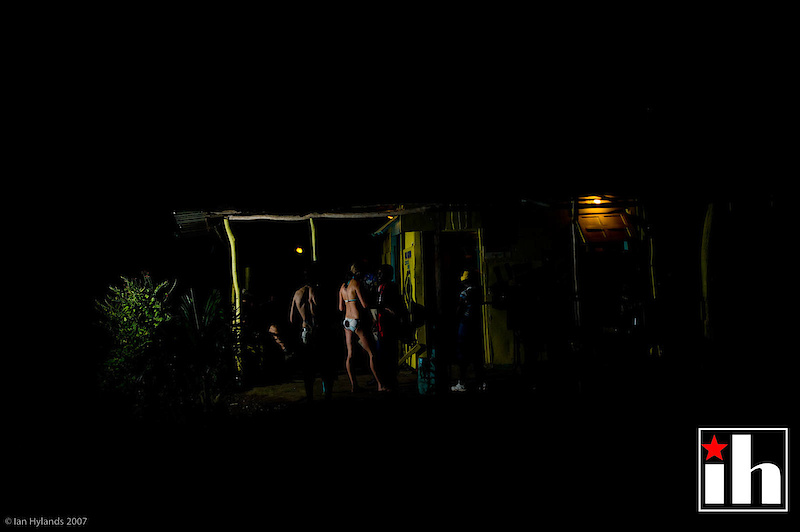
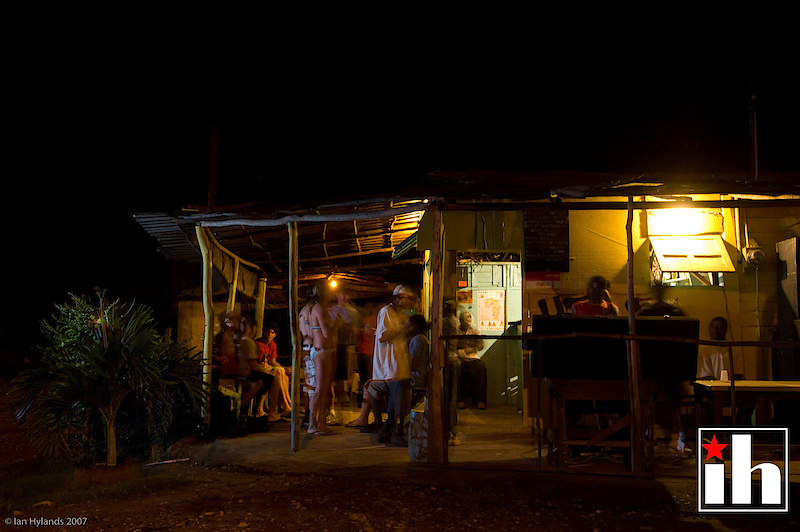
I exposed the first shot for the flash, but the ambient light was really dark so in the second shot I extended the shutter speed a fair bit to brighten up the ambient light and also opened up the aperture a bit to brighten the flash. Both of these photos have exactly the same lighting, the only difference is the camera settings.

Sequence strip of exposures showing my Nikon D3s range over 9 stops. The light is identical in all photos, all that changed was the shutter speed.
2. Quality
As well as being light or dark, light can also be soft or hard. This is primarily a function of how large the light source is compared to the subject. A large light source close to the subject creates a very soft light with soft shadows if any, the light wraps around the subject. A small bright light far from our subject creates a hard light with hard well defined shadows.
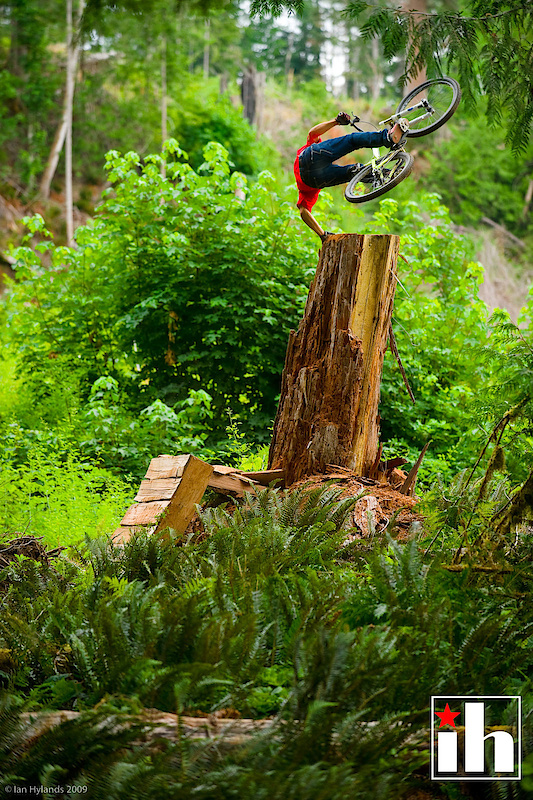
Sunlight may at first appear to be a small light source, however it is both small and soft as the earth’s atmosphere diffuses a lot of it, and it also tends to bounce and reflect off of lighter or bright objects. Fog and cloud also do a lot to diffuse and soften sunlight. While a single ray of sunlight in the forest can be fairly hard, full late afternoon sun in a brighter location (snow, concrete parking lot, dusty dirt lot) is a lot softer. Part of this has to do with the angle the sunlight travels through the atmosphere. In the morning and evening the sun is at a low angle and travels through significantly more of the atmosphere than it does at mid day, this helps to make early and late light a lot softer than midday light. Evening light in developed areas of the world is also softer than morning light as air pollution builds during the day and helps to diffuse the sunlight further. This pollution normally dissipates a lot at night when temperatures are cooler and the world is asleep, making morning light crisper and cleaner.
Crisp early morning light
3. Color
Sunlight varies in color greatly and this color is measured as temperature in degrees Kelvin. Normal daylight film used to be calibrated at about 5600K which produced a nice image in the middle of the day but was much warmer (towards the red side) in the morning and evening. The diffusing effect of the atmosphere also colors daylight, and normally daylight can vary from a warm 4000K in the late evening to a cool 6500K on a cloudy day. 6500K is considered to be the actual color of daylight without the effect of the atmosphere. Tungsten lightbulbs put out a light that is really orange at around 3200K and fluorescent bulbs can now vary greatly in color. Note that when you are adjusting the color of a RAW photo with the color slider it makes changes opposite to what you would think initially. Moving the slider to a lower number makes images appear cooler, while a higher number makes images appear warmer.
An evenly lit cloudy day photo, Darren Berrecloth killing it for NWD10. While I shoot with flash a lot, sometimes you just don't need it
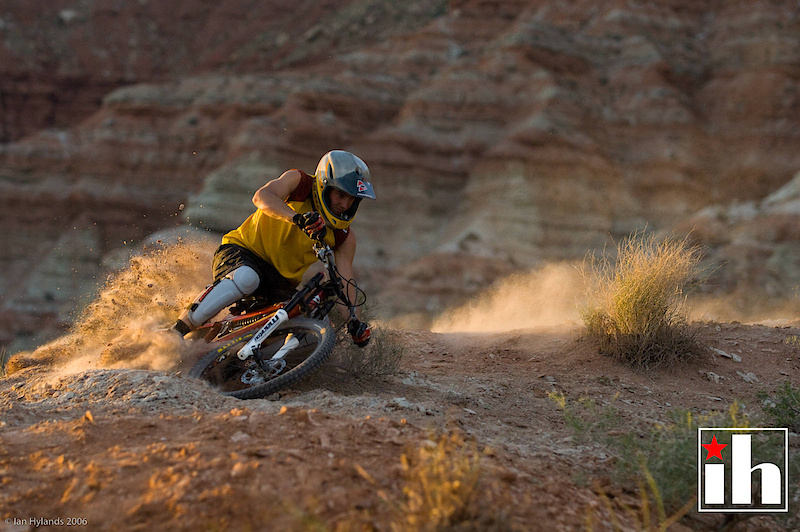
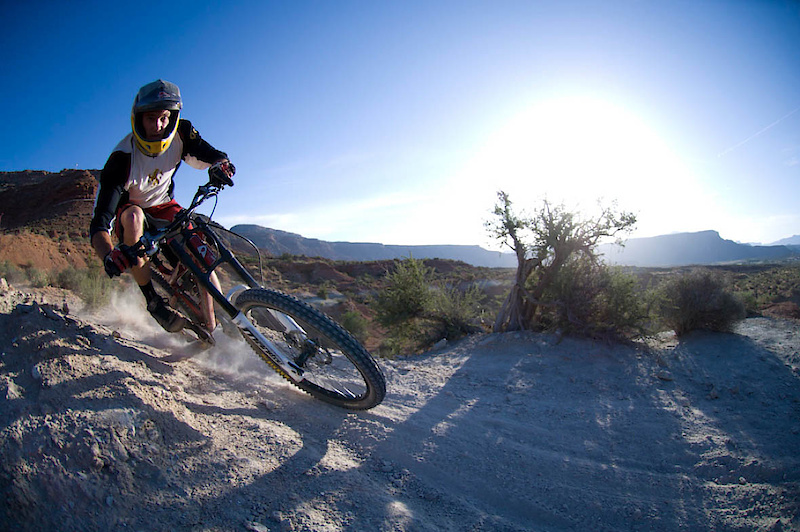
Super warm evening light. This photo was taken less than 3 or 4 minutes before the sun disappeared. Mike Kinrade, almost dragging bars in Utah
4. Direction
Light travels in a direction for the most part. It may be hard or soft, but the sun is a single light source and that light travels in straight lines radiating out from it. It may bounce and reflect off of things, but try to keep in mind that it has direction. Because of this things can look quite different depending on which direction we view them from, they can be front lit, back lit, or side lit. And everything in between. Remember that this applies to all light sources as well and not just the sun.
We can use natural objects to block or redirect (reflect) the light and change it’s direction, or we can place objects ourselves.
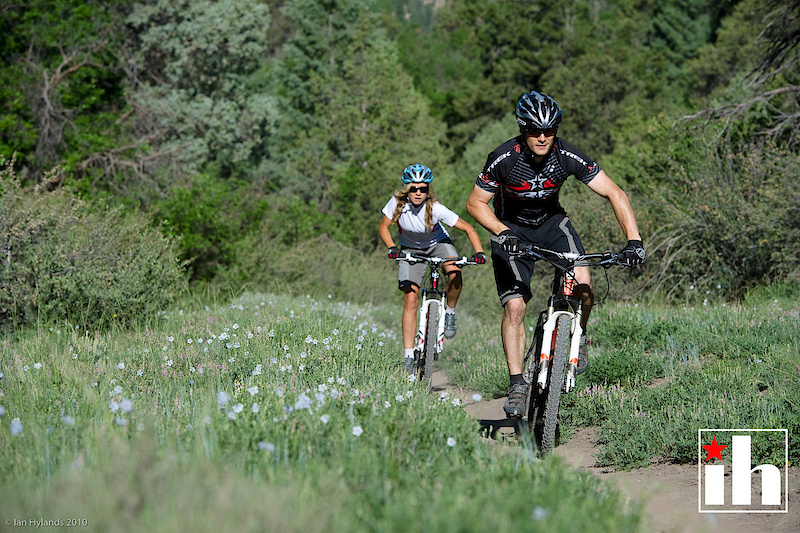
This image is a front lit shot of the exact same trail at almost the same time of day as the back lit shot below
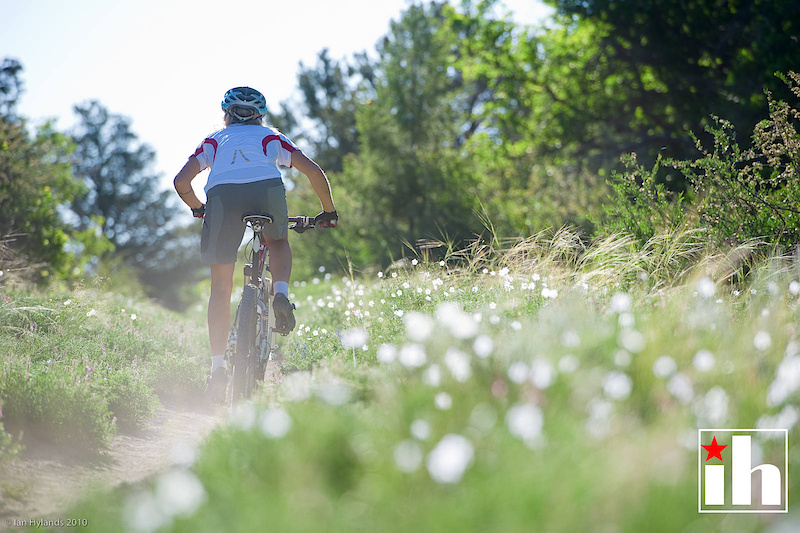
This back lit shot has a lot more punch to it than the front lit shot above. Same trail, almost the same time...
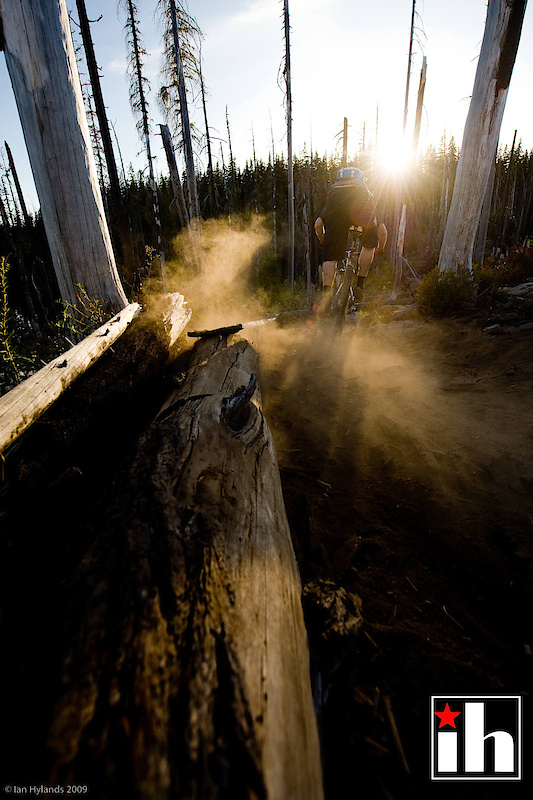
The dust in this back lit shot wouldn't look nearly as interesting if it was shot from the front. Kirt Voreis...
5. Highlight
The highlight is the brightest part of an image. When we are dealing with a single light source this is normally a reflective surface or object facing the light source.
6. Shadow
Shadow is the darkest part of an image. When we are dealing with a single light source this is normally a non-reflective object or surface facing away from the light source or in the shadow of something else.
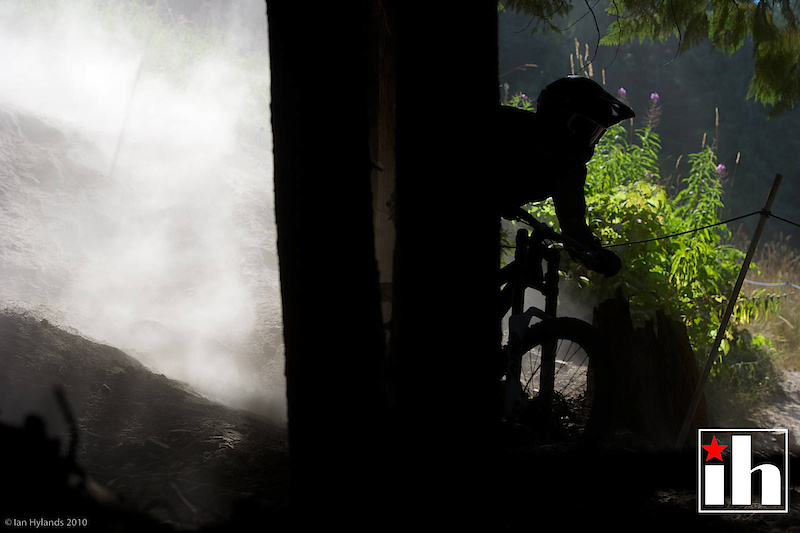
This image has a lot going on as far as light. The backlit dust is really bright, almost too blown out in spots, but the rider in the trees is a complete silhouette. Solid clipped shadow,almost no detail at all except for some bits reflected off his helmet and goggles...
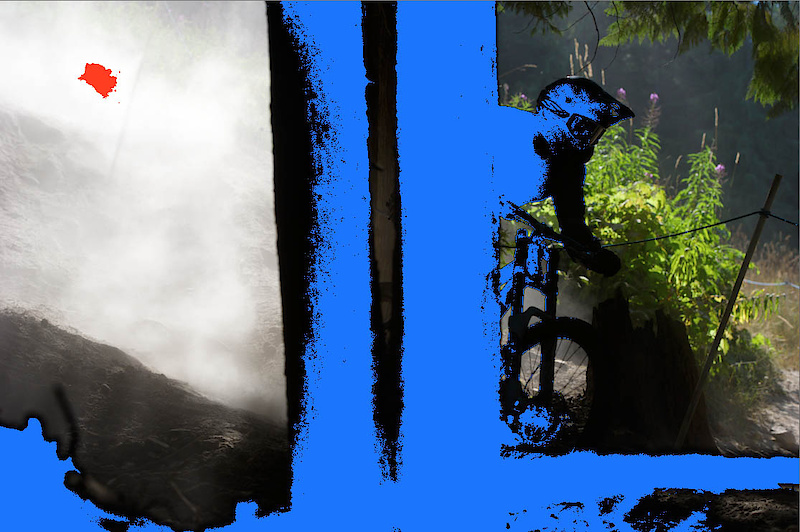
The blue areas are clipped shadows with no details, the red areas clipped highlights.
7. Contrast
Contrast in an image is the measurement of the difference between the highlights and the shadows. If there is a lot of range between the two there is very little contrast, if there is little range between the two then an image is said to have high contrast. Images shot on a cloudy day usually are low in contrast, and images shot in the bright sun are generally high in contrast.
Things to consider when shooting
1. See the light - What does it look like?
Learn to see what the light actually looks like before you shoot. Take a look around, is it bright or dark? Where is the light coming from? Are there shadows and highlights? How is the contrast?
Take the time to evaluate the scene you are shooting and look at it from different angles, not just for composition but for light as well. If you’re shooting front lit in an area of high contrast i.e. bright highlights and dark shadows, it may be very difficult to see anything, try looking at it from a backlit angle. Look at large areas of light and shadow and see if you can use them compositionally. Plants and greenery and other translucent objects often look better backlit.
2. Control the light - Can you make the light work for you?
Can you use a scrim to block unwanted light, or a reflector to add some light? Sometimes it doesn’t take much to change average light into good light. The easiest way is usually to choose a different time of day when the light works for you. Early morning or late afternoon/evening traditionally has the best light, but sometimes there is less than an hour of the day when the light might be perfect for what you need. Light between two trees or buildings for example.
This is late day sunlight, shining between two posts...
Read up on previous tutorials
Basic Workflow
Custom Color Profiles
Basic Composition
Author Info:

Must Read This Week
[UPDATED] Final Elite XC Results & Overall Standings from the Mairiporã XC World Cup 2024
41956 views
41956 views
Sign Up for the Pinkbike Newsletter - All the Biggest, Most Interesting Stories in your Inbox
PB Newsletter Signup
cheers.
Like an above poster said, I would also really benefit from a article on remote flash, since I've started into that alot more in the last year to get more desirable images in the woods. Just things like flash setup/location in relation to rider and camera, balancing flash power and exposure (I know one of my issues I've been working on is keeping the background and foreground colorful and properly exposed, while not having the subject too over-exposed).
Thanks again, really appreciated!
-Matt
I've just started a camera course & we actually discussed this very topic last night, I will be watching out for more tutorials from you in the future!