Reader Story: Building a Custom Bike Frame at Home

I've been building my own bike frames for the last five years and the thing I get asked about the most is the process. It turns out that there's a lot of people out there who have always wanted to give frame building a go, but don't know where to start. So, as I am about to embark on another frame build, I thought I would take the time to document the process; from design to fabrication.
Disclosure: This is really not intended to be a step by step guide and I am by no means a pro. The plan is to just give an insight into what it takes to build your own frame and maybe throw in a few helpful tips along the way.
Before we get started, here are some photos of frames I have made in the past:
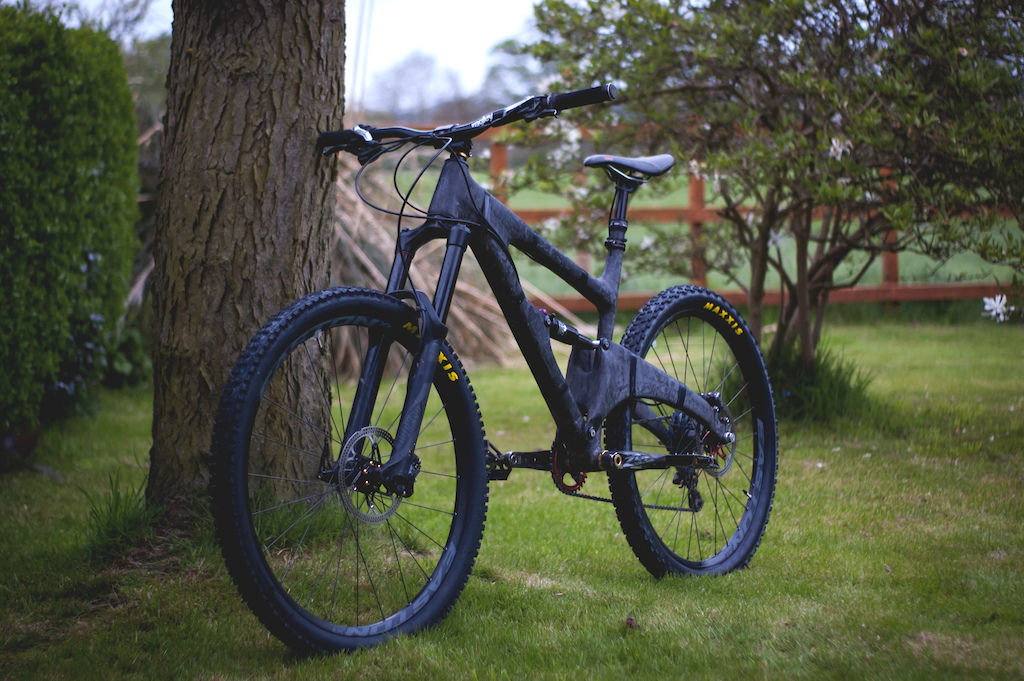
My first venture into carbon fibre: 27.5" wheels, 66º head angle, 140mm travel enduro bike.
One of my earlier frames, 26" wheels, 140mm travel, 65º head angle.

DH bike: 26" wheels, 178mm travel, 63º head angle.

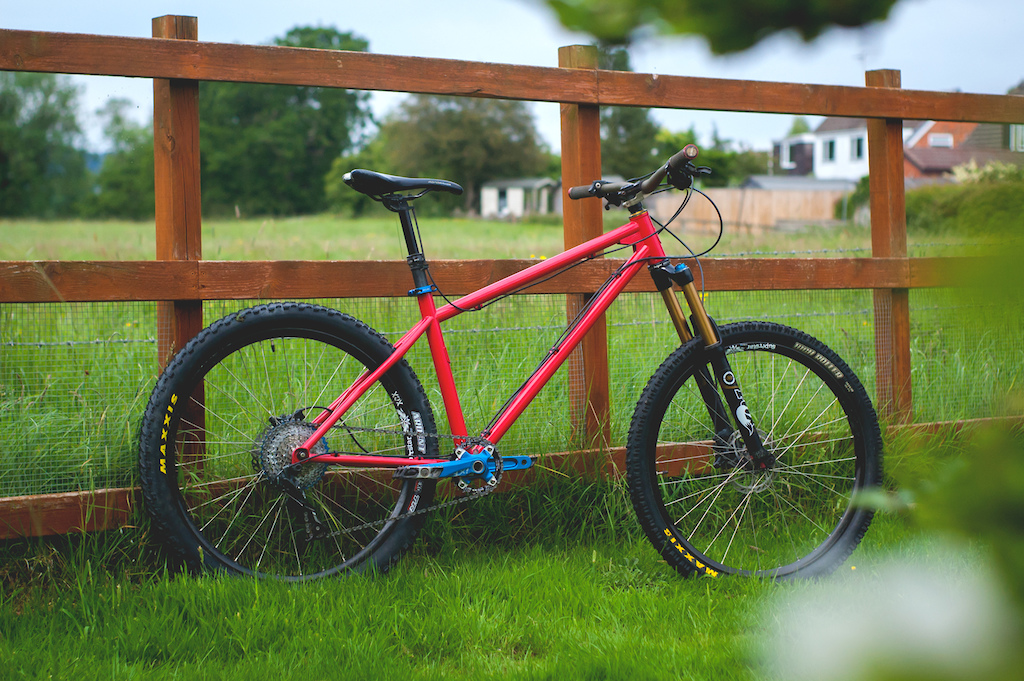
Wheels are 26", 140mm travel, 64º head angle, made for a friend.
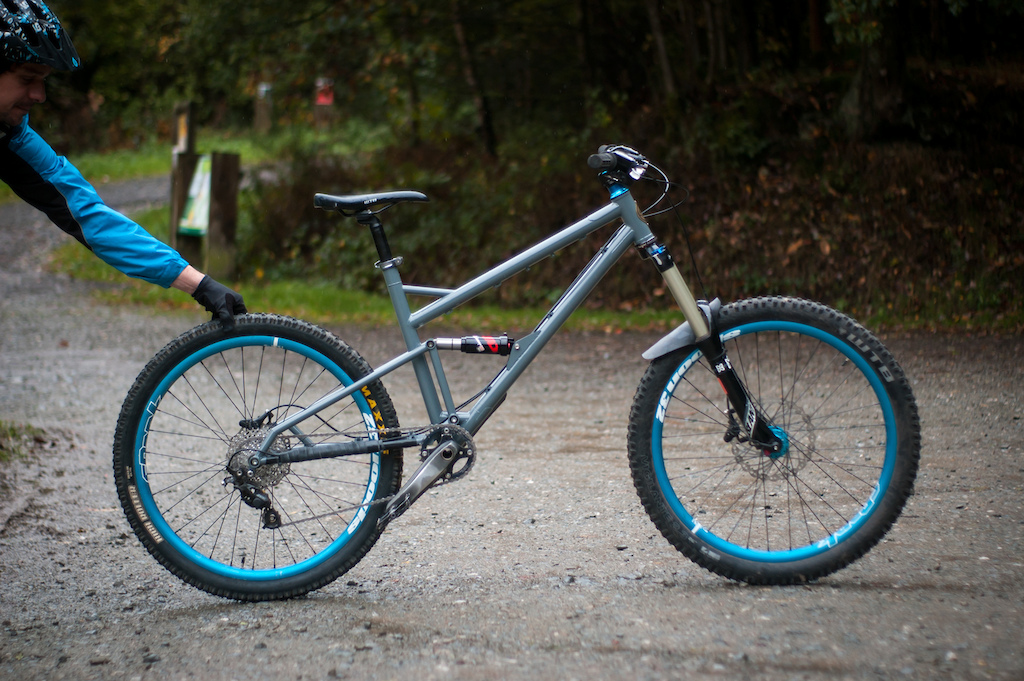
For my brother: 26" wheels, 160/140mm travel, 64º head angle, enduro bike.
MATERIALS: What you'll need
I buy all my tubing from Simon at www.ceeway.com, but there are lots more options out there (such as Reynolds). I like to keep things simple and use straight-gauge tubing, simply because it is easier to work with and you can also get longer lengths - and it's quite a bit more cost effective. If you wanted to get fancy and shave off a bit of weight, you could go with a double butted tubeset, but double butted is about two times the price of straight gauge.
The Columbus Gara tubing is standard 4130 chromoly and isn't the strongest option out there, but as stated, it's easy to work with and cost effective for a hobby builder like myself. I've only had one frame fail and that was at the top tube where the gusset met, this could of been down to a bit of dirt in the weld, faulty tube, the gusset itself or many other reasons. That being said, it took two years of racing all over Scotland and it earned a few podiums before it gave up the ghost.
Down tube:
Columbus Gara 35x0.9mm straight gauge 4130 chromoly
Top tube:
Columbus 31.8x1.0mm straight gauge 4130 chromoly
Seat tube:
Columbus Gara 35x0.9mm straight gauge 4130 chromoly
Seat tube collar:
Custom machined 100x35x2.0mm mild steel (ideally stainless but I had some mild steel already)
Chain stays:
Columbus Gara 19x0.9mm straight gauge 4130 chromoly
Seat stays:
Columbus Gara 16x0.9mm straight gauge 4130 chromoly
Bottom bracket shell:
English thread 40x73mm mild steel
Headtube:
HT44 110mm x 44mm ID 4130 chromoly headtube
Drop outs:
Custom machined stainless steel
Cable mounts:
3 x 170B - Double Cable Stop
3 x 170A - Single Cable Stop
6 x 478INOX - Bottle Boss M5 Stainless Steel
6 x 200 - Zip Tie Cable Guide
Columbus Gara 35x0.9mm straight gauge 4130 chromoly
Top tube:
Columbus 31.8x1.0mm straight gauge 4130 chromoly
Seat tube:
Columbus Gara 35x0.9mm straight gauge 4130 chromoly
Seat tube collar:
Custom machined 100x35x2.0mm mild steel (ideally stainless but I had some mild steel already)
Chain stays:
Columbus Gara 19x0.9mm straight gauge 4130 chromoly
Seat stays:
Columbus Gara 16x0.9mm straight gauge 4130 chromoly
Bottom bracket shell:
English thread 40x73mm mild steel
Headtube:
HT44 110mm x 44mm ID 4130 chromoly headtube
Drop outs:
Custom machined stainless steel
Cable mounts:
3 x 170B - Double Cable Stop
3 x 170A - Single Cable Stop
6 x 478INOX - Bottle Boss M5 Stainless Steel
6 x 200 - Zip Tie Cable Guide

DESIGN: CAD not required
Materials sorted, it's time to set about designing the frame. I design all my frames 2D in Adobe illustrator (effectively pen & paper), It's not the best program for the job, but as I use it daily (graphic designer), I know it very well. Bikecad is the best option otherwise and packs a load of great features, such as Bike fitting, and has a built in tube coping template maker. As a hobby builder, though, I can't justify the price tag.
Start with the fork. This frame is going to be a 29er and will run a 130mm travel fork (2018 Rockshox Recon RL Solo Air with 51mm offset). I personally prefer hardtail frames with a short travel fork. This is because the longer the travel, the more the geometry will change throughout said travel. I find this results in your weight being thrown forward, the reach effectively increasing, and the head angle steepening. Even with a 130mm fork, the head angle and reach goes from 63º/440mm to 64.5º/450mm between static and sagged.
To read a more detailed write up about hardtails, fork travel and geometry head over to BTR's blog here.
GEOMETRY: Static or at sag?
I start by designing a basic frame with the numbers I want static (unloaded) and then work out what the frame would be like with the desired sag, in my case 25%. I then fine tune these numbers (round up or down) and design the full bike with all the details included. I find working to sagged numbers helps me get an idea of how the bike will be once I am riding it.
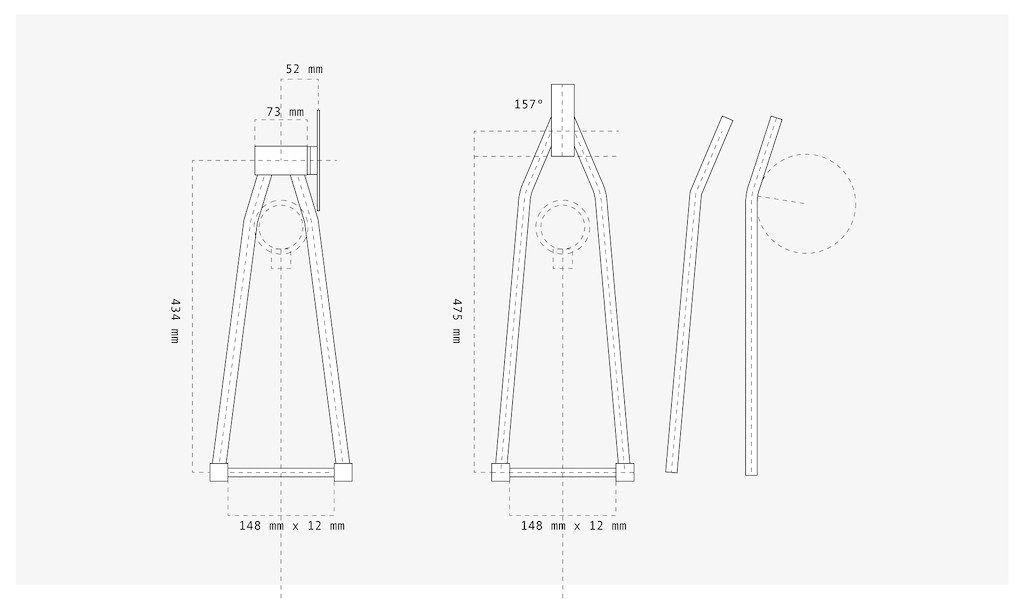
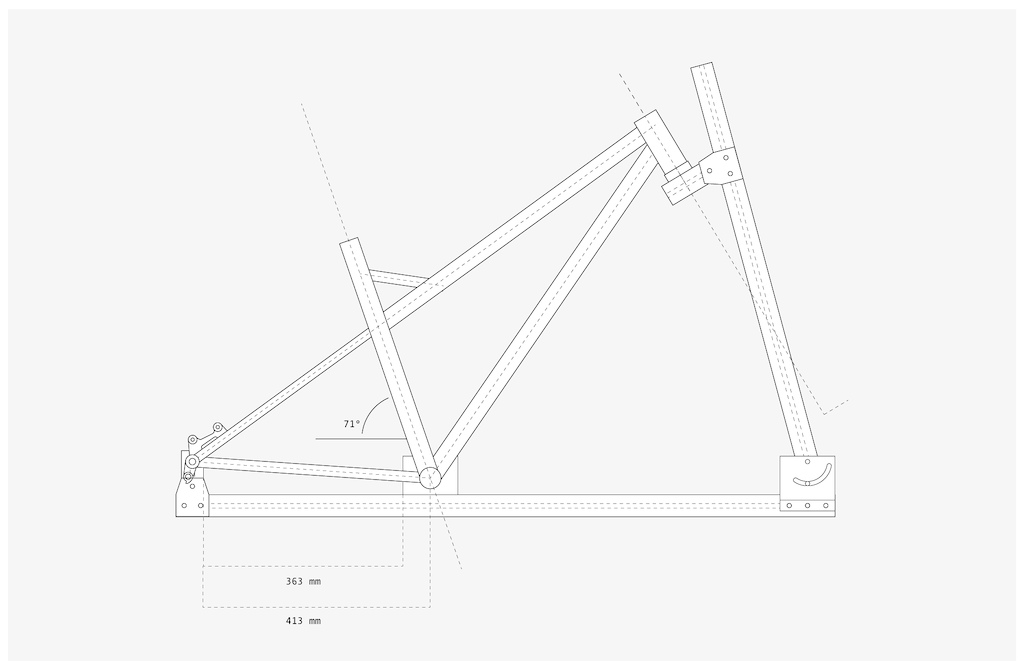
Head angle: 64.5º
Seat tube angle: 76º
Chainstay length: 428mm
BB drop: 70mm
Reach: 450mm
Axle: 148x12mm Boost
Seat tube angle: 76º
Chainstay length: 428mm
BB drop: 70mm
Reach: 450mm
Axle: 148x12mm Boost

FRAME JIG: Buy or build?
With the design stage of the frame complete, I now need to be able to hold the tubes at the correct angles. This is where your jig comes into play. There are plenty of options out there to purchase. Academy tools probably being one of the most cost effective (I will eventually get one myself). I decided to build my own out of aluminium extrusion and various other aluminium parts. Below is my design:
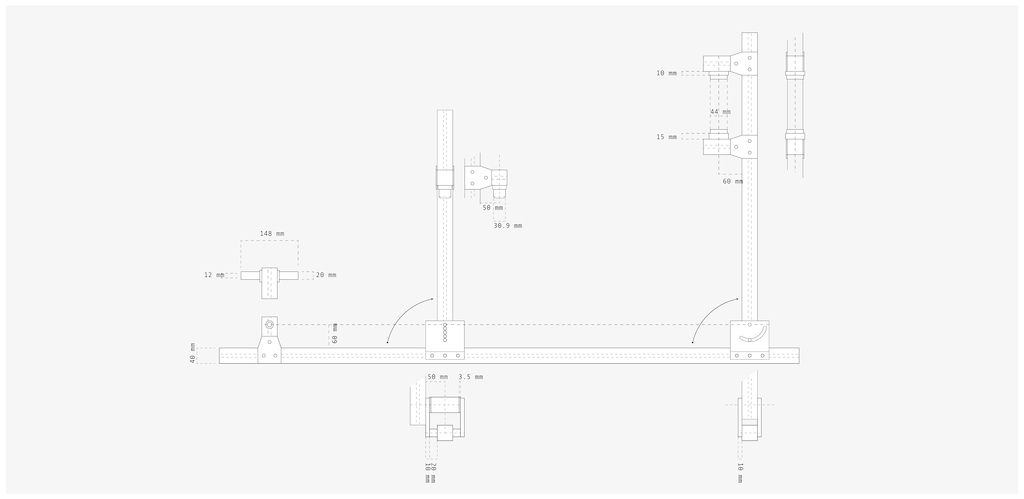
It's not the most sophisticated fixture, but it can be broken down into smaller jigs for making sections of the frame separately, like the front triangle. The aluminium extrusion is essentially a big Meccano set. One jig fits the bottom bracket to the seat tube. Thee second fits the bottom bracket to the head tube. I find keeping the sections as short as possible helps with alignment, as the short lengths help reduce any bending of the extrusion. Unfortunately, I don't have any photos from the build of my jig, as I made it a number of years ago.
Before I get into the build side of things, I draw up the frame/ frame sections in each jig as this helps with both cutting the tubes to length and also, setting up the jig later as accurately as possible.
I draw out the tube junctions and also how they will fit into my jigs. That gives me quick and easy references while I am building.
FABRICATION: Smaller steps ensure accuracy
Trying to document the full process of fabricating the frame has been quite a bit more difficult than I anticipated, but I suppose it can be broken down into five-ish steps; Cutting tubes to length, Coping/ mitering tubes, tack welding, alignment check and finish welding, followed by a further alignment check.
I start with joining the seat tube to the bottom bracket shell, then I build the front triangle, followed by the chainstays and seat stays. Once I am happy with all that, I then do the fiddly bits like, cable guides, the disc mount, rear mech hanger, and head badge...
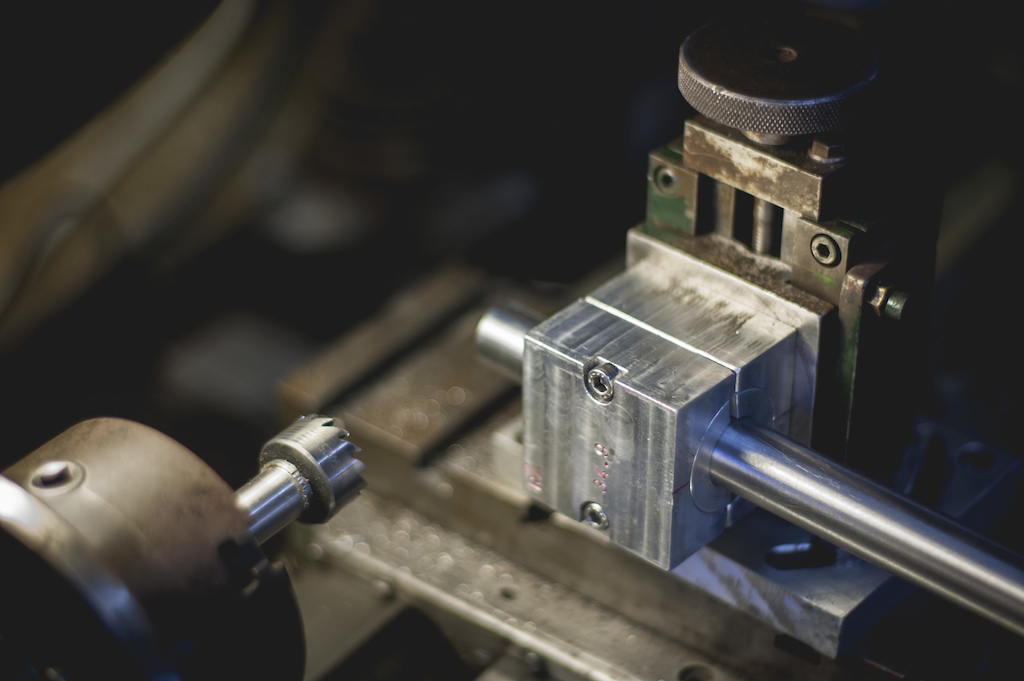
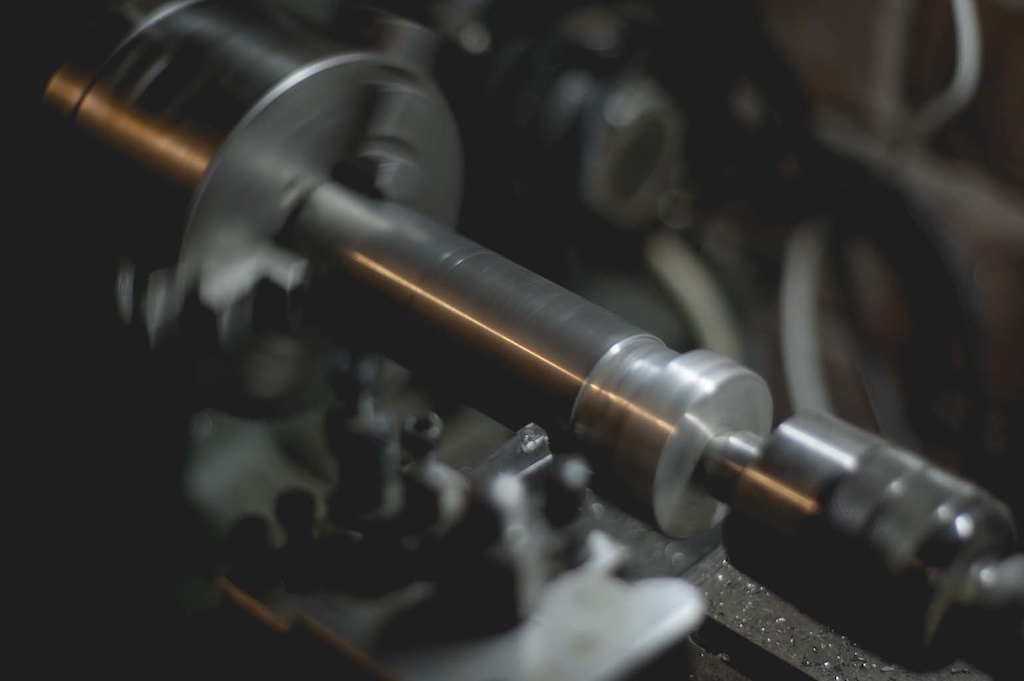
TUBE MITERING: I use an old lathe
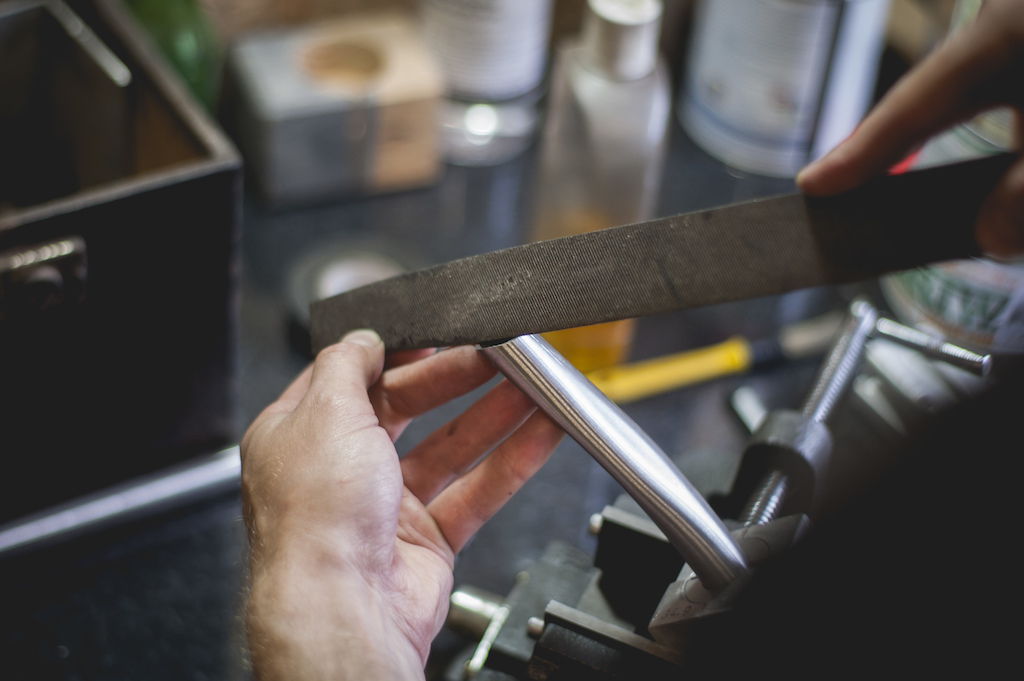
Tube mitering is the probably the first thing you will need to master if you plan on making your own frame. There are several ways to go about it from hand filing (really not that hard to master), use a lathe (my preference) ot a milling machine, or buy a dedicated tube notching tool. Hand filing with paper templates is the way to go for starting out. It helps to employ an online tool such as the - Metal geek tube coping calculator. (method shown further down the page).
When you're first starting out, it's best to cut a few lengths of tubing to practice your mitres. This also supplies you with some practice joints for welding later. For a great video showing the process of hand cutting a miter with files, check out Cobra frames video here.
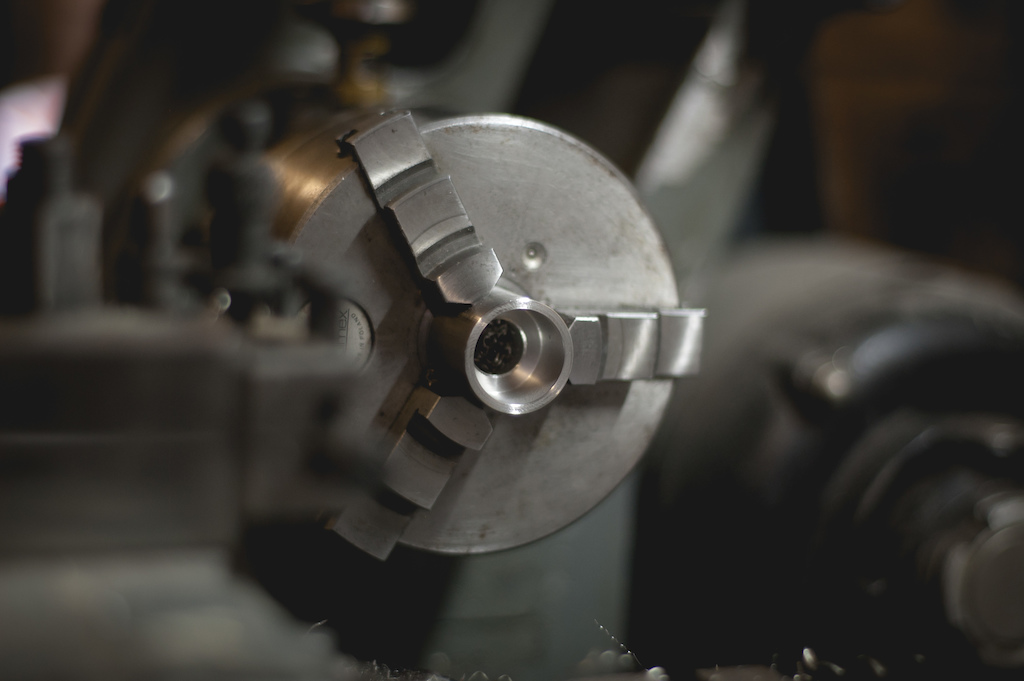
I have a fixture I made for my lathe using a tube block from Rä Bike, an old vertical slide my dad made many years ago and a custom base plate made to fit my lathe. It allows me to quickly and easily set up the cut to the correct angle and offset if needed, but I still use hand files to fine tune the fit or to clean up the cut if needed.
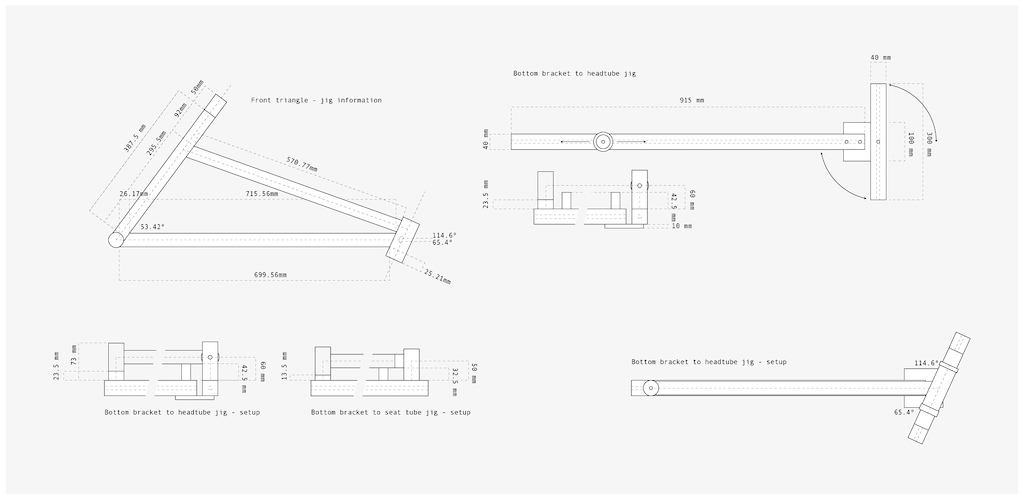
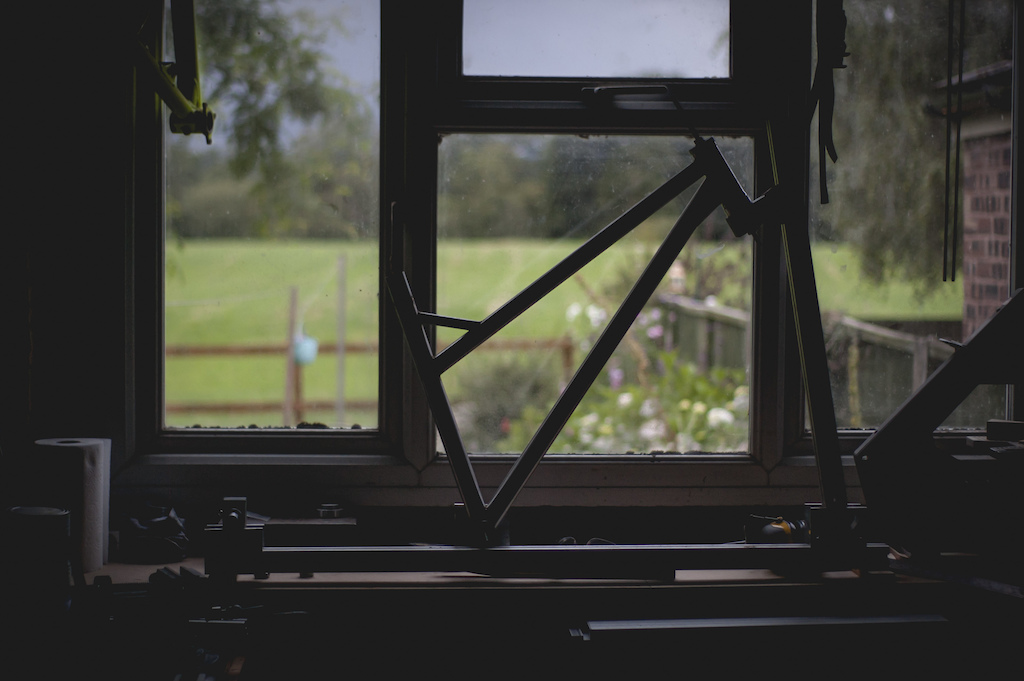
BUILDING THE FRONT TRIANGLE: It's showtime
Building the front triangle is one of my favourite parts of frame building. It's fairly straight forward and you can quickly get something that resembles a bike frame.
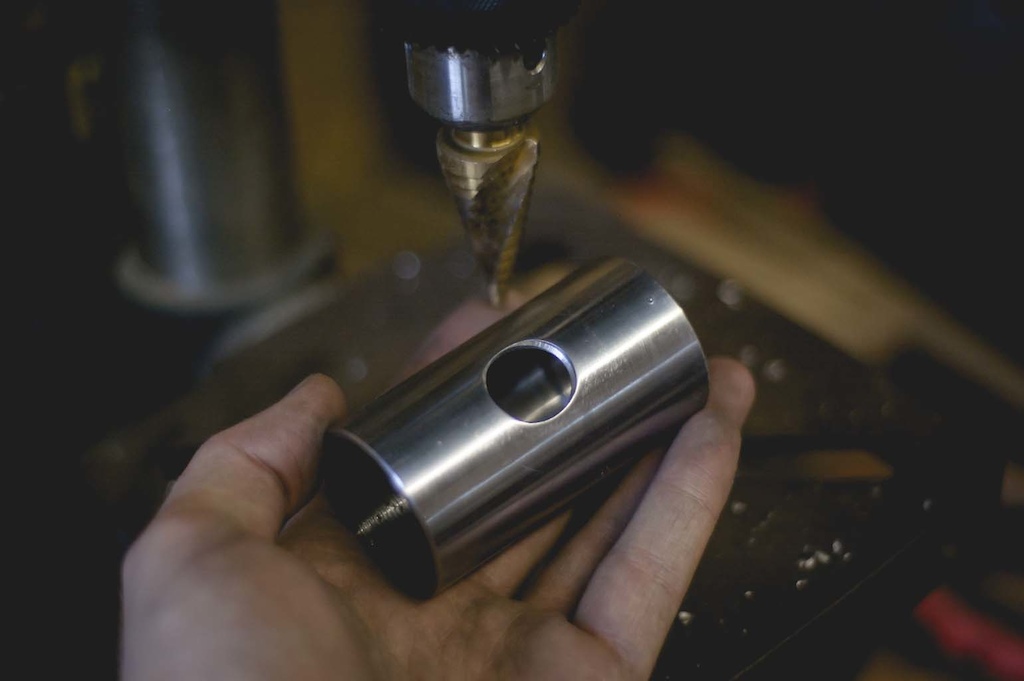
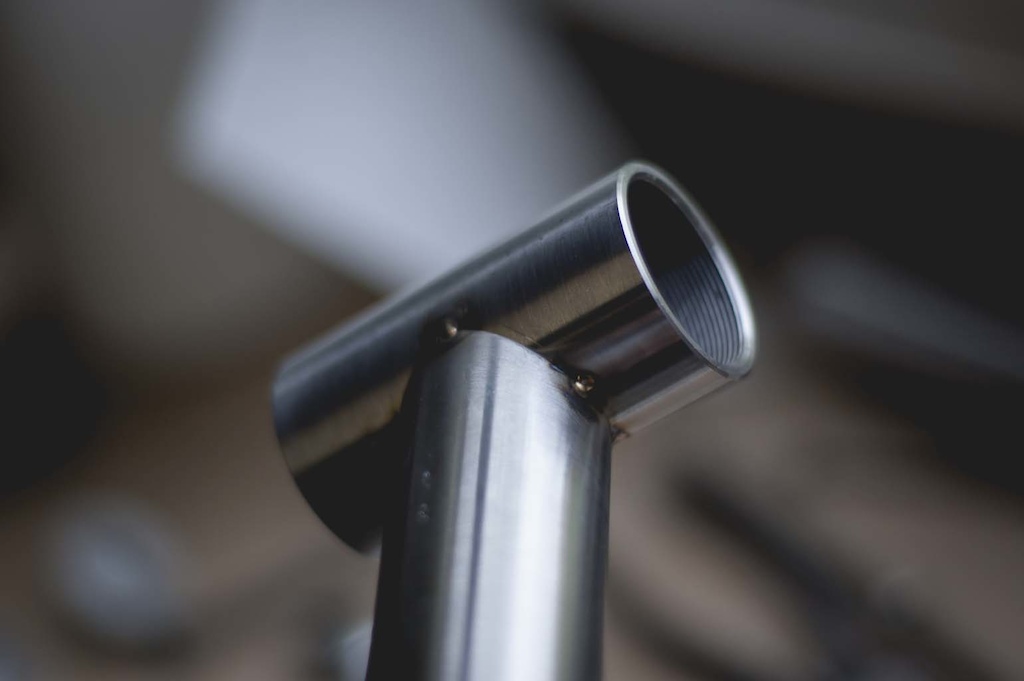
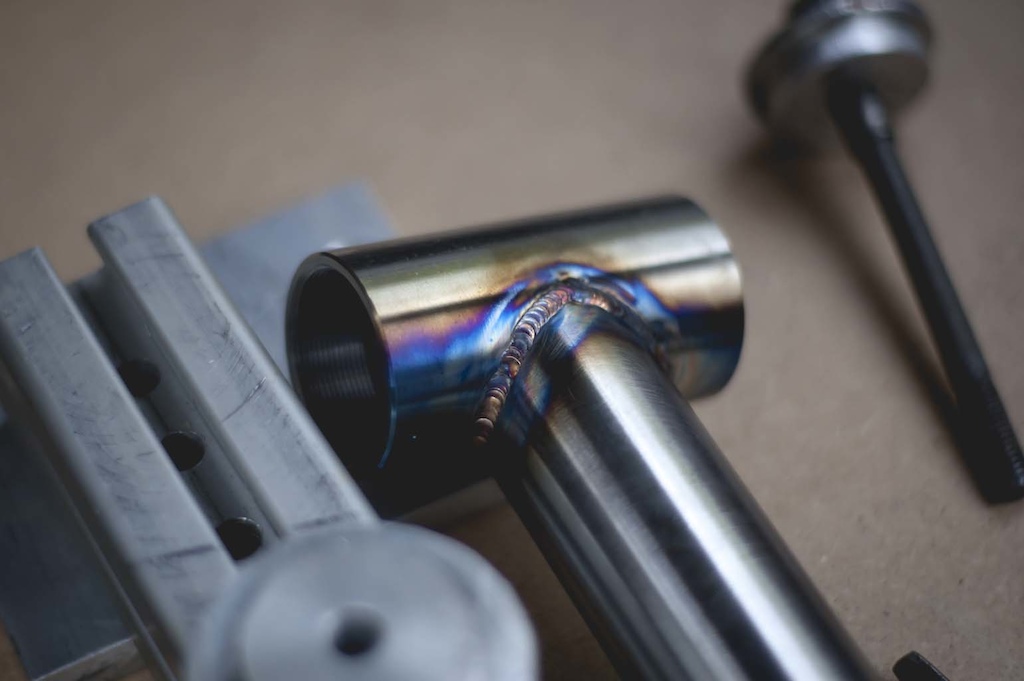
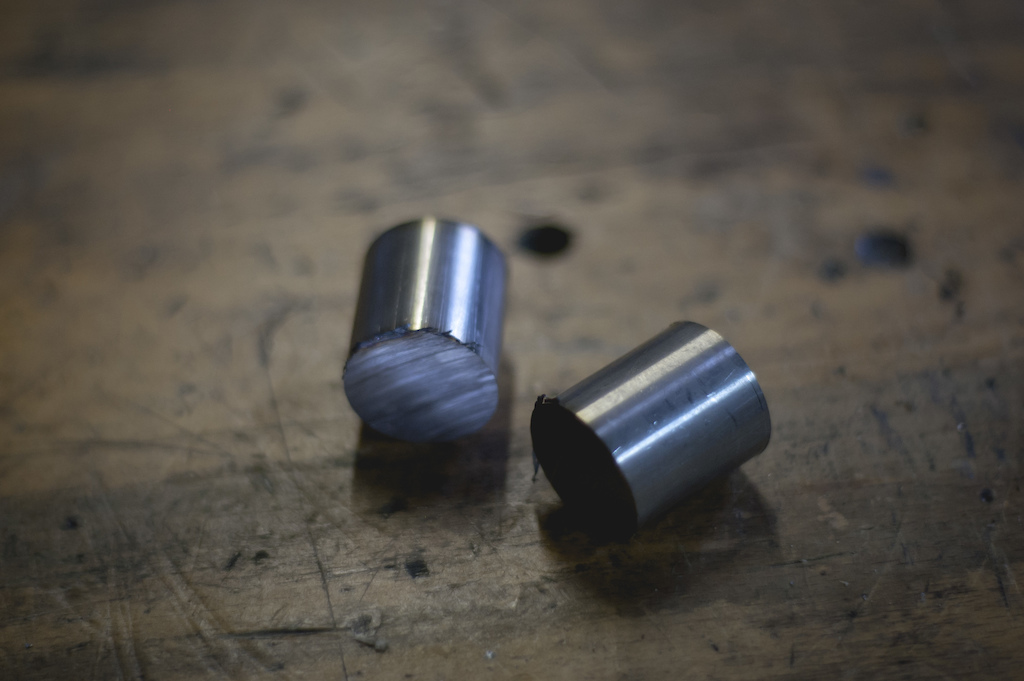
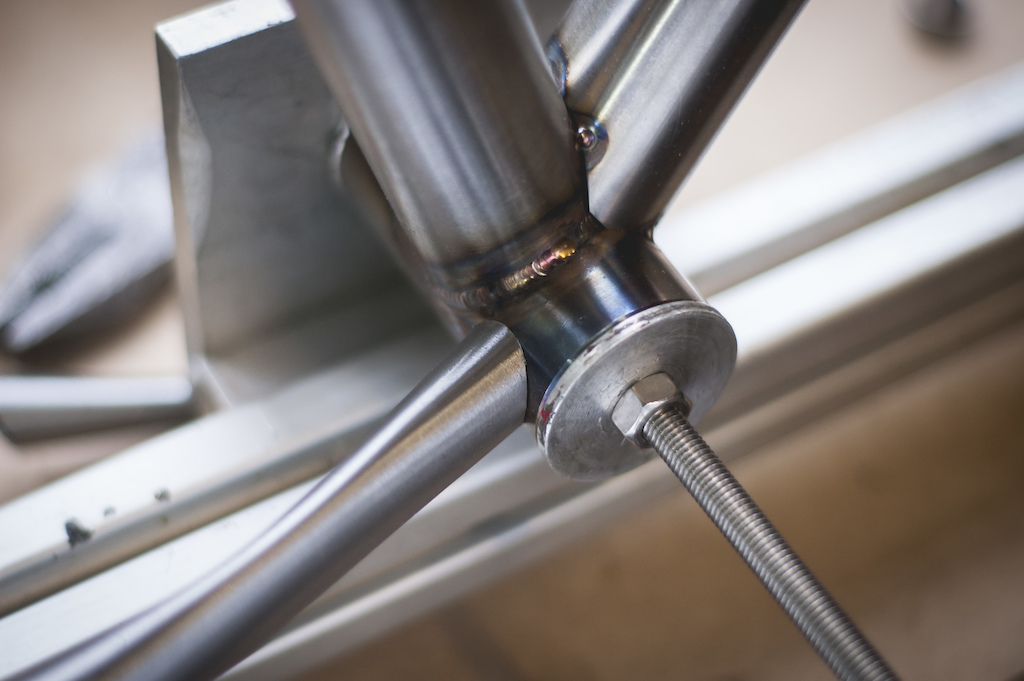
As mentioned before, I always start with joining the seat tube to the bottom bracket. I find it's the easiest way to ensure that the seat tube is aligned properly with the bottom bracket. Using my lathe fixture, this is a straight forward and fairly quick process of setting the angle, choosing the right size cutter, cutting the tube, cleaning up with a file and loading into the dedicated bb/seat tube jig. The hole in the BB is to allow any water that gets past the seat tube to drain away into the bottom bracket and out of the frame, there is also the added benefit of shaving off a few grams. There is also a hole under all of the tube joints to allow the frame to breathe which helps with condensation and it relieves pressure during the welding stage.


The seat tube/bottom bracket assembly is a simple starting point: A 90-degree angle cut with a hole saw. The two spacers in the lower right image center the seat tube on the bottom bracket shell.
Once I am happy with the fit up it's onto tacking the tube in place with the tig welder. After tacking the tube in place it can be removed from the jig and fully welded, I like to weld in short sections alternating from one side of the tube to the other allowing to cool in between, this is to keep the heat down and as a result minify the HAZ (heat affected zone).
During the weld process I keep putting the tube back into the jig to check for any movement, if anything has shifted you can fix this by welding on the opposite side of the movement to pull it back, but a tight miter to begin with reduces the risk of movement - if there is a gap during welding it will try and close which results in poor alignment.
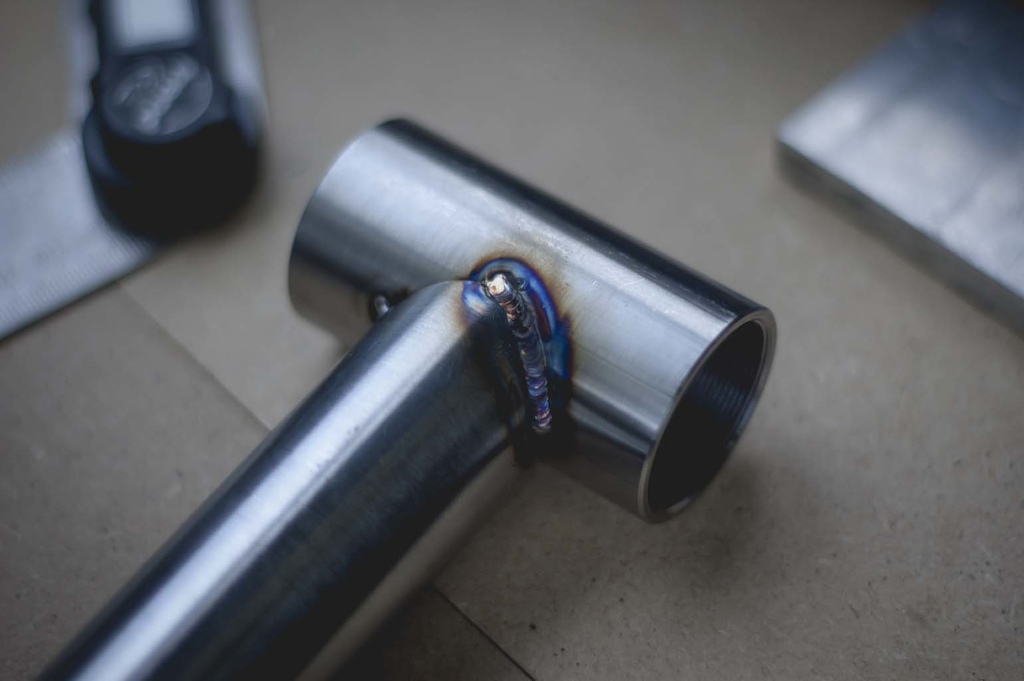
Tack welds position the tubes so you can weld outside of the jig. Keep checking the alignment and weld in small segments.
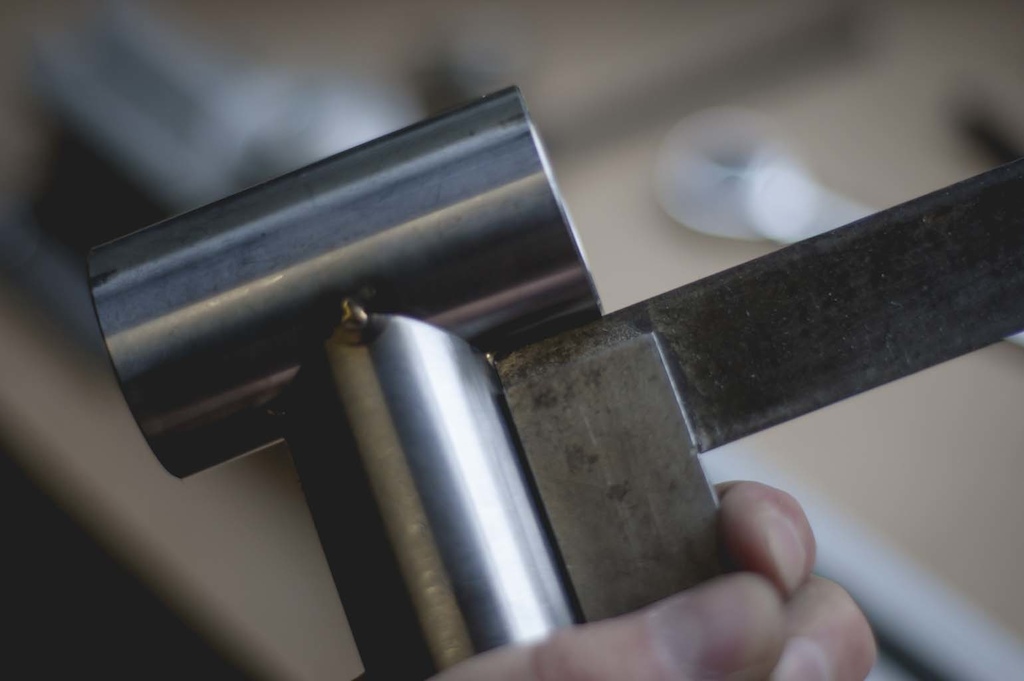
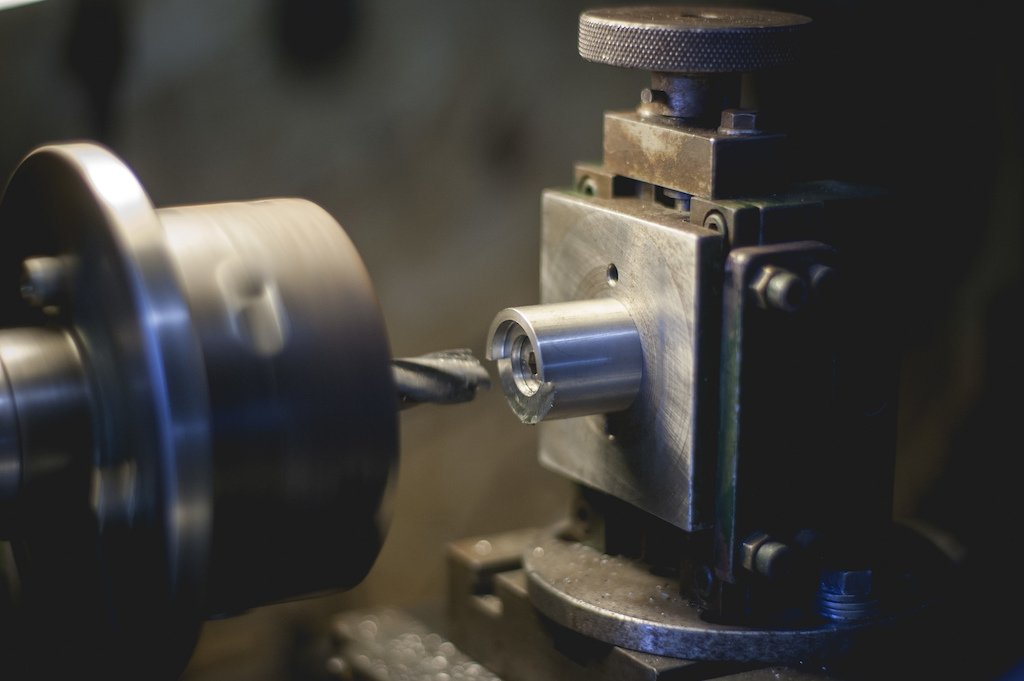
The same process is used to do the down tube and top tube using the measurements from my drawings earlier on. The only difference is with the down tube and top tube there are two cuts that need to be parallel with each other, this is achieved by using two tube blocks, one to fixed to the tube coping fixture on the lathe and the other is used as a level. By placing a digital angle finder on top of the second tube block you can remove/ rotate the tube and know if its level.

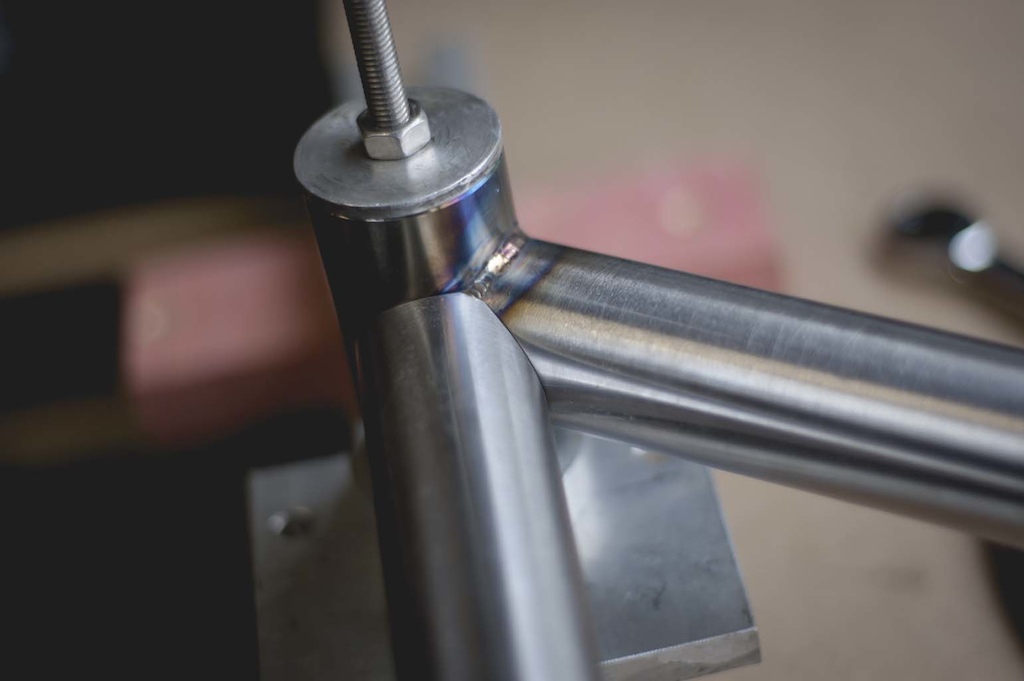


To ensure that the miters on each end are aligned, I clamp a tube block in the center of the tube (lower left) and check that with a level before making each cut.
SEAT TUBE COLLAR: You can also buy one ready made
I am yet to find a bicycle specific tube for 30.9mm seat tubes, in the past I have machined aluminium sleeves to slide into 34.9mm x 0.9mm tubing but they soon either got damaged or seized into the frames. Looking around for better solutions I found other frame builders using seat tube collars and welding them to the seat tube. Ideally, I would have liked to have used some 35mm x 2mm 316 stainless tubing, but I already had some mild steel in the right size.
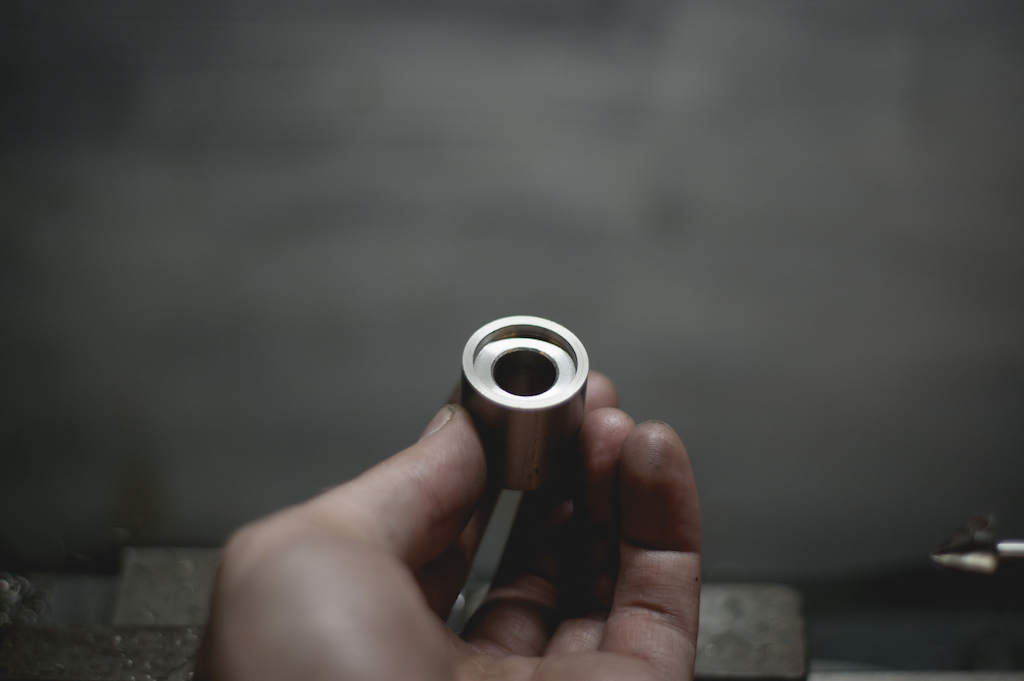
I start buy cutting the tube to rough size and then facing the edges on the lathe until it is 100mm in length. Half of the collar is then machined down to 33.1mm to fit the seat tube. If the fit is too tight, I put it back into the lathe and use a length of sandpaper to polish until the fit is right.

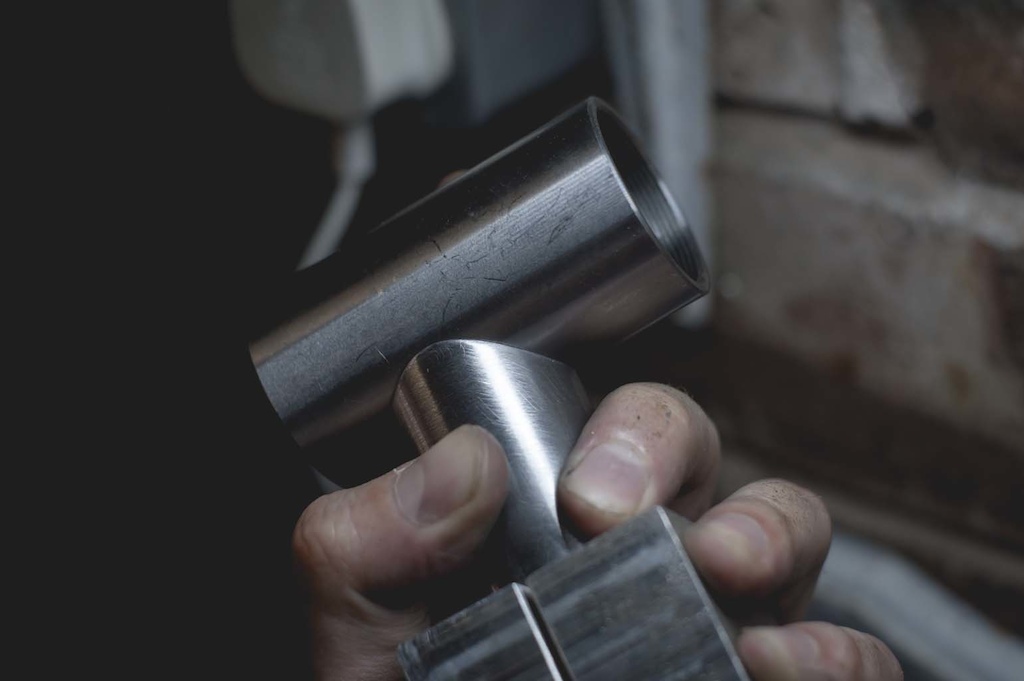
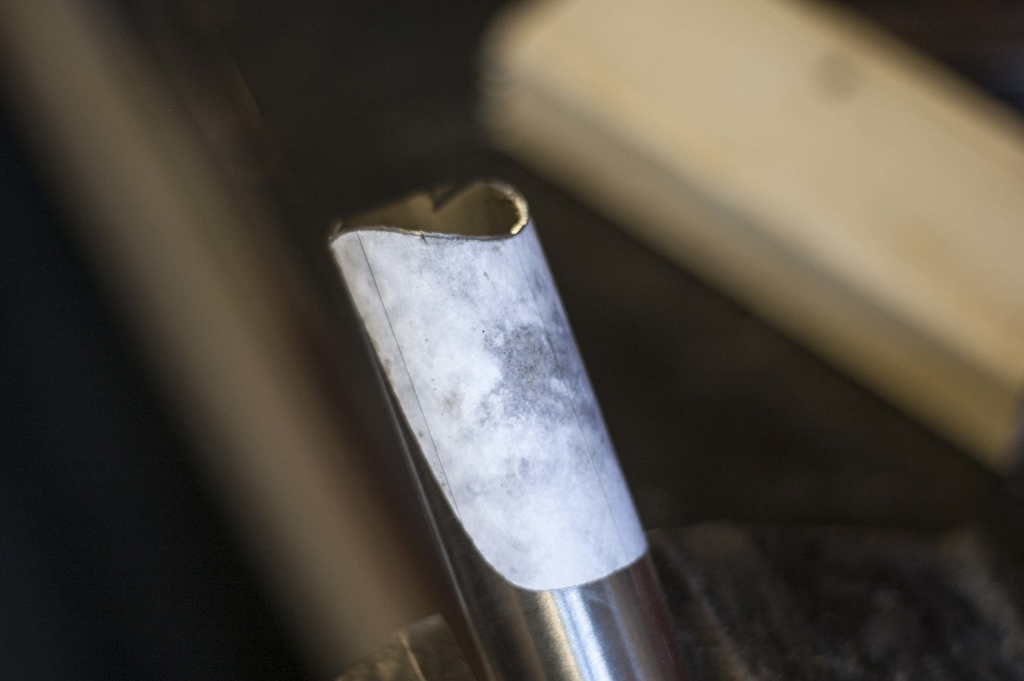
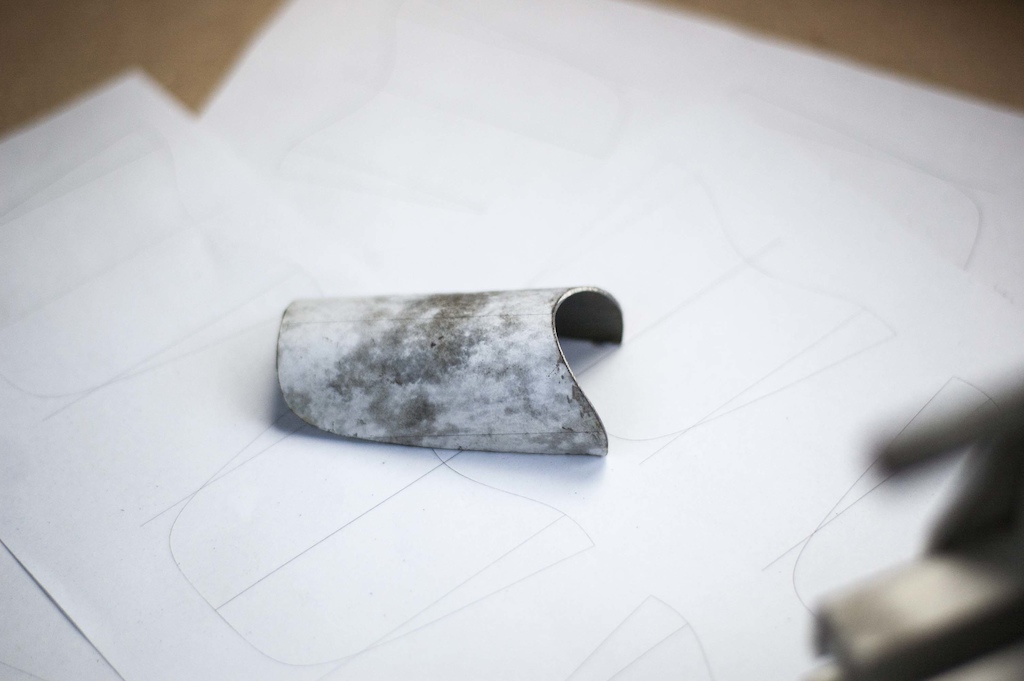
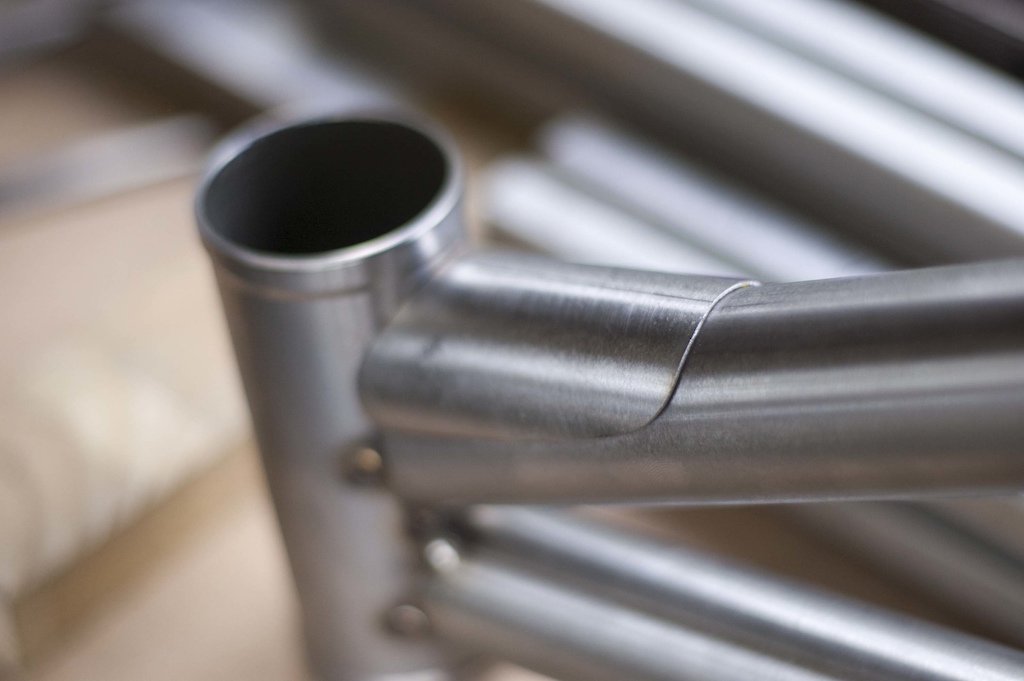
GUSSET: Steel frames like these
Even with dedicated fixtures for tube mitering, there will always be a time when the good old paper template method is needed. It's a good skill to learn when starting out with frame building. Some design software has a template maker built in, but I use an online tool called Metal Geek tube coping calculator. Using my original drawing, I input the angles and diameters into the calculator and let it do its thing, you then choose the format in which you want to download.
For the gusset, I made two templates and then used adobe illustrator to combine them into one (see second pic for template). I then cut it out and used some spray glue to glue the template on to the tube. Cutting as close to the template as I can with the angle grinder and then fine tune the fit with a file. When selecting a file, you want to choose one that has a radius as close to the parent tube's radius as possible. If this is no possible, you can use an arc motion side to side as you're filling the tube. Keep checking the the fit against the frame or parent tube. Highlight any high spots with a marker and keep filing until you're happy with the fit. It's a fairly tedious job (I actually enjoy it). but as mentioned previously, a tight fitting mitre makes all the difference when it comes to welding.

DROPOUTS: You can buy these too
Before I can get onto the chain/seat stays I need to make the dropouts, the easiest option is to buy a pre-made set with replaceable mech hanger, but as I like to make as much of the bike as possible, I set about machining some from 25mm stainless bar. It's a relatively simple (but time consuming) process of cutting to rough lengths, facing each side on the lathe, drilling a 12mm hole through the centre, boring the rest to until the wall thickness is 2mm and then machining the back side to make the catch for the wheel, which helps with fitting/removing the wheel. In the past, I have just machined it flat, but fitting the wheel can get fiddly this way.

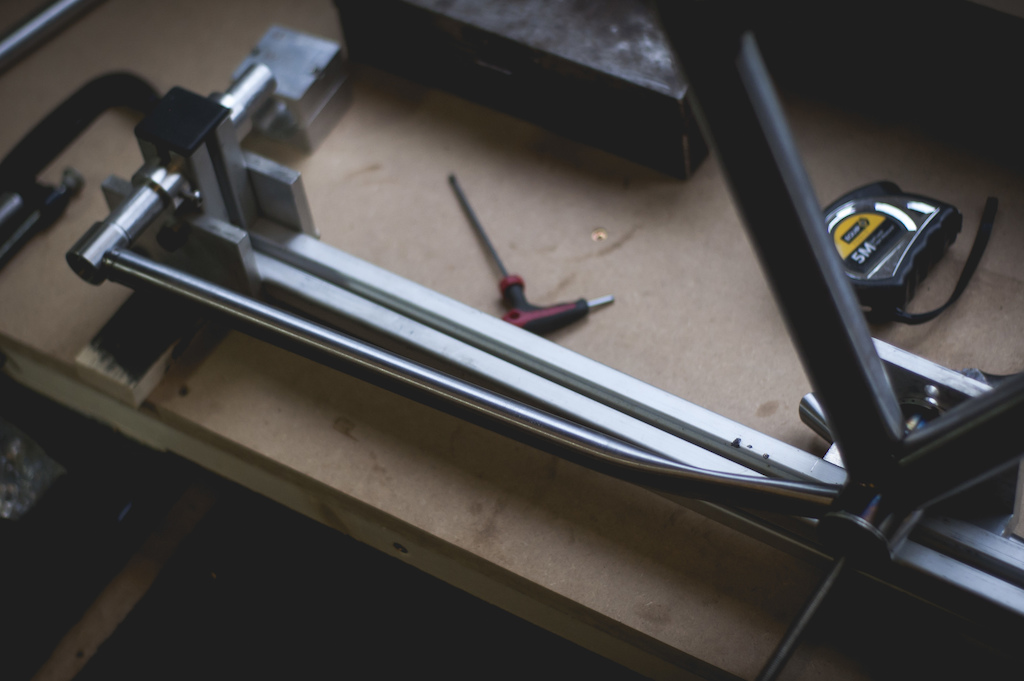
CHAINSTAYS & SEATSTAYS: Almost there
Dropouts complete, I can move onto my least favourite part of building a hardtail, the seat/chain stays. I could make life easier by buying pre-bent/ formed chain stays, but I like the freedom of starting with 19mm straight gauge chromoly and for this build. 16mm for the seat stays. As with most of the other steps, I start by heading to the macbook and drawing up the chainstays and seatstays to make getting the angles and lengths easier, as well as making setting up the jig simpler.
With the measurements in hand, it was time to set the jig up in its full configuration. It was at this point that I remembered I had cut down the largest length extrusion down to 1200mm,.which meant getting a bit clever with how I set the jig up. So once again it was back to the Macbook to draw up a plan.
Jig set up with front triangle and dropouts ready for the stays.
I find the chain and seat stays make or break a frame, which is why it's worth taking your time with them. It's a similar process to the rest of the frame, but with the added complication of bending and forming the tubes. I cut each stay a little long using my lathe fixture and then cut the rest by hand with a file. Constantly checking in the jig until the fit is just right. Too tight or too loose and after welding, the stays can pull in different directions. In the future, I plan on building a dedicated fixture to help improve and speed up this process.

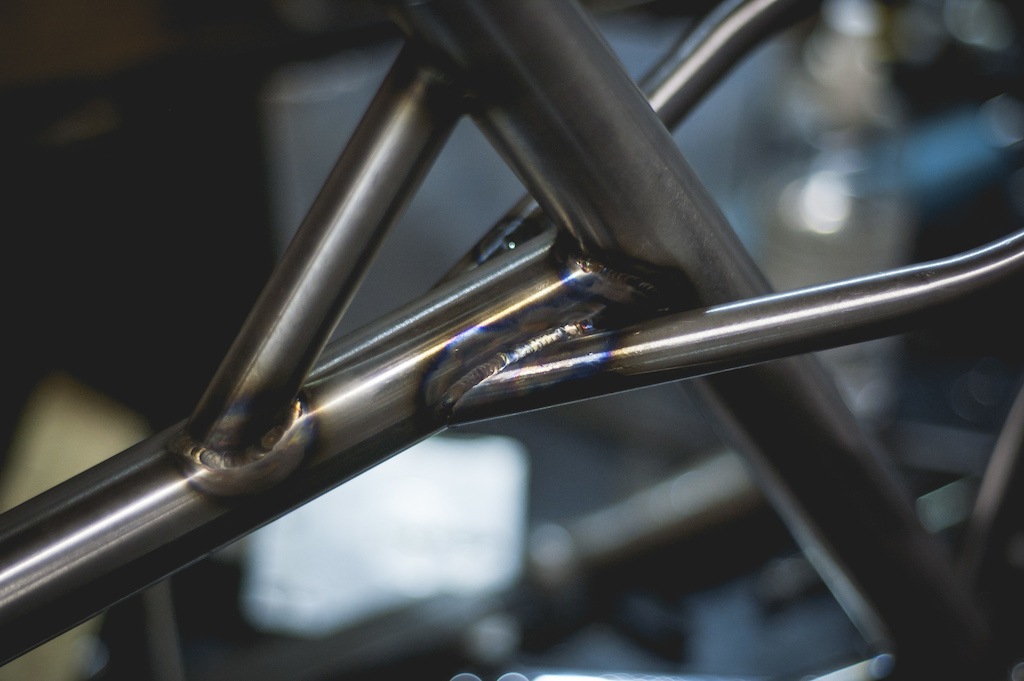
More pieces means there's a lot more to go wrong when assembling the rear triangle. Good fits assure proper alignment.
With the chain stay and seat stays done, it's time to tack weld the whole frame together and build it up to check alignment and also ensure that everything fits. Then I'll fully weld it and do final alignment.
Happy with how the frame is, it's back into the workshop to fully weld the whole frame. Once fully welded, it's time for the last alignment check and cold setting of the frame. Ideally, I would have a dedicated alignment table, but instead, it's a case of lots of measuring and then twisting, pulling and pushing in different directions with large levers (a metal pole). Without a dedicated alignment table, its a bit of trial and error until I get it where I am happy. This frame, the rear wheel is slightly tilting to one side at the top still, but you can barely notice it by eye and can't feel it riding, so is good enough for me.
For the brake mount and mech hanger, I have dedicated jigs to hold them in the right position and then it's simply the case of welding them on, again, taking my time to keep the heat down and checking alignment as I go.
BUILD TIME
The plan from the beginning was to keep this build as low cost as possible, so if I didn't already have the part, I searched through all the bargain buckets online for the best deals or went down the route of an unbranded alternative from ebay, such as the Satori dropper post, which seems to be a rebranded RSP with slight changes.
For the drivetrain I decided to go back in time to nine-speed SRAM, coupled with an 11-42t cassette. This is because I don't use all ten gears on my other bikes - but mainly, it's a hell of a lot cheaper.
For the drivetrain I decided to go back in time to nine-speed SRAM, coupled with an 11-42t cassette. This is because I don't use all ten gears on my other bikes - but mainly, it's a hell of a lot cheaper.
Wheelset: Superstar EX23 Boost £75 pair
Tyres: Maxxis Ardent/ Crossmark £50ish
Forks: Rockshox Recon RL £140
Crankset: Sr Suntour Zeron £60
Drivetrain: 9 Speed Sram x7 £15
Cassette: Sunshine 11-42t 9 Speed £25
Brakes: Magura mt2 £60 pair
Dropper: Satori 30.9mm £70
Bars: Raceface £25
Pedals: Promend £8
Tyres: Maxxis Ardent/ Crossmark £50ish
Forks: Rockshox Recon RL £140
Crankset: Sr Suntour Zeron £60
Drivetrain: 9 Speed Sram x7 £15
Cassette: Sunshine 11-42t 9 Speed £25
Brakes: Magura mt2 £60 pair
Dropper: Satori 30.9mm £70
Bars: Raceface £25
Pedals: Promend £8
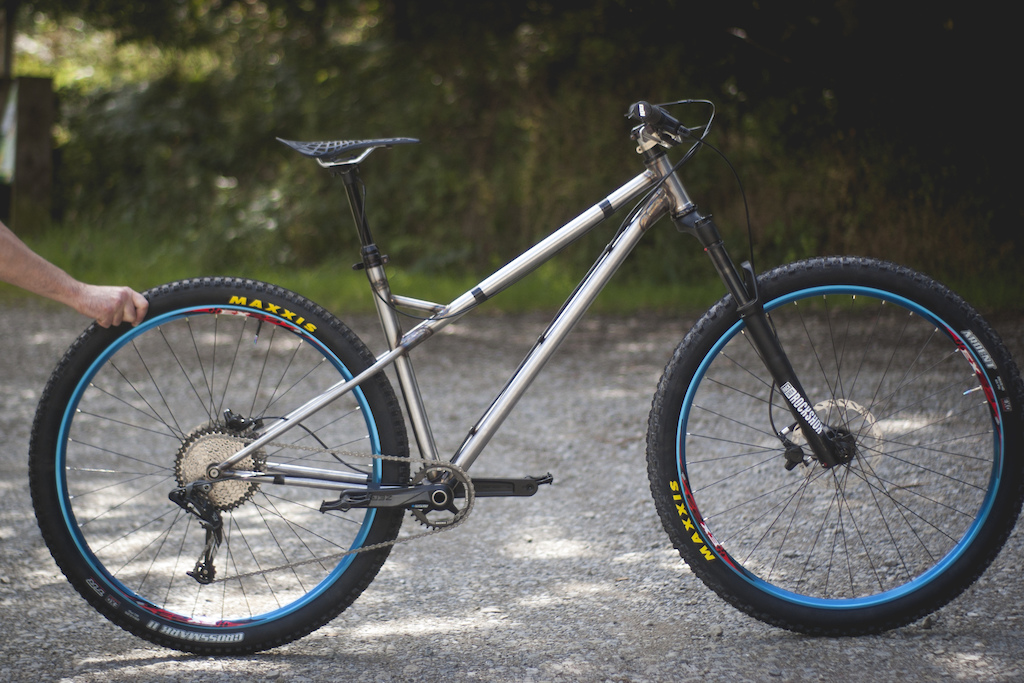
Just cable mounts and paint left to do.
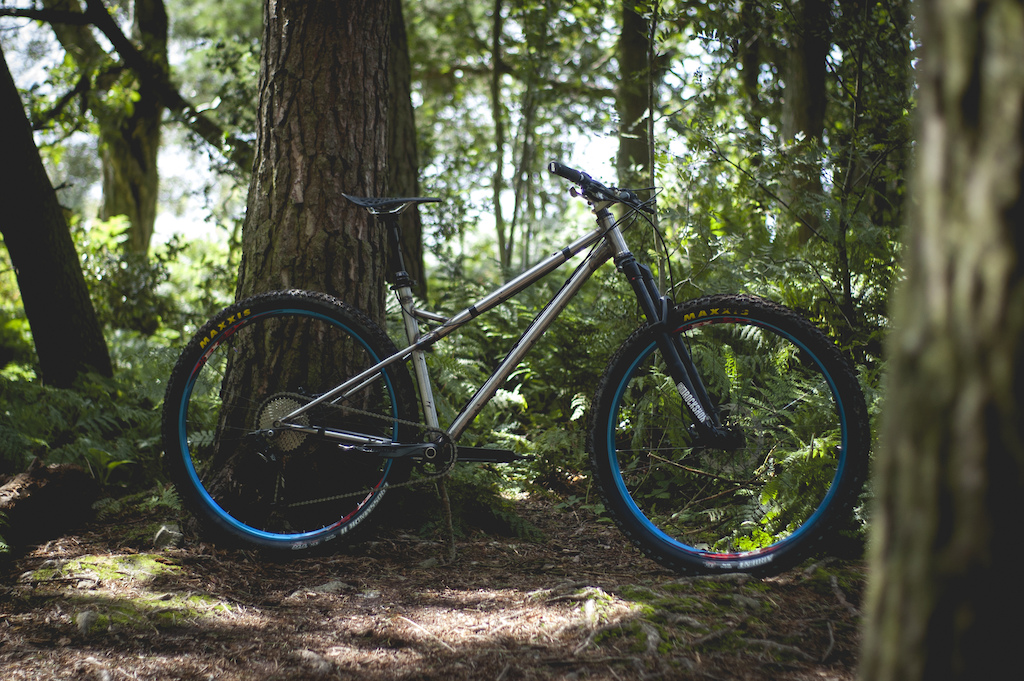
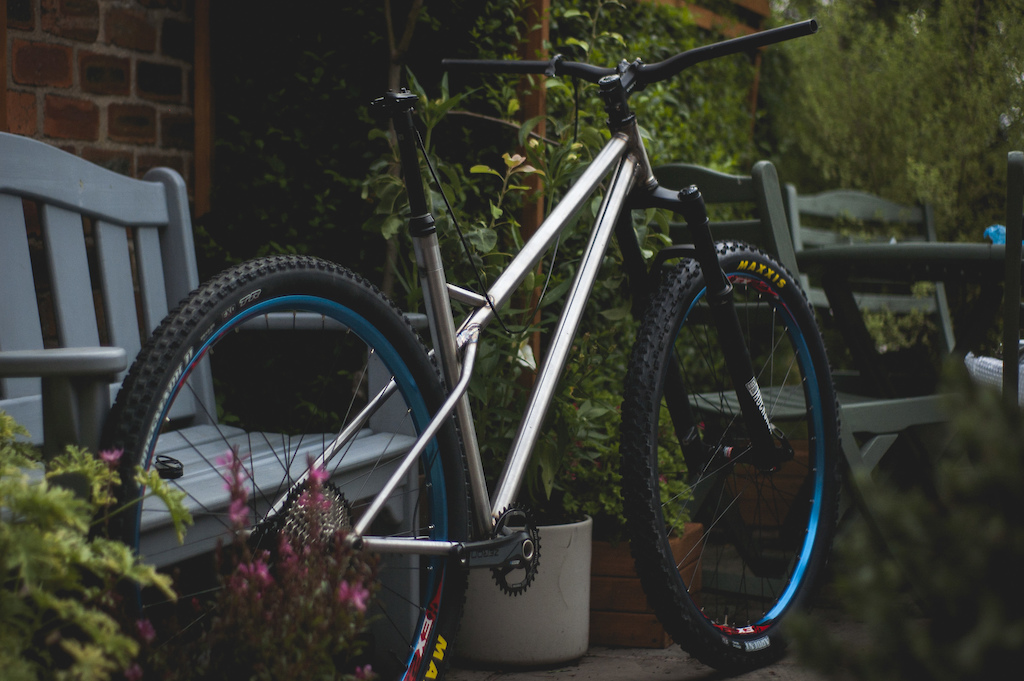
Maiden voyage at Eastridge wood, Shropshire.
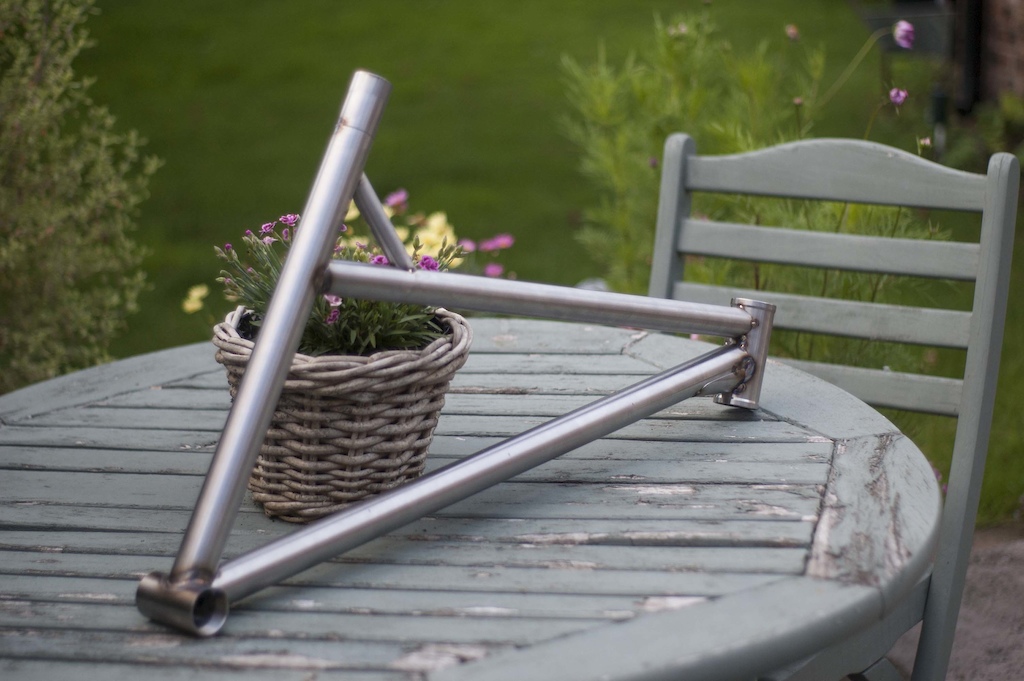
And that's it! I'm done, for now. I'm going to ride the bike for the next few weeks in its raw state trying out a few different cable positions (hence the electrical tape) and once I am happy, I'll just need to weld the remaining cable mounts, add a brace between the chain stay and seat stay to help spread the forces from braking and then decide on a colour (always one of the hardest decisions).
If you would like to keep up to date on this frame as well, as my other projects, then give me a follow on instagram.
USEFUL LINKS
- Ceeway bike building supplies
- Bear frame supplies
- Bike Academy tools
- Reynolds bicycle tubing
- Bikecad - Bicycle design software
- Paragon machineworks - Frame building supplies
- Homemade bikes - Pink bike thread, A treasure trove of useful information
- Tube coping calculator - Prints paper templates
- Linkage Bike Sim' Software - Suspension design
- BikeCalc - Calculating wheel sizes
- Cobra frame building tooling
Author Info:

Must Read This Week
Sign Up for the Pinkbike Newsletter - All the Biggest, Most Interesting Stories in your Inbox
PB Newsletter Signup
he's a home frame builer, videos are really well made showing all the process and speaking of/solving the eventual problems that come up
This is on my bucket list.
"Boutique industry frame builders hate him, find out why..."
This article is inspirational! Nothing short. I'm tempted to sign up to Instaprat just to follow!
I was the pilot riding the failed frame mentioned, to a few podiums in Scotland.
To be fair, the HA was slack (63.5!) and I absolutely hammered it. It rode amazingly.
Cheers Steve and keep up the good work!
*Orange Bikes enters the Chat*
I mean all this is fine and dandy, but the investment in all the tools isn't small, even if they're not the exact right tools for the job. This is something that I would consider doing, but living in the real world with mortgage and all the life stuff, it doesn't seem reasonable.
Something that cross my mind, and it's certainly is on my DO-IT-BEFORE-DIEING list.
I wish you all the best, and please continue your work & showing to everyone what a person can do, if it's willing to do it!
KUDOS!
I've added tooling since. A bench top mill and bench top lathe. The mill new at $2000 cad and the lathe used at $1500 cad. My jig can be made for about $200 cad in 1018 cold rolled steel.
Add in little stuff and you can easily set up a very competent little hobby set up for $5000 cad. I've build 8 frames now (three of those full suspension frames).
Myford ML7 lathe £500 secondhand
Cheap ebay TIG welder £160
Gas lens, tungsten etc about £30
Welder foot pedal (a modified on/off guitar amp pedal) £6
Welding gloves (not sure of price as they were a gift)
Pillar drill Free as it was my Grandad's. (but can get one for as little at £60)
Files were a couple quid each from car boot sales
Angle grinder around £25 from ebay
And that's about it for tools. But you could build a frame just using files, hacksaw, drill and welder.
1. The lathe isn't necessary for a hobby builder (1-2 frames a year). Just print out the paper templates and cut with a hacksaw and fine tune with a half round file. It takes me less than 5 minutes per cope, and is arguably a better fit.
2. Nova Cycles supply is a good source for tubing and dropouts in the USA.
Would love to see some pics of your frames
www.instagram.com/p/BvTxRxyhjoO/?utm_source=ig_web_copy_link
I remember the pain of starting out welding. Feel free to send me a message with your welding setup and I will try help, once you find the right settings it gets a lot easier. Also do you have a foot pedal? it makes a world of difference, I modified a guitar pedal on mine. www.instagram.com/p/BZWeXFalAf6
Did you weld the seat stays directly to the top tube to add a little more comfort, because the impacts are not directly transferred into the seatpost?
Great work!
As think while getting older I've lost the will to overcome all the pitfalls of learning by myself, I'd need to find a mentor to lead me through the learning process.
Congrats
chrisberkley.com/blog/how-to-build-a-steel-mountain-bike-frame-in-your-parents-garage
Same remark for the tube notching part, you could go with a simple file, and some angle grinder to remove the biggest part.
PB rocks today )
Why can't I do it?