Turn Up the Volume: RockShox Suspension Tuning Clinic

Jun 15, 2015
by Mike Kazimer  


When it comes to mountain bike suspension tuning, there's a wide range in levels of interest and technical know-how. On one side you have the 'set it and forget it' crowd, riders who don't typically do much to their fork or shock after getting the initial settings dialed in, and then on the other side are the tech-geeks, those who could wax poetic for hours about shim stacks and suspension curves, and who leap at any opportunity to point out the difference between 'damping' and 'dampening'.

Neither side is better than the other, and even at the highest level of the sport you're just as likely to find racers who rarely touch their suspension settings as you are those who make minute tweaks almost every single run. It was with those facts in mind that RockShox decided to hold a tuning camp in Squamish and Whistler, BC, in order to demonstrate the steps for getting the most out of their Pike fork and Monarch DebonAir rear shock, two of the most common high end suspension elements currently on the market.

Why Squamish? Well, in addition to being surrounded by some of the best riding in the world, it's home to Shawn 'The Wizard' Cruikshanks. His shop, Fluid Function, is located in small industrial park at the edge of town, and serves as a Canadian service center for SRAM products. Shawn is also the suspension guru entrusted with tuning the bikes of several SRAM sponsored athletes, including Brandon Semenuk. In short, if you need someone on hand to help get things dialed in, he's the guy to do it.

The purpose of the clinic wasn't to venture fully down the rabbit hole of suspension tuning, but to focus on the bigger picture, on the type of adjustments that are slightly more involved than turning a knob or flipping a lever, but still easily doable by anyone who can tell their left from right and turn a wrench. Adjusting the air chamber volume on either the Pike or Monarch DebonAir is a relatively simple procedure, but it can have a large influence on the way the suspension performs. In order to suss out the difference that altering the spacer configuration makes, we used the lift-served playground of Whistler Bike Park as our testing facility, repeating the same lap over and over again and changing settings between each run.

SRAM camp
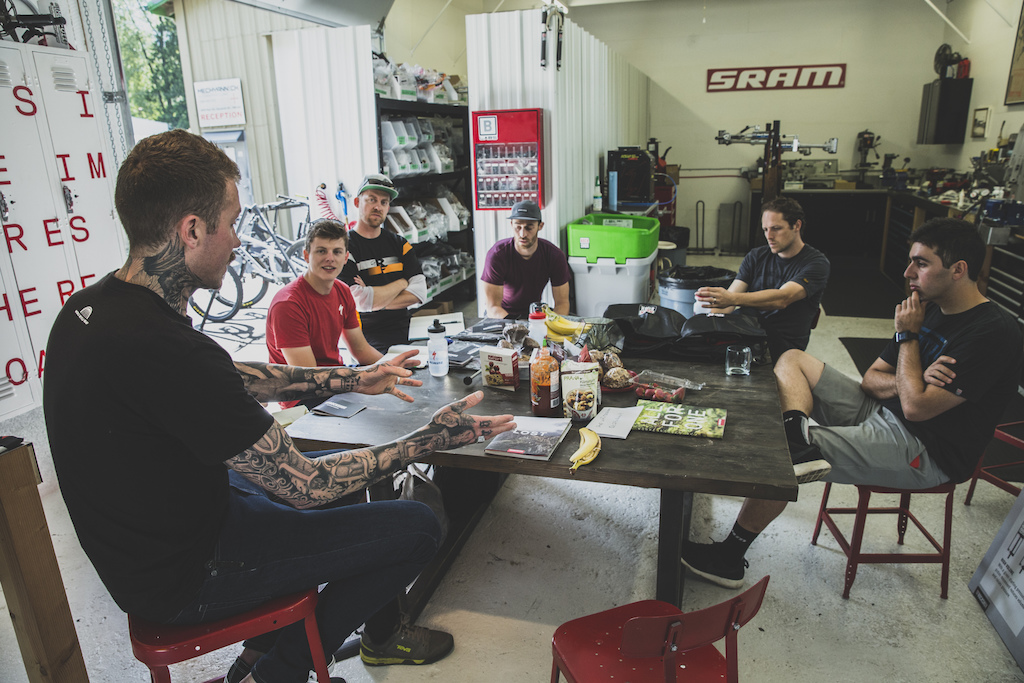
Class is in session - SRAM's Duncan Riffle dishes out the knowledge.


RockShox
RockShox volume spacer chart

Volume Spacer Basics

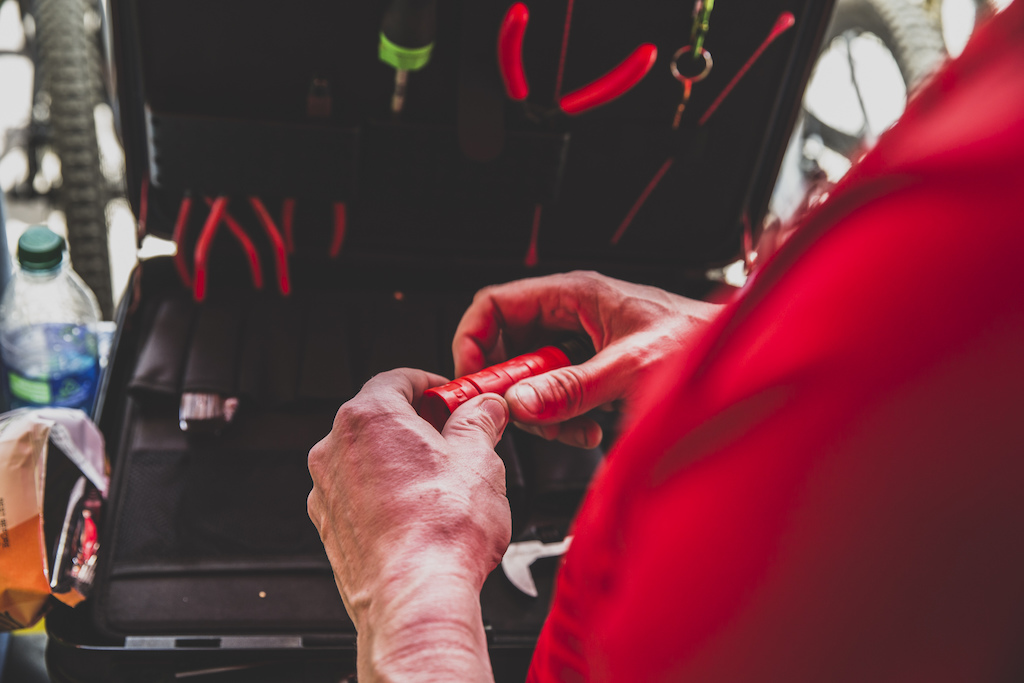
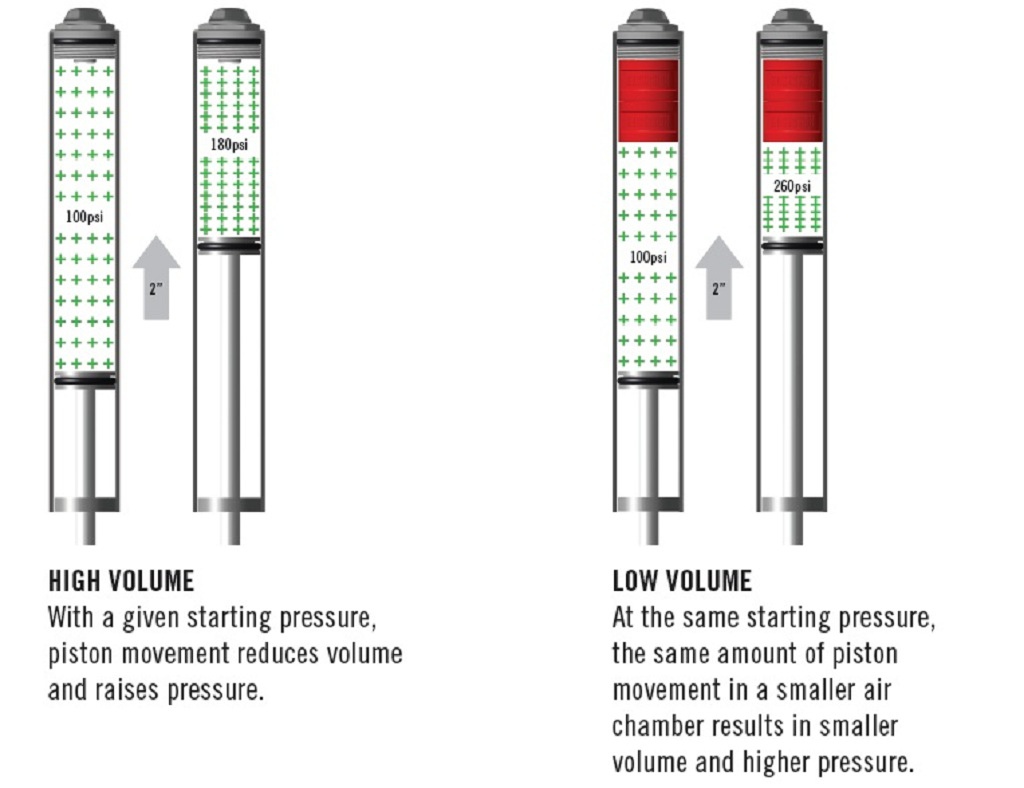
If you've purchased a bike equipped with a RockShox suspension fork recently, more than likely it came a couple red plastic spacers, which RockShox calls Bottomless Tokens. Although they might look like pieces for a game of checkers, the tokens thread into the underside of the top cap, as well as to each other, and allow for the amount of ramp up the fork has at the end of its stroke to be adjusted. Look at the illustration above, and you can see the difference in air pressure in a fork without tokens versus one with two installed.

Suspension setup isn't an exact science, but rather one that's based partially on how a fork or shock feels on the trail. That's why taking back to back laps on the same track is the best way to compare different settings. The lap used for this session in the Whistler Bike Park was Angry Pirate → Del Boca Vista → A-Line, a run that includes a mix of twisty singletrack with a few rocky sections, and finishes with the high speed jumps that A-Line is famous for.


Pike Bracket Testing

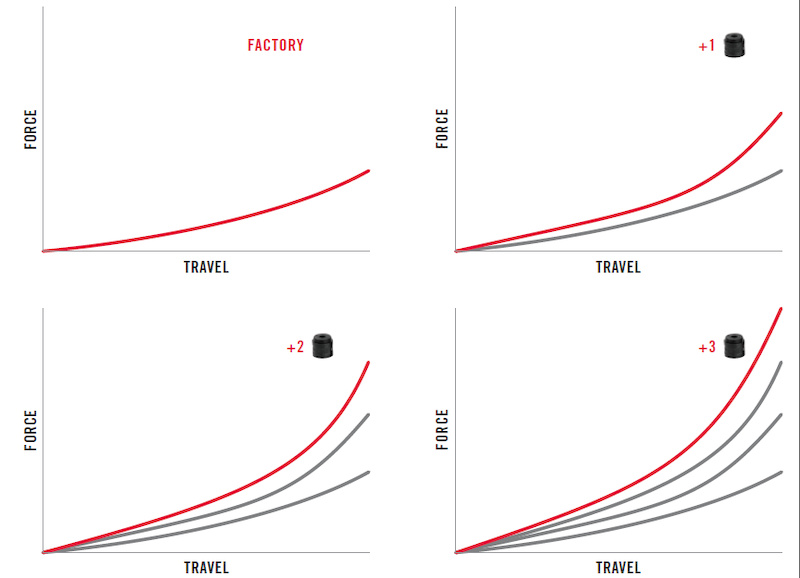
For my first lap, the fork (a 160mm Pike) was set the same way that I would usually run it on my home trails in order to set a baseline, something to compare the following runs against. Once the first of many runs down the mountain was complete, the one token that I normally have installed was removed in order to illustrate what one end of the range of settings felt like. The number of tokens a fork can accept varies depending on the amount of travel as well as the wheel size, but typically the less travel, the more tokens, because the ramp up needs to occur more quickly on a 80 or 100mm fork than it would on something with 150 or 160mm of travel.

Without any tokens installed, the fork felt more prone to diving, and it tended to get sucked into holes rather than staying in the middle portion of its travel. At slower speeds things felt relatively normal, but on bigger hits on rougher terrain it was clear that more progression at the end of the stroke would be helpful. After establishing what a token-free configuration felt like, it was time to install as many tokens as possible, in this case a total of four.
Whistler SRAM tuning camp
The fork's bottomless tokens are located underneath the non-driveside topcap.
Running the Pike filled to the brim with tokens created much more feedback in my hands, especially when plowing through brake bumps or over rocky section of trail. The ride height was altered as well, due to the fact that the increased ramp up kept the fork positioned higher up in its travel. At times this height felt beneficial, allowing me to really drive the bike into turns, pushing into the front end as hard as I wanted, but at other moments it simply felt like it was overkill, creating a ride that was too harsh for my liking. With the two ends of the spectrum established, it was time to work downwards, removing a token after each lap until arriving at the setting that best suited my preferences. As it turned out, the setting I initially had (one token) was what I ended up settling on as my default configuration, but for days in the bike park or during a race when higher speeds than usual are the norm, I'd be inclined to put another token in to take advantage of the additional ramp up.


RockShox DebonAir spring curve

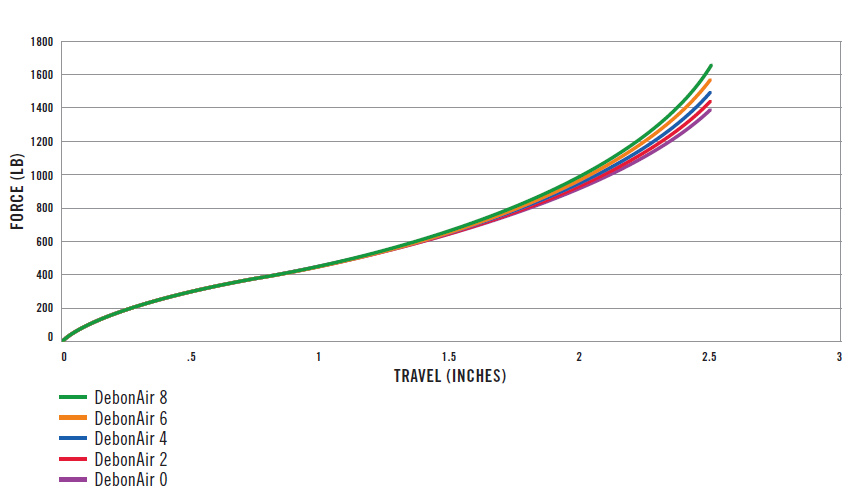
Monarch Plus DebonAir Bracket Testing

With the fork dialed in, it was time to start working on the rear shock, a Monarch Plus DebonAir. Once the air is removed from the shock, removing the rubber o-ring at the base of the outer air sleeve allows the sleeve to be slid off, and for the rubber band volume spacers to be added or removed. Unlike the fork, where one token makes a noticeable difference, it usually takes two or three rubber bands to make a difference in the shock's feel, as the above graphic illustrates.

Just like with the fork, after taking a run to set a baseline, it was time to install the maximum number of spacers, in this case a total of six. This caused the shock to feel like it was bouncing off obstacles, and it felt too firm in the rougher portions of the trail. On the smoother, jump filled section of the run the extra support was a benefit, providing a platform to push against and really pop off the lip of a jump.

Dropping down to three spacers in the shock ended up being the magic number, a setup that allowed the shock to track and grip well over roots and rocks, but with enough ramp up to keep from blowing through its travel. Of course, the number of bands required will depend on the bike's suspension design in addition to rider preference, since some designs are already inherently progressive and won't need as much progressiveness as a a bike with a more linear spring rate.

Whistler SRAM tuning camp
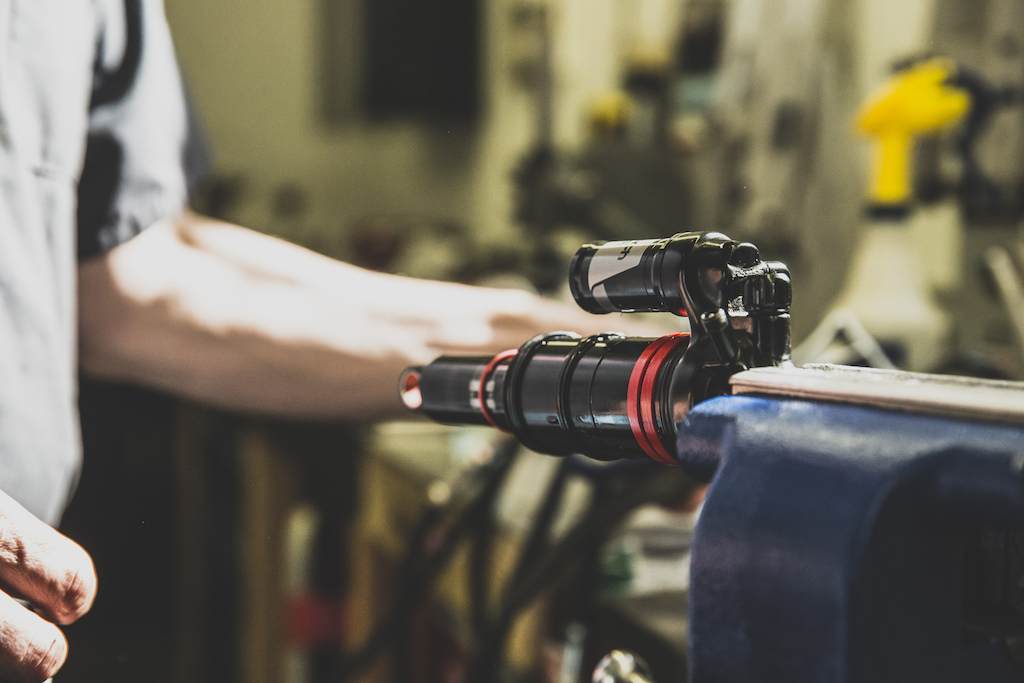
The red rubber bands under the air sleeve allow the amount of ramp up to easily be altered.


RockShox Camp


What was the end result of all of this fiddling about with plastic tokens and rubber bands? Well, in addition to getting to ride the incredible trails in Squamish and Whistler, it provided a chance to experience the extremes when it comes to suspension setup. Even if it's unlikely that I'll ever use those settings, it's good to know what a fork with four tokens, or a shock with six spacers feels like out on the trail.

For riders that are interested in going a little bit further with their suspension setup, experimenting with different air chamber volumes is the logical next step, and it's easy enough that it can be performed trailside with minimal hassle other than toting along a few tools you wouldn't typically bring on a ride. Taking that extra bit of time to dial in a set up is well worth it, and can lead to an even more enjoyable time out on the trail.


MENTIONS: @SramMedia / @Amarc


Author Info:
mikekazimer avatar

Member since Feb 1, 2009
1,716 articles

137 Comments
  • 173 1
 you're doing it right pinkbike
  • 33 173
flag ethanhagle (Jun 15, 2015 at 15:37) (Below Threshold)
 This was on Vital about 5 days ago, just sayin!
  • 212 10
 Nobody likes "just sayin" guy.
  • 39 2
 You're doing it right RS, give the consumer tons of great info...we're stoked to get some formal DIY with explanatory text! Wish all manufacturers pushed techy info like this...don't underestimate us riders.
  • 32 0
 We all know what happened to Tuco's friend in Breaking Bad when he said 'just sayin' at the end of season 1
  • 33 18
 You guys click more red down arrows then you click gears, just sayin.
  • 8 0
 They spent few days learning about air volume sparers? Their parents must have endless patience... "This goes into my nose?" :O
  • 15 1
 *than. Just sayin'.
  • 2 0
 If you are in need of volume reducer for Monarch Debonair RC3 and you cant find it online? Well! I have good news! Go to your nearest Michaels Arts and Craft and ask or look for wide rubber band and the price surprisingly $1.99 for 30 pcs and they comes with 5 different colors. What a great deal! Got mine yesterday and they fit perfectly. I used two pieces which is equivalent to 4 rubber band of the original. You can even customize the band to suit your need.
Good luck!
  • 65 0
 I'm just happy I was able to purchase a bike with rear suspension. It's like floating on clouds mixed with marshmallows.
  • 4 25
flag nutelladonut (Jun 14, 2015 at 21:20) (Below Threshold)
 got to the article 15 hours before it was meant to be released... this is interesting
  • 26 0
 Am I smelling a hint of Tech Tuesday?
  • 2 0
 Well, its Tuesday for sure ;-)
  • 7 0
 I don't think it's the greatest idea to put this out there without explaining the its relationship with low speed compression damping. Not explaining the balance of the two is just setting riders up for failure. With this info, most riders would think that when they're blowing through their travel in a rock garden, through turns, or down a steep decent, that they need more volume spacers. However, the issue and proper solution often (but not in all cases) lies in the low speed compression damping, either increasing LCD (when using too much of the travel) or decreasing LCD (when not using enough of the travel, and having little small bump sensitivity).
  • 1 0
 this comment needs more play
  • 12 2
 MRP Stage has a knob for this, no disassembly required!
  • 10 2
 More informative article nsmb.com/rock-shox-tuning-camp
  • 8 0
 so.. what is the difference between damping and dampening? #noob
  • 14 0
 Dampening is when you get something wet, damping refers to reducing movement in some way. www.pinkbike.com/photo/11392782
  • 4 0
 Damping is also what Dampers do. Its HUGELY and widely misunderstood that dampers are shock absorbers. They aren't. Technically speaking, the springs absorb shock by storing energy in the spring and releasing later on. Dampers only transmit force, to control the suspension motion and damp some of it out. None of this makes me ride a bike faster though unfortunately...
  • 4 0
 There is one caveat here, when using tokens for pike with less than 160mm travel, it will probably take more tokens. This is because due to the construction of the pike, the air chamber has the same volume whether you have 160mm or 140mm travel. Which means that the 140mm travel pike will be much more linear without tokens than 160mm pike.
  • 3 0
 Interesting article but it would be cool to get more insight beyond the use of tokens. On the Pike, there's an interesting balance in settings among air pressure, tokens, rebound, and low speed compression, depending on your weight and style of riding. Very tunable by the average person, without requiring a visit to the local suspension guru.
  • 4 0
 Okay Rockshox how about you start selling the damn volume reducer bands for the monarch+ DebonAir so we can tune our shocks....If anyone knows where I can get some that would be great. My LBS claims they can't get them yet.
  • 8 0
 Your shop should be obtain them direct from SRAM. Part number is 11.4118.042.000 with an msrp of $16USD.
  • 9 2
 These are literally elastic bands. Go grab a box of assorted elastics, pick out the small fat ones and save yourself $25. Kudos to rock shox for making tuning Walmart easy.
  • 2 1
 Even electrical tape or grease works as well in a pinch.
  • 2 0
 No need for red rubber bands. Cut an old inner tube and start tuning. That's what I did on my old monarch high volume.
  • 7 0
 I'd have thought elastic bands for the purpose of stationary would corrode over time and leave rubber crumbs in your shock (much like when you leave them stretched over paper for too long). The volume spacer bands are not the rubber bands you get from Walmart, they seem to be more like a plasticky silicone or something. If you don't want to buy the bands, then electricity tape and grease works too. I have heard people use a bit of inner tube too.
  • 4 0
 Standard rubber (or butyl inner tubes) are no go when there is oil, unless you want dissolved rubber goo in your shock.
  • 4 1
 On my enduro 29er my debonair with all the spacers in it still bottoms way too easily. I have it aired up to 300 psi (as high as my shock pump will go) for heavens sake! 200-300 psi change lowers the sag by less than 5%. Even on smooth trails my o-ring is at the bottom of the shock. What am I doing wrong?
  • 2 1
 Replacing the bands is so easy, I would worry about deteriorating elastic bands. Just pop the sleeve off once in a while to inspect and good to go. That being said, I would prefer the official bands but $25 is unnecessary.
  • 1 0
 @hamncheez I'm riding the same bike with the Debonair plus, and haven't had that issue at all. If you don't mind me asking, about how much do you weigh? What kind of hit does it take to bottom out? Does it bottom out going through rock garden, or on a G-out? Depending on what you respond with, I'm wondering if your damper is blown. I weigh ~185lb and run mid 200psi, and even on a decent sized hit I don't bottom the shock out. Mine feels bottomless, and I haven't put any extra volume spacers in at all.
  • 1 1
 @kfarm I weigh 210 lbs, and it bottoms on small drops/jumps. On a 4 foot to flat it bottomed harder than any other bike/shock I've owned and kicked me over the bars. On g-outs its harder to tell; the bike has the crappy butcher stock rear tire that folds over really easily, so on tight berms I'm still having problems, but its hard to tease out the tire effects. On this one g-out the rear tire bottoms to the rim, even at over 40 psi. I'll ride a trail that I think is decently smooth that should not use even half the travel, but the o-ring thing that measures your travel will be all the way at the bottom of the shock at the end of the trail, even though I didn't' feel any harsh bottoming.
  • 10 0
 How the heck do you bottom out your tire at 40 psi from a smooth g-out? At 40 psi, my tire is a frickin diamond!
  • 1 0
 @kfarm 210 pounds and a BIG g-out
  • 1 0
 Interesting @bishopsmike. Something definitely sounds off. I can take a much larger drop, land improperly, and not have anywhere near the same experience. It's hard to diagnose the issue without seeing and feeling for myself. However, one place I would start is by letting the air out of the shock, unthreading the air can, and cycling the suspension by pushing down on the seat with your hands. There should be a smooth, consistent pressure. It shouldn't go through the travel on its own, you should have to push down pretty firmly in order to cycle the suspension. Also, the rebound should feel the same, consistent throughout the stroke.

As for the tire, at 40psi your shouldn't be hitting rim in a G-out. And if you are, how are you not constantly rolling the tire off the rim in a turn? I will say, I'm not a fan of the control casing tires (especially as a rear). I run a butcher grid up front and slaughter (sometimes butcher) grid rear. The grid casing makes a HUGE difference in both longevity and sidewall strength.

Would you say your rider weight (gear, pack, everything) is less than 220lb? I hope I don't sound condescending at all, just want to try and help you have fun on his bike enjoy it!
  • 2 0
 @kfarm 4 foot to *flat* is pretty big for a clyde. Outside of BMX/trials.

What threw me with that response was more the "kicked me over the bars" statement. I'm having a hard time coming up with how a ___-to-flat landing would ever do that, unless landing super rear-heavy, which would cause most shocks to bottom out...hard. Or, maybe he has nuclear powered rebound.
  • 1 0
 I'm prob about 220 loaded up, and I have depressurized the shock a few times. Fist was to try and add some volume spacers, only to find that it was already using the maximum amount. The screw that threads into the rear of the shock from the yoke also wiggled loose, and I had to deflate the shock to go in there and put locktight on it. The compression/rebound action is extremely smooth when deflated, and feels good on the trail when not landing. I bought it used, but these have only been around for a few months so I don't see how the previous rider could have blown the compression so quickly.

The drop was into a berm, and there was some downhill slope to the landing; I kind of hit the knuckle, except thats where you have to land to make the turn. Its really not that big a deal, but I bounced off the bottom of the shock and burped the air out of both tires, sending me into the bushes. With those cheap specialized tires/rims they burp nearly time I ride. I'm going back to tubes with them.
  • 1 0
 If you are in need of volume reducer for Monarch Debonair RC3 and you cant find it online? Well! I have good news! Go to your nearest Michaels Arts and Craft and ask or look for wide rubber band and the price surprisingly $1.99 for 30 pcs and they comes with 5 different colors. What a great deal! Got mine yesterday and they fit perfectly. I used two pieces which is equivalent to 4 rubber band of the original. You can even customize the band to suit your need.
Good luck!
  • 2 0
 I've got a factory tuned debonair on a specialized enduro. I find the shock seems not able to deal well with short travel high speed compression. It's fine when it has to go right through its travel on bigger hitting drops etc but seems really harsh almost hard tail like if it just takes a quick square edge bump or big root. Any suggestions.
  • 1 0
 Monarch was and is harsh on highspeed damping. I guess there is not enough oilflow possible, because they reworked the oilflow on the 2016 model.


These "tuning tips" leave so many questions unanswered. Like, what can I do when I never reach full travel with correct sag and hitting it really hard...? Can I make the airchamber bigger??
  • 1 0
 @cxfahrer

If you're not getting full travel with the correct sag and you're hitting stuff as hard as you ever will, you need to lower your HSC. You could also remove any volume spacers you have, but that will change the actual feeling of your fork/shock and you'll need to find the new sag point.
  • 1 0
 At correct sag on my monarch debonair plus I blow through the travel way to easily, and I have all the volume spacers in it. It only comes in a medium compression tune, and I think for an Enduro it could benefit from more compression damping.
  • 1 0
 @brussell: talking about the Monarch Debonair? I had an L/S Tune, all spacers out. Sold the bike after messing around for months.
  • 1 0
 @hamncheez: Put some volume spacers to the negative chamber too ,it should helps..
  • 3 1
 So........I was thinking of 3d printing some tokens for my pikes, but in different heights, say.......5mm and 10mm. Extra fine tuning ability as I quite like one token and find two a bit much round here. So I feel like spending time tuning between one and two with some custom tokens.
  • 2 0
 I've struggled to set this fork up but this article has helped & there is a good article on nsmb.com too. I now run 4 tokens / 105 psi / lsc 4 clicks from quick and the bottom one right in the middle. I was running 125 psi as I am 19 stone and it felt harsh but also appeared to fall past the mid point too quickly. Now I have great small bump response & plushness without diving. I am hitting rutted local berms a lot quicker with the bike tracking better. I think as a big guy - the high pressure required for sag can screw small bump compliance. I think ramping up from a lower psi with additional tokens is the way to go.
  • 2 0
 Sorry if this has already been asked i scrolled through as many comments as i could handle but cant find any info online about wether you can install bottomless rings on a 2015 monarch plus rc3? Got all payched about it then went to install them and cant find a way to remove the air sleeve?
  • 4 2
 I'm not currently bottoming my Pike at the current air pressure with 1 token. So if I put a bunch of tokens in my Pike, I could run less air pressure and get better small-bump sensitivity and potentially still have a similar bottom out point as I currently have with 1 token. Is this correct?
  • 10 0
 Technically, that would be correct. However, the lower the pressure that you run(even if you're not bottoming), the further you would sag into the travel at ride height vs sitting higher in the travel. It will give you more small-bump sensitivity, but there's a trade-off and a limit, which creates the balancing act that is tuning.
  • 1 0
 of course, for example for me 1 was not enough and 2 was too much so I ended with 1 and 1/3 tokens at 28% sag
  • 3 0
 @garrettstories This article missed out on something very important, and has to be included when talking about volume spacers: Low Speed Compression Damping. @rattpoison was right in that it's a balancing act, but low speed compression damping is absolutely a part of that equation (and many people miss that) as well. I wouldn't suggest more spacers and less pressure at the moment. Depending where your LCD is at, I would recommend less LCD.
  • 6 5
 I don't get it. DebonAir and Plus are just upgrades with more air volume, right? And then we put tokens in to lower the air volume?? Wat. What am I missing here?
Also it would've been cool to see more pics and info concerning the disassembly steps and tools required. Anyways I'm definitely gonna play around with tokens in my Pike to see whats what.
  • 21 1
 It does seem a little counterintuitive, but remember that the DebonAir can also reduces the amount of force needed to get the shock moving through the beginning of its travel when compared to the standard can. Using the volume spacers allows you to adjust how progressive the shock feels without affecting the initial small bump sensitivity.
  • 4 0
 Another way to look at it: the Debonair can makes it feel more coil-like in the first half of the travel, and the air volume reducers affect the ramp up in the bottom half of the travel.
  • 9 0
 "I don't get it. DebonAir and Plus are just upgrades with more air volume, right?"

The De-boner air can does give you more air spring volume, but it also gives you more negative air volume which is what helps make the shock more supple in the first part of the stroke than a standard air can. You may not need to put any volume reducers with certain frames, but it is easily done if necessary.

'Plus' is not an air volume upgrade. The piggy back on the Plus allows the shock to use more oil than the standard shock which helps to stop the oil from overheating as quickly as some of it is housed outside of the shock stanchion, where all the heat is generated through friction.
  • 7 0
 It is incredible on the adjustability in suspension these days....... my problem is, I'm just not good enough to tell the difference of 1-3 clicks I don't need the best, but I sure damn do want it !
  • 1 0
 Thanks for the answers guys! Smile Quick followup since I've got you here: What happens/how do I tell if the oil overheats..? Does it just change consistency altering the shocks characteristics?
  • 2 0
 Yup thats the main effect The viscosity of the oil will drop as temperature increases which reduces damping. I believe the vivid air uses some other techniques to combat this and automatically adjusts the damping with an increase in temperature.
  • 2 0
 perfectly said, @dingus.

@wicol, you are correct. It changes the consistency of the fluid when it is overheated. Just like hydraulic brakes, when the fluid reaches its boiling point, the tiny air bubbles expand into large air bubbles. Also, when a fluid reaches its boiling point and cools back down, it now has broken down some of the fluid, and will reach its boiling point even easier the next time... and the cycle continues.
  • 2 0
 as you put more token's you keep the sdame pressure or start to reduce?
for now my fork is runing with one token and 75 psi (i'm 73kg equiped) but i was thinking of put another one to make it more progressive,
  • 7 0
 Try dropping 5psi or so when you add the next token in - that'll help keep the fork feeling similar to how it does now, but with more ramp up.
  • 2 0
 thank's, i will do that
i also run a monarch plus debonair, and i find myself mostly riding it on the trail position, only to ride fully open when there is low grip or is seriosly rough, like the back up mode for when thing's get real ahah, is it bad for the shock riding pretty much everything on trail? i am an agressive rider, and even for racing i rarely put it on open as i like how it feels
  • 5 0
 @tiagomano, it's totally fine to ride in trail mode the majority of the time. All that's doing is adding low speed compression damping - you won't hurt anything by running it that way.
  • 1 0
 Hello, great article. I would like to ask if was it tried while sag kept same? I have a new lighter bike with 140mm in the back Monarch RT ML, and I like it at about 30%. I ride relatively agressively. Because i owned 170 FR beast before and of course sometimes with harsher riding, I feel I am using more of the travel with new bike than I would like. I have not felt some strong hit or bumb, but bit worrying while seeing the gummy ring sliping near the end so I would like to make it much more progressive and keep it same 30% sag with normal or slower compression for light jumps. Anyone tried spacers on that shock?
  • 2 1
 Need moar info!!!!

I ride a hard to tune bike - '14 Nomad. The differences I get from adjusting tire pressure, rear shock pressure and fork pressure, not to mention compression and rebound, are huge and driving me nuts. I'm now at a "doesn't suck" set up - and I want to get to awesome. Can you guys give us a program to follow to dial in all these adjustments?
  • 1 1
 Assuming not a huge amount has changed in the kinematics of the frame between '10 and '14....

I run my xfusion vengeance at 68psi (barely 20% sag, 78kg full gear) with 6 clicks low speed and 7 high speed.
Used to have rp23 on the rear, ran that 160 psi at 25% sag, but put a length of inner tube inside the can to act the same as a volume spacer. Now run a rock shox kage rc coil shock with 500lbs spring and 2 clicks compression..

Take as you will friend!
  • 1 0
 @GVArider I agree. It's a hard bike to tune. I run 20-25% (closer to 25) sag in the front 30-32.5% in the rear in the neutral riding positing. This feels awesome for me. However; I think adding one volume spacer up front and maybe 2-3 in the shock would give us a plush but still more supportive feeling. I might try but most likely I'm just going to go out and ride my bike.
  • 1 0
 I've got a pike up front and Monarch Plus in the rear - no tokens added. Sag is fine (18-20% front, 32-35 rear), rebound about four clicks from wide open, compression two clicks from open. This set up just doesn't feel very plush up front (so more sag, I guess, since I don't usually use all my travel - but I'm more worried about brake/big hit dive and so take a stiffer front).

My friend has a 13 slayer with a Lyric front end, which is just dialed. Rocky descents are just absorbed softly - while I feel like I've got more "bounce" (fast rebound?) than squish.

Thoughts on adjustments?
  • 1 0
 I would try using tokens in the front and possibily speeding up the rebound, tokens will help you stay up with more mid stroke support and the rebound will help the fork to stay higher over big repeated hits
  • 1 0
 Have a look over on nsmb for a similar article from this camp that goes into more detail;
nsmb.com/rock-shox-tuning-camp/#comment-2081406018
  • 1 0
 Honestly on this bike 18% to 20% is a huge difference in feel. Try it out at 20% or more. Not as much dive as you'd expect and it really plushens it up. Better yet add a token or two and let us know how it works out!!!
  • 2 0
 You might want to check this out, does it all automatically. kck.st/1JGvmUZ
  • 1 0
 Automated telemetry for suspension is definitely the future... I'll just sit and wait to see if this thing ends up working out. I've got two kickstarter projects that haven't launched after more than a year. I'll pay full price for it if they get it right!
  • 1 0
 Great article with a very good explanation of the tuning procedures, how they work, why and how it feels on the trail. When and how was this training session advertised and are other training opportunities available at Fluid Function? I would really like to attend some if they are available.
  • 4 0
 Good Stuff Mike - Thanks!
  • 2 0
 every time I have a question or I am thinking about doing something to my bike pinkbike weirdly covers it that week, I love it.
  • 1 1
 So... as the article states, even at the highest level you've got those that "set and forget". Doesn't that tell us something about how useful the picky suspension adjustments actually are? I say it's not all in your head... but the demands even on the same trail are so diverse that workout active real-time adjustments it's not really worth a whole lot.
  • 1 1
 Or they have tech guys who set their shocks up for them, cos they don't know how....
  • 1 0
 I have two Pikes on two different bikes with different travel and completely different geo. in order to get high end performance on both this has been a huge help. They are (you guessed it) not the same at all. It does make a difference
  • 1 1
 anyone discovered that the fork is setup really well out of the box?! :-)
after doing a lower leg service i have huge trouble setting it up like before. need to use 90 psi now instead of 60 before, and thus small bump sensitivity is gone..
  • 1 0
 great guys at Fluid Function Thomas made some adjustments to my fork and shock , can,t thank them enough . it,s made a huge difference in my riding will definitely getting more work from them when the time comes .
  • 1 0
 I realize this is an old article, but I haven't been able to find an answer anywhere. Can you use the volume spacers on a regular monarch shock? I'm talking the standard air can size not plus or debonair.
  • 2 0
 Hey I see you posted (semi) recently, and no response, so I'll do the best I can.
I don't see any reason the monarch is any different from the monarch plus/debonair.
  • 1 0
 Does it means that if i'm heavier than "usual" riders I should put one or two tokens in my Pike ?

I'm 100kg equiped (220lbs)
  • 1 0
 No, you initially set the air pressure in your fork in the bracket that matches your weight or until you reach desired sag (20-25%)
  • 1 0
 Okay so I dont get the difference between putting a token or more air in the fork ?
  • 5 0
 @verbilim, tokens affect how your fork feels at the end of its travel, while adding more air will be noticeable from the very beginning of the stroke. You may be able to use tokens as a way to get away with running slightly lower pressure, keeping the fork supple for the small bumps but with enough ramp up so you don't bottom out all the time.
  • 2 0
 Ok thanks a lot i understand it way better now !
  • 2 0
 use air pressure to set the proper sag, then use the tokens to tune bottoming out resistance.
  • 1 0
 I'm a similar weight to you. I put 3 tokens in but dropped the air pressure by 10psi. Beginning stroke feels amazing, no harsh bottom out or excessive dive.
  • 1 0
 I'm not an expert so could have this wrong, but my basic understanding is that putting more or less air in just changes the % sag. Adding tokens means you change the actual volume which changes the travel curve, i.e., you need more force to blow through the same travel, which might be useful for aggresive riders that blow through their travel even though their sag is set correctly. The diagram with the volumes illustrates it best. The one without the tokens needs 180 psi force to compress 2" travel, but the one with tokens has a smaller volume and needs 250 psi force for the same 2" travel. I believe it also means you can run lower pressures, for the same sag, which then gives better small bump sensitivity as it takes less force to overcome the initial pressures. I think SRAM have a good tuning guide for the pikes on their website.
  • 2 0
 Spot On
  • 3 0
 Fuck my bike that has the new pike did not come with the volume spacers
  • 8 0
 Go to bike shop. Ask for tokens. They should literally have built gigantic wands to do battle with from all the extra ones they have.
  • 1 0
 Does your shop give them away, or are they charging a few bucks for them?
  • 2 0
 how can i reduce the air volume on my 2013 lyrik rc? do the pike tokens fit in?
  • 1 0
 I'm still trying to figure out how I can avoid putting 350psi in my Monarch+Debonair to reach 20% sag. Granted I'm not a lightweight rider (240 wet), but still.
  • 1 0
 Sounds like you need to reduce the volume in your positive chamber.
  • 3 1
 Try letting all your psi out, drop rebound and compression to zero. Fill psi back up in using increments of 50. Unscrew the shock pump each time and slowly compress the shock a few times. Repeat until your desired sag. Worked for me and I run the same psi as my body weight.
  • 1 0
 DavidSA; would that positive chamber be the space further down inside the can? IE closer to the shock piston?
  • 1 0
 I just put my Monarch+Debonair on my 2014 StumpJumper. Weighing 230lbs I only hit 35% sag with 300psi. My Shock pump only goes to 300psi so I'm really weary of putting any more air in to get 25-30% sag. I have never had to put so much air in a shock to get correct sag. After reading high psi seems to be the norm for heaver riders like us. I called sram and they said it would be fine up to 350psi. So im a little stumped as well
  • 1 0
 @cds36: I've gotta put similar amounts in mine to get proper sag. Floor shock pumps are awesome for this.
  • 3 3
 Hmmm.....the articles back now? I saw this posted Sunday evening (9:00 or 10:00 PM AB time), but by the time I finished reading the Leogang coverage that was below it, it had vanished??

wazupwifdat?
  • 2 0
 So many many bands comes stock installed in the Monarch plus?
  • 3 0
 OEM frame manufacturers have the option to specify number of bands as well as compression and rebound tunes.
  • 2 0
 Can you use those bands on 2014/15 vivid air?
  • 1 1
 Yes. The downloadable service guide from the SRAM site shows you how to do it.
  • 1 0
 The kit is for both but waiting to hear how the vivid comes apart
  • 2 0
 Just tell me how to tune my rear for chainless.
  • 3 0
 You mean beadless?
  • 2 0
 still nothing about vivid air.............. like the rest of the internet
  • 1 0
 Aha, thanks Mike. The "2014 Vivid Air R2C" pdf manual I have is identical except for the air spacers section, weird.

So how easy a job is this on the Vivid Air, anyone? I could do with a little ramp-up in mine for sure. Seems like a pin wrench and a proprietary Vivid Air wrench are required, plus I kind of knackered an old Monarch RT3 when I did an air can service once and that was a much simpler procedure (step 4 of the air can removal has me worried, messing with the IFP). I'll probably just deal with it this year and send it away for a real service & tune over winter.

And where do we buy the red shock spacers anyway? I don't think this has been mentioned.
  • 1 0
 Easy job.
Only tool needed is a BB tool.

1: Remove all air pressure from the shock, pull the shock whilst doing this to make sure pressure is removed from negative chamber too.
2: Remove main Air valve.
3: Put the rebound end in a vice, and undo the main air can sealhead with the BB tool.
4: Slide the sealhead up, and be careful to keep hold of the inner alignment ring (metal ring that holds the inner aircan sleeve straight.)
5: Gently tease the inner aircan toward the sealhead,
6: push in the volume spacers onto the inner aircan, past the seal. (Pg21 in the linkabove)
7: Push the inner aircan back into the main aircan fully.
8: make sure the alignment ring is straight, and tighten the sealhead back up with the BB tool.
9: Put the main air valve back in, and pressure up. (cycling the shock a few times to even up the negative chamber)

Voila.
Volume tuned.
  • 1 0
 P.S. Do this before you add volume spacers.

P1 = Pressure shock main chamber to 20psi only.
P2 = Fully compress the shock fully with the pump attached, and note the final pressure. (40psi)
Pc = Presure change = P2/P1 = 2 in my example.

Volume change = 1/Pc = 1/2 in this example.
Compressed volume = 1/2 original volume in the above.

Do this again once your volume reducers are in and it will give you a numerical value for the amount of volume ramp up.
Example after: p1=20, p2 =60, pc=3 so volume change is 1/3 or original.

Due to the inverse relationship between pressure and volume, so small volume change = big pressure change.
  • 1 0
 where can we buy the rubber bands for rear shocks??
  • 3 0
 Cut up an old inner tube and start tuning Smile
  • 1 0
 thanks mate.. cheers!! Smile
  • 2 0
 If you are in need of volume reducer for Monarch Debonair RC3 and you cant find it online? Well! I have good news! Go to your nearest Michaels Arts and Craft and ask or look for wide rubber band and the price surprisingly $1.99 for 30 pcs and they comes with 5 different colors. What a great deal! Got mine yesterday and they fit perfectly. I used two pieces which is equivalent to 4 rubber band of the original. You can even customize the band to suit your need.
Good luck!
  • 1 1
 ...pity i don't own any air shocks. when do we get one for coil shocks and that kind of stuff?
  • 3 0
 preload ring does the same job
  • 2 0
 Fox guys ?!
  • 1 0
 where do you find the monach bands at?
  • 1 1
 CRC has had them in stock for a month or so. Or just buy some quarter in wide rubber bands at the hardware store
  • 2 0
 If you are in need of volume reducer for Monarch Debonair RC3 and you cant find it online? Well! I have good news! Go to your nearest Michaels Arts and Craft and ask or look for wide rubber band and the price surprisingly $1.99 for 30 pcs and they comes with 5 different colors. What a great deal! Got mine yesterday and they fit perfectly. I used two pieces which is equivalent to 4 rubber band of the original. You can even customize the band to suit your need.
Good luck!
  • 1 0
 I want this exact article.....for Marzocchi
  • 2 3
 Rockshox suspension would be okay if they didn't keep failing,given up on RS now until they sort their shit out,and customer service gets better in the UK.Grrrrrr.....
Below threshold threads are hidden


Copyright © 2000 - 2024. Pinkbike.com. All rights reserved.
dv65 0.107280
Mobile Version of Website