Technical Tuesday: How To Fix A Broken Chain
For the sixth episode of Technical Tuesday we'll explain how to fix a broken chain and how to properly use a chain tool. Inside you'll find step by step instructions and a great How-To video running you through this repair.
Read on...While breaking a chain may not be quite as common as it once was, it can still quickly ruin a good day on the bike. And if you haven't yet broken a chain while miles out in the bush, your time is coming! Unlike some other mechanicals, if you don't have the proper tools and knowledge to sort out this problem on the trail, it will mean that you are dead in the water. A chain tool is a mandatory piece of equipment that should always be in your backpack. Thankfully this only requires a single tool to fix and can take just minutes once you have the technique nailed down. Below you'll find step by step instructions and a How-To video.
Watch the video to learn how to use a chain tool to fix your broken chain:
Step By Step Instructions On How To Fix Your Broken Chain:
Tools needed: Chain tool or multi tool with built in chain tool.
![photo]()
Before you start this job it is important to figure out what make of chain you have on your bike. If you have a Shimano chain on your bike you'll either have to reconnect it by using another company's reusable link, or by inserting one of Shimano's new pins. If you do not have either of those items you can still follow the steps below in order to get your bike back on the trail and yourself out of the bush, but be sure to be careful as the new connection will not be as strong as if you had used the new pin and could fail. I would recommend taking it to your local shop to have them fix it before you hit the trails again.
There are a number of reasons why your chain could have broken and there are many riders out there who swear by one brand over another. The truth is that any and all chains can break, but there is always a good reason for it. The causes could range from a bad shift under load that caused an outer plate to separate from the pin, large amounts of wear, or even incorrect installation in the first place. Despite a lot of riders insistence that it must be down to their leg strength, this is never the case as there is always an underlying cause. The chain may have broken while you were practicing your gate starts, but your meager amount of ponies wasn't the root cause of the problem!
1. The first thing to do is to remove the broken chain from your bike. This will make it much easier to remove the damaged links and check for any others that may be twisted and cause your bike to skip under load. When you look at the breaking point on the chain you may see a number of different things. Depending on how the chain snapped, you may be left with any number of combinations of male (inner links) and female (outer plates), but to put it back together without using a replaceable link you'll need to use your chain tool and make one end a male end and the other a female end.
![photo]()
2. Now lets start by removing the damaged pieces. Some chain tools feature two different slots to put the chain in. The inner most position is strictly for fixing stiff links that may arise after you fix the chain, but you'll only ever use the outermost position to install or remove links. If your chain tool only has one position then you don't have to worry about this. One more thing to note is that some chain tools use a threaded dial to fit different width chains. If this is the case with your tool, simply turn the dial in after you've placed your chain in the slot. This will hold it in place as you work on it. As you are doing this, you'll only want to remove the damaged pieces in order to keep the chain as close to its proper length as possible. In order to produce a male end (inner link) simply push the chain pin completely through and out the opposite side. The outer plates will fall away and you'll be left with only the inner link. Take care not to let the roller (round piece that can be found between the two inner plates) fall out as they sometimes are prone to doing so.
![photo]()
3. The next step is to make a female (two outer plates) end on the opposite end of the chain. This is the tricky part. Once again, put the chain in your tool's outermost position and make sure that the tool's pin is perfectly lined up with the chain pin. Begin to push the pin, but the key is to stop before it is completely through. The goal is to push it out far enough to allow you to remove the damaged bits, and if done right you'll have to flex the two pieces to snap them apart. Once apart, you should have close to a millimeter of the pin protruding towards the inside of the female outer plates. If you happen to accidentally push the pin all the way out, you'll have to restart on a new section of chain as it's not recommended to try and reinstall the wayward pin. Leaving the chain pin protruding slightly to the inside will also make it much easier to join the chain once it's on your bike, as it will snap together and you won't have to hold it.
![photo]()
4. Now you're ready to reinstall the chain onto your bike. In order to have the least amount of chain tension to make it easier on yourself, shift your rear derailleur to the smallest cog position and your front derailleur (if you have one) to the smallest ring position. Feed the chain through on the route that it would normally take, but be sure to have the pin that you just pushed mostly out facing to the outside of the bike so it is easier to work with.
![photo]()
5. Join the two ends of the chain together. If you've pushed the pin on the female end just the right amount, you should be able to snap it together and not have to hold it from coming apart. If not, you'll struggle to keep it from springing apart as you use the chain tool to push the pin through. One trick is to take a 4" section of old spoke and bend it into a "C" shape, using each end to hold the chain together. Before you begin to push the pin back into the chain, take a few seconds to make sure that everything is lined up. If the chain pin is not lined up perfectly with the holes in the outer plates, it will damage them as it passes through and the chain will not be safe to ride. When you're happy that everything is lined up, begin pushing the chain pin through until there is an equal amount protruding on either side of the outer plates. Depending on your chain, the ends of the pin may be very close to flush with the outer plates. The important part is that both sides are equal. Inspect the new joint carefully for any damage to the chain such as plates that were bent out during installation.
![photo]()
6. There is a good chance that the chain does not rotate freely at the new joint. This is because the outer plates have been squeezed together in the chain tool as you pushed the pin through. You can easily spot a stiff link when pedaling backwards and watching it go through the rear derailleur's pulley wheels. There are two ways to deal with this, you can use your hands or use your chain tool to fix it. I prefer to simply use my hands. Place one hand on each side of the chain with your thumbs close to the stiff link. Using some effort, flex the chain side to side directly at the offending link. It should only take one or two tries until the new joint turns freely. The alternative method is to use the innermost position on your chain tool to give the pin at the stiff link only the slightest nudge. This is also an effective method of freeing up the stiff link.
![photo]()
7. Before you jump on your machine and start sprinting away, always check to make sure that you've done the job correctly. There should be no bowing or cracking of the outer plates at the new joint. Run through your gears and take a few cautious pedals before going out and wheelie dropping off your balcony! Keep in mind that you've removed chain links and the chain is now shorter than it was before you broke it. If the chain was already at just the right length, it may be too short now when in the bigger cogs. Be very careful otherwise you'll end up installing a new rear derailleur and hanger!
Past Tech Tuesdays:
Technical Tuesday #1 - How to change a tube.
Technical Tuesday #2 - How to set up your SRAM rear derailleur
Technical Tuesday #3 - How to remove and install pedals
Technical Tuesday #4 - How To Bleed Your Avid Elixir Brakes
Technical Tuesday #5 - How To Check And Adjust Your Headset
Have you found this tutorial helpful? Share any of your hints or tips below!
Read on...While breaking a chain may not be quite as common as it once was, it can still quickly ruin a good day on the bike. And if you haven't yet broken a chain while miles out in the bush, your time is coming! Unlike some other mechanicals, if you don't have the proper tools and knowledge to sort out this problem on the trail, it will mean that you are dead in the water. A chain tool is a mandatory piece of equipment that should always be in your backpack. Thankfully this only requires a single tool to fix and can take just minutes once you have the technique nailed down. Below you'll find step by step instructions and a How-To video.

Step By Step Instructions On How To Fix Your Broken Chain:
Tools needed: Chain tool or multi tool with built in chain tool.
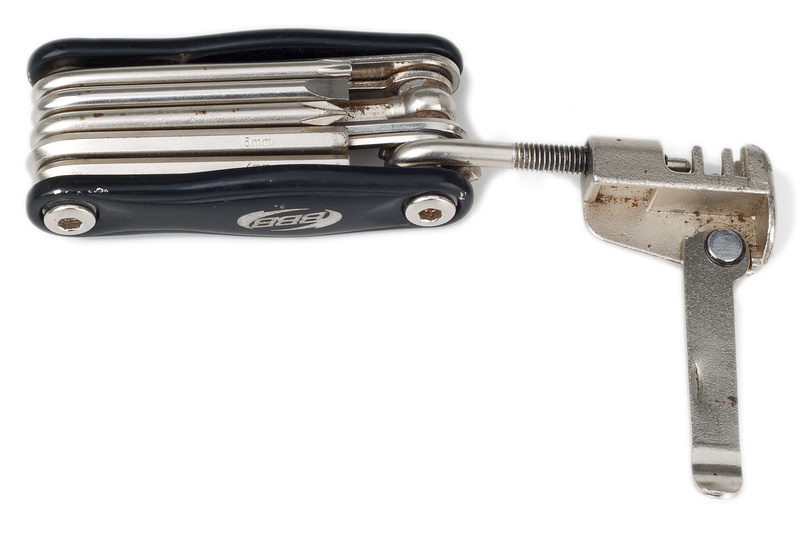
Multi tool with built in chain tool
Before you start this job it is important to figure out what make of chain you have on your bike. If you have a Shimano chain on your bike you'll either have to reconnect it by using another company's reusable link, or by inserting one of Shimano's new pins. If you do not have either of those items you can still follow the steps below in order to get your bike back on the trail and yourself out of the bush, but be sure to be careful as the new connection will not be as strong as if you had used the new pin and could fail. I would recommend taking it to your local shop to have them fix it before you hit the trails again.
There are a number of reasons why your chain could have broken and there are many riders out there who swear by one brand over another. The truth is that any and all chains can break, but there is always a good reason for it. The causes could range from a bad shift under load that caused an outer plate to separate from the pin, large amounts of wear, or even incorrect installation in the first place. Despite a lot of riders insistence that it must be down to their leg strength, this is never the case as there is always an underlying cause. The chain may have broken while you were practicing your gate starts, but your meager amount of ponies wasn't the root cause of the problem!
1. The first thing to do is to remove the broken chain from your bike. This will make it much easier to remove the damaged links and check for any others that may be twisted and cause your bike to skip under load. When you look at the breaking point on the chain you may see a number of different things. Depending on how the chain snapped, you may be left with any number of combinations of male (inner links) and female (outer plates), but to put it back together without using a replaceable link you'll need to use your chain tool and make one end a male end and the other a female end.

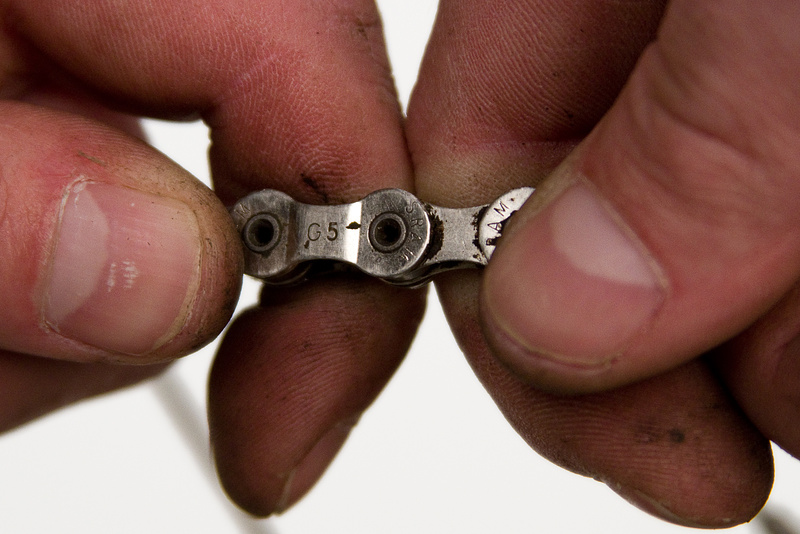
Damaged chain link that needs to be removed
2. Now lets start by removing the damaged pieces. Some chain tools feature two different slots to put the chain in. The inner most position is strictly for fixing stiff links that may arise after you fix the chain, but you'll only ever use the outermost position to install or remove links. If your chain tool only has one position then you don't have to worry about this. One more thing to note is that some chain tools use a threaded dial to fit different width chains. If this is the case with your tool, simply turn the dial in after you've placed your chain in the slot. This will hold it in place as you work on it. As you are doing this, you'll only want to remove the damaged pieces in order to keep the chain as close to its proper length as possible. In order to produce a male end (inner link) simply push the chain pin completely through and out the opposite side. The outer plates will fall away and you'll be left with only the inner link. Take care not to let the roller (round piece that can be found between the two inner plates) fall out as they sometimes are prone to doing so.

This chain tool has both an inner position to help loosen stiff links and a standard outer
position to drive the chain pin in or out.
position to drive the chain pin in or out.
3. The next step is to make a female (two outer plates) end on the opposite end of the chain. This is the tricky part. Once again, put the chain in your tool's outermost position and make sure that the tool's pin is perfectly lined up with the chain pin. Begin to push the pin, but the key is to stop before it is completely through. The goal is to push it out far enough to allow you to remove the damaged bits, and if done right you'll have to flex the two pieces to snap them apart. Once apart, you should have close to a millimeter of the pin protruding towards the inside of the female outer plates. If you happen to accidentally push the pin all the way out, you'll have to restart on a new section of chain as it's not recommended to try and reinstall the wayward pin. Leaving the chain pin protruding slightly to the inside will also make it much easier to join the chain once it's on your bike, as it will snap together and you won't have to hold it.
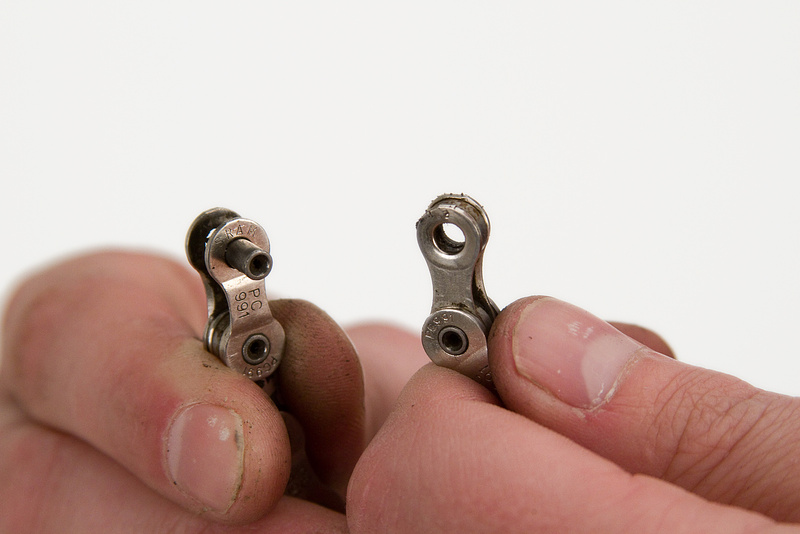
New female end on the left, male on the right
4. Now you're ready to reinstall the chain onto your bike. In order to have the least amount of chain tension to make it easier on yourself, shift your rear derailleur to the smallest cog position and your front derailleur (if you have one) to the smallest ring position. Feed the chain through on the route that it would normally take, but be sure to have the pin that you just pushed mostly out facing to the outside of the bike so it is easier to work with.
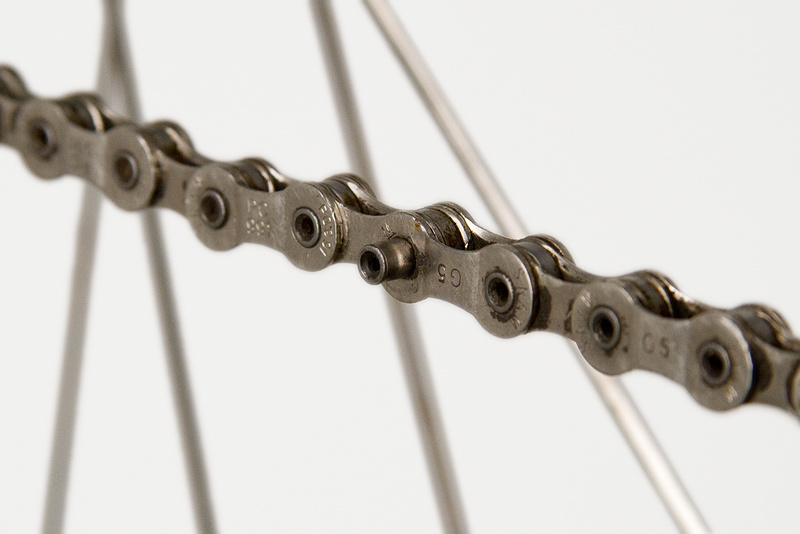
Chain pin facing out and ready to be reinstalled
5. Join the two ends of the chain together. If you've pushed the pin on the female end just the right amount, you should be able to snap it together and not have to hold it from coming apart. If not, you'll struggle to keep it from springing apart as you use the chain tool to push the pin through. One trick is to take a 4" section of old spoke and bend it into a "C" shape, using each end to hold the chain together. Before you begin to push the pin back into the chain, take a few seconds to make sure that everything is lined up. If the chain pin is not lined up perfectly with the holes in the outer plates, it will damage them as it passes through and the chain will not be safe to ride. When you're happy that everything is lined up, begin pushing the chain pin through until there is an equal amount protruding on either side of the outer plates. Depending on your chain, the ends of the pin may be very close to flush with the outer plates. The important part is that both sides are equal. Inspect the new joint carefully for any damage to the chain such as plates that were bent out during installation.

Using the chain tool to reinstall the chain pin
6. There is a good chance that the chain does not rotate freely at the new joint. This is because the outer plates have been squeezed together in the chain tool as you pushed the pin through. You can easily spot a stiff link when pedaling backwards and watching it go through the rear derailleur's pulley wheels. There are two ways to deal with this, you can use your hands or use your chain tool to fix it. I prefer to simply use my hands. Place one hand on each side of the chain with your thumbs close to the stiff link. Using some effort, flex the chain side to side directly at the offending link. It should only take one or two tries until the new joint turns freely. The alternative method is to use the innermost position on your chain tool to give the pin at the stiff link only the slightest nudge. This is also an effective method of freeing up the stiff link.
You can use your hands to free up a stiff link
7. Before you jump on your machine and start sprinting away, always check to make sure that you've done the job correctly. There should be no bowing or cracking of the outer plates at the new joint. Run through your gears and take a few cautious pedals before going out and wheelie dropping off your balcony! Keep in mind that you've removed chain links and the chain is now shorter than it was before you broke it. If the chain was already at just the right length, it may be too short now when in the bigger cogs. Be very careful otherwise you'll end up installing a new rear derailleur and hanger!
Past Tech Tuesdays:
Technical Tuesday #1 - How to change a tube.
Technical Tuesday #2 - How to set up your SRAM rear derailleur
Technical Tuesday #3 - How to remove and install pedals
Technical Tuesday #4 - How To Bleed Your Avid Elixir Brakes
Technical Tuesday #5 - How To Check And Adjust Your Headset
Have you found this tutorial helpful? Share any of your hints or tips below!
Author Info:

Must Read This Week
Sign Up for the Pinkbike Newsletter - All the Biggest, Most Interesting Stories in your Inbox
PB Newsletter Signup
What would be worth mentioning, I think, is the quick link. I always carry around at least one. I find that fixing the chain (as mentioned in this article) is actually a bit finicky, and I always end up with either a sticky link, or a weak link (and a shortened chain). The Quick Link saves time, and fixes your chain like new. And it's a very inexpensive option.
Just my 2 cents. Not hating on PinkBike or anything! I'm really stoked that they are sharing this information in fact. :-)
Other brands can be reconnected with the original pin, or by a replaceable link.
Happy?
Every brake needs a slightly different technique, more to come...
Surely at some point you were riding a bike before you knew how to split a chain!? Since this statement applied to you at some point in your life... Why don't you log off, sell your bike (to somebody who isn't a tool), and never come back? Then we can get down to business encouraging more people to enjoy their bikes.
However if you meant bushings, it is pretty hard to do it at home. You need a tool, either original or made by yourself. Both ways it's easy to get them up, but it takes some know-how to fit them down properly, so it's better if PB doesn't show it, so people don't screw up their forks. Changing oil: that's easier than adjusting rear mech properly. There's no rocket science in unscrewing top and bottom caps, then checking oil level charts.
Truing a wheel is not problematic until you don't care that your spokes are not evenly tensioned. If you want to do it right it takes some skill.
LBSs make the bike world spin. If you believe all you need is internet for tech tips and online shops for cheaper stuff, well: wait a week everytime you break something stupid in your bike, i.e. you get some crap on your brake pads just before the weekend. Or you need to buy something and you are not sure what, if it fits. i.e. if handlebars have too little rise for your SC fork so the brake levers don't hit the top tube. Go to a LBS and they will let you try a couple.