Unior Universal Bearing Press Set - Review
There are everyday kinds of tools that we should all have, things like hex keys and screwdrivers, and then there are tools for the less common jobs that, while we might not need to use them that often, can make all the difference when the time does come. Unior's $299 USD Universal Bearing Press Set, an everything-included kit for installing many different sizes of bearings, certainly fits into the latter category.
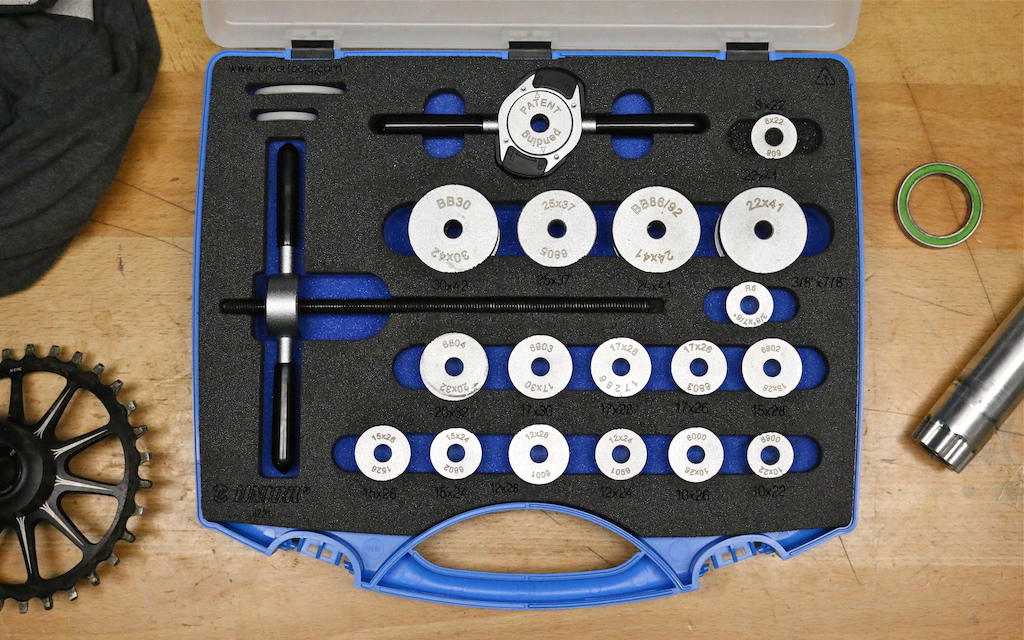
The Unior name isn't well known in North America, but the Slovenian company offers an absolutely massive range of bike tools that covers any task that could arise, whether we're talking about jobs in the garage or full-fledged professional bike shops. Their Universal Bearing Press Set is designed to make installing bearings into frames and components (mostly hubs) a relatively simple task by including pretty much any size adapter you might need for a job. This includes adapters for 608, 1526, 6000, 6001, 6802, 6803, 6804, 6805, 6900, 6901, 6902, 6903, and R6 bearings, as well as 28 x 17 (Hope), BB30, and all PressFit standards.
Universal Bearing Press Set Details:
• Intended use: bearing installation
• Threaded rod and two handles
• Quick-release handle for ease of use
• Adapters for 16 sizes of bearings
• Plastic frame protectors
• Includes plastic storage box
• Weight: 4lb (box, press, all adapters)
• MSRP: $299 USD
• www.uniortools.com / @uniortools
• Intended use: bearing installation
• Threaded rod and two handles
• Quick-release handle for ease of use
• Adapters for 16 sizes of bearings
• Plastic frame protectors
• Includes plastic storage box
• Weight: 4lb (box, press, all adapters)
• MSRP: $299 USD
• www.uniortools.com / @uniortools
 |
 Put down the hammer and stop using sockets. Put down the hammer and stop using sockets. |
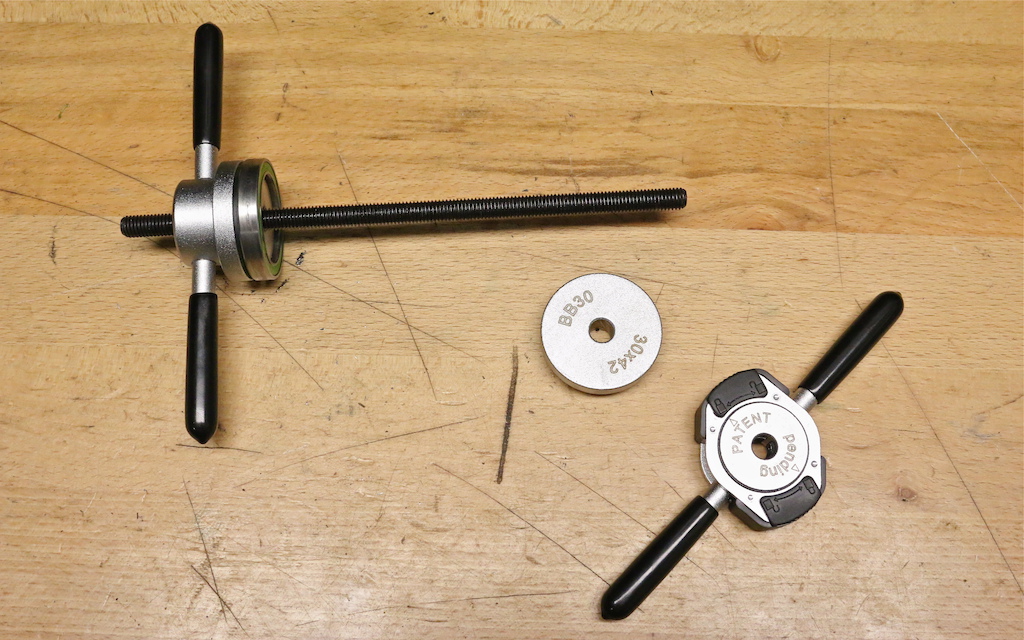
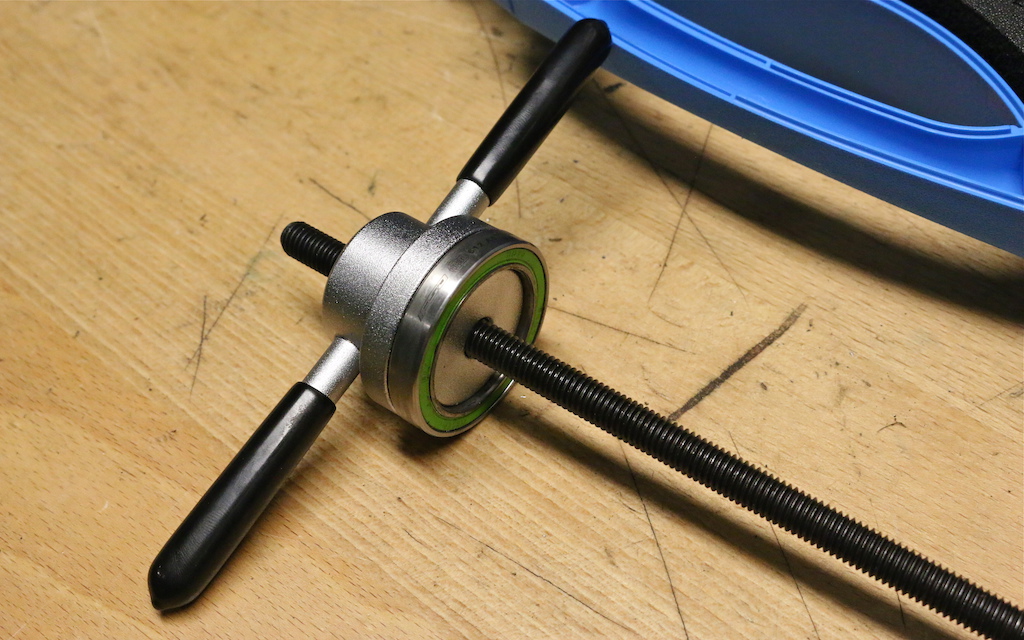
All those different adapters would be useless if you had no way to press the bearings into whatever it is you're working on, though. Unior's compact bearing press consists of a threaded steel rod and a simple threaded handle with rubber handgrips. The opposite handle features a trick quick-release system that, when engaged, engages the threads of the handle onto the rod while allowing it to spin freely so you can press the bearing in. Unlock the handle by rotating a collar by about 45-degrees and the split female threads inside of it retract away from the rod, allowing you to slide it on and off without having to spin it along the full length of the rod. Neato.
All of the above comes in a 12'' x 10'' plastic suitcase with foam cutouts for the press and all of the bearing adapters to slot into, hopefully keeping you from having to dig through your toolbox to look for that one adapter that escaped.
Performance
It's pretty easy to make your own inexpensive bearing press by picking up some threaded rod, washers, and a few nuts from the hardware store, but it's always nice to have tools made specifically for the job. The Unior bearing press is exactly that, especially because all of the adapters you'll ever need are in the box and have their sizes labeled, which makes it all super easy to use.
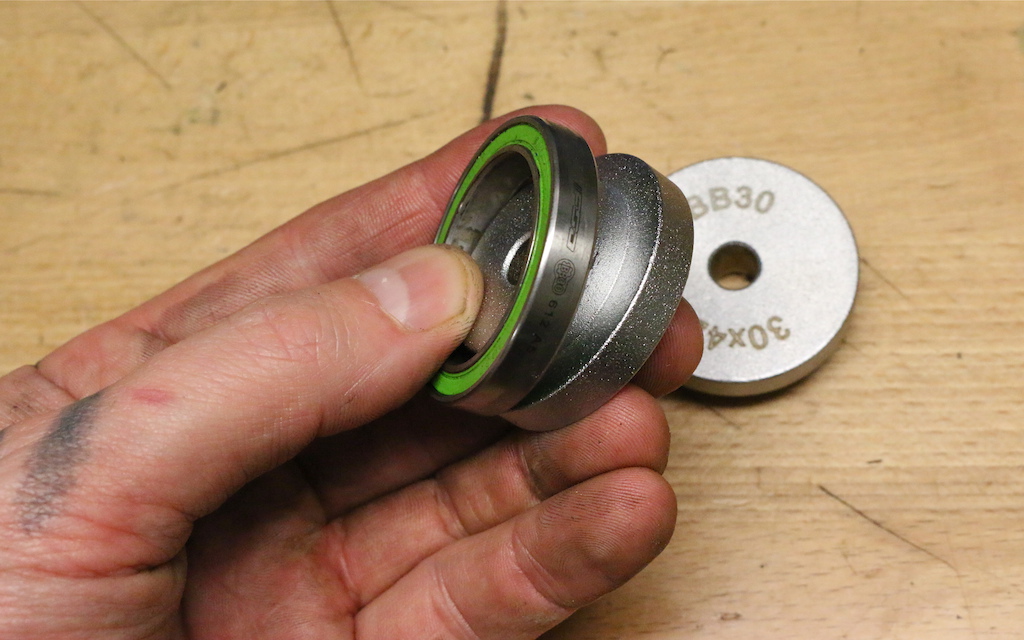
The bearings fit perfectly on each adapter.
The handles are long enough to provide more than enough leverage.
I used the kit to install a few different kinds of bottom bracket bearings, as well as some wheel bearings, and everything went smoothly. The tool's handles aren't that long, but you've got big troubles if you need more leverage than what they provide, while the nifty quick-release handle did make it super fast to get everything together and lined up. This certainly isn't a necessity, but it is nicer than having to thread the second handle all the way on and off the rod.
The quick-release handle also engages the rod firmly when its female threaded jaws are clamped down, without feeling like it rattles around or fits sloppily - there's no way it's going to slide or shift once it's locked down.
The quick-release handle also engages the rod firmly when its female threaded jaws are clamped down, without feeling like it rattles around or fits sloppily - there's no way it's going to slide or shift once it's locked down.
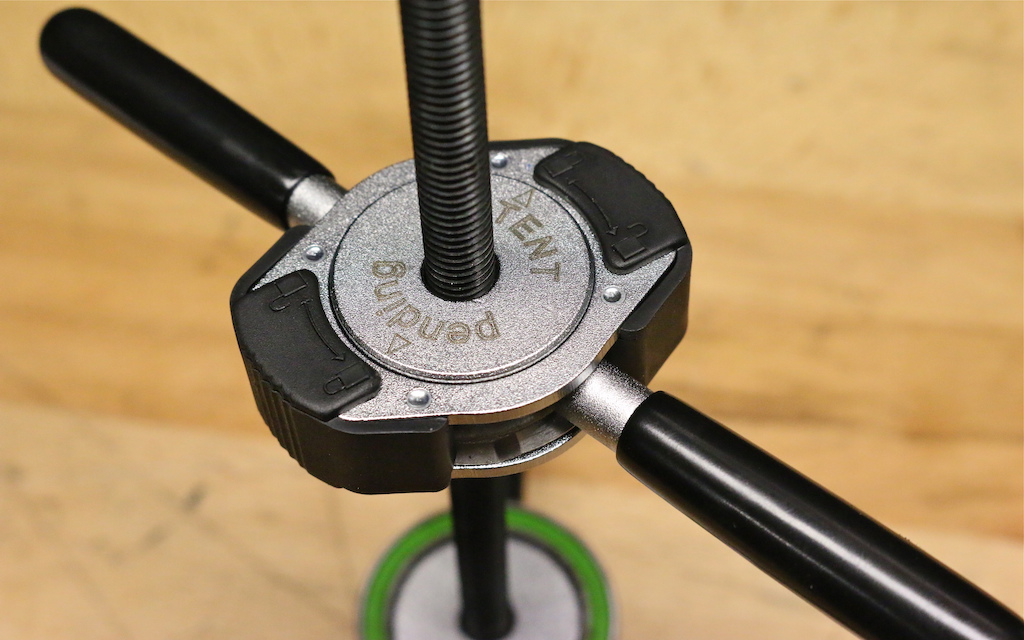
Unior's quick-release handle slides onto the threaded rod and can be engaged with the threads with a single hand.
The only thing that I might change would be to angle the tool's handles out rather than have them sit flat at 90-degrees as they do now. I found that the handles won't clear the non-drive-side chain stays of some full-suspension bikes, something I solved by stacking an extra adapter under the handle to provide more clearance. Alternately, you can just hold that side stationary while rotating the drive-side, which I probably didn't think of at the time due to the copious amount of brake cleaner fumes in my cramped home workshop.
One thing that the Unior bearing press can't do, at least not in stock form, is install headset cups into a frame. The only thing that's holding it back, as far as I can tell, is that it doesn't come with large enough adapters, something that would be pretty easy to solve with a trip to the hardware store for some big washers. If Unior had included two additional large adapters, their bearing press would have been able to do the job of two tools.

Line it up and push it home.
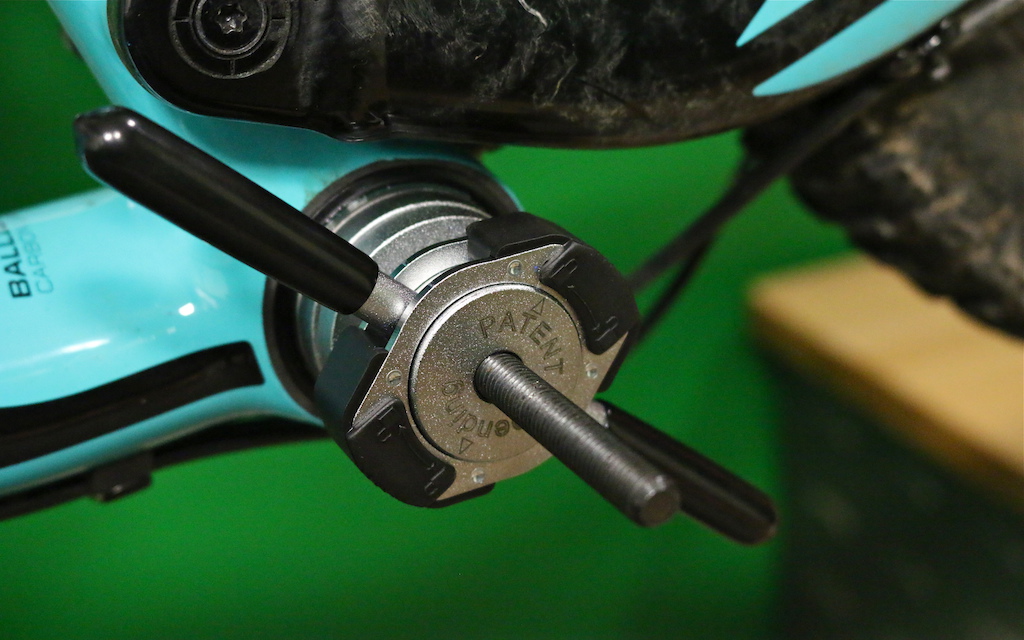
The handles won't clear the chain stays of some bikes, but you can simply turn the opposite side instead.
Pinkbike’s Take:
 | Unless you work in a shop or go through bottom brackets incredibly quickly, a bearing press kit will probably seem a bit extravagant. And while the tool's $299 USD price tag is in the same ballpark as other shop-quality bearing press kits, there are much less expensive options (that don't come with all of the adapters) that will probably better suit most home mechanics. That said, raise your hand if you have a bit of a tool fetish and simply like to be able to do any and all jobs that might come up. If that sounds like you, then Unior's bearing press kit is worth having a look at. All of the bits you'll need are included in a compact box, and it's quick and easy to use. - Mike Levy |
Author Info:

Must Read This Week
[UPDATED] Final Elite XC Results & Overall Standings from the Mairiporã XC World Cup 2024
42190 views
42190 views
Sign Up for the Pinkbike Newsletter - All the Biggest, Most Interesting Stories in your Inbox
PB Newsletter Signup
Even now I can knock up a passable wheel in an hour or so at the kitchen table if I put my mind to it.
Good times.
wheel building is simply awesome - the action of taking a number of separate components and creating a WHEEL
that wheel can then take you across the World, or around your neighborhood, if you prefer
installed in the bicycle, turns an inefficient animal (human being) into the most energy efficient form of transport
when you sit and really look at the modern bicycle wheel, it really is a work of genius, when you consider how it evolved and how it works
I've built close to 600 wheels in my time as a wrench, and don't build as many these days due to the predominance of pre-built factory wheels, but certainly enjoy building one from time to time
2 weeks back I built DT 350 hubs onto Roval Traversee rims with DT Revolution spokes and brass nipples for my 2016 Giant XTC mountain bike, really enjoyed the building experience and so rad to go out into the woods rolling on wheels I've built
2 great tips for mountain bike pivot bearings:
1. with the bolt / axle hardware removed (you can leave the bearing in place), simply rotate the inner race perhaps 90 degrees with your fingers. exposes a different part of the inner race to the primary loading area, and dramatically increases bearing life.
2. after repacking bearings (you can leave the bearing in place, and carefully pry the outer shield off with craft knife), grab a cordless (or mains powered) drill / screwdriver and remove the bit. Spin the chuck close so the bit grips form a conical shape, and gently press this against the bearing inner race whilst working the drill. This spins the fresh grease deep into the bearing and makes sure everything is fully lubricated.
www.pinkbike.com/photo/10919020
See if THAT relaxes you
Also, with your second point are you suggesting repacking sealed bearings or is this something you do after pressing in new bearings?
the problem with most suspension pivots (unlike wheel bearings) is that the majority of suspension pivots have a very limited rotation. This then creates localized wear as a small number of the ball bearings (can be 3-4 balls) actually take the bulk of the load.
The use of a sealed radial bearing (designed for high speed rotation, not limited and repetitive angular rotation) for a suspension pivot is in engineering terms the worst choice, but it actually works okay in the real world when faced with less than perfect manufacturing tolerances on frames, and constant ingress of mud / water.
The ideal choice (to share load across the entire unit) would be something like IGUS composite bushings,but past experience (i.e. Banshee) has shown how poor they actually work in day to day use, when frame tolerances are out, and they often 'flog out' the bushing socket in the frame, and wear axle components.
By rotating the inner race you present a less worn face into that area, as well as rotating less worn ball bearings into action.
My second point is about repacking sealed bearings - whether used or new (I always repack new bearings with quality marine bearing grease).
Unfortunately with many bearings, the factories skimp on grease simply because it saves money (imagine save a small volume of grease on each unit when making 100,000 bearings!)
I've been shocked how little grease is present in many new 'sealed' bearings in headsets, pivots and press fit (BB30) bottoms brackets- which explains why so many bikes suffer corrosion and damaged bearing so quickly from new.
So whether you are saving existing used bearings by repacking or packing some extra quality grease into new bearings, the advise is the same, get that drill spinning and distribute your grease throughout the bearing package
If I was a shop, sure I'd buy a real set - but I can spin metal & buy alot of allthread for $300 for as often as I use mine.
Threaded rod: $10
Nuts, washers: $5
Bribe for lathe machinist to turn several stainless adapters: $50 in beer
Box wrenches: $5
@plyawn For sure. Sometimes the instructors even encourage this. When I worked at George Brown College we encouraged side projects because it developed more skills. No harm in asking.
To backup our statement, feel free to watch our short promo video for bike tools:
www.youtube.com/watch?v=figo_Qlom_k
And longer version that also shows our automotive parts factory:
www.youtube.com/watch?v=JaftkkeBi1I
We are just stating what could be done by the average joe who needs to replace a few each season and doesn't need the kit.
Also, for sake of argument, lets say you just use a stack of washers in place of the lathe work, and compare that price. is that silly too?
Further, consider that I didn't even propose a comparable product, but rather a cobbled up tool. So am I really comparing item to item or suggesting what could work for someone who needs only a few sizes. Comparable? Not really.
I just don't understand the attitude you've dropped. 'silly', condescending 'I love posts like yours', 'people like you fail', etc. Fortunately it's all incorrect.
While the even pressure, compared to battering on it with a socket, reduces the likelihood of pressing it in sideways, it's certainly still possible.
The fittings required to guide the drift(the part which sits on the bearing) properly are often specific to each assembly(frame, hub, etc.), when used with an arbor press (e.g. bit.ly/1PJVTmJ), so it wouldn't be easy, but perhaps they could figure out a way, or maybe I've missed their solution.
Knowing how hard you can hit something without it breaking is probably the most valuable skill any mechanic or engineer will ever learn. Anyone who say different hasn't lived enough.
but I was really just playing off the title leading into the article. The reality is you can make your own press using a variety of general shop tools including even, gasp, sockets.
some people cn afford/justify $1000s if not 10's of $10,000s for tools on their hobby, not me.
Just out of curiosity, what makes this bearing press tool kit any better than all the many, many other similar ones out there?
Good. Now that we're clear.
Carry on.
I might be more accurate to call it popularity policy
I'm not against proper tools, but not having a $300 press kit doesn't mean you can't get it done properly. Either way is a hypothetical situation. It always "just depends".
Lol