Video: Suspension Setup 101 With a ShockWiz
Suspension setup can be a confusing topic, and there are all sorts of theories and opinions floating around on how to achieve the ideal settings. During Crankworx Whistler I took some time to help Paul Haysom, aka Paul the Punter, get his Trek Slash dialed in. In order to facilitate the process, we used a Quarq Shockwiz, the tiny monitoring device that gives setup recommendations based on a rider's preferences and data gathered out on the trail.
A Shockwiz certainly isn't a required accessory, but it can be a useful tool if it's available. At the end of the day, though, the correct settings will be the ones that feel best to you, the rider, and not the ones that a computer spits out.
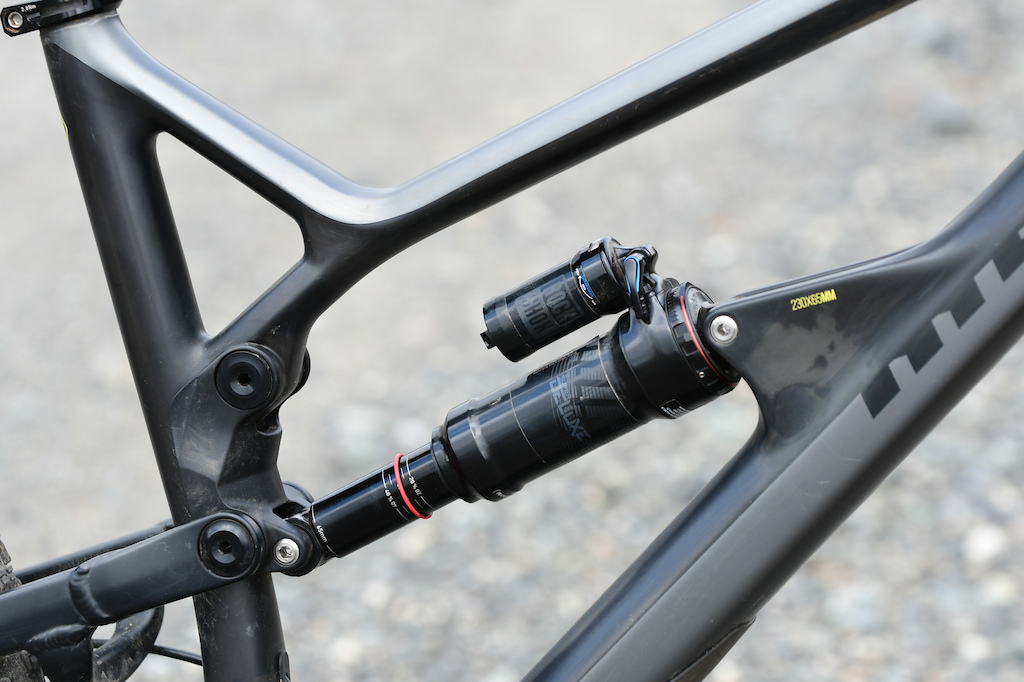
That red o-ring and the gradients printed on the shock, in this case a RockShox Super Deluxe, make setting the right amount of sag a simple process.
The Process
Setting sag: Most frame manufacturers will have a suggested amount of sag mentioned somewhere in their setup guide. If not, in most cases, 30% is a safe place to start for the rear shock. What's sag? It's the amount that the shock sinks into its travel when you're aboard the bike wearing all your riding gear. If the shock has sag gradients printed on it, all that you need to do is slide the travel indicator o-ring up towards the body of the shock, sit on the bike (with someone holding it or while leaning against a wall), and then get off.
Take a look at where the o-ring is and adjust the air pressure accordingly with a shock pump. If you don't have those handy gradients printed on your shock, you'll need to bust out a tape measure or some calipers to see how far the o-ring has moved. Take that number and divide it by the stroke length of the shock. For instance, if you have a shock with a 60mm stroke, you'd want to set it up with 18mm of sag in order to hit that 30% mark.
Sag amounts for a fork are typically between 15 – 20% depending on rider preference. Start with inflating the fork to the manufacturer's recommended pressure based on your riding weight and see how it feels. It'll take some trail time to really tell, but a quick lap around the parking lot will at least let you know if you're in the ballpark. Too stiff? Let some air out. Too soft? Add a few more pounds of pressure.

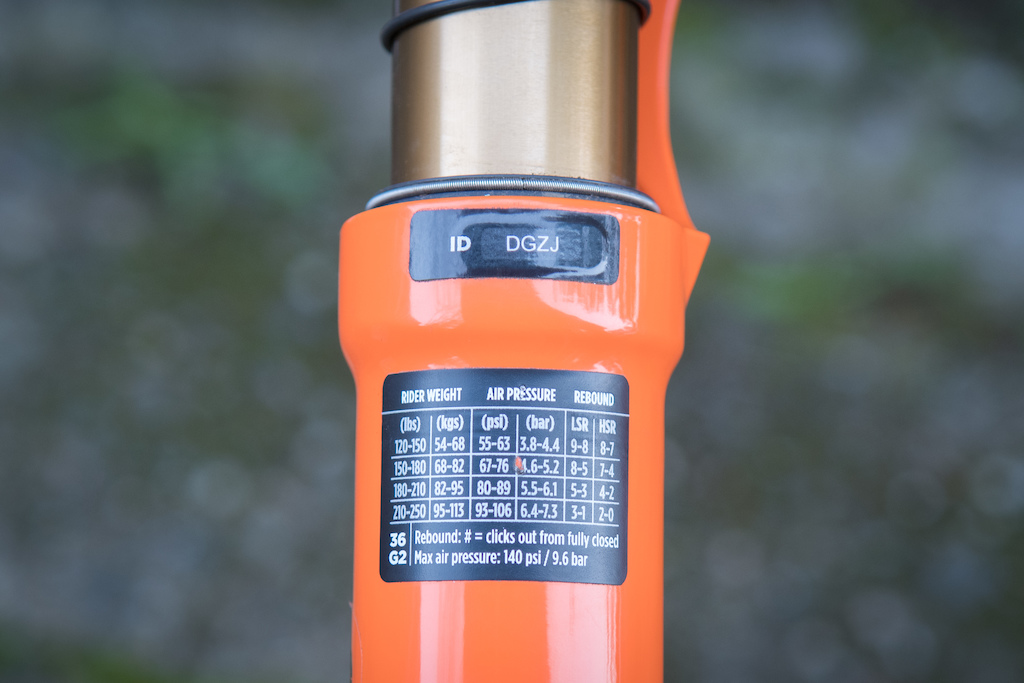
Manufaturers' suggested settings aren't always 100% accurate, but they provide a very good starting point.
Turning Dials
If you need a place to start, begin by adjusting the rebound and compression dials according to the manufacturers' suggestions. Feel free to tweak accordingly if things feel way too fast or slow, although I've found that most setup guides are fairly accurate these days. This will give you a baseline that you can work from.
Next, it's time to head for some laps. There's nothing wrong with heading out on a ride and adjusting things as you go, but if you really want to get into it, find a section of trail where you can easily take multiple laps. Take a lap, and pay attention to what you're feeling. Is the shock rebounding too quickly or too slowly? Is there a lack of small bump sensitivity? Are you bottoming out off of every drop? I find it easiest to focus on one suspension component at a time, and I'll typically get the rear shock dialed in to my liking first, and then focus on the fork.
After that initial lap, you'll need to decide what needs to be adjusted. This is where it can be helpful to have a more knowledgeable friend along for the ride, or a gadget like the ShockWiz. How much you can actually change will also depend on how many external adjustments your fork or shock has.
Once you've made a change, whether that's to speed up the rebound, or reduce the amount of compression damping, head up for another lap. Did those changes help? Take notes so that you can return to your original setup if necessary – that way it's easy to undo any tuning that doesn't seem to have been beneficial.

Volume spacers are extremely useful for adjusting the amount of end-stroke ramp up in an air sprung fork or shock.
Volume Spacers
Along with adjusting the fork or shock's rebound and compression settings, internal volume spacers can be very helpful. You'll need a few more tools, but it is something that can be performed trailside if you're prepared. Spacers affect how much a shock ramps up towards the end of its travel, and are often a necessity to make sure you're not clanging off the bottom every time you land off a jump or drop.
Again, the best way to determine if you need to change your spacer setup is to take a lap, ideally hitting a drop or jump that would typically use a good amount of your bike's suspension travel. Keep an eye on where the o-ring is at the end of each run; if it seems like you're using full travel too often it's probably time to add in a volume spacer. Alternately, if you have the correct amount of sag but never ever seem to be able to use all the travel removing a spacer may be necessary.
Keep on Learning
There are a wealth of resources available online and in real life to help you make the most out of your suspension. This video is meant to provide a very basic general overview, a glimpse into what a typical suspension setup session might look like. Your local bike shop is a great place to start – a knowledgeable mechanic can get you headed down the right path, and then offer further suggestions once you've gone on a ride or two to see how it feels.
Suspension setup can be an intimidating topic for some riders, but don't be afraid to ask questions, experiment, and above all, have fun.
Author Info:

Must Read This Week
Sign Up for the Pinkbike Newsletter - All the Biggest, Most Interesting Stories in your Inbox
PB Newsletter Signup
And that's the end of that.
It’s a good tool, but personal preference is the ultimate decider. What it does do is give a decent baseline to work from.
Would I buy one, god no. But I’ll keep borrowing one from the local shop for a 6 pack of beer.
Less is more
I've had it give me ridiculous recommendations, like trying to get me to run 4 tokens in a Fox 34 140 when 3 felt like garbage. I did some experimenting with it and found the results were easy to skew, along with it sometimes not knowing what it wanted. I also found it seemed to like the air pressures on the softer side with more tokens, which didn't really work out for me.
The other problem is that the calibration process is ridiculous inaccurate, but critically important. I've done it 5 times on the same fork and gotten 4 different ratios before. For such an easy process, it's something that shifts around way too often.
I think the value in the Shockwiz is when you have someone that knows about suspension setup, but can't ride your bike the way you can (different weight, bike, riding style, etc). It can be useful for them to put on your fork/shock, then read the results and offer suggestions along with your feedback on how the bike feels. If you don't know what the settings mean or have an understanding of suspension setup, then you are probably gonna end up frustrated with it.
I will also add that I found being in the yellow or green acceptable all around, whereas red was always off. The detections (e.g. pogo, etc) were all pretty spot on. The way I interpreted it was that yellow or green is the range of preference (riding style, feel, etc), but red was always off. It's challenging to try and chase having all greens, I found with it all green the shock was too soft and slow, but I could push things into the yellow and it feel right.
I'd also like to see it do more graphing. It'd be cool to see the data laid out in front of you and compare against different runs or adjustments. It'd be even cooler, although I know it'd be difficult, if it could track time somehow and provide overlay of that data with video or GPS.
To me this seems like a great tool for the guy who loves to talk on and on about suspension with his riding partners, and share his knowledge and experience in techno mumbo jumbo while completely distracting from the ride.
The right side sags at about 20%
The volume adjusters ramp up the travel keeping it plush in the first half then making it harder meaning you can run less air but still get more support in the mid to bottom stroke.
I am 200lbs plus kit (or 100kg in proper money) and run 2 vs in my Pikes.
Post processing, Well, i'm happy to sit and drink a cup of tea between runs while it thinks.
Not arguing, as I say I know f*ck all about electronics, but I just struggle to believe that the work this thing does would be any stress at all for the average smart phone.
One of the two devices we ordered also developed an error while riding, where it didn't record everything anymore.
F is there anything our phone can't tell us!? Amazing technology, trust the computers.
Not all of us have the years of experience and/or time to develop a deep knowledge of suspension and its nuances. And even if you do, the ShockWiz can help you get in the ballpark right away. Consider a new bike purchase: How many rides would it take you to get the suspension dialed in? Looking at the Number of Rides Last Year Poll, many of us are in the 1x/week club.
Wouldn’t you rather spend that time enjoying your rides rather than trying to figure out what needs adjusting for your next one?
Might as well take advantage of the technology that’s available, to let us do what we love.
Full disclosure: We rent and ship ShockWiz devices across the country, for far longer and cheaper than any LBS: Check us out at FeelTheBerm.com.
www.lezyne.com/product-dpumps-hp-shock.php
www.youtube.com/watch?v=CA1b_jr5XZc