Yoga For Strong, Supple, Somewhat More Bulletproof Ankles - Monthly Yoga with Abi
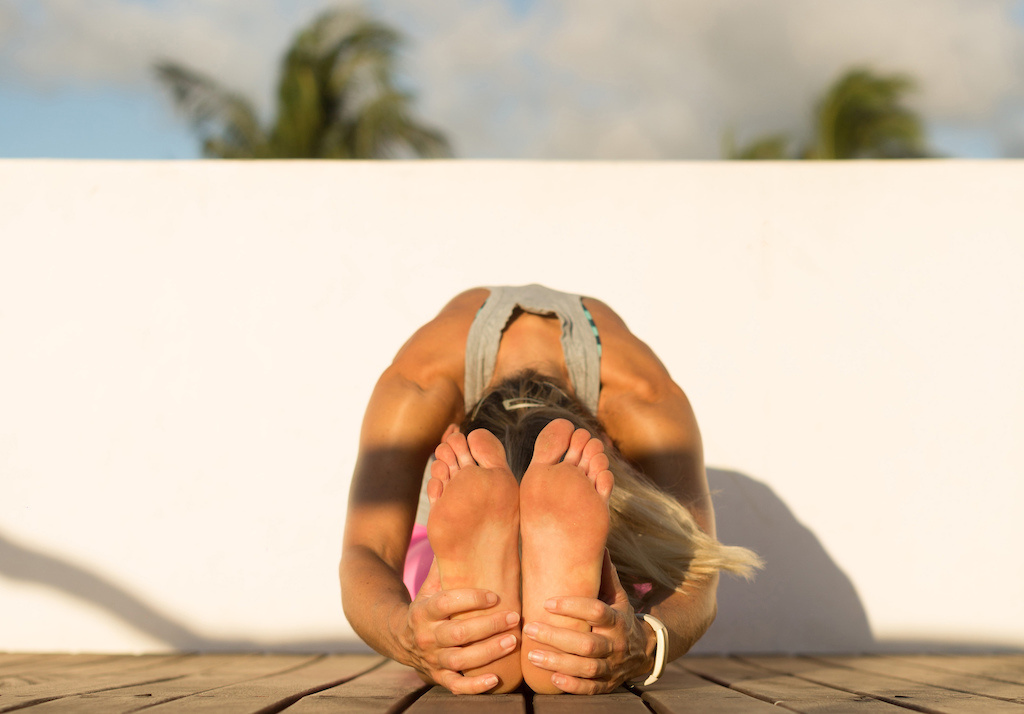
Ankle strength and conditioning—it's not as sexy as ab workouts or sprint training, but it is just as important, as many of you have experienced first-hand.
There are three components to healthy ankles—stability, flexibility and mobility—and yoga can help to improve all three. As I try to demonstrate in all my articles, one of the primary reasons that yoga is so effective at addressing muscular imbalances and chronic pain, is that it isn’t reductionistic. We’re not extracting the proverbial omega-3 fish oil from the Wild Atlantic salmon, and then mega-dosing.
A word of caution
These poses are not designed to heal ankle injuries—please work with a really good physical therapist if you’re recovering from a sprain, strain or break. Stretching could make the injury worse and disrupt the healing process. And don’t be tempted to leave an ankle injury untreated as your whole body can end up tight and twisted as a result.
For the rest of you, if you practice these exercises consistently, you’re likely to be significantly less breakable on the bike.
Barefoot is best
Whenever you are in shoes, the bones and muscles in your feet are in large part immobilised—and that can’t be good. Shoes are like casts for your feet, under which your muscles atrophy and your range of motion wastes away. Your feet and ankles can become rigid, weak and might even start causing you pain. So, the first thing to do is take off your shoes as much as possible and walk on different types of terrain, like rocks, sand and grass, barefoot. This will strengthen the intrinsic muscles in your feet, giving you a more solid foundation on which to build strength, power and control.
And if you don’t like being barefoot very much, you can at least take off your shoes to do a few minutes of yoga.
Part One: Strong, Stable Ankles
Strengthening the ligaments in your ankles and the muscles surrounding the ankle joint is going to improve your control, allow you to generate more power and increase your resilience (decrease your risk of injury).
When you practice yoga, you strengthen your feet, ankles and lower legs in all of the standing poses and in the transitions between them. This is a great start but I’m also going to give you three poses to take it to the next level—a concentric and eccentric contraction, a one-legged balancing pose and an isometric, balancing hold.
1. Standing on tiptoes/calf raises
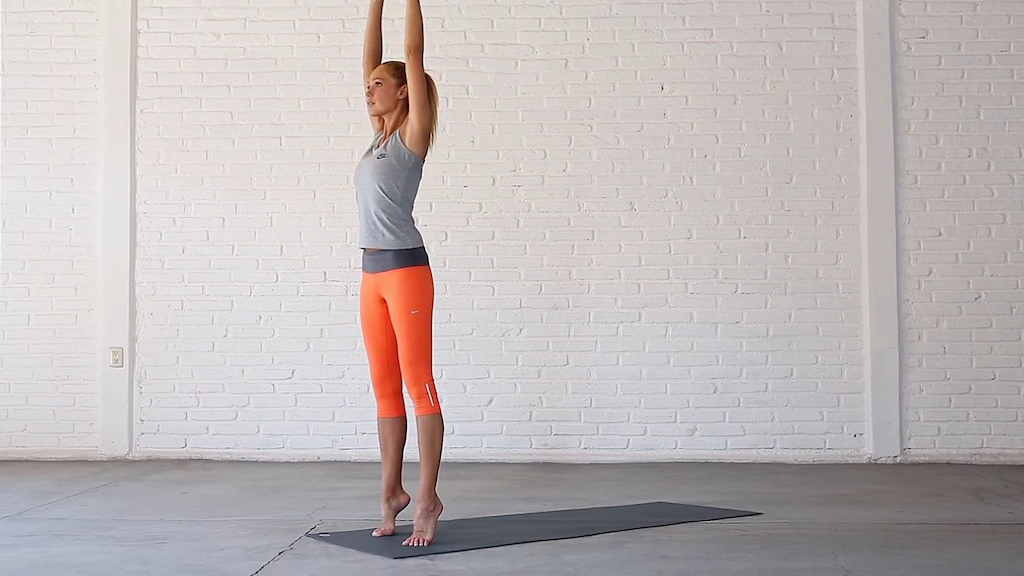
Objectives:
- Increases ankle stability and mobility.
- Strengthens the arches, the intrinsic muscles of the feet, the Achilles tendon and the lower leg muscles.
- Warms up the feet and ankles.
- Improves balance.
Instructions:
- Stand with your feet hip-width apart, toes pointing straight ahead. Rest your arms by your sides.
- Distribute your weight evenly in your feet, between the ball of the big toe, the ball of the little toe and the heel. Try not to let your feet roll in (pronate) or out (supinate).
- Look at a point at eye-line that isn't moving to help you keep your balance.
- Inhale, slowly come up onto the balls of your feet, sweep your arms out and up overhead. Exhale, slowly lower your heels to the ground, bring your arms back down by your sides.
- Breathe in and out through your nose.
- Don’t rush it.
- Repeat 10-15 times, with as much control as you can.
2. Tree
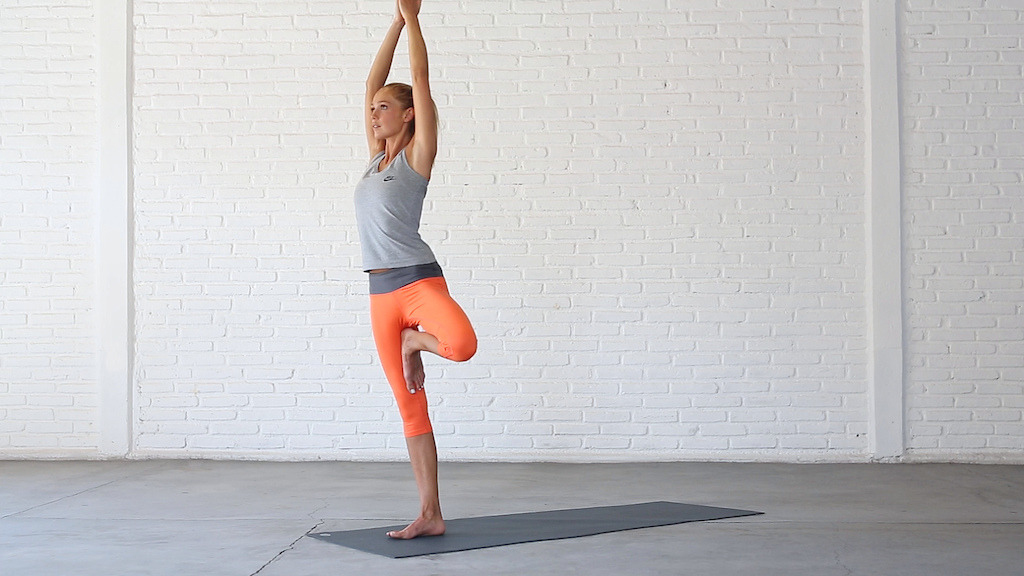
Objectives:
- Increases ankle strength and stability.
- Strengthens the feet, legs, hips and core.
- Opens up the hips.
- Improves balance.
Instructions:
- Stand with your feet hip-width apart, toes pointing straight ahead. Bring your hands to your hips.
- Shift your weight into your right foot and bring the sole of your left foot to the inside of your right ankle, calf or inner thigh. Avoid pressing your foot into your knee as this joint is not designed to move laterally. Place it either above or below.
- Try to keep your right foot flat on the ground—not rolling out or in.
- You can keep your hands on your hips, bring them together at your chest or reach them up overhead.
- Focus on a point at eye line that isn’t moving to help you keep your balance.
- Hold the pose as still as you can for 5-10 deep breaths, in and out through your nose.
- For an extra challenge, close your eyes.
- Release the pose and switch sides.
3. Awkward Pose
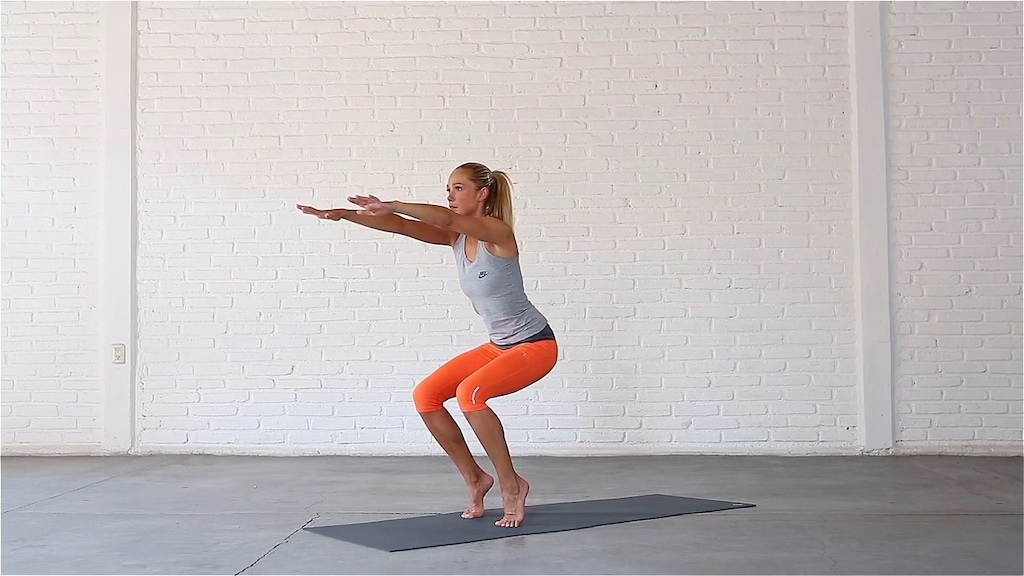
Objectives:
- Increases ankle strength and stability.
- Strengthens the feet, legs, hips and core.
- Improves balance.
Instructions:
- Stand with your feet hip-width apart, toes pointing straight ahead.
- Look at a point at eye-line that isn’t moving to help you keep your balance.
- Inhale, come up onto your tiptoes, lift your arms up in front of you to shoulder height. Exhale, bend your knees and lower down as slowly as you can until your thighs are almost parallel with the ground.
- Keep your heels up and try not to lean too far forward.
- Relax the muscles in your face.
- Hold the pose for 3-5 deep breaths, in and out through your nose.
- Slowly come back up to standing and shake out your legs.
- Repeat 2-3 times.
Part Two: Flexible, Supple Ankles
Your ankle moves in 4 primary directions:
- Dorsiflexion—feet flexed, toes pulled back towards the shins.
- Plantar flexion—toes pointed.
- Inversion—rolling onto the outer edge of the foot.
- Eversion—rolling onto the inner edge of the foot.
There are several yoga poses that help to increase ankle flexibility, but for this article, I’ll just demonstrate one for each direction plus a bonus posture that I’ll come to at the end.
1. Squat
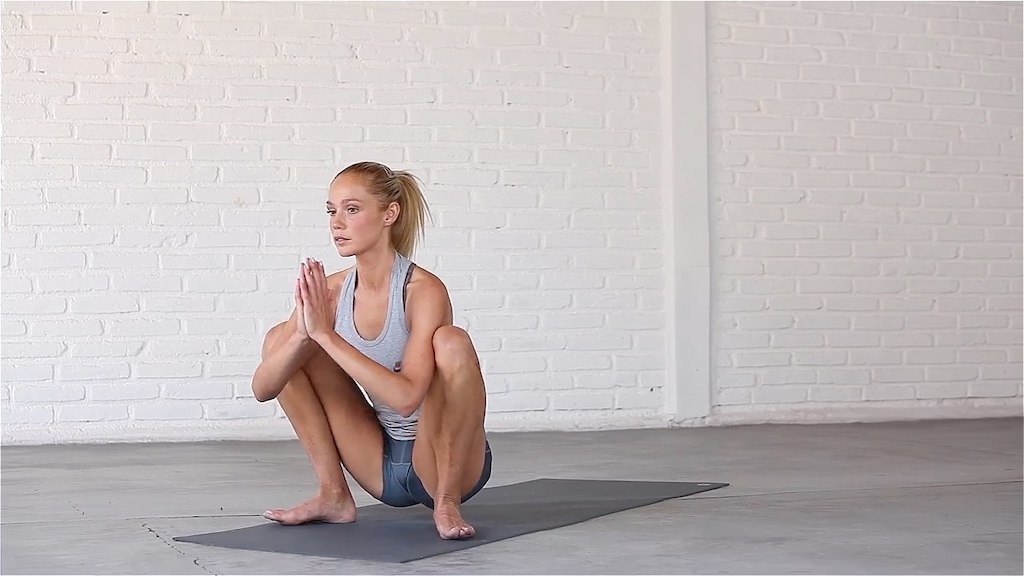
Objectives:
- Stretches the ankles, knees, groin and glutes.
- Strengthens the feet, ankles and lower legs.
- Opens up the hips.
Instructions:
- Stand with your feet slightly wider than hip-width apart and turn your toes out about 45 degrees.
- Bend your knees and squat down as far as is comfortable.
- Bring your upper body in between your thighs and touch your palms together.
- Lengthen your spine and press your triceps against your knees to open up your hips.
- Hold the pose for 5-10 deep breaths, in and out through your nose.
Modification:
- If you don’t have the flexibility in your ankles, calves and/or hips to keep your feet flat on the ground, don’t try to force it. You can support your heels on a rolled up mat or towel and keep practising the pose until you start to see an improvement.
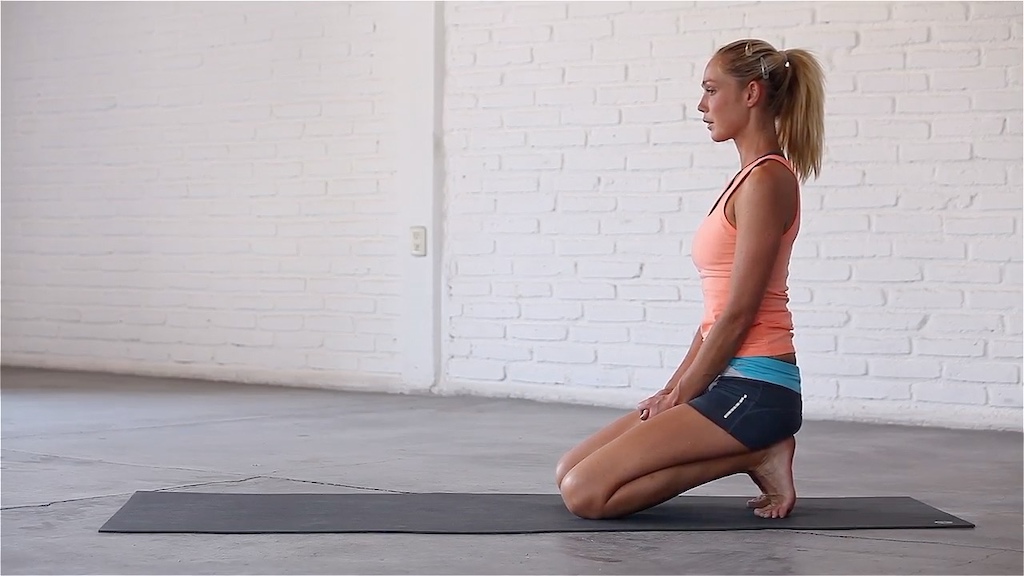
2. Thunderbolt
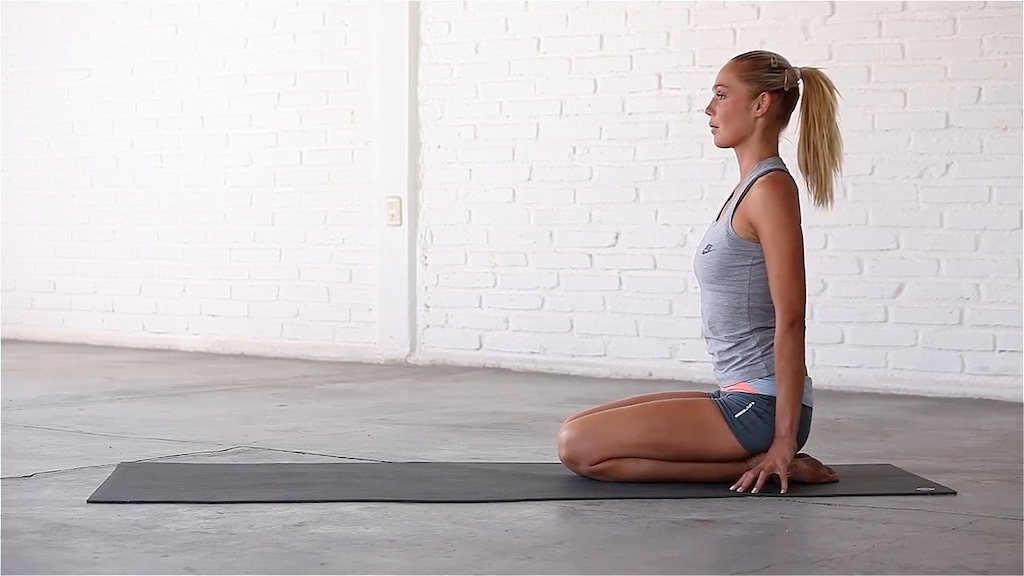
Objectives:
- Stretches the feet, ankles, knees and quads.
Instructions:
- Sit back on your heels, bring your knees close together and rest your hands in your lap.
- Check that your toes point straight back and that your feet don’t roll in or out.
- Sit up tall, look straight ahead and hold the pose for 5-10 deep breaths, in and out through your nose.
- For an extra challenge, you can bring your fingertips behind you, lean back and lift your knees off the mat for a few breaths.
Modification:
- If this pose is uncomfortable on your knees, you can put a rolled up mat or towel between the backs of your thighs and your calves. You can also sit on a block between your feet. Try to keep your knees pointing straight ahead.
3. Modified Reclining Spinal Twist
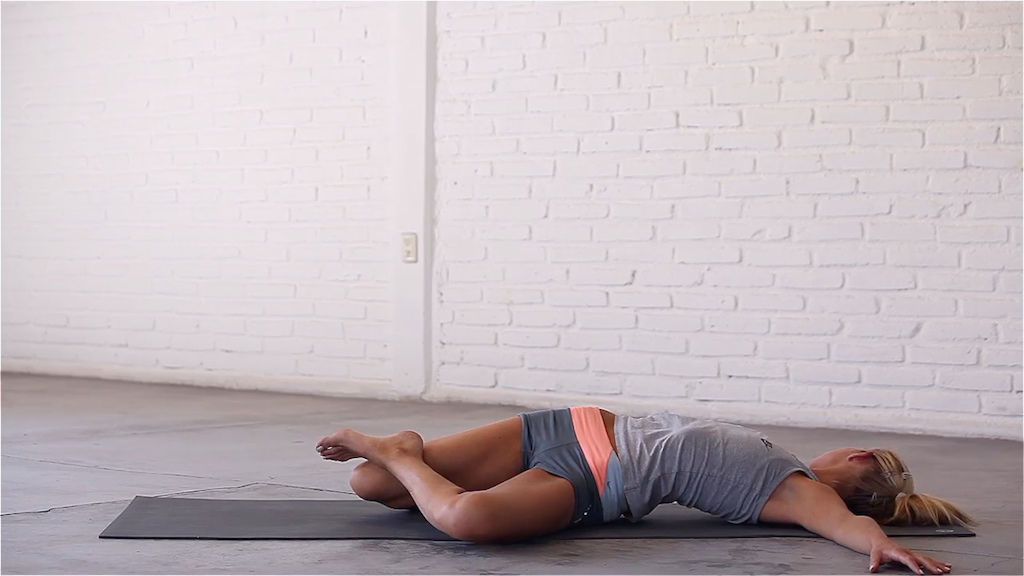
Objectives:
- Stretches the ankles, IT Band, outer hips, lower back, abs, obliques and neck.
- Can help to relieve lower back pain.
Instructions:
- Lie on your back with your knees bent, feet flat on the mat.
- Bring both arms out at shoulder-height, palms facing down.
- Straighten your left leg up to the sky and press through your heel. Bring your left ankle to your right knee and drop the inside of your right ankle to the mat. Gently lower your right knee down with the left foot still in place.
- Look to the right and stay here for 5-10 breaths, or up to a few minutes if it feels good.
- Come back to centre and switch sides.
4. Happy Baby
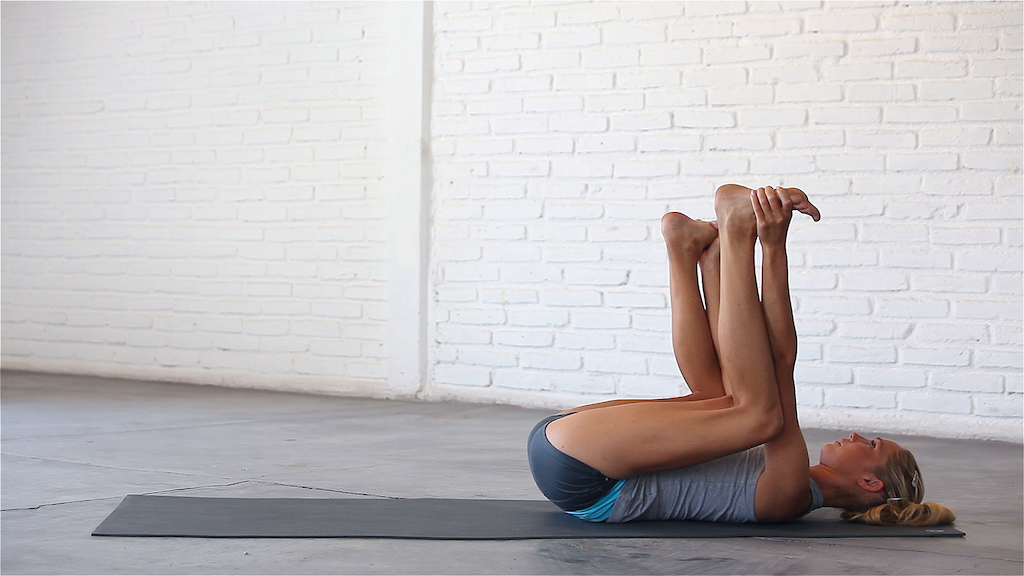
Objectives:
- Stretches the feet, ankles, groin and hamstrings.
- Releases tension at the lower back.
Instructions:
- Lie on your back and hug your knees into your chest.
- Keep your feet together and bring your knees out wide. Thread your hands through and take hold of the outsides of your feet.
- Bring your ankles out over your knees, flex your feet and gently pull down on the outsides of your feet, turning the soles of your feet up to the sky.
- If you can’t reach your feet, take hold of your ankles or lower legs and draw slow circles in each direction.
- Stay in the pose for 5-10 breaths, or as long as you want.
5. Screaming Toe
Objectives:
- Stretches the toes, ankles and the soles of your feet. It’s the anti-shoe pose.
- Increases your pain tolerance.
Instructions:
- Kneel with your knees and ankles together and your toes tucked under. Keep your heels aligned directly over your toes. Don’t let them fall out to the sides or in towards each other.
- Try to relax.
- Hold the pose for 5-10 deep breaths, in and out through your nose. Then deepen your breath and hold it for 5 more. Remember that you can always do more than you think.
- If you need to, you can lean forward to take some of the weight off your toes.
Modification:
- You can place a rolled up blanket between your calves and the backs of your thighs if this is too intense on your knees.
Part Three: Functional, Mobile Ankles
Functional mobility refers to much more than just range of motion. It encompasses flexibility, strength, stability, control, balance and coordination.
If we put some of these poses into a flow, you should find that it brings the spring back into your ankles and calves and gets your feet moving more fluidly in a variety of different directions and angles.
Try to stay focused on trying to make the movements in your feet and ankles as smooth and controlled as possible, throughout the sequence. Try to stretch, strengthen and gently push against your edges, steadily increasing your range of motion, building resilience and improving your control and coordination.
As always, stop if it hurts and don’t try to push through pain. If you start shaking, breathe and soften where you need to. Pain in yoga is never ok. Suffering, on the other hand, is fine.
This is a fairly advanced sequence designed to challenge your strength, mobility, flexibility and balance. If you can’t do all the poses initially, don’t be intimidated. You have something to work towards.

Soft-tissue work
Finally, treat yourself to a foot massage. Your feet probably don’t get a lot of love, but they should—since their health and alignment affect the way your ankles, knees and hips function. And if that feels too indulgent, take a tennis or lacrosse ball to the soles, sides and tops of your feet, to your heels, all parts of your ankles and up your calves. In Tools of Titans, Amelia Boone, world champion obstacle racer, recommends rolling your feet on a golf ball to break up the fascia. Just remember to start slow.
Please let me know if you have any questions in the Comments below. And if you want to try more Balancing sequences to condition your feet, ankles and lower legs, you can download a progressive 15-video series here: vimeo.com/ondemand/yogabalancechallenge.
Previous Yoga with Abi:
Release Tension In The Upper Back & Injury-Proof Your Shoulders
Yoga For Sore, Weak or Inflexible Wrists
Loosen Up Tight Hips With 3 Types Of Poses
15-Minute Post-Ride Routine Designed To Optimize Your Recovery
Three Levels of Yoga to Relieve Lower Back Pain
Stretches to Relieve a Tight Chest and Stiff Shoulders
The Most Effective Style of Yoga to Increase Your Flexibility
Easy 15-Minute Yoga Routine To Loosen Up Tight Joints
How To Release Tight Quads And Increase Your Power
How To Release Chronically Tight Hamstrings
A Challenging One-Hour Yoga Flow Class
Take Control of Your Mind and Push Your Personal Limits
Yoga To Relieve Pain In Between The Shoulder Blades
15-Minute Routine To Unlock Tight Hips
15-Minute Yoga Routine To Build Core Strength
Short Yoga Routine To Help With Lower Back Pain in Bikers
15-Minute Yoga Routine To Enhance Balance and Agilityl
15-Minute Post-Ride Yoga Routine
8 Quick Yoga Stretches To Do At Work
MENTIONS: @yoga15app
Author Info:

Must Read This Week
How to Watch the 2024 Mountain Bike World Cup [Update: Staylive Offering Access in New Zealand, South Africa & More]
60265 views
60265 views
[UPDATED] Final Elite XC Results & Overall Standings from the Mairiporã XC World Cup 2024
41195 views
41195 views
Sign Up for the Pinkbike Newsletter - All the Biggest, Most Interesting Stories in your Inbox
PB Newsletter Signup
Dear Abi, Dear Abi,
My bike fitness stinks,
My legs are all twisted and my back 's full of kinks,
You'd think I could whip** but my hips hold me back,
I need to do something to get me on track.
Siiiiiiiiiiiigggnnneeed,
Stiff rider***
(Performs Abi sequence)
Dear Abi, Dear Abi,
I've done many a pose,
I can move my whole body, I got strength in my toes,
You help keep us all healthy, which is something we like,
So I offer great thanks on behalf of Pinkbike.
Siiiiiiiiiiiigggnnneeed,
Comment section
*Why yes, I am bored at work.
**lol definitely can't whip
***intended for clean mind
Specialy exercises 1 and 2 are realy good!
Thank you for the demonstration video. It clearly demonstrates how to gently transition from standing into the calf raise ( I just saw the first few minutes.) I will stretch these areas tonight. Again, thank you!
a mtber, I understand that feet+ankles modify force from the pedals and basically help maintain body position. As a former yoga teacher, it may have been more appropriate to include photos of all the awesome modifications (I.e, folded mat under the heels in squat, small towel rolls under the front of the ankle in thunderbolt) due to the ubiquity of ankle trauma among PB readers. As a physical therapy student, I would include the idea that even one PT appointment can help you to realize current limitations and ways to progress in order to avoid chronically weak and/or stiff ankles. For real. Those older folks who fall and break their hips, then get pneumonia post-op day 3 and just become weaker and basically start dying... Well, they mostly did not slip on black ice or drunkenly fall down the stairs. It often starts at the foot and ankle. So do your yoga : )
Ditto for chiropractors.
Dont let a PT do all the work. It usually is a personal process...something that works for 1 person doesnt always work for the next.
Seriously, do some research on chiropractic and the history of it....it's pretty wacky.
No Chiropractic office emphasizes x-rays here.
Everyone's experience is different.