Tech Tuesday: Clean and Lubricate Your Fox F32 Dust Wiper Seals
This Tech Tuesday shows how you can wake up your suspension fork’s performance in about five minutes for pennies, using a flat screwdriver, a clean cloth, some factory lubricant and little bit of elbow grease. The problem is dirty or poorly lubricated dust-wiper seals and the fix is quite simple. We used a Fox 32 Float RLC fork for the illustration.
![hero image]()
Stiction is the Enemy
Seal friction is the number one enemy of a suspension fork. Every time the fork reaches the beginning or end of its stroke, before it reverses direction, the stanchion momentarily stops sliding under the lip of the dust wiper seal. Once immobile, the dust wiper’s tightly wrapped synthetic rubber lip adheres to the stanchion tube. This creates a great deal of starting friction – like sliding a piano across a wooden floor – the force necessary to start the piano (or stanchion tube in this case) moving again is significantly more than that which is necessary to keep it sliding. Suspension engineers call starting friction “stiction” because it makes the suspension feel sticky instead of responsive.
![what you ll need]()
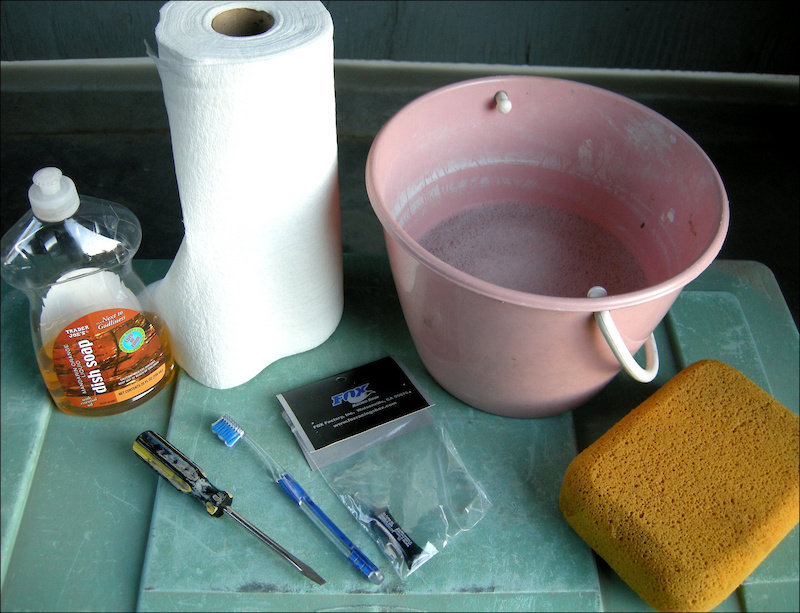
What You’ll Need:
-A clean fork and a clean environment to work on it. (a bike stand is a great help here).
-A thin blade flat screwdriver to use to pry out the seal.
-Factory authorized lubricant for the seal (15-weight suspension fluid will work in a pinch).
-Masking tape to cover the screwdriver blade to keep from marring your sliders (not really necessary unless you like to keep your stuff looking new, or you own an Audi).
-A couple spotlessly clean shop towels (or a roll of paper towels).
-Your Mom's toothbrush.
-A bucket of water and some bio-degradable detergent (dish-washing detergent is OK).
Tip: The life and happiness of your fork depends upon its sliding surfaces, so make every move in a deliberate and controlled manner so you don‘t slip with the screwdriver and gouge the stanchion tube or cut the seal. Take your time and the job will actually go faster. Also, you may need to back off you low-speed compression or perhaps, add some spring pressure to compensate for the slippery action of your newly serviced fork seals. Grime and stiction build up over time as the fork loses its lubrication, which causes many riders to adjust their spring and damping pressures to compensate.
![clean fork and seal area]()
Step one: Clean your fork well, especially around the inside of the arch where it curves behind the fork wiper seal. Dish washing detergent and water are a good call for this task.
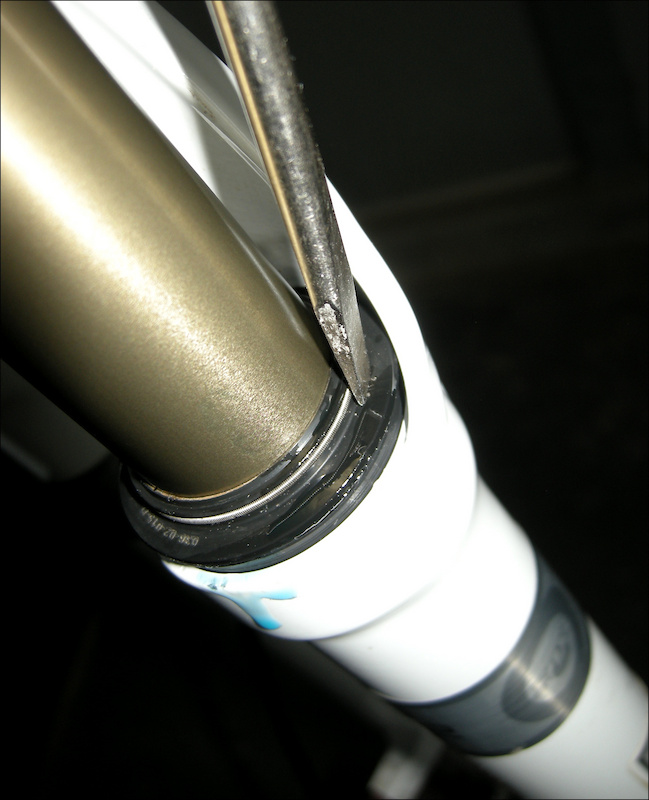
![Lifting wiper seal]()
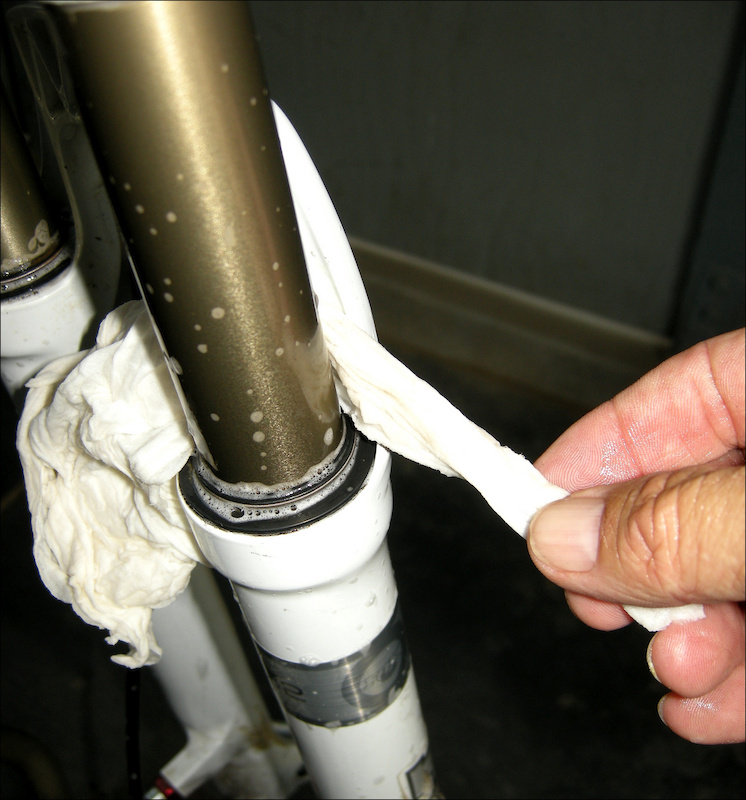
Step two: take a close look at the dust wiper seal where it sits against the fork slider. There should be a few depressions molded into the base to allow a thin screwdriver blade to slip between the fork and seal. Tape up the screwdriver blade if you want to keep the sliders looking perfect and, using a slight side-to-side wiggle motion, work the blade under the seal until it lifts. You won’t need much pressure to lift the seal, so don’t force the screwdriver. Repeat in three places around the seal until you can lever it out all the way. Slide the seals up the stanchion tubes about 3 inches.
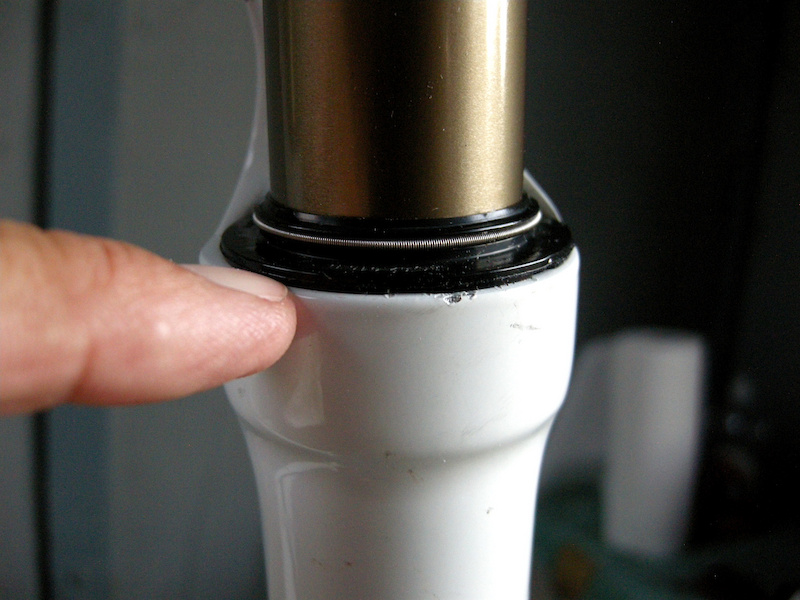
![locate and lift glide ring]()
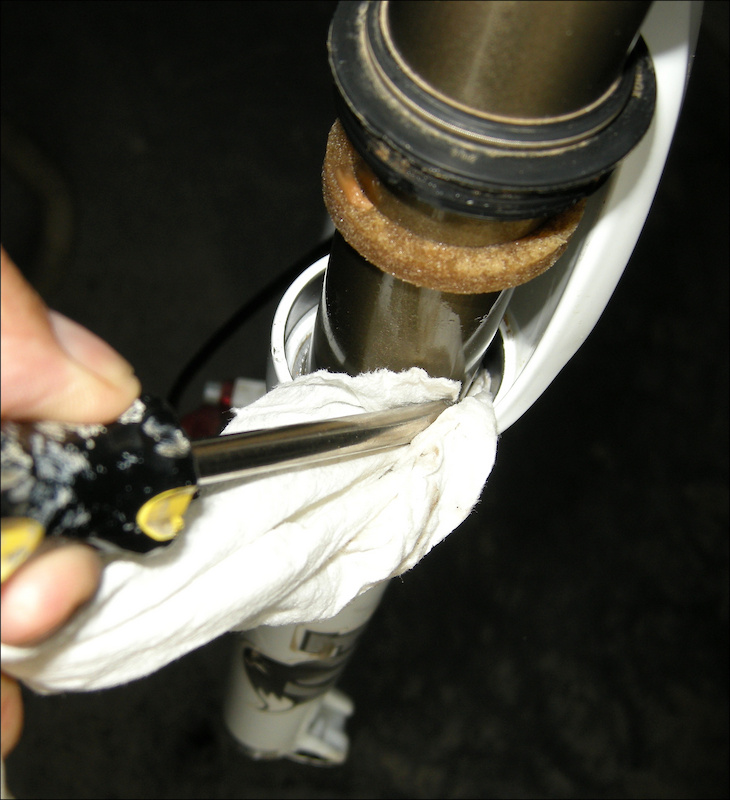
Step three: Look inside the slider to find a foam lubrication glide ring – most forks use one as a reservoir for lubricating oil and to continuously spread new lubricant on the stanchion tube. You may get lucky and pry them up with a screwdriver blade, but it’s a lot easier to put the bike on the ground and compress the fork to lift the glide rings. Slide the foam glide rings up near the seals.
![clean seal cavity]()
Step four: Using a towel wrapped around the screwdriver blade carefully clean the seal area and under the glide rings until there is no evidence of oil or grime. Fill the cavities with paper towels or shop towels so dirt and grime can’t fall into them while you work on the seals and glide rings. You can use masking tape to hold the plugs in place.
![brush wiper]()
Step five: Use your mom’s tooth brush, along with bio-degradable cleaner or detergent and water to clean the seals and glide rings inside and out. Dry all parts with a clean towel.
![lubricate glide ring]()
Step Six: Prepare the lubricant you will use to saturate the glide rings (Fox sells it in 5 cc bubble packs). Slide the glide rings into the fork cavities and put enough oil into them so that they are dripping full. Use your finger to lubricate the stanchion tubes for an inch or so above the rings.
![press wiper seal in]()
Step Seven: Slide a dust wiper down on the fork slider and visually align it so it sits level with the slider. CAREFULLY, push the seal in using hand pressure and the screwdriver blade. Place the blade near the outer edge of the seal where it is reinforced by an internal steel band molded into the rubber. Press the seal in by working around the circumference in three opposing spots until it seats. This will not take a lot of force, so use some love. Take care when you reach behind the fork arch with the screwdriver.
![inspect seal]()
Step eight: Make a visual inspection to ensure that the dust wiper seals are seated evenly on the fork sliders and then cycle the fork about ten times to get the fork running smoothly – wipe any excess oil from the fork and then go ride.
![Ready to ride]()
Remember to clean your fork and seal area well before you remove the wipers. Small amounts of grime can shorten the life of your fork if it gets into the mech. Got any more tips for sprucing up a fork? We'd love to know.
Past Tech Tuesdays:
Technical Tuesday #1 - How to change a tube.
Technical Tuesday #2 - How to set up your SRAM rear derailleur
Technical Tuesday #3 - How to remove and install pedals
Technical Tuesday #4 - How To Bleed Your Avid Elixir Brakes
Technical Tuesday #5 - How To Check And Adjust Your Headset
Technical Tuesday #6 - How To Fix A Broken Chain
Technical Tuesday #7 - Tubeless Conversion
Technical Tuesday #8 - Chain Wear
Technical Tuesday #9 - SRAM Shift Cable Replacement
Technical Tuesday #10 - Removing And Installing a Headset
Technical Tuesday #11 - Chain Lube Explained
Technical Tuesday #12 - RockShox Totem and Lyric Mission Control Damper Mod
Technical Tuesday #13 - Shimano XT Crank and Bottom Bracket Installation
Technical Tuesday #14 - Straightening Your Derailleur Hanger
Technical Tuesday #15 - Setting Up Your Front Derailleur
Technical Tuesday #16 - Setting Up Your Cockpit
Technical Tuesday #17 - Suspension Basics
Technical Tuesday #18 - Adjusting The Fox DHX 5.0
Technical Tuesday #19 - Adjusting The RockShox BoXXer World Cup
Technical Tuesday #20 - Servicing Your Fox Float Shock
Technical Tuesday #21 - Wheel Truing Basics
Technical Tuesday #22 - Shimano Brake Pad Replacement
Technical Tuesday #23 - Shimano brake bleed
Technical Tuesday #24 - Fox Lower Leg Removal And Service
Technical Tuesday #25 - RockShox Motion Control Service
Technical Tuesday #26 - Avid BB7 Cable Disk Brake Setup
Technical Tuesday #27 - Manitou Dorado Fork Rebuild
Technical Tuesday #28 - Manitou Circus Fork Rebuild
Technical Tuesday #29 - MRP G2 SL Chain Guide Install
Technical Tuesday #30 - Cane Creek Angleset Installation
Technical Tuesday #31 - RockShox Maxle Lite DH
Technical Tuesday #32 - Find Your Tire Pressure Sweet Spot
Technical Tuesday #33 - Three Minute Bike Preflight Check
Technical Tuesday #34 - MRP XCG Install
Technical Tuesday #35 - Stem Choice and Cockpit Setup
Technical Tuesday #36 - Handlebars - How Wide Affects Your Ride
Technical Tuesday #37 - Repairing A Torn Tire
Technical Tuesday #38 - Coil spring swap
Technical Tuesday #39 - Trailside help: Broken Shift Cable
Technical Tuesday #40 - Installing a Fox Float Air-Volume Spacer
Technical Tuesday #41 - Replace the Seals on Your 2011 RockShox Boxxer World Cup Fork
Visit Parktool.com to see their entire lineup of tools and lubes
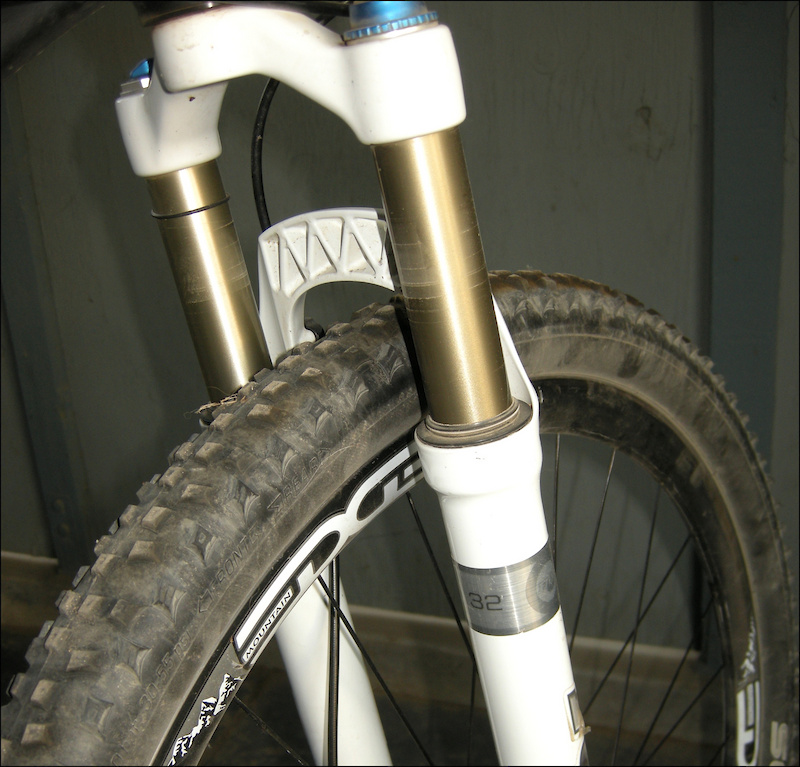
Dry and dirty dust wiper seals can rob a fork of its low-speed sensitivity. Follow these simple steps to get your fork sliding smoothly again.
Stiction is the Enemy
Seal friction is the number one enemy of a suspension fork. Every time the fork reaches the beginning or end of its stroke, before it reverses direction, the stanchion momentarily stops sliding under the lip of the dust wiper seal. Once immobile, the dust wiper’s tightly wrapped synthetic rubber lip adheres to the stanchion tube. This creates a great deal of starting friction – like sliding a piano across a wooden floor – the force necessary to start the piano (or stanchion tube in this case) moving again is significantly more than that which is necessary to keep it sliding. Suspension engineers call starting friction “stiction” because it makes the suspension feel sticky instead of responsive.
What You’ll Need:
-A clean fork and a clean environment to work on it. (a bike stand is a great help here).
-A thin blade flat screwdriver to use to pry out the seal.
-Factory authorized lubricant for the seal (15-weight suspension fluid will work in a pinch).
-Masking tape to cover the screwdriver blade to keep from marring your sliders (not really necessary unless you like to keep your stuff looking new, or you own an Audi).
-A couple spotlessly clean shop towels (or a roll of paper towels).
-Your Mom's toothbrush.
-A bucket of water and some bio-degradable detergent (dish-washing detergent is OK).
Tip: The life and happiness of your fork depends upon its sliding surfaces, so make every move in a deliberate and controlled manner so you don‘t slip with the screwdriver and gouge the stanchion tube or cut the seal. Take your time and the job will actually go faster. Also, you may need to back off you low-speed compression or perhaps, add some spring pressure to compensate for the slippery action of your newly serviced fork seals. Grime and stiction build up over time as the fork loses its lubrication, which causes many riders to adjust their spring and damping pressures to compensate.
Step one: Clean your fork well, especially around the inside of the arch where it curves behind the fork wiper seal. Dish washing detergent and water are a good call for this task.

Particles of dirt (right) should have been cleaned before removing the wiper.
Step two: take a close look at the dust wiper seal where it sits against the fork slider. There should be a few depressions molded into the base to allow a thin screwdriver blade to slip between the fork and seal. Tape up the screwdriver blade if you want to keep the sliders looking perfect and, using a slight side-to-side wiggle motion, work the blade under the seal until it lifts. You won’t need much pressure to lift the seal, so don’t force the screwdriver. Repeat in three places around the seal until you can lever it out all the way. Slide the seals up the stanchion tubes about 3 inches.

Step three: Look inside the slider to find a foam lubrication glide ring – most forks use one as a reservoir for lubricating oil and to continuously spread new lubricant on the stanchion tube. You may get lucky and pry them up with a screwdriver blade, but it’s a lot easier to put the bike on the ground and compress the fork to lift the glide rings. Slide the foam glide rings up near the seals.
Step four: Using a towel wrapped around the screwdriver blade carefully clean the seal area and under the glide rings until there is no evidence of oil or grime. Fill the cavities with paper towels or shop towels so dirt and grime can’t fall into them while you work on the seals and glide rings. You can use masking tape to hold the plugs in place.
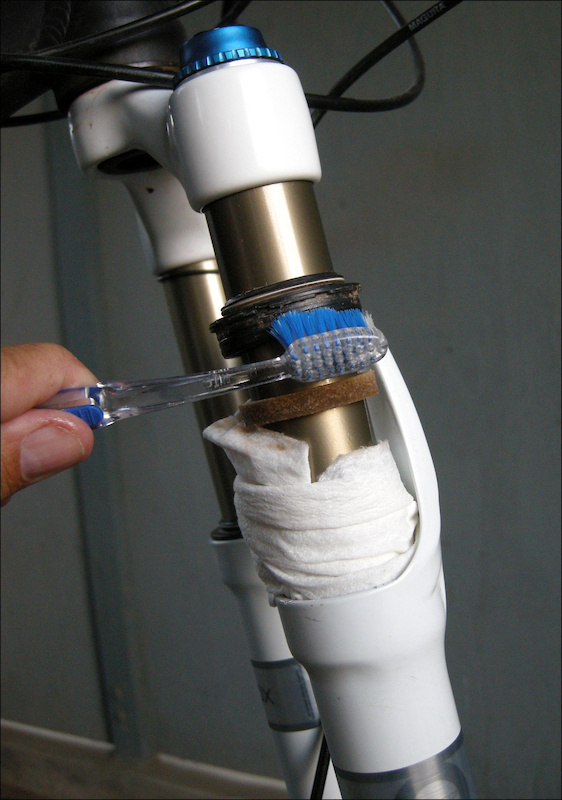
Step five: Use your mom’s tooth brush, along with bio-degradable cleaner or detergent and water to clean the seals and glide rings inside and out. Dry all parts with a clean towel.

Step Six: Prepare the lubricant you will use to saturate the glide rings (Fox sells it in 5 cc bubble packs). Slide the glide rings into the fork cavities and put enough oil into them so that they are dripping full. Use your finger to lubricate the stanchion tubes for an inch or so above the rings.
Step Seven: Slide a dust wiper down on the fork slider and visually align it so it sits level with the slider. CAREFULLY, push the seal in using hand pressure and the screwdriver blade. Place the blade near the outer edge of the seal where it is reinforced by an internal steel band molded into the rubber. Press the seal in by working around the circumference in three opposing spots until it seats. This will not take a lot of force, so use some love. Take care when you reach behind the fork arch with the screwdriver.
Step eight: Make a visual inspection to ensure that the dust wiper seals are seated evenly on the fork sliders and then cycle the fork about ten times to get the fork running smoothly – wipe any excess oil from the fork and then go ride.
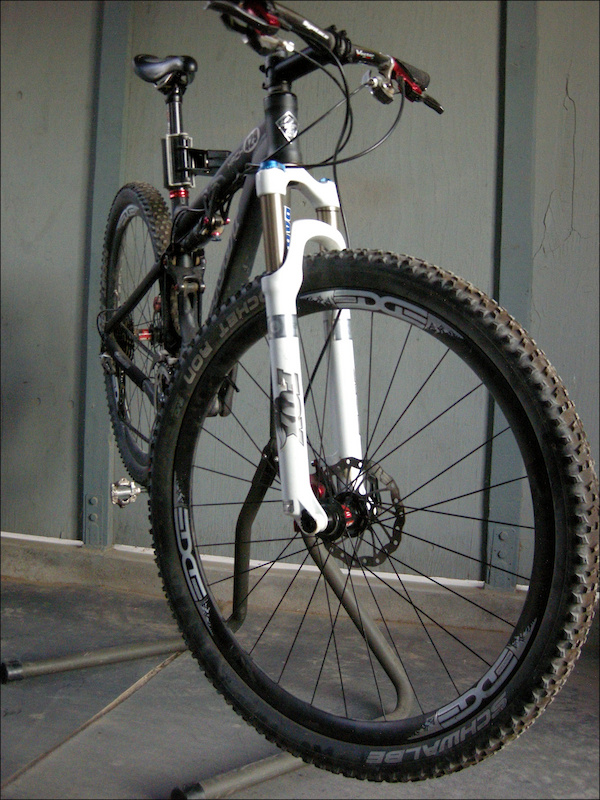
A job well done. Cycle the fork a few times to get the dust wiper and stanchion tubes lubricated and then enjoy riding your front suspension as it was intended to be.
Remember to clean your fork and seal area well before you remove the wipers. Small amounts of grime can shorten the life of your fork if it gets into the mech. Got any more tips for sprucing up a fork? We'd love to know.
Past Tech Tuesdays:
Technical Tuesday #1 - How to change a tube.
Technical Tuesday #2 - How to set up your SRAM rear derailleur
Technical Tuesday #3 - How to remove and install pedals
Technical Tuesday #4 - How To Bleed Your Avid Elixir Brakes
Technical Tuesday #5 - How To Check And Adjust Your Headset
Technical Tuesday #6 - How To Fix A Broken Chain
Technical Tuesday #7 - Tubeless Conversion
Technical Tuesday #8 - Chain Wear
Technical Tuesday #9 - SRAM Shift Cable Replacement
Technical Tuesday #10 - Removing And Installing a Headset
Technical Tuesday #11 - Chain Lube Explained
Technical Tuesday #12 - RockShox Totem and Lyric Mission Control Damper Mod
Technical Tuesday #13 - Shimano XT Crank and Bottom Bracket Installation
Technical Tuesday #14 - Straightening Your Derailleur Hanger
Technical Tuesday #15 - Setting Up Your Front Derailleur
Technical Tuesday #16 - Setting Up Your Cockpit
Technical Tuesday #17 - Suspension Basics
Technical Tuesday #18 - Adjusting The Fox DHX 5.0
Technical Tuesday #19 - Adjusting The RockShox BoXXer World Cup
Technical Tuesday #20 - Servicing Your Fox Float Shock
Technical Tuesday #21 - Wheel Truing Basics
Technical Tuesday #22 - Shimano Brake Pad Replacement
Technical Tuesday #23 - Shimano brake bleed
Technical Tuesday #24 - Fox Lower Leg Removal And Service
Technical Tuesday #25 - RockShox Motion Control Service
Technical Tuesday #26 - Avid BB7 Cable Disk Brake Setup
Technical Tuesday #27 - Manitou Dorado Fork Rebuild
Technical Tuesday #28 - Manitou Circus Fork Rebuild
Technical Tuesday #29 - MRP G2 SL Chain Guide Install
Technical Tuesday #30 - Cane Creek Angleset Installation
Technical Tuesday #31 - RockShox Maxle Lite DH
Technical Tuesday #32 - Find Your Tire Pressure Sweet Spot
Technical Tuesday #33 - Three Minute Bike Preflight Check
Technical Tuesday #34 - MRP XCG Install
Technical Tuesday #35 - Stem Choice and Cockpit Setup
Technical Tuesday #36 - Handlebars - How Wide Affects Your Ride
Technical Tuesday #37 - Repairing A Torn Tire
Technical Tuesday #38 - Coil spring swap
Technical Tuesday #39 - Trailside help: Broken Shift Cable
Technical Tuesday #40 - Installing a Fox Float Air-Volume Spacer
Technical Tuesday #41 - Replace the Seals on Your 2011 RockShox Boxxer World Cup Fork
Visit Parktool.com to see their entire lineup of tools and lubes
Author Info:

 Member since Mar 23, 2011
Must Read This Week
Sign Up for the Pinkbike Newsletter - All the Biggest, Most Interesting Stories in your Inbox
PB Newsletter Signup
is this the service that fox recommend every 24 hours of riding or something? If so, much easier than I thought it would be, no need to take it to LBS!
I prefer to know it before I start to mess it up.
So, to all of you who are about to do this, be cautious and tape up the blade of the screwdriver! This is a handy and quick tip to keep your fork running smooth.
RC
secondly as stated above its no more hassle (with the exception of older talas systems on fox - i believe) to just pull the lowers off, fresh oil bath and also coat those bushings with slick honey, judy butter or prep m. then syringe in some oil, or if you have no foam rings a light run of said lube around the inners of the seals, that will achieve much more than the relatively thin 5/10wt oil your going to put on the foam rings and it usual lasts longer. more is not always better in that case too.
And if you dont have a proper seal press sockets come in very handy (various forks will need different sockets and you may need 2 sizes as RS and Marzo forks have oil and dust seals, oil seal being inside the lower requiring a smaller socket than the dust seal)
why not just do the usual "LOWERS SERVICE" method that Fox recommend for their forks?
I've been doing "lowers services" for my Fox forks and my customers Fox forks (also for Rockshox and Marzocchi) for years
its easily the best method because you refresh the lubrication oil in the fork lowers after thoroughly cleaning them, replace the Float fluid on the foam rings after completely removing and cleaning them away from the fork.
and can fully inspect / clean / replace the fork seals properly as the stanchions are not in place, and can use seal tool to press the seals back into the fork 100% flat with no damage to the seal outer
takes 10-15 minutes with practise
Just drop the lowers and do it right! Takes 20 minutes.