Stories posted under Pinkbike Community blogs are not edited, vetted, or approved by the Pinkbike editorial team. These are stories from Pinkbike users.
If a blog post is offensive or violates the Terms of Services, please report the blog to Community moderators.
The photography anthology: Part 2 - Panoramas
Part two of my series on photography. Today it's panoramas. Also a bonus section on HDR panoramas.
Ironically enough pinkbike won't let me use a panoramic shot for the story image. Cheers.
------------------------------------------------------------------------------Panoramas aren't seen much on pinkbike. I'd like to pretend this is because it's not a form that really suits sport shots, but in reality it's down to the fact that panoramas are extremely wide and not very tall, a format that this website simply can't display well. In fairness I know several dedicated photography websites that struggle with it too.
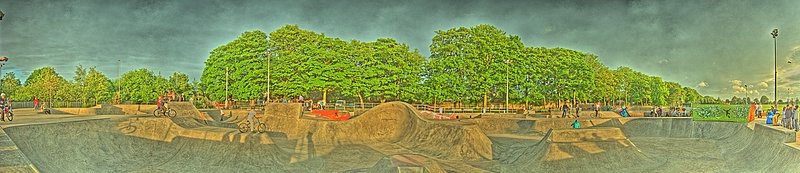
By panorama I mean a photo that displays a very wide angle of view, such as this one:
![photo]()
The full size version is here: http://img441.imageshack.us/img441/6285/panocrop.jpg
That's about 180* or so of view. A typical wideangle SLR lens might give you ~100* of view. Panoramas can be easily made to a full 360* field of view.
It's not a technique that immediately springs to mind for sports photography. Consider my shot above. I'm not showing any real action, but what I am showing is the general layout and 'mood' of the place that you can't get with a single snapshot. There must have been times when people reading this have looked over a vast vista, at say a bike racing event, and wished they could capture an overall detailed view. You'll know this feeling if you had it.
If you're hoping for another wall of text affair like my last article, I must regret to inform you that this technique is very straightforward, with a few caveats.
The theory:
Panoramas are easy to understand. You take multiple shots across a scene and then use software to digitally 'stitch' them into one. It's easier to explain by going straight into an example.
The practice:
Any camera will do, although a SLR makes things faster. You need to find your spot and position yourself carefully. In particular avoid any close-up objects like railings or walls. You should have a good clean view. Also avoid shooting into the sun.
Depending on your camera, you may want to reduce the image size setting. My D40 is 6MP and that's fine, but if you normally shoot at 12 or even 18MP you should think about setting it lower. You can always scale down later in software of course.
Point your camera in portrait (sideways) orientation at the far side of your panoramic scene. Have the horizon straight in the middle of the shot. Take the photo. Like this:
![photo]()
Yes I know I said don't have the sun in the frame .
.
What you need to do now is move slightly round and capture the next shot. It is VERY IMPORTANT that you obey these two points:
1-Keep the horizon dead central. Do not point the camera up or down at all.
2-Have lots of overlap between the two shots. There should be an object that appears fully and clearly in both shots.
Continue panning round and taking shots. If you have a slow compact this can be rather tedious.
What you're looking for is several shots all showing the panoramic scene, all overlapping. In my example here are the first 4 shots. These are undedited except for being placed together.
![photo]()
My first shot is at the far right. Note that the next one along is slightly further right but still shows the floodlight post in full. By the third shot the lightpost is near the edge of the frame. By the fourth shot it's out of it. This is the sort of overlap you need. Too much overlap does no harm, but too little makes the panorama impossible to stitch.
Keep going until you have captured the full panorama.
Now comes the software part. Just as with HDR, there are countless different programs out there, but I'll show you with my personal favourite Autostitch. The 'basic' version is free and I can't see anyone needing anything more advanced. There's also now an iphone version......
http://cvlab.epfl.ch/~brown/autostitch/autostitch (PB doesn't seem to link it properly).
Get all your photos together in a folder and open the program. It's as simple as doing file>open and selecting ALL the images.
![photo]()
It shouldn't take very long to blend the shots together. At the end the finished panorama opens automatically.
![photo]()
Firstly, it's not very big. The software automatically scales it down. If you want to change that then do Edit>options in autostitch and set the Scale option to something higher. 100% is obviously full size. Be aware that if you go too high this will bring your computer to a standstill and may even crash due to lack of memory. You can try increasing the memory option to compensate.
The next thing is the black borders around the edge. This is a result of distortions in the lens. Oh and if you didn't keep the horizon steady between shots you'll pay for it here. There is an option called autocrop in the settings which I assume would remove the borders for you, but it seems to do nothing that I can see.
You have to manually crop out the central rectangular area in the software of your choice and then perform your usual adjustments.
Notes:
There isn't as much to go wrong here as with HDR, but you still need to be smart to get good results. You can hopefully see the isssue with having the sun in the frame in my example - part of the panorama is too dark. The dynamic range is too low.....whatever shall we do? I wonder.....
Before I get onto HDR panoramas I will mention some other limitations on this technique.
Movement between frames is inevitable in some scenes. It results in blurred/ghosted images though not as severely as HDR. Look at the full version of my panorama at the start of this article. Over at the far right there's two images of the skateboarder at the green wall. It's quite subtle though and not usually a huge problem.
You can also see the artifacts that occur when you have close-up objects. Look the the bags on the ground at the left. You can see a halo type effect around them where the software is struggling to stitch them smoothly. It's not too bad in this example but it gets worse as they get closer.
HDR Panoramas:
My previous article on HDR is here. Read the section on 'RAW Tonemapping'. http://allebong.pinkbike.com/blog/ItsNotThatHard.html
There's 2 ways of doing a HDR and strangely enough 2 ways of doing a HDR panorama.
If you're reading this part I'm going to assume you are now somewhat familiar with QTPFSGUI from my last article.
If you're feeling masochistic then you can try doing exposure blending for the individual panorama shots. This will be tedium like you've never known, and it probably won't work well anyway. The reason is that as each shot is different, so the HDR result will be as well, and it will make the panorama look strange and uneven.
Direct RAW tonemapping is the best and easiest way as it tends to be more consistent. A few notes though; it still isn't advised to shoot into the sun, and large brightness variations may still upset it. It works best on relatively dull scenes.
QTPFSGUI has a very useful batch processing option. It's a little fiddly to use so I'll show you.
First open one of your RAW files and enter the tonemapping screen. Set your desired operator and options and test it to see if it looks right. Now, click on the little save button below where it says 'Tonemapping settings'. This allows you to save the settings as a simple .txt file for the batch tonemapper, and also allows you to reload them when doing normal tonemapping. If you've found settings your happy with it's a good idea to save them.
Simply enter a name and save it somewhere sensible, eg my documents, as you'll be needing to find it again soon.
Exit the tonemapper and close your RAW file in the window. Now create an output folder for your finished images. It's also handy to have all your RAW files in a single folder for this next part.
Do Tools>Batch tonemapping. It's a fairly simple window.
On the left is your input of RAW files. It's a simple case of doing 'add directory' and selecting the folder you made with the RAW files in it. If you didn't sort them you can add each RAW file with the 'add files' option.
The left column allows you to add the tonemapping settings. Again it's simply 'add files' and select the tonemapping settings file you made earlier.
Finally select your output folder and hit Start. Now comes the waiting. There doesn't appear to be an option to scale the images down to reduce processing time, so each jpeg will come out at the maximum size. This takes a while for many photos even on a fast PC.
When they are all done you simply use autostich as normal.
Here's my only HDR pano on pinkbike to date:
![photo]()
Full size here: http://img218.imageshack.us/img218/3944/hdrpano1.jpg
I'm not very happy with it due to the extreme amount of noise in the sky. I used Fattal with no denoise setting so I only have myself to blame. I also done that with a compact camera, so there's even more noise than usual.
You may have picked up that I said that compacts don't have RAW modes. Well, mine didn't by default, and I'm currently thinking of doing an article on how I enabled it along with a whole host of other juicy things like intervalometers. It would only apply to people with Canon compacts though, and even then not every one. If you're curious it's the Canon Hack Development Kit, or CHDK, available here: http://chdk.wikia.com/wiki/CHDK
Endote:
I'm not sure what to write about now. I said timelapses but that depends on your camera (see above about Canon compacts). I may do a feature about more basic techniques to help out less experienced photographers. Throughout all this I've been assuming a certain level of knowledge. I could also include basic image editing, just dead simple things like compression, cropping, levels etc . Things which I at least struggled with for some time.
I'll take anyones feedback here. If there's a particular photo of mine that you'd like to know more about, feel free to ask.
Ironically enough pinkbike won't let me use a panoramic shot for the story image. Cheers.
------------------------------------------------------------------------------Panoramas aren't seen much on pinkbike. I'd like to pretend this is because it's not a form that really suits sport shots, but in reality it's down to the fact that panoramas are extremely wide and not very tall, a format that this website simply can't display well. In fairness I know several dedicated photography websites that struggle with it too.
By panorama I mean a photo that displays a very wide angle of view, such as this one:

The full size version is here: http://img441.imageshack.us/img441/6285/panocrop.jpg
That's about 180* or so of view. A typical wideangle SLR lens might give you ~100* of view. Panoramas can be easily made to a full 360* field of view.
It's not a technique that immediately springs to mind for sports photography. Consider my shot above. I'm not showing any real action, but what I am showing is the general layout and 'mood' of the place that you can't get with a single snapshot. There must have been times when people reading this have looked over a vast vista, at say a bike racing event, and wished they could capture an overall detailed view. You'll know this feeling if you had it.
If you're hoping for another wall of text affair like my last article, I must regret to inform you that this technique is very straightforward, with a few caveats.
The theory:
Panoramas are easy to understand. You take multiple shots across a scene and then use software to digitally 'stitch' them into one. It's easier to explain by going straight into an example.
The practice:
Any camera will do, although a SLR makes things faster. You need to find your spot and position yourself carefully. In particular avoid any close-up objects like railings or walls. You should have a good clean view. Also avoid shooting into the sun.
Depending on your camera, you may want to reduce the image size setting. My D40 is 6MP and that's fine, but if you normally shoot at 12 or even 18MP you should think about setting it lower. You can always scale down later in software of course.
Point your camera in portrait (sideways) orientation at the far side of your panoramic scene. Have the horizon straight in the middle of the shot. Take the photo. Like this:

Yes I know I said don't have the sun in the frame
What you need to do now is move slightly round and capture the next shot. It is VERY IMPORTANT that you obey these two points:
1-Keep the horizon dead central. Do not point the camera up or down at all.
2-Have lots of overlap between the two shots. There should be an object that appears fully and clearly in both shots.
Continue panning round and taking shots. If you have a slow compact this can be rather tedious.
What you're looking for is several shots all showing the panoramic scene, all overlapping. In my example here are the first 4 shots. These are undedited except for being placed together.

My first shot is at the far right. Note that the next one along is slightly further right but still shows the floodlight post in full. By the third shot the lightpost is near the edge of the frame. By the fourth shot it's out of it. This is the sort of overlap you need. Too much overlap does no harm, but too little makes the panorama impossible to stitch.
Keep going until you have captured the full panorama.
Now comes the software part. Just as with HDR, there are countless different programs out there, but I'll show you with my personal favourite Autostitch. The 'basic' version is free and I can't see anyone needing anything more advanced. There's also now an iphone version......
http://cvlab.epfl.ch/~brown/autostitch/autostitch (PB doesn't seem to link it properly).
Get all your photos together in a folder and open the program. It's as simple as doing file>open and selecting ALL the images.

It shouldn't take very long to blend the shots together. At the end the finished panorama opens automatically.

Firstly, it's not very big. The software automatically scales it down. If you want to change that then do Edit>options in autostitch and set the Scale option to something higher. 100% is obviously full size. Be aware that if you go too high this will bring your computer to a standstill and may even crash due to lack of memory. You can try increasing the memory option to compensate.
The next thing is the black borders around the edge. This is a result of distortions in the lens. Oh and if you didn't keep the horizon steady between shots you'll pay for it here. There is an option called autocrop in the settings which I assume would remove the borders for you, but it seems to do nothing that I can see.
You have to manually crop out the central rectangular area in the software of your choice and then perform your usual adjustments.
Notes:
There isn't as much to go wrong here as with HDR, but you still need to be smart to get good results. You can hopefully see the isssue with having the sun in the frame in my example - part of the panorama is too dark. The dynamic range is too low.....whatever shall we do? I wonder.....
Before I get onto HDR panoramas I will mention some other limitations on this technique.
Movement between frames is inevitable in some scenes. It results in blurred/ghosted images though not as severely as HDR. Look at the full version of my panorama at the start of this article. Over at the far right there's two images of the skateboarder at the green wall. It's quite subtle though and not usually a huge problem.
You can also see the artifacts that occur when you have close-up objects. Look the the bags on the ground at the left. You can see a halo type effect around them where the software is struggling to stitch them smoothly. It's not too bad in this example but it gets worse as they get closer.
HDR Panoramas:
My previous article on HDR is here. Read the section on 'RAW Tonemapping'. http://allebong.pinkbike.com/blog/ItsNotThatHard.html
There's 2 ways of doing a HDR and strangely enough 2 ways of doing a HDR panorama.
If you're reading this part I'm going to assume you are now somewhat familiar with QTPFSGUI from my last article.
If you're feeling masochistic then you can try doing exposure blending for the individual panorama shots. This will be tedium like you've never known, and it probably won't work well anyway. The reason is that as each shot is different, so the HDR result will be as well, and it will make the panorama look strange and uneven.
Direct RAW tonemapping is the best and easiest way as it tends to be more consistent. A few notes though; it still isn't advised to shoot into the sun, and large brightness variations may still upset it. It works best on relatively dull scenes.
QTPFSGUI has a very useful batch processing option. It's a little fiddly to use so I'll show you.
First open one of your RAW files and enter the tonemapping screen. Set your desired operator and options and test it to see if it looks right. Now, click on the little save button below where it says 'Tonemapping settings'. This allows you to save the settings as a simple .txt file for the batch tonemapper, and also allows you to reload them when doing normal tonemapping. If you've found settings your happy with it's a good idea to save them.
Simply enter a name and save it somewhere sensible, eg my documents, as you'll be needing to find it again soon.
Exit the tonemapper and close your RAW file in the window. Now create an output folder for your finished images. It's also handy to have all your RAW files in a single folder for this next part.
Do Tools>Batch tonemapping. It's a fairly simple window.
On the left is your input of RAW files. It's a simple case of doing 'add directory' and selecting the folder you made with the RAW files in it. If you didn't sort them you can add each RAW file with the 'add files' option.
The left column allows you to add the tonemapping settings. Again it's simply 'add files' and select the tonemapping settings file you made earlier.
Finally select your output folder and hit Start. Now comes the waiting. There doesn't appear to be an option to scale the images down to reduce processing time, so each jpeg will come out at the maximum size. This takes a while for many photos even on a fast PC.
When they are all done you simply use autostich as normal.
Here's my only HDR pano on pinkbike to date:
Full size here: http://img218.imageshack.us/img218/3944/hdrpano1.jpg
I'm not very happy with it due to the extreme amount of noise in the sky. I used Fattal with no denoise setting so I only have myself to blame. I also done that with a compact camera, so there's even more noise than usual.
You may have picked up that I said that compacts don't have RAW modes. Well, mine didn't by default, and I'm currently thinking of doing an article on how I enabled it along with a whole host of other juicy things like intervalometers. It would only apply to people with Canon compacts though, and even then not every one. If you're curious it's the Canon Hack Development Kit, or CHDK, available here: http://chdk.wikia.com/wiki/CHDK
Endote:
I'm not sure what to write about now. I said timelapses but that depends on your camera (see above about Canon compacts). I may do a feature about more basic techniques to help out less experienced photographers. Throughout all this I've been assuming a certain level of knowledge. I could also include basic image editing, just dead simple things like compression, cropping, levels etc . Things which I at least struggled with for some time.
I'll take anyones feedback here. If there's a particular photo of mine that you'd like to know more about, feel free to ask.
Author Info:
 Member since Sep 17, 2006
Must Read This Week
[UPDATED] Final Elite XC Results & Overall Standings from the Mairiporã XC World Cup 2024
41992 views
41992 views
Sign Up for the Pinkbike Newsletter - All the Biggest, Most Interesting Stories in your Inbox
PB Newsletter Signup
0 Comments
Login or Sign Up