Stories posted under Pinkbike Community blogs are not edited, vetted, or approved by the Pinkbike editorial team. These are stories from Pinkbike users.
If a blog post is offensive or violates the Terms of Services, please report the blog to Community moderators.
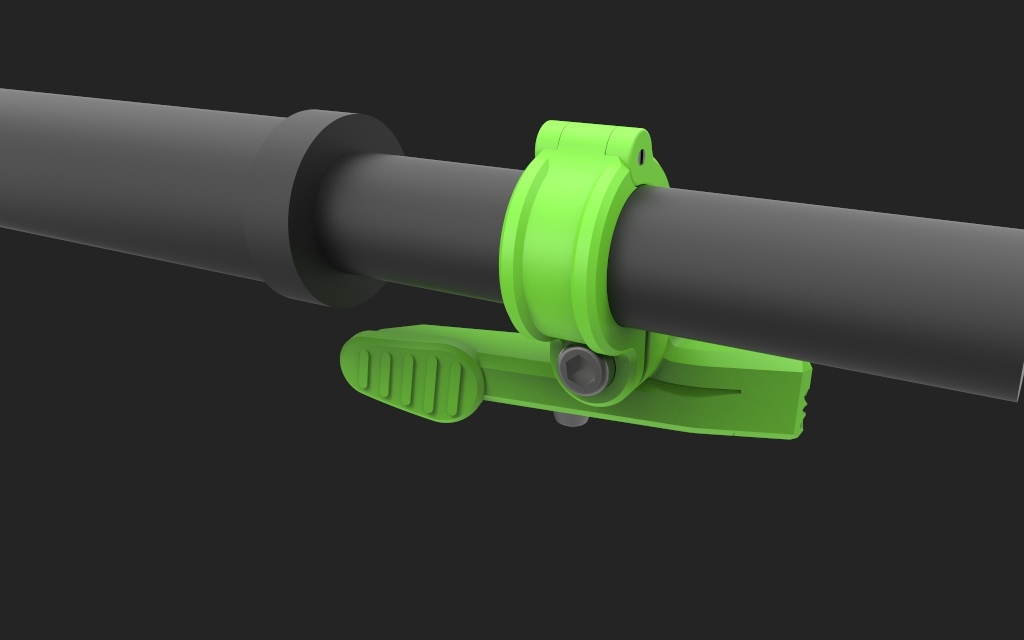
3D-printed dropper post remote
This is a remote for dropperposts I made a while back, the lever sits more underneath the handle bar and with the rotation pivot more forward than others. The idea is that you shouldn't have to unwrap your thumb as much to actuate it and instead be able to keep a better grip of your handlebar. Useful if you actuating it while you are riding through a rough section.
![photo]()
The function is 100% but I'm probably gonna reprint a new finger plate for better ergonomics.
I had some initial worries regarding the strength but it's been on for a couple of weeks and through some crashes so hopefully it'll hold together. Trying to get access to a CNC-mill so I can make a aluminium version of it though
You need:
1x 608 bearing, preferably sealed
1x M8 washer
1x M5 large washer
3x M5 Nut
1x M5 bolt
1x M5 washer
1x wire clamp thingy from a Shimano rear dereileur
1x wire tensioner from a Shimano shifter
1x M3 bolt
![photo]()
Some instructions:
Printing:
-Print everything is ASA or ABS. 100% infill. You want it strong. See the screen shot of Simplify3d for how to orient the different parts.
-Use supports everywhere except for in the channel for the wire. Remove them manually.
-Cold acetone vapour smooth everything for extra strength, 24h minimum with very little acetone in the container to get the acetone to penetrate the parts better.
-Clean up all parts post printing with a dremel/knife
![photo]()
Lever:
-Attach the thumb plate to the lever by gluing it with acetone(it will partly melt the ABS/ASA).
-Press the nut into its slot with a small drop of acetone to glue it in place, similar for the washer on the other side. Wait for the acetone to evaporate then use a short M5 bolt and the wire clamp from an old Shimano derailleur to clamp down the wire.
-Press the bearing into the lever, make sure you use a
Mainbody:
-Thread the hole for the wire tensioner with a M5 tap. Screw in a wire tensioner from a shimano shifter or similar.
-Drill out the bottom 8mm of the hole in the middle of the bearing with a 5mm drillbit.
-Thread the rest of the hole in the middle of the bearing with a M5 tap.
-Press a M8 washer around the center pin to act as a harder mounting surface for the bearing.
-Press the lever assembly with the bearing in it onto the body.
-Secure and preload the bearing with first a large M5 washer and then a M5 bolt.
Clamp mechanism:
-Take a M3 bolt, cut of the head so you have a threaded rod that is 16 mm long, cut a small slot in one end for a flat screw driver.
-Use a M3 tap to thread the hole in the outbord side
-Use a M5 tap to thread the hole for the clamping screw
-Assemble the front clamp to the main body with the M3 rod as the axle. Use a small amount of loctite to hold it in place.
Attach the wire from your dropper and go shred!
![photo]()
![photo]()
![photo]()
![photo]()
https://www.thingiverse.com/thing:3479440

The function is 100% but I'm probably gonna reprint a new finger plate for better ergonomics.
I had some initial worries regarding the strength but it's been on for a couple of weeks and through some crashes so hopefully it'll hold together. Trying to get access to a CNC-mill so I can make a aluminium version of it though
You need:
1x 608 bearing, preferably sealed
1x M8 washer
1x M5 large washer
3x M5 Nut
1x M5 bolt
1x M5 washer
1x wire clamp thingy from a Shimano rear dereileur
1x wire tensioner from a Shimano shifter
1x M3 bolt

Some instructions:
Printing:
-Print everything is ASA or ABS. 100% infill. You want it strong. See the screen shot of Simplify3d for how to orient the different parts.
-Use supports everywhere except for in the channel for the wire. Remove them manually.
-Cold acetone vapour smooth everything for extra strength, 24h minimum with very little acetone in the container to get the acetone to penetrate the parts better.
-Clean up all parts post printing with a dremel/knife

Lever:
-Attach the thumb plate to the lever by gluing it with acetone(it will partly melt the ABS/ASA).
-Press the nut into its slot with a small drop of acetone to glue it in place, similar for the washer on the other side. Wait for the acetone to evaporate then use a short M5 bolt and the wire clamp from an old Shimano derailleur to clamp down the wire.
-Press the bearing into the lever, make sure you use a
Mainbody:
-Thread the hole for the wire tensioner with a M5 tap. Screw in a wire tensioner from a shimano shifter or similar.
-Drill out the bottom 8mm of the hole in the middle of the bearing with a 5mm drillbit.
-Thread the rest of the hole in the middle of the bearing with a M5 tap.
-Press a M8 washer around the center pin to act as a harder mounting surface for the bearing.
-Press the lever assembly with the bearing in it onto the body.
-Secure and preload the bearing with first a large M5 washer and then a M5 bolt.
Clamp mechanism:
-Take a M3 bolt, cut of the head so you have a threaded rod that is 16 mm long, cut a small slot in one end for a flat screw driver.
-Use a M3 tap to thread the hole in the outbord side
-Use a M5 tap to thread the hole for the clamping screw
-Assemble the front clamp to the main body with the M3 rod as the axle. Use a small amount of loctite to hold it in place.
Attach the wire from your dropper and go shred!


https://www.thingiverse.com/thing:3479440
Author Info:

 Member since Jan 10, 2015
Must Read This Week
[UPDATED] Final Elite XC Results & Overall Standings from the Mairiporã XC World Cup 2024
42084 views
42084 views
Sign Up for the Pinkbike Newsletter - All the Biggest, Most Interesting Stories in your Inbox
PB Newsletter Signup
2 Comments
- 1 0
i am commenting because I am probably going to do a similar thing, very cool way to save $50! High Five!
- 1 0
How durable has it been, with ABS?
Login or Sign Up