Tech Tuesday - Cup and Cone Hub Rebuild
How do they work? A cup and cone hub makes use of loose ball bearings and allows you to easily adjust bearing tension, unlike most sealed bearing hubs that don't allow for any adjustment. They consist of the "cup" that acts as the bearing's outer race, which is pressed into the hub shell and not replaceable, and the "cone" that serves as the inner race and threads onto the axle. The hub bearings, which are usually 1/4" in rear hubs and 3/16" in front hubs, spin between the cup and cone. Bearing tension is adjusted be threading the cone down on the axle, and then locking its position in place with the locknut (a spacer between the cone and locknut allows you to tighten the two against each other easily). Front cup and cone hubs are usually symmetrical, although the hub will be offset slightly to compensate for its rotor disc rotor mounting. Rear hubs use a freehub (the clutch mechanism that allows you to coast) and the driveside cone and locknut can be found set within, sometimes hidden from view. You can learn more about cup and cone hubs by checking out last week's Tech Tuesday.
![Tech Tuesday]()
Some helpful pointers before you begin:
• While a crescent wrench can be used to loosen a locknut, you'll need a cone wrench to fit in-between the locknut and the cone's shoulder. Take your wheel down with you to your local shop and find the correct size to fit.
• 13, 15 and 17mm cone wrenches are commonly required for to work on a front hub, 17 and 19mm are usually needed for rear hubs.
• A thick, water resistant grease is best for use within hubs.
• Front hubs usually use ten 3/16" balls per side, rear hubs nine 1/4" balls per side. This isn't always the case though - count the number of balls per side before removing them.
• Ball bearings can be found at your local shop and are inexpensive. If you're going to take the time to rebuild your hub you should also replace the bearings.
• You are going to have many small parts on your workbench. Lay them out in order as you remove them from the hub.
• It is very important that the ends of the axle do not protrude out too far beyond the locknut. If this is the case the wheel will not be able to be tightened down in the frame or fork. The axle should never extend to the outer face of the dropouts. Axle protrusion should also be even on both sides.
• Your goal should be to adjust the hub so that it has the least amount of bearing tension without being loose. Hubs with damaged bearing surfaces may not spin smooth when setup correctly.
![Tech Tuesday]()
How tight is right? It is important to note that adjusting the hub bearings tighter than required will not in any way keep them from coming loose sooner, but will actually increase wear on all components. A loose ball hub that has been ridden with too much bearing tension will likely have damaged both the cone and cup, possibly requiring the hub to be replaced. The same will result from riding a hub that is too loose. So, how do you know when it is set correctly?
Ideally, a quick release hub should have a slight amount of knocking or looseness to it when it is not clamped in the frame or fork. This is because the hollow axle will flex a small amount when the quick release is clamped down properly, taking up that loose feeling. If a quick release hub has no play in it when it is out of the bike it is likely too tight. This does not apply to solid axles that use wheel nuts to hold them in place. That all gets thrown out the window if the hub uses a bent axle, or damaged cup and cone. Replace the parts as needed for it to be adjusted correctly.
What's needed:
• Cone wrenches (13, 15, 17 and 19mm are all common sizes)
• Adjustable wrench (optional)
• Axle clamp (you'll also need a vice to use this)
• Magnet (optional)
• Clean rag
![Tech Tuesday]()
![Tech Tuesday]()
![Tech Tuesday]()
![Tech Tuesday]()
![Tech Tuesday]()
![Tech Tuesday]()
![Tech Tuesday]()
![Tech Tuesday]()
![Tech Tuesday]()
![Tech Tuesday]()
![Tech Tuesday]()
![Tech Tuesday]()
![Tech Tuesday]()
![Tech Tuesday]()
![Tech Tuesday]()
![Tech Tuesday]()
Do you have any pointers on how to adjust cup and cone hub bearings? Share them below!
Past Tech Tuesdays:
Tech Tuesday #1 - How to change a tube.
Tech Tuesday #2 - How to set up your SRAM rear derailleur
Tech Tuesday #3 - How to remove and install pedals
Tech Tuesday #4 - How To Bleed Your Avid Elixir Brakes
Tech Tuesday #5 - How To Check And Adjust Your Headset
Tech Tuesday #6 - How To Fix A Broken Chain
Tech Tuesday #7 - Tubeless Conversion
Tech Tuesday #8 - Chain Wear
Tech Tuesday #9 - SRAM Shift Cable Replacement
Tech Tuesday #10 - Removing And Installing a Headset
Tech Tuesday #11 - Chain Lube Explained
Tech Tuesday #12 - RockShox Totem and Lyric Mission Control Damper Mod
Tech Tuesday #13 - Shimano XT Crank and Bottom Bracket Installation
Tech Tuesday #14 - Straightening Your Derailleur Hanger
Tech Tuesday #15 - Setting Up Your Front Derailleur
Tech Tuesday #16 - Setting Up Your Cockpit
Tech Tuesday #17 - Suspension Basics
Tech Tuesday #18 - Adjusting The Fox DHX 5.0
Tech Tuesday #19 - Adjusting The RockShox BoXXer World Cup
Tech Tuesday #20 - Servicing Your Fox Float Shock
Tech Tuesday #21 - Wheel Truing Basics
Tech Tuesday #22 - Shimano Brake Pad Replacement
Tech Tuesday #23 - Shimano brake bleed
Tech Tuesday #24 - Fox Lower Leg Removal And Service
Tech Tuesday #25 - RockShox Motion Control Service
Tech Tuesday #26 - Avid BB7 Cable Disk Brake Setup
Tech Tuesday #27 - Manitou Dorado Fork Rebuild
Tech Tuesday #28 - Manitou Circus Fork Rebuild
Tech Tuesday #29 - MRP G2 SL Chain Guide Install
Tech Tuesday #30 - Cane Creek Angleset Installation
Tech Tuesday #31 - RockShox Maxle Lite DH
Tech Tuesday #32 - Find Your Tire Pressure Sweet Spot
Tech Tuesday #33 - Three Minute Bike Preflight Check
Tech Tuesday #34 - MRP XCG Install
Tech Tuesday #35 - Stem Choice and Cockpit Setup
Tech Tuesday #36 - Handlebars - How Wide Affects Your Ride
Tech Tuesday #37 - Repairing A Torn Tire
Tech Tuesday #38 - Coil spring swap
Tech Tuesday #39 - Trailside help: Broken Shift Cable
Tech Tuesday #40 - Installing a Fox Float Air-Volume Spacer
Tech Tuesday #41 - Replace the Seals on Your 2011 RockShox Boxxer World Cup Fork
Tech Tuesday #42 - Clean and Lubricate Your Fox F32 Dust Wiper Seals
Tech Tuesday #43 - Thread Locker Basics
Tech Tuesday #44 - Install a SRAM X.0 Two-By-Ten Crankset
Tech Tuesday #45 - VPP Suspension Bearing Service
Tech Tuesday #46 - Rotor Straightening
Tech Tuesday #47 - Finding and fixing that creak
Tech Tuesday #48 - Bleed and Service Magura Marta Disc Brakes
Tech Tuesday #49 - Cup and Cone Hub Basics
Tech Tuesday #50 - Install and Adjust Pedal Cleats
Visit Parktool.com to see their entire lineup of tools and lubes
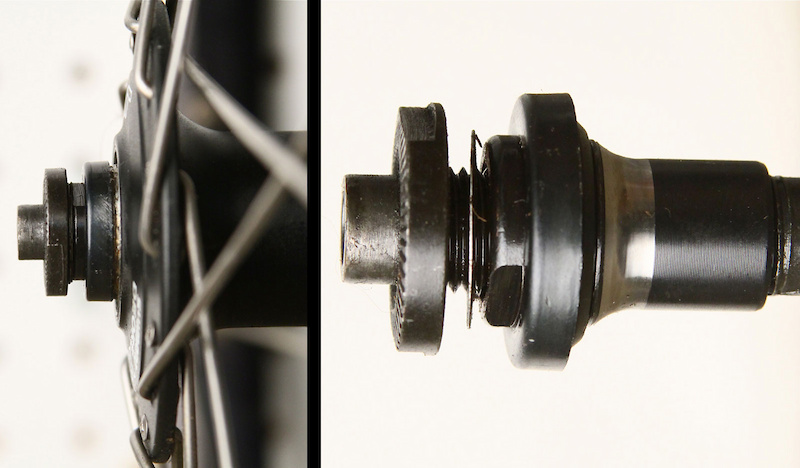
Cup and cone hub components (from left to right): locknut, thin washer, and the cone.
Some helpful pointers before you begin:
• While a crescent wrench can be used to loosen a locknut, you'll need a cone wrench to fit in-between the locknut and the cone's shoulder. Take your wheel down with you to your local shop and find the correct size to fit.
• 13, 15 and 17mm cone wrenches are commonly required for to work on a front hub, 17 and 19mm are usually needed for rear hubs.
• A thick, water resistant grease is best for use within hubs.
• Front hubs usually use ten 3/16" balls per side, rear hubs nine 1/4" balls per side. This isn't always the case though - count the number of balls per side before removing them.
• Ball bearings can be found at your local shop and are inexpensive. If you're going to take the time to rebuild your hub you should also replace the bearings.
• You are going to have many small parts on your workbench. Lay them out in order as you remove them from the hub.
• It is very important that the ends of the axle do not protrude out too far beyond the locknut. If this is the case the wheel will not be able to be tightened down in the frame or fork. The axle should never extend to the outer face of the dropouts. Axle protrusion should also be even on both sides.
• Your goal should be to adjust the hub so that it has the least amount of bearing tension without being loose. Hubs with damaged bearing surfaces may not spin smooth when setup correctly.
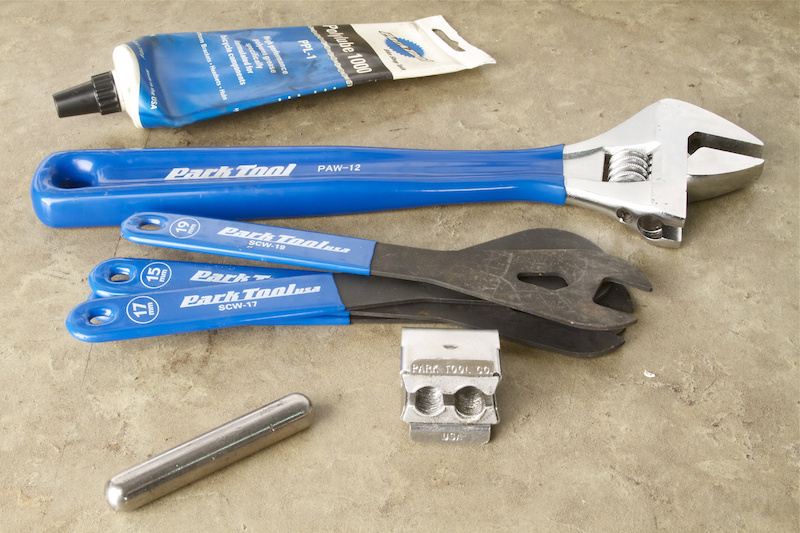
The proper sized cone wrenches and grease are mandatory for this job, but a magnet, crescent wrench and axle clamp can also be of use.
How tight is right? It is important to note that adjusting the hub bearings tighter than required will not in any way keep them from coming loose sooner, but will actually increase wear on all components. A loose ball hub that has been ridden with too much bearing tension will likely have damaged both the cone and cup, possibly requiring the hub to be replaced. The same will result from riding a hub that is too loose. So, how do you know when it is set correctly?
Ideally, a quick release hub should have a slight amount of knocking or looseness to it when it is not clamped in the frame or fork. This is because the hollow axle will flex a small amount when the quick release is clamped down properly, taking up that loose feeling. If a quick release hub has no play in it when it is out of the bike it is likely too tight. This does not apply to solid axles that use wheel nuts to hold them in place. That all gets thrown out the window if the hub uses a bent axle, or damaged cup and cone. Replace the parts as needed for it to be adjusted correctly.
What's needed:
• Cone wrenches (13, 15, 17 and 19mm are all common sizes)
• Adjustable wrench (optional)
• Axle clamp (you'll also need a vice to use this)
• Magnet (optional)
• Clean rag
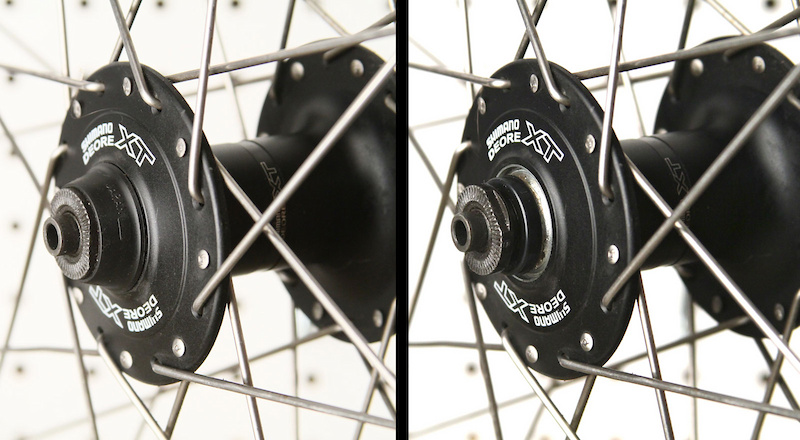
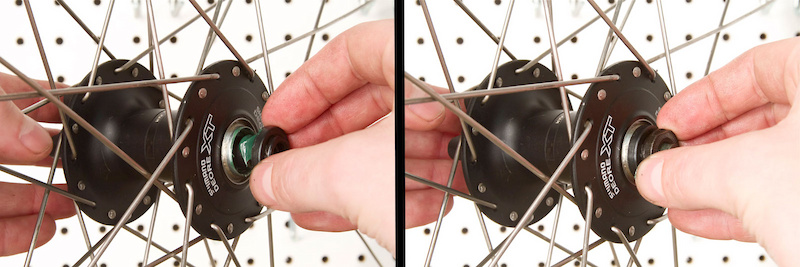
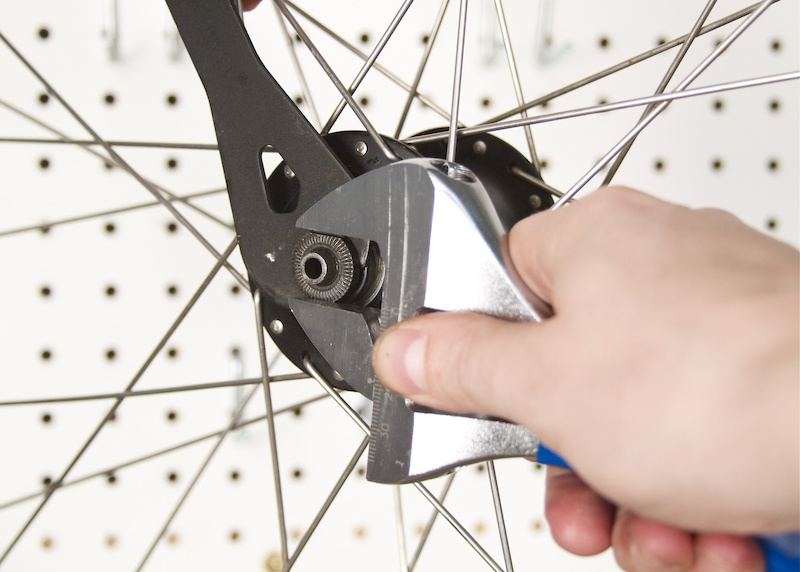
Step 1 - Remove the wheel from the bike and take out the quick release, being careful not to lose the centering springs on each side. Most loose ball hubs use a rubber dust shield that will need to be taken off in order to access the wrench flats. If you are working on a rear hub you'll also need to remove the cassette. Count the number of exposed threads on the end of the axle before continuing to the next step. If the axle uses unthreaded ends, like shown above, you can use a caliper to take a measurement.
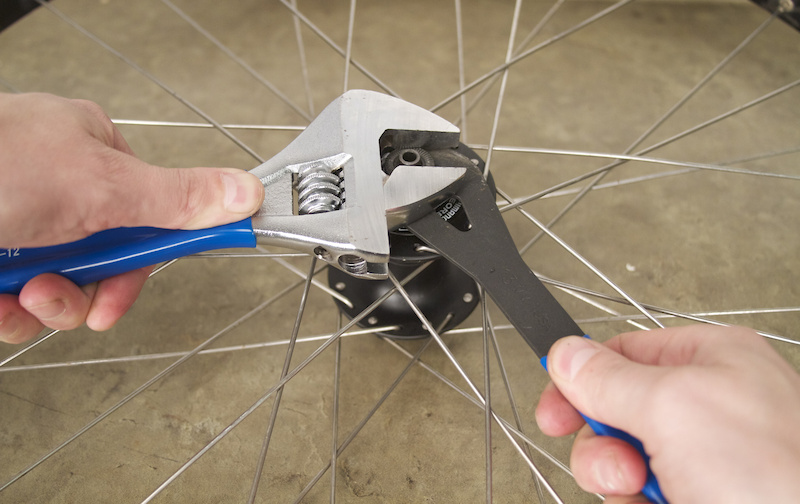
Step 2 - Always disassemble the disc side of rear hubs, and the non-disc side of front hubs. You now need to unlock the cones and remove them from one side of the hub. Do this by holding the cone with the correct size cone wrench while turning the locknut counter clockwise with either a cone wrench or a crescent wrench. You can also use an axle clamp (optional) to hold the axle in a vice while loosening the locknut.
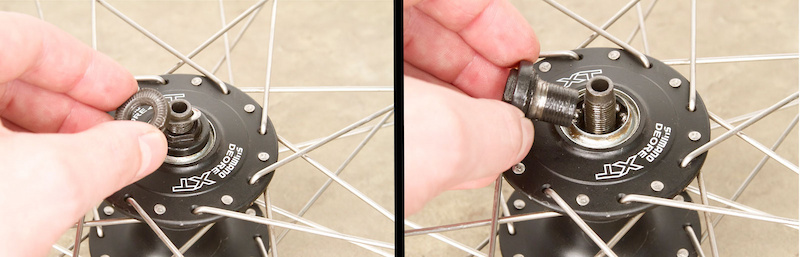
Step 3 - With the wheel face up on the countertop to prevent parts from falling out, unthread and remove the locknut, thin washer and cone from the axle. Put this in a safe place in the same order that they were removed in.
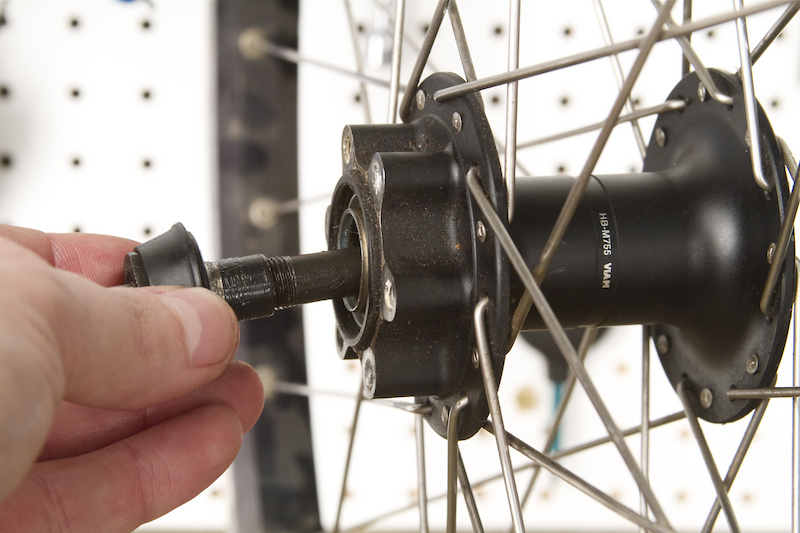
Step 4 - Remove the axle by pulling it out slowly from the opposite side, being careful not to lose any ball bearings as you do so. Always take note of which side of the hub you are removing the axle from to avoid confusion when reassembling.
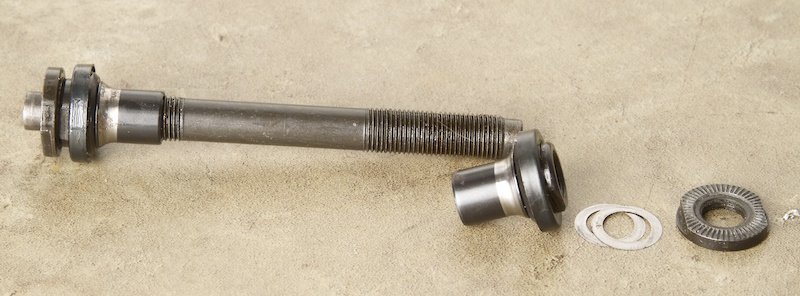
Step 5 - At this point you should have the cone, washer(s) and locknut removed, along with the axle itself. Some hubs will use one thicker washer between the cone and locknut, while others will use multiple thin washers. The washers not only allow the cone and locknut to be tightened against each other without coming loose, but are also vital for proper spacing. Always assemble the hub with the same washers, in the same order, as it was taken apart. Take a few minutes to give the axle and other parts a proper cleaning at this point.

Step 7 - Now is also a good time to be sure that the opposite side is tightened correctly. Hold the cone in place firmly with the cone wrench while checking the locknut with either a cone wrench or crescent wrench by turning it clockwise.
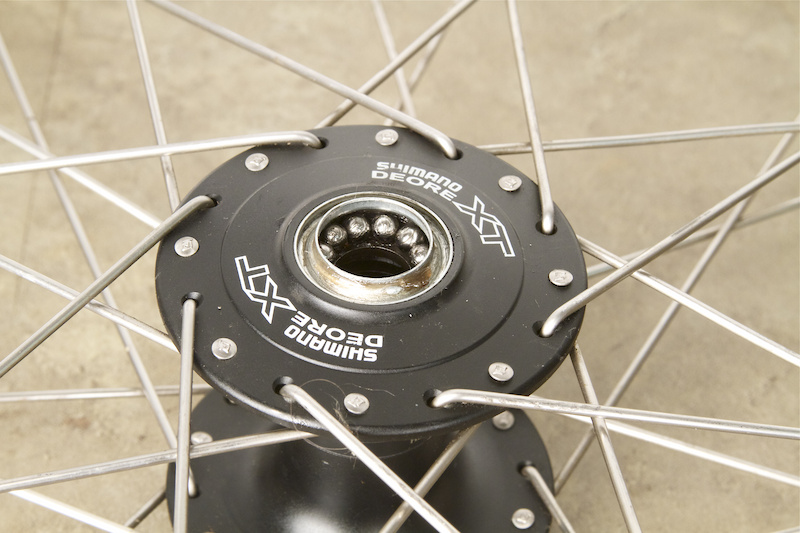
Step 8 - Count the number of ball bearings on each side before removing them. Front hubs usually use ten 3/16" balls per side, rear hubs nine 1/4" balls per side, although that isn't always the case.
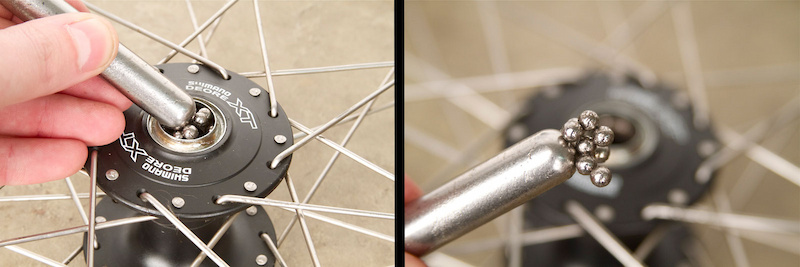
Step 9 - A magnet will make removing the bearings easy, but it isn't required. If you don't have a magnet on hand you can simply use the tip of a screw driver to dislodge the balls, or they will often fall out on their own. Double check the center bore of the hub to be sure that no stray bearings are hiding within. Many loose ball ball hubs will use metal dust caps that are pressed into place (the silver ring surrounding the bearings in the photo above) and not meant to be removed. While you can pop them out with a screwdriver, this will often damage them. You're far better off to leave them in place.
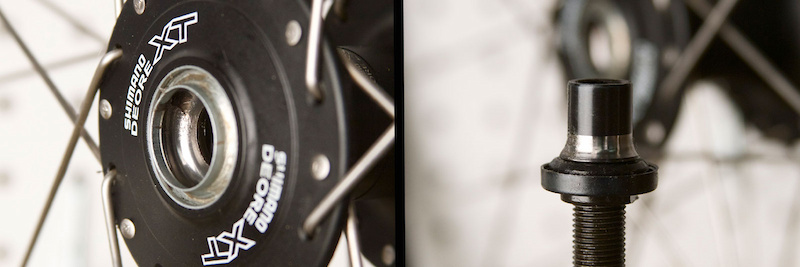
Step 10 - Your goal is to get all of the old grease, along with the grime and minute metal shavings that may be present in it, out of the hub's bearings surface. A rag wrapped around your finger will do the job, although you may find it easier to use a Q-Tip to reach in. Now is also the time to closely inspect the bearing surfaces on both the cup and the cone. They should be smooth and free of any pitting or uneven wear that will cause the hub to spin roughly. If you find damage on a cone you should take it to your local shop for them to match it up with a new one (there are many, many different sizes). Unfortunately, there isn't much to do about a damaged cup - these are pressed into the hub and not replaceable. A nice, thick grease can go a long way to hiding any imperfections, but a worn cup is often the death knell of a hub.
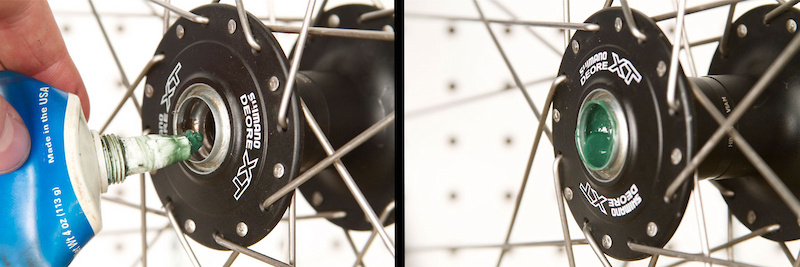
Step 11 - Grease is your friend. Lay a thick bead onto the bearing surface of the cup, making sure to have it completely cover its circumference. This will also help hold the balls in place. Install the ball bearings carefully in both sides, using the same amount on each side as when you took the hub apart.
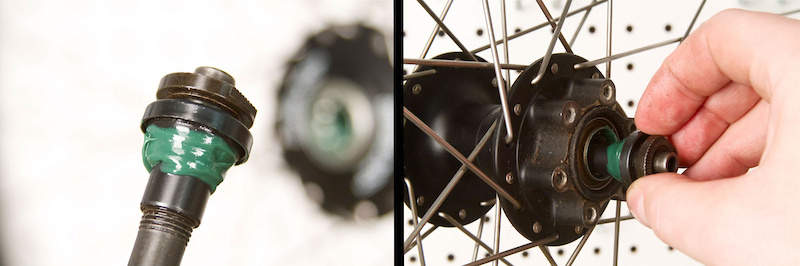
Step 12 - Once the bearings are in place it's time to reinstall the axle. Before doing so, apply a bead of grease to the bearing surface on the cone. Take note of which side you are putting the axle in from, as it needs to be on the same side as you removed it. For front hubs you should be inserting in from the non-disc side, rear hubs from the drive side. Be careful not to knock any ball bearings free.
Step 13 - Reinstall the cone after giving the bearing surface a smear of grease, followed by the correct washer(s) and the locknut. Turn the cone clockwise until it comes into contact with the bearings and then back it off one quarter of a turn.
Step 14 - Use the cone wrench to hold the cone in place while you tighten down the locknut onto it with another wrench. The hub will likely require further adjustment, but it is important to keep in mind that quick release hub bearing adjustment may feel slightly loose when the wheel is not clamped into place, but then be free of any play once installed. This is because a hollow quick release axle flexes slightly as it is tightened down.
Turn the quick release hub's axle with your fingers - it should spin smoothly, but have a slight about of play. Install it in the frame or fork and feel for play by holding the top of the wheel and rocking it back it fork. If there is no play, and the wheel turns smoothly, you are done. If not, continue with the steps below.
Turn the quick release hub's axle with your fingers - it should spin smoothly, but have a slight about of play. Install it in the frame or fork and feel for play by holding the top of the wheel and rocking it back it fork. If there is no play, and the wheel turns smoothly, you are done. If not, continue with the steps below.
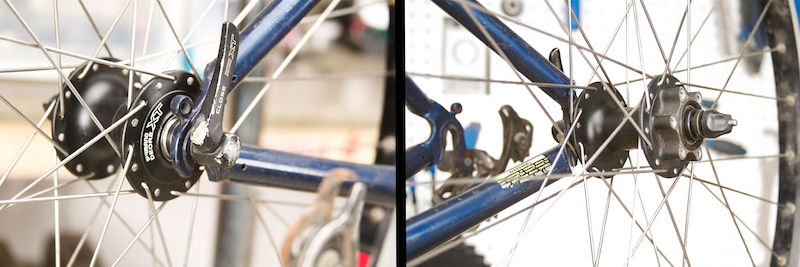
Step 15 - Remove the hub's rubber dust covers and quick release springs (so that the QR nut makes contact only with the outer hub's locknut) and clamp the wheel to the outside of the bike's rear tringle, with the side you are adjusting facing out. Quick release clamping force should be roughly the same as when the wheel is installed on the bike to be ridden.

Step 16 - Place one hand over the out facing cone and locknut, and the other out at the rim. Gently rock the rim back and forth while feeling for play at the hub with your other hand. If any knocking is felt you'll have to snug the hub's bearing adjustment up slightly.

Step 18 - Hold the cone in place carefully with one wrench while using another to loosen the locknut by turning it counter clockwise. Once the locknut is loose, turn the wrench holding the cone clockwise by about ten degrees. Hold the cone in place while you retighten the locknut down onto it. Recheck for any free play by redoing step 16, and if any is felt repeat this process until it is gone. Take your time and make small adjustments at each go - it will likely take you at least a few tries to get it perfect.
The final test is to open the quick release lever slightly (so that it rests at 45 degrees, but still holds the wheel in the dropout) and feel for knocking in the hub. There should be a slight amount, but it should disappear once the QR lever is retightened.
Count the number of protruding axle threads on each side, making sure that they match up to before you took the hub apart and are even on each side. Wipe away any excess grease.
Past Tech Tuesdays:
Tech Tuesday #1 - How to change a tube.
Tech Tuesday #2 - How to set up your SRAM rear derailleur
Tech Tuesday #3 - How to remove and install pedals
Tech Tuesday #4 - How To Bleed Your Avid Elixir Brakes
Tech Tuesday #5 - How To Check And Adjust Your Headset
Tech Tuesday #6 - How To Fix A Broken Chain
Tech Tuesday #7 - Tubeless Conversion
Tech Tuesday #8 - Chain Wear
Tech Tuesday #9 - SRAM Shift Cable Replacement
Tech Tuesday #10 - Removing And Installing a Headset
Tech Tuesday #11 - Chain Lube Explained
Tech Tuesday #12 - RockShox Totem and Lyric Mission Control Damper Mod
Tech Tuesday #13 - Shimano XT Crank and Bottom Bracket Installation
Tech Tuesday #14 - Straightening Your Derailleur Hanger
Tech Tuesday #15 - Setting Up Your Front Derailleur
Tech Tuesday #16 - Setting Up Your Cockpit
Tech Tuesday #17 - Suspension Basics
Tech Tuesday #18 - Adjusting The Fox DHX 5.0
Tech Tuesday #19 - Adjusting The RockShox BoXXer World Cup
Tech Tuesday #20 - Servicing Your Fox Float Shock
Tech Tuesday #21 - Wheel Truing Basics
Tech Tuesday #22 - Shimano Brake Pad Replacement
Tech Tuesday #23 - Shimano brake bleed
Tech Tuesday #24 - Fox Lower Leg Removal And Service
Tech Tuesday #25 - RockShox Motion Control Service
Tech Tuesday #26 - Avid BB7 Cable Disk Brake Setup
Tech Tuesday #27 - Manitou Dorado Fork Rebuild
Tech Tuesday #28 - Manitou Circus Fork Rebuild
Tech Tuesday #29 - MRP G2 SL Chain Guide Install
Tech Tuesday #30 - Cane Creek Angleset Installation
Tech Tuesday #31 - RockShox Maxle Lite DH
Tech Tuesday #32 - Find Your Tire Pressure Sweet Spot
Tech Tuesday #33 - Three Minute Bike Preflight Check
Tech Tuesday #34 - MRP XCG Install
Tech Tuesday #35 - Stem Choice and Cockpit Setup
Tech Tuesday #36 - Handlebars - How Wide Affects Your Ride
Tech Tuesday #37 - Repairing A Torn Tire
Tech Tuesday #38 - Coil spring swap
Tech Tuesday #39 - Trailside help: Broken Shift Cable
Tech Tuesday #40 - Installing a Fox Float Air-Volume Spacer
Tech Tuesday #41 - Replace the Seals on Your 2011 RockShox Boxxer World Cup Fork
Tech Tuesday #42 - Clean and Lubricate Your Fox F32 Dust Wiper Seals
Tech Tuesday #43 - Thread Locker Basics
Tech Tuesday #44 - Install a SRAM X.0 Two-By-Ten Crankset
Tech Tuesday #45 - VPP Suspension Bearing Service
Tech Tuesday #46 - Rotor Straightening
Tech Tuesday #47 - Finding and fixing that creak
Tech Tuesday #48 - Bleed and Service Magura Marta Disc Brakes
Tech Tuesday #49 - Cup and Cone Hub Basics
Tech Tuesday #50 - Install and Adjust Pedal Cleats
Visit Parktool.com to see their entire lineup of tools and lubes
Author Info:

 Member since Oct 18, 2005
Must Read This Week
[UPDATED] Final Elite XC Results & Overall Standings from the Mairiporã XC World Cup 2024
42172 views
42172 views
Sign Up for the Pinkbike Newsletter - All the Biggest, Most Interesting Stories in your Inbox
PB Newsletter Signup
Step 13 Re-insert bearings that dropped into the centre of the hub when you turned around to grab the axle
Step 14 Be careful not to knock any bearings free
Step 15 Why is did the axle push a bearing out the opposite end?
Step 16 Remove axle and replace bearing.
Step 17 Be careful not to knock any bearings free.
Step 18 Pick up bearing that dropped onto the floor. Wipe off dust and dirt that stuck to the grease. Clean bearing and replace.
Step 19 Be careful not to knock any bearings free...
The videos will return in the future for certain repairs.
1. when you've got the hub re-assembled ( and before you tighten the lock-nut ), hold the wheel out in front of you and give it a gentle spin while holding the axle in your hands. You'll be able to feel the hub as it spins. If it feels silky smooth, with no slop, then you've got the cones tight enough... but if you can feel small lumps ( you'll feel each ball bearing as it rolls ) as the hub spins, then you've got the cone too tight, so back it off a tiny bit at a time until that lump feeling goes away.
2. when tightening the lock nut, I've found that if you over tighten the cone just a tad, then once you tighten the outer lock nut, you'll have the correct tightness on the cone... I've found that when you tighten the outer lock nut, the cone will tend to twist a bit as well, resulting in a loose, sloppy feeling cone. By giving the cone just a titch ( 1/16 extra turn ) more tightening before tightening the outer lock ring, it will loosen just enough to nestle in that perfect spot you want.
I've done this tons of times, and have gotten perfect rolling, silky smooth hubs every time... I've even fooled mechanics, as they thought that I had tossed the used hubs I purcahsed from them and replaced them with brand new ones.
Unfortunately, I'm stuck with v-brakes. For the front hub, would the non-disc side be the right/drive side? My hubs are in great need of service!
135mm hub spacing with 145mm axle.
(145-135)/2 = 5mm of protuding axle.
I know it sounds obvious but in my early days I spent ages trying to centre the nuts/cones etc on an axle.
In case you drop one you wont have to chase it around the floor!
/backhanded compliments >
But really. Much obliged.
My concern; Will I cause any damage by having a littl more thread on one side as opposed to the other?? any help would be great
danielprimed.com/wp-content/uploads/2008/04/bic-cristal-pen-lid.jpg
on the other hand, i believe they are perfectly suited for roadies and that's where they belong along with qr.
Saying that, perhaps showing Shimano and Mavic and Hope would do most readers.
bikedownhail: I had same issue on deore hub on my old commuter, I used pretty normal degreaser and a tooth brush. I used the hard plastic side for the most stubborn part. Degreasing is good to do on anything you are "regreasing".
1. Remove wheel
2. Remove cup/cone hub from wheel
3. Sell cup/cone hub
4. Buy sealed bearing hub
5. Install new sealed bearing hub
6. Service complete
Also, Lind, I doubt you have ever owned or seen Phil Wood or Crupi hubs before. They roll better than any unsealed hub bar none.
Racing wise IMO is the place where you DO want sealed bearings.
So much nonsense on here about how good cup and cone hubs are.
Rubbish - THEY ARE TOSS.
There's no way round it
I'm not hating on unsealed bearings, I just think overall sealed bearings are better, and much less of a PITA. Shoot, my hadley and edco bearings have 8 years on them and they are mint. Just service them like normal. Like someone else mentioned, you don't even have to pull the bearings on some hubs to remove.
And lulz on the comment about 200$'s. You can get phil wood bearings for less than a hundred, and those are some of the best, if not the best bearings in the industry.
To each and their own also. Sealed or unsealed, some like, some dislike. This was never about me ranting about unsealed hubs, it was in response to some horrid information someone posted up gawking about the crappiness of sealed hubs.
Any sealed bearing I've used has never had to be replaced, even in my 3 year old rear hub.
I've had Phil Wood bearings in my T.Mag linkage for over 6 years of insane beat downs (and about 40 miles a week of riding). I've also had phil wood bearings in my BMX bike that was raced 5-7 races a week for over 10 years with NO rebuild.
If your blowing phil wood bearings a couple times a season you need to quit riding bikes, or working on them. One or the other. Or, just stop buying shitty ass base parts.
I don't think any 17 year old has enough time in DH, let alone on bikes to say that certain components blow every few seasons, when there are hundreds, if not thousands of us on pinkbike who are much older that think, and know otherwise from experience.
To Add... just saw this... www.pinkbike.com/photo/3853605 No wonder cedrico is going through bearings multiple times a season... he can't even ride a bike on a "pump track" without taco-ing his wheels. In your case cedrico, you just need to learn how to ride a bike... and not kill the bike. So, troll comment from you 100%.
Many people don't realize that Phil Wood was the creator of the sealed bearing hubs for bikes, and basically the oldest and longest fully active company dealing with sealed bearings, and one of the oldest US based bike companies ever. Phil wood started in 1926, and in 1971 came out with the very first sealed bearing hubs, and also sealed bottom brackets. IE, with a company being the industry standard for sealed bearings, you think almost everyone would know P/W bearings are pretty much as good as it gets in terms of strength, reliability, and pretty much 0 work to maintain them.
I'm trying to understand why sealed bearings are so unpopular and there has to be a better reason than the fact that people are afraid of it because it's different...