Technical Tuesday: SRAM Shifter Cable Replacement
Today's Tech Tuesday will show you how to quickly and easily change the shift cable on your SRAM shifter. Inside you'll find both step by step instructions and a great How-To video to guide you through the process.
Read on...If your rear shifting is off, there is a good chance that the shift cable itself is the culprit. The steel wire that moves your rear derailleur up and down your cassette can be the weak link in an otherwise dialed system. Your shift cable is susceptible to contaminants like moisture and dirt that can quickly render it useless. It doesn't take much to send the performance South, and once that happens a can of spray lube can only help so much. The bad news is that replacing the cable is the only solution a lot of the time, but the good news is that a new cable is relatively cheap and installing it should only take a few minutes.
Learn how to quickly change the cable in your SRAM shifter:
Step by step instructions
Tools needed: 5 mm allen key or folding allen key set, cable cutters
The instructions below guide you through replacing a shift cable on your rear SRAM shifter. The same basic steps apply to the front shifter as well, with only a few differences. When changing the cable on a front shifter, you'll want to shift to the smallest chainring/easiest gear before undoing the cable anchor bolt. Also, the internals of the front shifter are visually different to the rear unit. Take note of the path that the cable takes before removing it.
This Tech Tuesday does not cover making shift adjustments that you'll most likely have to perform soon after installing a new cable. To find out how to dial in your shifting have a look at a previous Technical Tuesday that will guide you though this setup.
![photo]()
![photo]()
![photo]()
![photo]()
![photo]()
![photo]()
![photo]()
![photo]()
![photo]()
![photo]()
![photo]()
![photo]()
Past Tech Tuesdays:
Technical Tuesday #1 - How to change a tube.
Technical Tuesday #2 - How to set up your SRAM rear derailleur
Technical Tuesday #3 - How to remove and install pedals
Technical Tuesday #4 - How To Bleed Your Avid Elixir Brakes
Technical Tuesday #5 - How To Check And Adjust Your Headset
Technical Tuesday #6 - How To Fix A Broken Chain
Technical Tuesday #7 - Tubeless Conversion
Technical Tuesday #8 - Chain Wear
Have you found this tutorial helpful? Share any of your hints or tips below!
Visit Parktool.com to see their entire lineup of tools.
Read on...If your rear shifting is off, there is a good chance that the shift cable itself is the culprit. The steel wire that moves your rear derailleur up and down your cassette can be the weak link in an otherwise dialed system. Your shift cable is susceptible to contaminants like moisture and dirt that can quickly render it useless. It doesn't take much to send the performance South, and once that happens a can of spray lube can only help so much. The bad news is that replacing the cable is the only solution a lot of the time, but the good news is that a new cable is relatively cheap and installing it should only take a few minutes.

Step by step instructions
Tools needed: 5 mm allen key or folding allen key set, cable cutters
The instructions below guide you through replacing a shift cable on your rear SRAM shifter. The same basic steps apply to the front shifter as well, with only a few differences. When changing the cable on a front shifter, you'll want to shift to the smallest chainring/easiest gear before undoing the cable anchor bolt. Also, the internals of the front shifter are visually different to the rear unit. Take note of the path that the cable takes before removing it.
This Tech Tuesday does not cover making shift adjustments that you'll most likely have to perform soon after installing a new cable. To find out how to dial in your shifting have a look at a previous Technical Tuesday that will guide you though this setup.
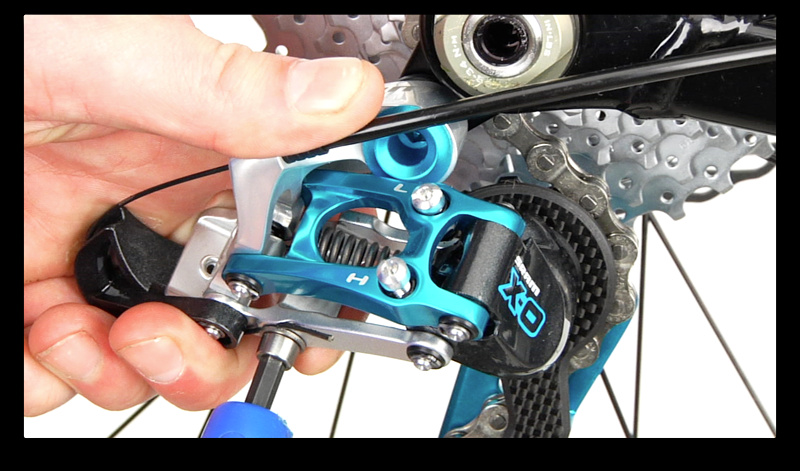
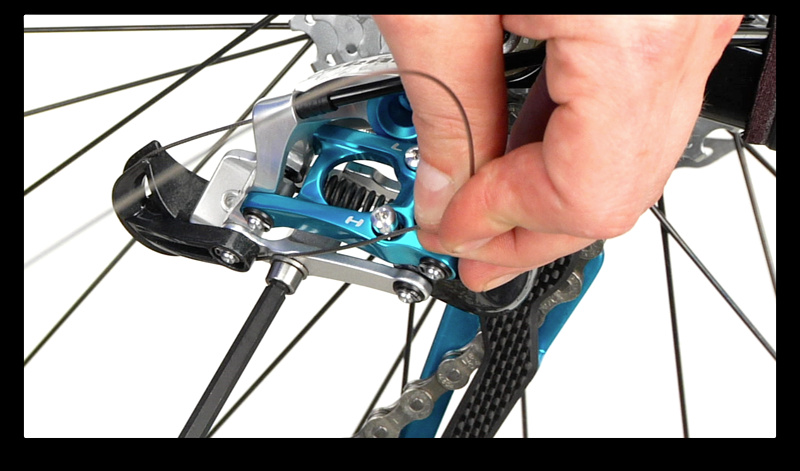
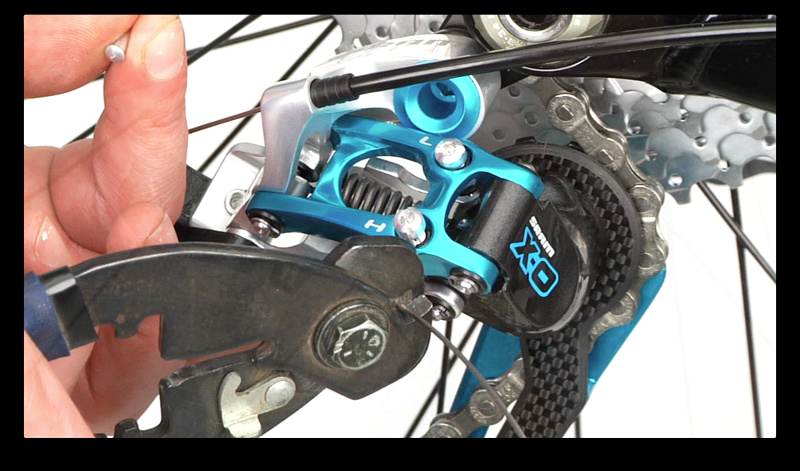
Step 1. Shift your rear derailleur to the smallest cog/hardest gear. Trim the old cable end off and use a 5 mm allen key to loosen the cable anchor bolt. Take note of where the cable is clamped (above or below the bolt) as this can greatly effect the shifting

Step 2. Using a 5 mm allen key, remove the SRAM shifter from its perch to allow you to access the silver dial that holds the cover on

Step 3. Turn the dial counterclockwise to remove it, be sure to put it somewhere safe where it won't roll away. You can now remove the shift cover to access the shift cable within the shifter
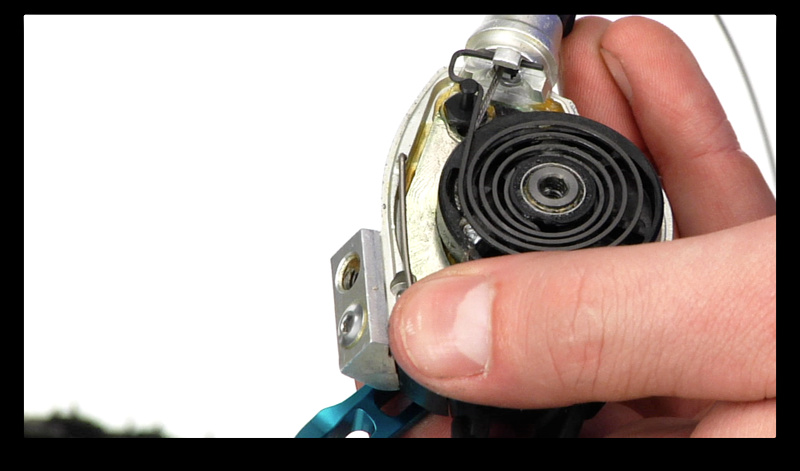
Step 4. With the cover off you should be able to spot the end of the cable just underneath the large spring. Take note of where it sits and the path that it takes to exit the shifter. You should be able to dislodge the head of the cable by gently pushing the cable into the shifter through the barrel adjuster. Completely remove it from the shifter.
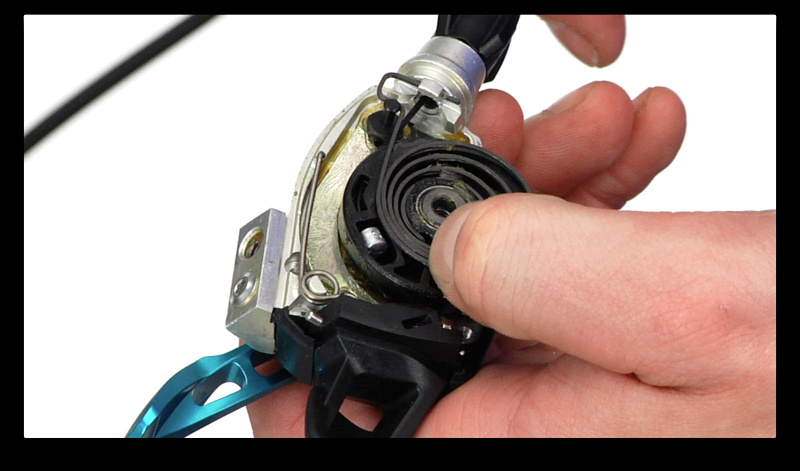
Step 5. You may have to gently pull aside the large spring to allow the cable end to exit the shifter. It only needs a few mm's of extra clearance. You might have to do the same thing when installing the new cable
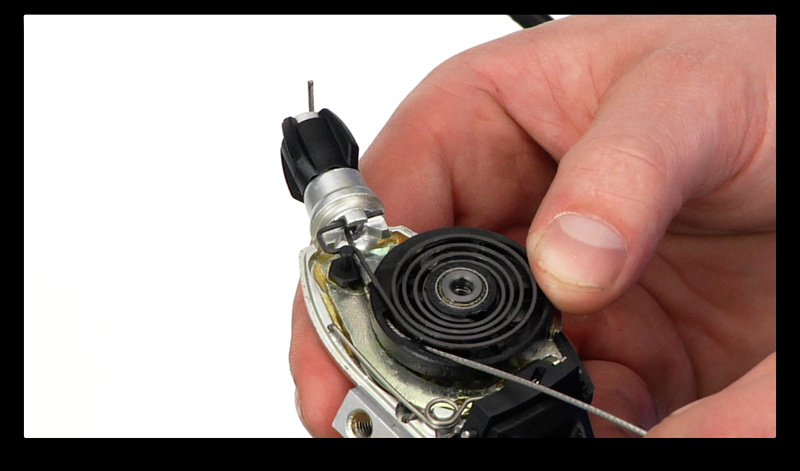
Step 6. Now it's time to install your new cable. Thread it in using the same path as the old cable. If you are having trouble lining up the cable to feed it though, you can use pointy spoke or even the end of a pen to help guide it through. Be sure that the cable end is fully seated in its home position

Step 7. Reinstall the shift cover and lightly snug down the silver dial by turning it clockwise.

Step 8. Reinstall the shifter onto its perch before feeding the new cable though the housing

Step 9. Gently push the new cable though the housing until it exits at the derailleur. If the new cable doesn't slide smoothly though the housing, you may need to replace some or all of it. We'll cover this job in an upcoming Tech Tuesday
Step 10. With the derailleur still inline with the smallest cog (hardest gear), guide the cable though the correct path and tighten the anchor bolt as you pull the new cable snug
Step 11. Use your cable cutters to trim the new cable, leaving about an inch of extra cable. Crimp on your new cable end

Check your shifting before you hit the trails and make any adjustments as needed. Remember that shifting performance on the rack can vary greatly from actually test riding the bike
Past Tech Tuesdays:
Technical Tuesday #1 - How to change a tube.
Technical Tuesday #2 - How to set up your SRAM rear derailleur
Technical Tuesday #3 - How to remove and install pedals
Technical Tuesday #4 - How To Bleed Your Avid Elixir Brakes
Technical Tuesday #5 - How To Check And Adjust Your Headset
Technical Tuesday #6 - How To Fix A Broken Chain
Technical Tuesday #7 - Tubeless Conversion
Technical Tuesday #8 - Chain Wear
Have you found this tutorial helpful? Share any of your hints or tips below!
Visit Parktool.com to see their entire lineup of tools.
Author Info:

 Member since Oct 18, 2005
Must Read This Week
Sign Up for the Pinkbike Newsletter - All the Biggest, Most Interesting Stories in your Inbox
PB Newsletter Signup
But with shimano having a great big hole to change the cable this does let a load crap in to the shifter and screwing it up!!!
BUT what would your prefer?? easy cable change but rubbish shifting or britiant shifting with a little bit of hassel changing the cable once in a blue moon??
LMFAO
Have you ever notice how there is always a slack in you shimano trigger??? During the first par of the travel nothing happen and only then the shifter engage and start pulling the cable. And with a shimano shifter you can change 3 or 4 speed at most in one push... With a SRAM X9 or X0 there is zero slack in the trigger. As soon as the trigger start moving the shifter start pulling cable and you can change 5 speed in one push...
If you want a smooth trigger feeling and be able to change the cable in a sec, go for shimano i don't blame you, but don't say that SRAM is a big bunch of crap.
I am a bike mechanic and a rider and i ride SRAM and i think that SRAM is the best.
at the end of the day no one will ever finish this debate, they both work fine with proper adjustment so each to their own!
What the photos don't show is that you need to make sure you hang on to the shifter tightly and not allow the other side of the shifter to get loose. If the actual shifter lever comes out, even slightly, or un-wound you are in for a fun time getting the shifter back to working order. So, when you take off the carbon cover, just make sure you push-in on the bolt/shifter lever on the other side of the carbon cover.
I spent about 4 hours fixing both of my XO shifters, not knowing these things would just spring apart, if you didn't hang on to them.
I would also suggest adding some quality grease inside, to keep things shifting/working well, there are also small cartridge bearings on both sides of the shifter.
they give you common sense "tips". c'mon, give us something worthwhile.