Tech Tuesday: Volume Spacers and Spring Curves
It's been ten years since the last Tech Tuesday article, so it's probably time to get this educational series rolling again. All of the previous articles can be accessed here, and it's worth taking a few minutes out of your day to watch 16-year-old Mike Levy explain how to fix a flat. —Kaz
![photo]()
Words: Samuel McMain
Photos: Ryan Palmer
How to fine-tune your ride.
Dialing in your suspension is a time-consuming task. We get it and we’ve all been there too. Setting your sag is one thing (that we covered here), but diving even deeper to optimize your spring curve is a task that involves more than just a shock pump, a measuring tape and a wall to lean on. But as with most things suspension-related, an increase in investment correlates strongly with an increase in performance and comfort on the trail. The purpose of this edition of Tech Tuesday is to demystify the use and principles of volume spacers and arm you with the know-how to continue down the path fine-tuning your ride.
Speak the language:
Air chamber – Your suspension’s spring, this is a chamber filled with pressurized air that is compressed as your suspension moves through its travel
Air volume – The size (volume) of your air chamber
Spring rate – How much force is required to compress your air spring (air chamber)
Spring curve – A representation of how your spring rate changes throughout suspension travel
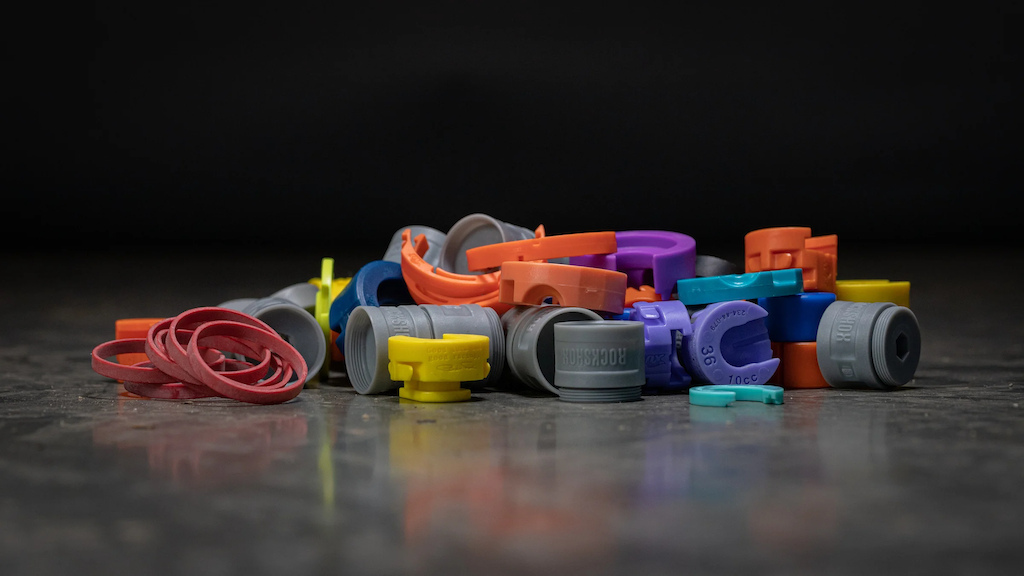
Volume spacer – An object that can be added or removed from your suspension’s air chamber to increase or decrease the air volume
Bottom-out – To fully use your suspension’s travel
Bottom-out resistance – How hard it is to achieve bottom-out
Mid-stroke – The middle part of the suspension travel
Supportive – A characteristic feeling of a suspension setup that resists moving too easily into travel
Progressive – A spring curve that increases in spring rate through travel
Linear – A spring curve that keeps a constant spring rate through travel
![photo]()
What the heck is a spring curve and why is it important?
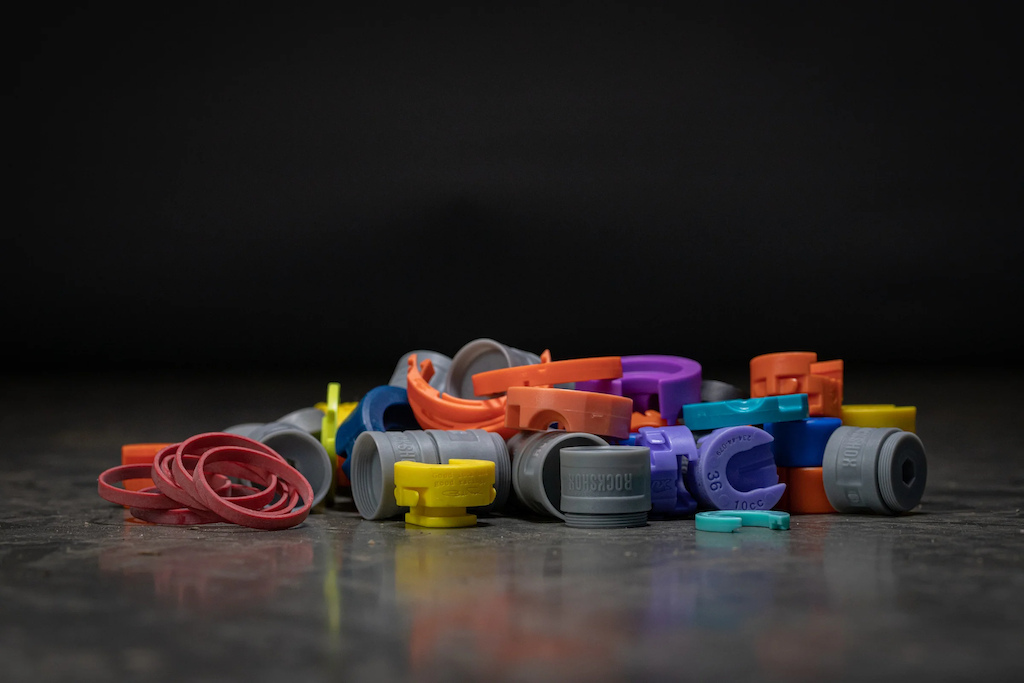
Before we can start shoving those colorful little volume spacers in our forks and shocks, it’s important to understand why we would even want to do such a thing in the first place. In fact, by the end of this post, some of you might actually want to remove some spacers. Intrigued? Read on.
To start with, your spring curve is a representation of how your spring rate changes as your suspension moves through its travel. With a coil spring, the spring rate remains unchanged throughout the travel, while air springs are always progressive. As you move through travel in an air spring (be it in an air fork or air shock), the air chamber (volume) shrinks while the amount of air in that chamber stays constant—in other words, the air is forced to compress and increase in pressure. The more air is compressed, the more force it takes to compress it further. This principle is why air springs work as well, springs.
When we talk about air suspension being progressive, we mean that the spring curve of an air spring increases in rate the farther you move into travel. The last centimeter of travel is harder to move through than the first centimeter.
So, how can we use the progressive nature of air springs to our advantage on the trail?
![photo]()
The basics of using progression
Hold on to your butts; this is going to be a quick and dirty explanation. In a few words, if you’re bottoming out frequently, but your sag is correctly set, add a volume spacer to reduce air chamber volume and increase the rate of progression in your suspension. Reducing volume makes your suspension firmer sooner in the travel, increasing the spring rate in the mid and end-stroke.
On the other hand, if your sag is set correctly and you can’t seem to use your travel fully, removing a spacer and increasing air chamber volume makes the middle and end of suspension travel softer and easier to move through. This would be changing your spring curve to be more linear instead of progressive.
Sound simple? Well, there are some caveats to it all (that we can harness for performance profit!)
![photo]()
![photo]()
Air chamber volume and its effects on spring curve
Before we really start to unpack this, we need to talk about the part of the spring curve that an air chamber’s volume affects. Because in the real world, changing air chamber volume only affects part of your spring curve—the mid-stroke and end-stroke.
The initial part of travel, say, roughly the first 35%, is only affected by the air pressure. See also, sag. This is slightly a simplification of the actual physics of it all, but for our purposes let’s say that the first part of your suspension travel is only affected by the PSI reading on your shock pump.
But that leaves the majority of your suspension up in the air (pun intended) to be modified by adjusting volume. Here are the basics:
Reduce volume by adding spacers: slightly increase spring rate in the mid-stroke, greatly increase spring rate in the end-stroke.
Increase volume by removing spacers: slightly decrease spring rate in the mid-stroke, greatly decrease spring rate in the end-stroke.
Take a minute to think about the implications here; these basic statements aren’t as basic as they may seem. Here are some quick tips you can apply to your suspension tuning:
Add volume spacers to reduce the frequency of bottom-outs
Remove volume spacers to make it easier to use your full travel
Add volume spacers and decrease air pressure to make your suspension more supple while maintaining bottom-out resistance
Remove volume spacers and increase air pressure to make your suspension more supportive initially while maintaining bottom-out resistance
Hold up, where did those last two options come from?
![photo]()
![photo]()
Adjusting air pressure when adding/removing volume spacers
Yeah, this is totally a thing you can do. Adjusting air pressure while also changing air chamber volume allows you to fine-tune the two extreme ends of the spring curve independently of each other. You might think of it this way, adjust your air pressure to adjust how you want the initial part of your travel to feel, then add or remove volume spacers to achieve the desired bottom-out resistance.
What about mid-stroke support? People are always talking about mid-stroke support these days. Well, in short, you can’t have your cake and eat it too—usually. It’s very difficult to achieve exactly the amount of mid-stroke support you want while also dialing in the initial and end-strokes. Want more mid-stroke support? You can either bump up pressure or decrease volume (both of which affect one end of the spring curve as well as the mid-stroke).
There are ways to get around this, but they have to do with how your particular fork or shock was designed and often involve the size of your negative air chamber. For example, Rock Shox’s MegNeg air can for the SuperDeluxe rear shock increases the negative air chamber volume, which increases mid-stroke support by offsetting positive air chamber forces farther into the initial part of the travel, allowing you to run a higher positive pressure. There’s more going on there, but that’s for a future post.
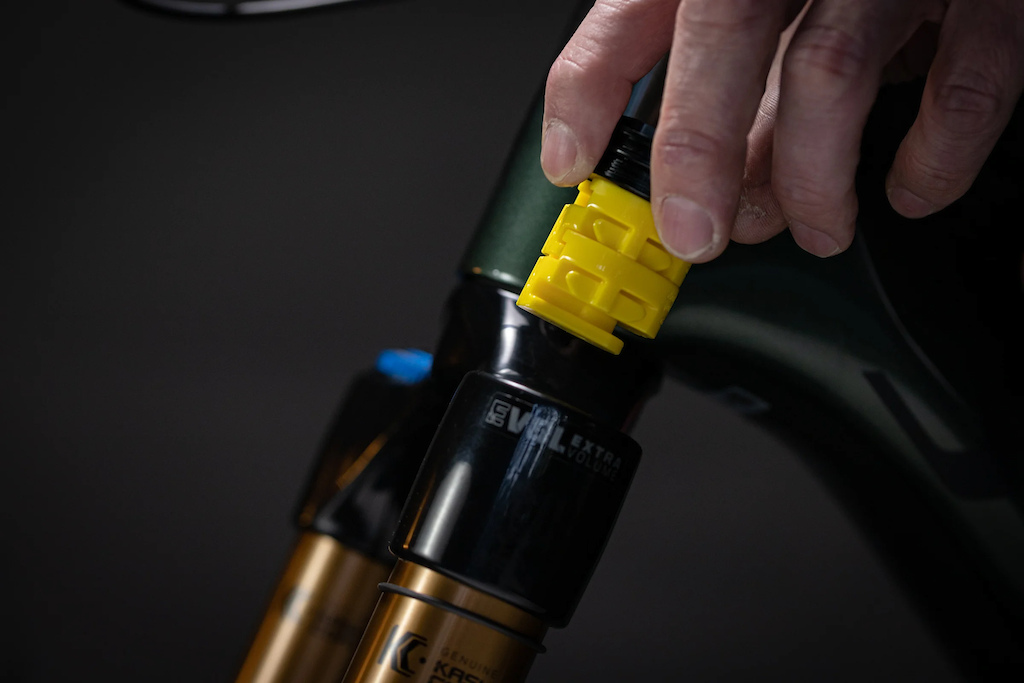
Adding/removing volume spacers on your fork/shock
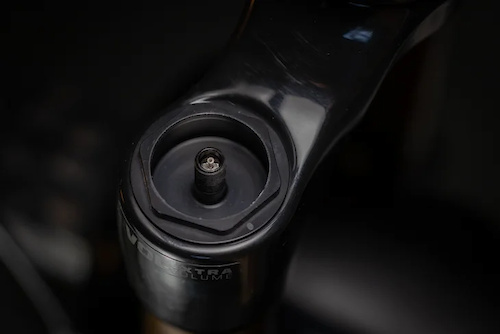
For the most common forks and shock out there, Fox and RockShox, the process of adding or removing volume spacers is pretty straightforward. Each company uses plastic “pucks” for their forks that are attached to the bottom of the top cap of the fork’s air chamber. Rear shocks will differ slightly, but most use a similar plastic puck that slots upside the air chamber of the shock near the top of the shock or clips around the air can.
The procedure for adjusting volume spaces in suspension can be broken down into a few key steps, which we’ll outline below. However, note that there may be significant differences between various shocks and forks, so be sure to check your user manual for specific instructions. Some brands, like Cane Creek, DVO and Ohlins, don’t actually use plastic pucks in their forks and adjust air chamber volume differently, and the process for doing such on those suspension designs isn’t going to look like what we outline here. Again, check your user manual.
![photo]()
![photo]()
Step 1: Note your air pressure! Before you do anything to your suspension, make sure you know what pressure (and the rest of your settings) you are running. This doesn’t mean just sticking a shock pump on, as the increase in air volume from the hose of the shock pump will actually slightly decrease the pressure of your air chamber. This is especially important in air shocks with small air chambers running high pressures—for example, connecting a shock pump to a DVO Topaz T3 caused the pressure to drop from 114psi to 109psi. Take your reading after filling your suspension, and write it down somewhere for future reference.
Step 2: Depressurize your system! This is a HUGE safety step. Never, ever attempt to disassemble your suspension with it pressurized. I’ve seen top caps go through ceiling tiles and riders go to the ER with oil sprayed at high pressure into their eyes. Seriously, make sure there is no air in the fork.
To do this, use your shock pump’s air release valve to let the air out of your suspension. Remember that there’s a pressurized negative chamber as well, and you’ll need to cycle your suspension while slowly releasing pressure to equalize both chambers for depressurization. On a rear shock where you will be removing the whole air can, a pressurized negative chamber will make it very difficult (and possibly dangerous) to actually remove the air can.
Step 3: Remove the top cap or air can. On most forks, you’ll need a dedicated non-chamfered socket to remove the top cap. Do not use a standard chamfered socket as you’ll round the flats of the top cap. A top cap-specific, champferless socket is the best tool for the job, but a pair of Knipex pliers work well too. Crescent wrenches should be avoided, but can be used in a pinch. Remember, that top cap is made of soft aluminum and easily damaged. Some forks, like Rock Shox and Ohlins forks, actually use a standard cassette tool to remove the top cap.
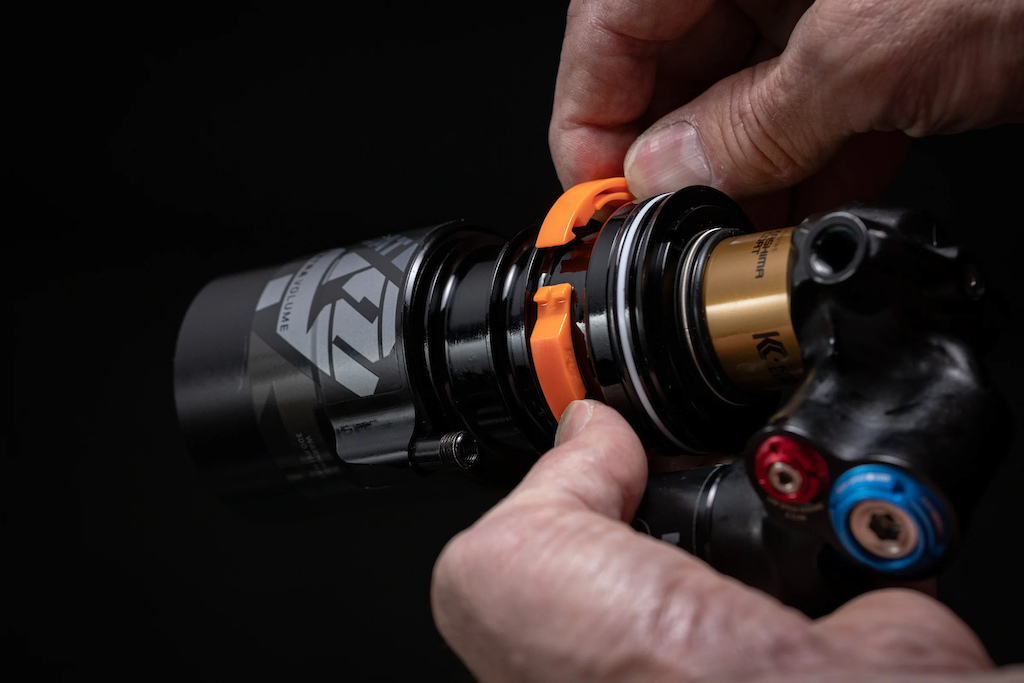
For rear shocks, assuming you’ve fully depressurized the system, most air cans will unscrew (lefty loosey) from the shock body. Some other shocks, like a Fox Float X2, Cane Creek DB IL or DVO Topaz T3, slide open, not unscrew. Refer to your user manual if you’re unsure what part of the shock is the air can, as well as how to get into it.
![photo]()
Step 4: Note the current volume spacer(s) already in your suspension. Again, this is super important. Make you know what your baseline is before making any changes; it’s impossible to make comparisons to the previous set-up if you don’t know what that set-up was.
Step 5: Add or remove spacers. Most fork volume spacers clip or screw together, while some, notably Cane Creek and MRP, use self-contained systems. Refer to your user manual to see how your fork gets things done.
On rear shocks, the process is similar but with some additional rules. First and foremost, avoid using a metal tool to remove spacers. You run the risk of scratching internal surfaces and ruining seals/leaking oil/pressure. If you can’t get a spacer out with your fingers, find something plastic to do the job. Unless you’re a master at Operation, try to avoid using a metal pick. Additionally, note where and how the spacers are located and oriented. Some rear shocks allow for the adjustment of both positive and negative air chambers, so make sure you’re adjusting the right one! Again, refer to your user manual.
Step 6: Re-install the air can or top cap. Be especially careful not to cross-thread or damage o-rings. Additionally, rear shock air cans generally only need to be hand tight if of the screwed-on variety, like a car’s oil filter (but refer to your user manual). Top caps need to be a bit tighter, but use a torque wrench and be very careful not to over tighten things. See also: Very expensive parts to replace if damaged.
Step 7: Inflate. Reconnect and inflate your suspension back to your original pressure. After the first 50psi, stop and cycle the suspension—give it a good compression, but it doesn’t need to bottom out—to equalize the negative and positive chambers—you can damage things if you skip this step! When you arrive at your desired pressure, cycle the suspension a few times to make sure things are fully equalized. It can take 10-15 cycles in some cases. Then check the pressure again, as it will lower slightly when the pressure equalizes between chambers. In some cases, it might need a little top-off.
Step 8:: Go Ride!
![photo]()
Testing your new setup!
Rule one of suspension set up reads thus; Thou shall not change more than one setting at a time. This means you should not make an adjustment in pressure at the same time as adding or removing volume spacers or changing damping. Why? If you change more than one variable, how do you know which variable caused a change in how your suspension feels?
With that in mind, if you changed air pressure or volume, chances are you will need to tweak another setting, but resist doing so until you’ve done a lap or two on your test loop so you get a feel for what needs a tweak.
Speaking of test loops, pick one that is representative of the riding you normally do. It should include the following aspects: high-speed chunder (to test initial suppleness), big but slow compressions like tight berms, G-outs or hard braking segments (to test mid-stroke support) and a few hard hits (to test bottom-out resistance). You don’t need to go out and find the gnarliest huck-to-flat as that’s probably not something you’ll ride every day, and you’ll end up with a set-up that’s too stiff. Likewise, don’t sell yourself short or you’ll end up with a setup that blows through travel too easily.
Your test loop should also be easily accessible, fun and highly repeatable. Say, it should be doable to run it 2 or more times in an hour. It’s hard to compare runs that are hours or days apart.
Keep a page of notes on your phone or notepad with your impressions each run and/or at different settings. The farther you go into fine-tuning your set-up, the more you’ll rely on your notes to recall past settings and how they felt.
On a final note, the weather will significantly affect how your suspension feels. Riding in near-freezing temps will make your suspension perform differently than on a hot summer day. Keep things consistent!
![photo]()
Final considerations
The fine-tuning of suspension takes time, especially since you need to partially disassemble your suspension to make changes. Patience is key, and keep in mind that the process is as much about finding what doesn’t work as it is about finding what does. And on that note, what works will change from venue to venue—your ideal setup for a mid-summer bike park day will be different than what you’ll run mid-winter in sloppy, slow roots and mud. This highlights the importance of keeping notes of your settings.
However, that’s not to say that you can’t find a set-up that more or less suits 90% of your riding, compromising a bit on the outliers.
Our last piece of advice is this: try new things. No suspension setup is ever dialed and humans are remarkably good at adjusting and adapting. What you might think is a perfect setup one day might actually feel terrible after playing around with settings, but you’ll never find that out if you don’t change things up.
Words: Samuel McMain
Photos: Ryan Palmer
How to fine-tune your ride.
Dialing in your suspension is a time-consuming task. We get it and we’ve all been there too. Setting your sag is one thing (that we covered here), but diving even deeper to optimize your spring curve is a task that involves more than just a shock pump, a measuring tape and a wall to lean on. But as with most things suspension-related, an increase in investment correlates strongly with an increase in performance and comfort on the trail. The purpose of this edition of Tech Tuesday is to demystify the use and principles of volume spacers and arm you with the know-how to continue down the path fine-tuning your ride.
Speak the language:
Air chamber – Your suspension’s spring, this is a chamber filled with pressurized air that is compressed as your suspension moves through its travel
Air volume – The size (volume) of your air chamber
Spring rate – How much force is required to compress your air spring (air chamber)
Spring curve – A representation of how your spring rate changes throughout suspension travel
Volume spacer – An object that can be added or removed from your suspension’s air chamber to increase or decrease the air volume
Bottom-out – To fully use your suspension’s travel
Bottom-out resistance – How hard it is to achieve bottom-out
Mid-stroke – The middle part of the suspension travel
Supportive – A characteristic feeling of a suspension setup that resists moving too easily into travel
Progressive – A spring curve that increases in spring rate through travel
Linear – A spring curve that keeps a constant spring rate through travel
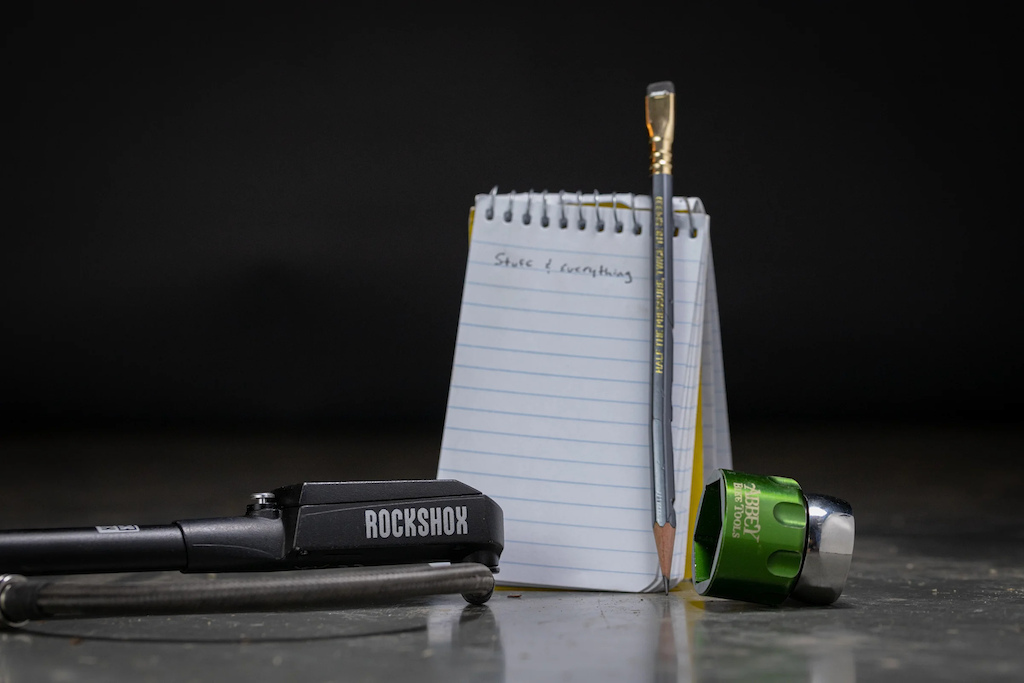
What you’ll need: Something to note current pressure, a shock pump and whatever tool is needed to access your suspension’s air chamber. Consult your user manual on that last one.
What the heck is a spring curve and why is it important?
Before we can start shoving those colorful little volume spacers in our forks and shocks, it’s important to understand why we would even want to do such a thing in the first place. In fact, by the end of this post, some of you might actually want to remove some spacers. Intrigued? Read on.
To start with, your spring curve is a representation of how your spring rate changes as your suspension moves through its travel. With a coil spring, the spring rate remains unchanged throughout the travel, while air springs are always progressive. As you move through travel in an air spring (be it in an air fork or air shock), the air chamber (volume) shrinks while the amount of air in that chamber stays constant—in other words, the air is forced to compress and increase in pressure. The more air is compressed, the more force it takes to compress it further. This principle is why air springs work as well, springs.
When we talk about air suspension being progressive, we mean that the spring curve of an air spring increases in rate the farther you move into travel. The last centimeter of travel is harder to move through than the first centimeter.
So, how can we use the progressive nature of air springs to our advantage on the trail?
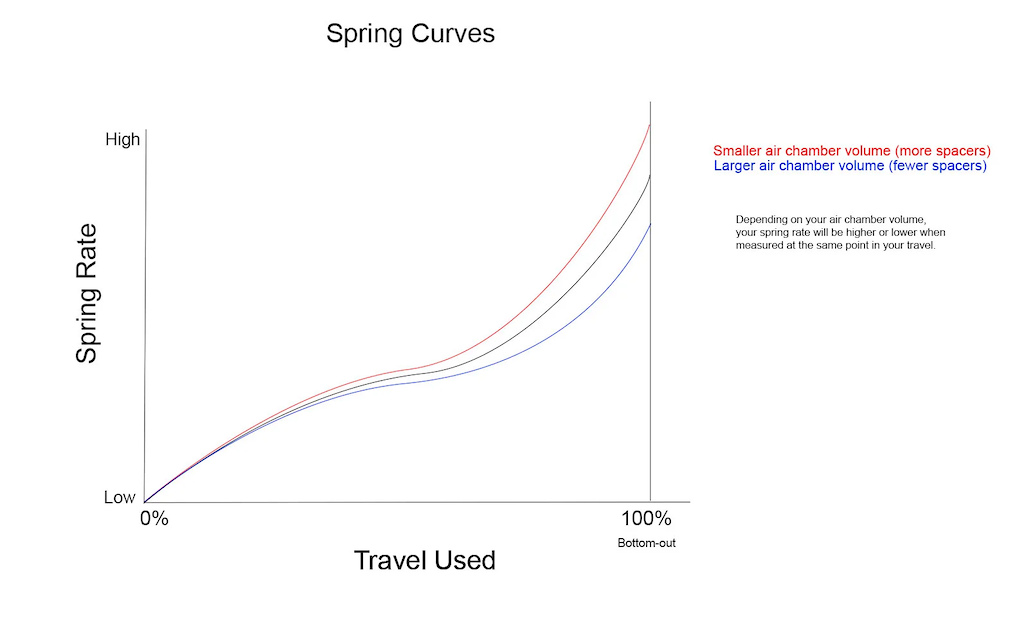
A highly accurate graph, which is certainly to be used for scientific purposes and not just for a visual illustration. Based on the spring curve for an Ohlins TTX rear shock.
The basics of using progression
Hold on to your butts; this is going to be a quick and dirty explanation. In a few words, if you’re bottoming out frequently, but your sag is correctly set, add a volume spacer to reduce air chamber volume and increase the rate of progression in your suspension. Reducing volume makes your suspension firmer sooner in the travel, increasing the spring rate in the mid and end-stroke.
On the other hand, if your sag is set correctly and you can’t seem to use your travel fully, removing a spacer and increasing air chamber volume makes the middle and end of suspension travel softer and easier to move through. This would be changing your spring curve to be more linear instead of progressive.
Sound simple? Well, there are some caveats to it all (that we can harness for performance profit!)
This fork might need a reduction in volume.

This fork might need an increase in volume.
Air chamber volume and its effects on spring curve
Before we really start to unpack this, we need to talk about the part of the spring curve that an air chamber’s volume affects. Because in the real world, changing air chamber volume only affects part of your spring curve—the mid-stroke and end-stroke.
The initial part of travel, say, roughly the first 35%, is only affected by the air pressure. See also, sag. This is slightly a simplification of the actual physics of it all, but for our purposes let’s say that the first part of your suspension travel is only affected by the PSI reading on your shock pump.
But that leaves the majority of your suspension up in the air (pun intended) to be modified by adjusting volume. Here are the basics:
Reduce volume by adding spacers: slightly increase spring rate in the mid-stroke, greatly increase spring rate in the end-stroke.
Increase volume by removing spacers: slightly decrease spring rate in the mid-stroke, greatly decrease spring rate in the end-stroke.
Take a minute to think about the implications here; these basic statements aren’t as basic as they may seem. Here are some quick tips you can apply to your suspension tuning:
Add volume spacers to reduce the frequency of bottom-outs
Remove volume spacers to make it easier to use your full travel
Add volume spacers and decrease air pressure to make your suspension more supple while maintaining bottom-out resistance
Remove volume spacers and increase air pressure to make your suspension more supportive initially while maintaining bottom-out resistance
Hold up, where did those last two options come from?
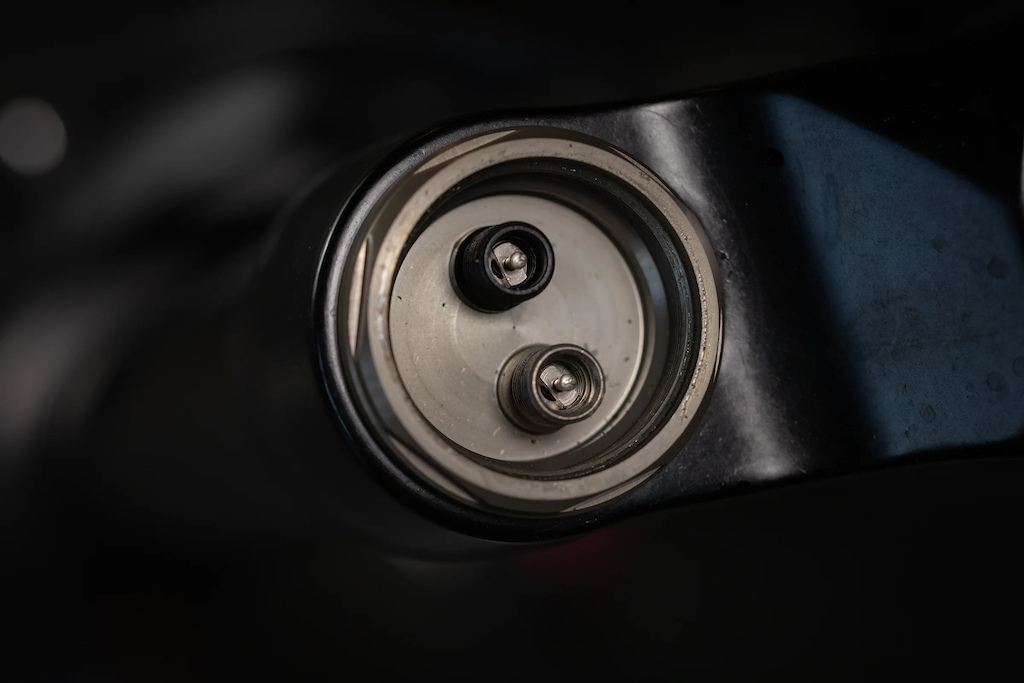
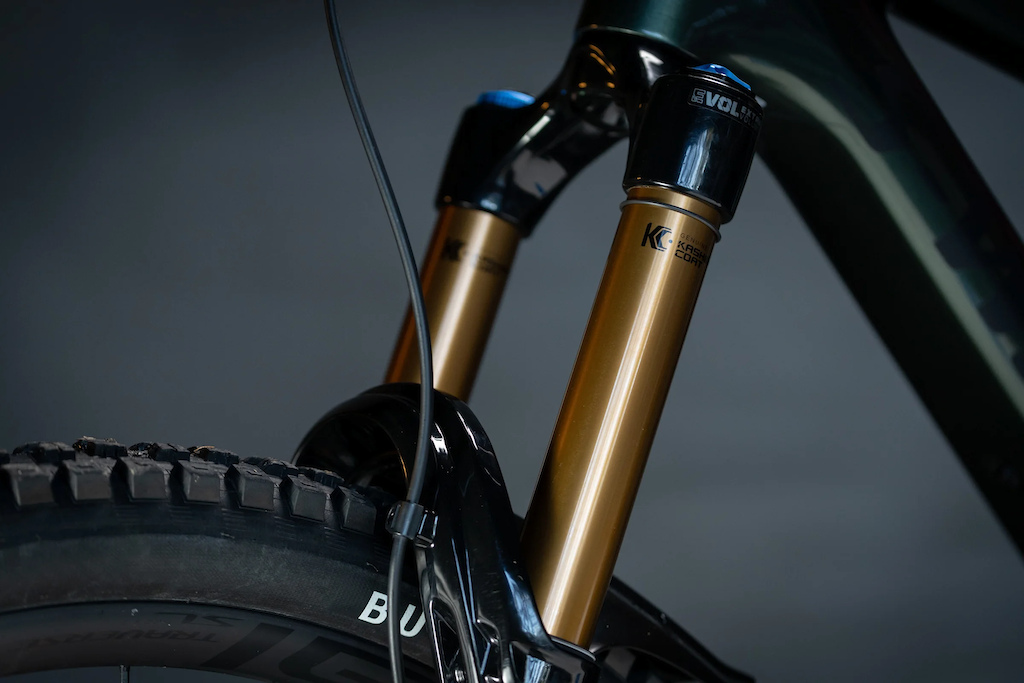
Not all suspension uses volume reduction. While the Fox 36 (top) has only one chamber that is modified by spacers, an EXT Era has two air chambers that are adjusted independently to modify overall spring curve.
Adjusting air pressure when adding/removing volume spacers
Yeah, this is totally a thing you can do. Adjusting air pressure while also changing air chamber volume allows you to fine-tune the two extreme ends of the spring curve independently of each other. You might think of it this way, adjust your air pressure to adjust how you want the initial part of your travel to feel, then add or remove volume spacers to achieve the desired bottom-out resistance.
What about mid-stroke support? People are always talking about mid-stroke support these days. Well, in short, you can’t have your cake and eat it too—usually. It’s very difficult to achieve exactly the amount of mid-stroke support you want while also dialing in the initial and end-strokes. Want more mid-stroke support? You can either bump up pressure or decrease volume (both of which affect one end of the spring curve as well as the mid-stroke).
There are ways to get around this, but they have to do with how your particular fork or shock was designed and often involve the size of your negative air chamber. For example, Rock Shox’s MegNeg air can for the SuperDeluxe rear shock increases the negative air chamber volume, which increases mid-stroke support by offsetting positive air chamber forces farther into the initial part of the travel, allowing you to run a higher positive pressure. There’s more going on there, but that’s for a future post.
Adding/removing volume spacers on your fork/shock
For the most common forks and shock out there, Fox and RockShox, the process of adding or removing volume spacers is pretty straightforward. Each company uses plastic “pucks” for their forks that are attached to the bottom of the top cap of the fork’s air chamber. Rear shocks will differ slightly, but most use a similar plastic puck that slots upside the air chamber of the shock near the top of the shock or clips around the air can.
The procedure for adjusting volume spaces in suspension can be broken down into a few key steps, which we’ll outline below. However, note that there may be significant differences between various shocks and forks, so be sure to check your user manual for specific instructions. Some brands, like Cane Creek, DVO and Ohlins, don’t actually use plastic pucks in their forks and adjust air chamber volume differently, and the process for doing such on those suspension designs isn’t going to look like what we outline here. Again, check your user manual.
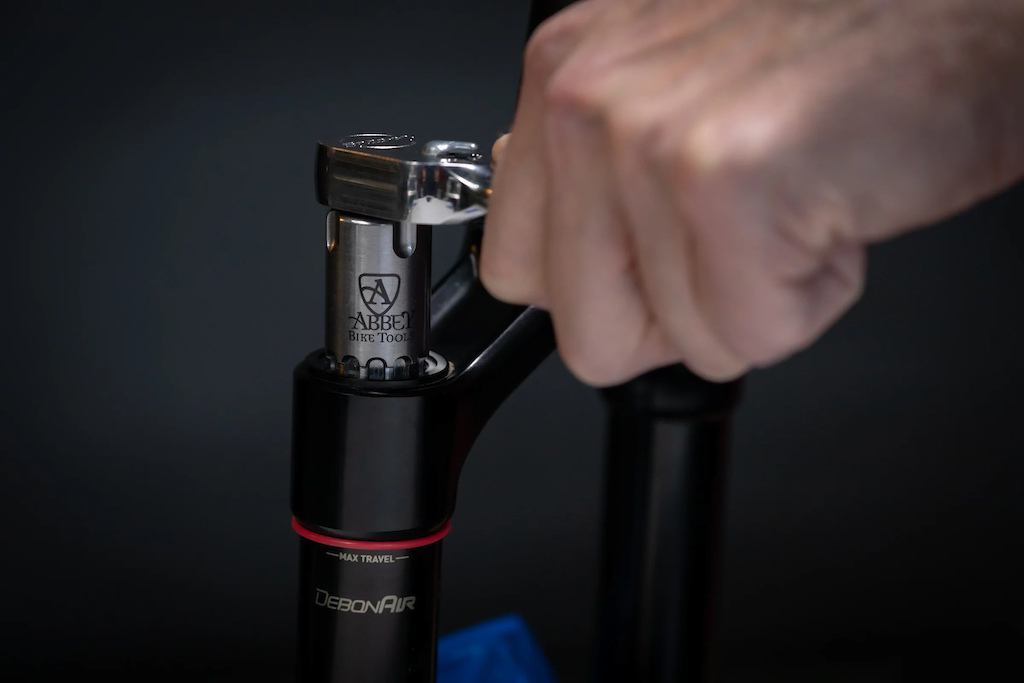

Some forks have socket or wrench flats, others use a cassette tool.
Step 1: Note your air pressure! Before you do anything to your suspension, make sure you know what pressure (and the rest of your settings) you are running. This doesn’t mean just sticking a shock pump on, as the increase in air volume from the hose of the shock pump will actually slightly decrease the pressure of your air chamber. This is especially important in air shocks with small air chambers running high pressures—for example, connecting a shock pump to a DVO Topaz T3 caused the pressure to drop from 114psi to 109psi. Take your reading after filling your suspension, and write it down somewhere for future reference.
Step 2: Depressurize your system! This is a HUGE safety step. Never, ever attempt to disassemble your suspension with it pressurized. I’ve seen top caps go through ceiling tiles and riders go to the ER with oil sprayed at high pressure into their eyes. Seriously, make sure there is no air in the fork.
To do this, use your shock pump’s air release valve to let the air out of your suspension. Remember that there’s a pressurized negative chamber as well, and you’ll need to cycle your suspension while slowly releasing pressure to equalize both chambers for depressurization. On a rear shock where you will be removing the whole air can, a pressurized negative chamber will make it very difficult (and possibly dangerous) to actually remove the air can.
Step 3: Remove the top cap or air can. On most forks, you’ll need a dedicated non-chamfered socket to remove the top cap. Do not use a standard chamfered socket as you’ll round the flats of the top cap. A top cap-specific, champferless socket is the best tool for the job, but a pair of Knipex pliers work well too. Crescent wrenches should be avoided, but can be used in a pinch. Remember, that top cap is made of soft aluminum and easily damaged. Some forks, like Rock Shox and Ohlins forks, actually use a standard cassette tool to remove the top cap.
For rear shocks, assuming you’ve fully depressurized the system, most air cans will unscrew (lefty loosey) from the shock body. Some other shocks, like a Fox Float X2, Cane Creek DB IL or DVO Topaz T3, slide open, not unscrew. Refer to your user manual if you’re unsure what part of the shock is the air can, as well as how to get into it.
Step 4: Note the current volume spacer(s) already in your suspension. Again, this is super important. Make you know what your baseline is before making any changes; it’s impossible to make comparisons to the previous set-up if you don’t know what that set-up was.
Step 5: Add or remove spacers. Most fork volume spacers clip or screw together, while some, notably Cane Creek and MRP, use self-contained systems. Refer to your user manual to see how your fork gets things done.
On rear shocks, the process is similar but with some additional rules. First and foremost, avoid using a metal tool to remove spacers. You run the risk of scratching internal surfaces and ruining seals/leaking oil/pressure. If you can’t get a spacer out with your fingers, find something plastic to do the job. Unless you’re a master at Operation, try to avoid using a metal pick. Additionally, note where and how the spacers are located and oriented. Some rear shocks allow for the adjustment of both positive and negative air chambers, so make sure you’re adjusting the right one! Again, refer to your user manual.
Step 6: Re-install the air can or top cap. Be especially careful not to cross-thread or damage o-rings. Additionally, rear shock air cans generally only need to be hand tight if of the screwed-on variety, like a car’s oil filter (but refer to your user manual). Top caps need to be a bit tighter, but use a torque wrench and be very careful not to over tighten things. See also: Very expensive parts to replace if damaged.
Step 7: Inflate. Reconnect and inflate your suspension back to your original pressure. After the first 50psi, stop and cycle the suspension—give it a good compression, but it doesn’t need to bottom out—to equalize the negative and positive chambers—you can damage things if you skip this step! When you arrive at your desired pressure, cycle the suspension a few times to make sure things are fully equalized. It can take 10-15 cycles in some cases. Then check the pressure again, as it will lower slightly when the pressure equalizes between chambers. In some cases, it might need a little top-off.
Step 8:: Go Ride!
Testing your new setup!
Rule one of suspension set up reads thus; Thou shall not change more than one setting at a time. This means you should not make an adjustment in pressure at the same time as adding or removing volume spacers or changing damping. Why? If you change more than one variable, how do you know which variable caused a change in how your suspension feels?
With that in mind, if you changed air pressure or volume, chances are you will need to tweak another setting, but resist doing so until you’ve done a lap or two on your test loop so you get a feel for what needs a tweak.
Speaking of test loops, pick one that is representative of the riding you normally do. It should include the following aspects: high-speed chunder (to test initial suppleness), big but slow compressions like tight berms, G-outs or hard braking segments (to test mid-stroke support) and a few hard hits (to test bottom-out resistance). You don’t need to go out and find the gnarliest huck-to-flat as that’s probably not something you’ll ride every day, and you’ll end up with a set-up that’s too stiff. Likewise, don’t sell yourself short or you’ll end up with a setup that blows through travel too easily.
Your test loop should also be easily accessible, fun and highly repeatable. Say, it should be doable to run it 2 or more times in an hour. It’s hard to compare runs that are hours or days apart.
Keep a page of notes on your phone or notepad with your impressions each run and/or at different settings. The farther you go into fine-tuning your set-up, the more you’ll rely on your notes to recall past settings and how they felt.
On a final note, the weather will significantly affect how your suspension feels. Riding in near-freezing temps will make your suspension perform differently than on a hot summer day. Keep things consistent!
Final considerations
The fine-tuning of suspension takes time, especially since you need to partially disassemble your suspension to make changes. Patience is key, and keep in mind that the process is as much about finding what doesn’t work as it is about finding what does. And on that note, what works will change from venue to venue—your ideal setup for a mid-summer bike park day will be different than what you’ll run mid-winter in sloppy, slow roots and mud. This highlights the importance of keeping notes of your settings.
However, that’s not to say that you can’t find a set-up that more or less suits 90% of your riding, compromising a bit on the outliers.
Our last piece of advice is this: try new things. No suspension setup is ever dialed and humans are remarkably good at adjusting and adapting. What you might think is a perfect setup one day might actually feel terrible after playing around with settings, but you’ll never find that out if you don’t change things up.
Author Info:

 Member since Aug 6, 2009
Must Read This Week
How to Watch the 2024 Mountain Bike World Cup [Update: Staylive Offering Access in New Zealand, South Africa & More]
59373 views
59373 views
Sign Up for the Pinkbike Newsletter - All the Biggest, Most Interesting Stories in your Inbox
PB Newsletter Signup
At this point with my Lyrik ultimate I've removed all the volume spacers and added a ton of air pressure. It rides so much better than the old days of even 2 spacers.
Now the back, that thing gets all the reducers, at least up until now riding a progressive suspension (decreasing leverage ratio). The New fox float X is pretty good with the medium reducer in it.
Even this article - helpful as it is - contains misconceptions, such as equating spring rate with spring force. For example, it states that a higher compression ratio (more tokens) slightly reduces mid-stroke support. That's true if the base pressure were to remain the same, but that's not relevant when comparing two, good set-up alternatives. Examples and explanations below, which assume no changes to damping. (For anyone who feels "R-M-R uses too many words", feel free to stop reading at any time and save yourself the keystrokes to complain.)
Example 1: Improving a set-up with a token
Initial: Suspension is mostly ideal, but the suspension reaches a hard bottom-out on infrequent, severe impacts.
Change: Increase support near bottom-out via increased air spring compression ratio.
Final: Essentially the same support in the early part of the travel, slightly more support in the mid-stroke, and significantly more support near bottom-out.
Conclusion: Changed from an inadequate set-up with insufficient support to one with sufficient support.
Example 2: Comparing different set-ups, but both are adequate
A: More linear set-up with higher base spring pressure and lower compression ratio.
B: More progressive set-up with lower base spring pressure and higher compression ratio.
This is the more relevant example, since neither set-up is "wrong". In this example, the use of a higher compression ratio (via additional spacer(s)) decreases mid-stroke support because it should be used in conjunction with decreased base pressure. Both set-ups allow the suspension to work properly across the range of impacts. Set-up A has more mid-stroke support, but feels firmer most of the time, while B feels softer, but dives more.
These examples illustrate what @WestwardHo rightly stated: when comparing set-ups that allow full travel to be used - without hard bottom-outs - mid-stroke support and spring progressivity are inversely related.
This is good insight for me, while I've sort of intuitively felt this I guess I hadn't thought about it in such simple terms.
Would you say that for these 2 setups, you are effectively choosing between initial stroke sensitivity and midstroke support? Maybe it isn't that simple.
For my riding i've typically placed a high importance on midstroke support, and have generally preferred the feeling of coils. Maybe just confirmation bias but this gives some reasoning for what I've experienced.
@sudochuckwalla: those 2-positive-air-chamber concepts try to achieve both and clearly succeed to some extent.
If we imagine an extremely progressive spring, it's crazy soft ... until it's not. Very plush and comfortable most of the time, yet still resists bottoming out. Sounds great, so far, but the dive will be severe, it's difficult to predict the response to terrain or rider inputs, and the bike will respond slowly and awkwardly to turn initiation and hopping / popping / pumping.
A linear spring builds resistance more quickly and is the opposite of the things described above.
I favour a linear spring with a position-sensitive damper, rather than the traditional set-up of a position-sensitive (progressive) spring with a constant (with respect to position) damper.
@Larsgeorge Thank you. Yes, multi-chamber springs are an excellent way to gain mid-stroke support without the weight of a coil. Unfortunately, if few people understand how tokens work, good luck getting users to properly set up a multi-chamber air spring and multi-rate (velocity and position) damper!
1. Faster rebound damping.
2. More linear spring curve. Remove the tokens and raise the pressure.
3. Add low-speed compression damping.
Points 2 and 3 may make it feel firmer. If so, it's going to be a matter of choosing the lesser of two evils.
Going further, you can replace the stock air spring with a multi-stage system or replace the air spring with a coil.
I wrote:
"For example, it states that a higher compression ratio (more tokens) slightly reduces mid-stroke support."
Should've written:
"For example, it states that a higher compression ratio (more tokens) slightly increases mid-stroke support."
Previously I had a 36, which felt a bit more soft in the beginning, but only after adding a MRP Ramp Control - the standard one - the fork went to another level of adjustability. Great stuff! Actually the simpler (or cheaper) your fork is, you will benefit more from adding a Ramp Control, as it fulfills the tasks similar to compression adjustment.
I'm 69/72kg~, 65psi, 44mm sag (26%) no volume tokens (previously had the factory 2x in there) HSC,LSC all wound off.
Nothing wrong with the 2 volume spacers just wanted to try none, and it's even better. I'm using full travel, for very pumpy, fast, jumpy blues I wind on the LSC. For steep, long l, fast descents (Pleney Steeps for instance) il add about 6-7clicks of HSC to keep the fork up in its travel. But 80% of the time. I'm running both off and then fiddle to remind myself what it's like on or off
I'm overwhelmed by how much support and adjustment the 36 or 38 grip2 has. I've never been a Fox fanboi. Quite the opposite actually. But getting my 36 was the best £600 I've ever spent on a bike
Fantastic! Thank you for all the word things..
Did anyone mention that changing spacers in a shock means you’ll have to increase/decrease psi to get back to your sag setting?
So many people out there just using baseline settings, never tweaking anything to find out what's best for their specific bike/terrain/riding style/preferred characteristics, etc, etc.
Suspension is similar - there is so much feel and perception involved in what is 'best,' and the trail/terrain change the defnintion of 'best' the same way a different room, song, mix band, etc does.
And, just like bass - some people have one bass, plug it into an amp and play. Some riders pump their shocks up, twist some knobs on the first ride, and never touch it again and have a great experience for years. Others are taking notes, using apps, buying stuff, getting tunes, twiddling knobs, installing spacers and are never happy.
We have gone to "the leverage curve has been perfected so precisely that you need to use the exact - fork length/shock stroke/air or coil - this frame was intended to", to "dual crown? oh yeah we took it into account, so the frame is strong enough so just check your A2C to be sure the resulting geometry change fits your need".
Also mulleting bikes (just rear 29>27) sometimes without using offset bushings, or Madonna Raaw and Transition Patrol's options to use 60 OR 65mm stroke shocks.
So in addition to suspension setups, I would argue that you can do whatever you want, just forget preconceived ideas about "what should work" when trying things out.
Few examples : I have gone from 216x63 air to 222x70 coil, still figuring out best sag, and on the front I use pressure to determine basically "ride height", which is more important to me than "I have to use full travel" (in my case 0 spacers). But that leads to another topic, of why I think bikes need more travel in the rear...
I make adjustments to dial in the performance, but once that is done, I just leave it
This is a common misstatement and incorrect. As you lower pressure (an in turn sag), you put the suspension further into its travel at the dynamic ride height, where the spring curve is getting more progressive. As a result, you have less usable travel and are riding where the spring rate is higher and the suspension becomes firmer. People will end up in a cycle of dropping pressure and adding spacers to only get an ever harsher ride. When in doubt, remove spacers and up pressure.
The author conflates the purposes of the spring and the damper, they serve separate functions and need to be treated separately. The spring is used to set the proper rate and ride height. With an air spring, you set pressure for proper feel in the first 1/2 of the travel, volume spacers are used to control the ramp up and bottom out (which crosses over into high speed compression dampening). If once you set the initial spring rate, you are bottoming, add volume spacers. If you are not getting full travel, remove them. Always start with no spacers.
No matter what I do to the Fox 34/36 Forks, they pretty much feel like crap off the top. Only the 38 feels decent. I've followed all of Fox recommendations and tried every combo of tokens, no tokens, sag, compression/rebound etc.
I recently changed to a Mezzer Pro on my Levo and in 1 ride had it dialed and feeling incredible and all I did was use their setup guide and used the recommendations for my weight (180 lbs).
Different strokes for different folks.
You did exactly what you are supposed to, set your initial spring rate to where it is correct, use volume spacers to control the bottoming. The problem arises where people are dropping pressure and adding volume spacers searching for plushness. All they are doing is putting themselves in the steep part of the spring curve, leading to harshness. Then they drop the pressure further, add more tokens and make the problem worse.
I can pull a Mezzer Pro out of the box and get it dialed in 1 ride. I play with LSC when I change the style of riding I do and that's it.
To me, tokens are the way to steer where in the travel I want that ramp up to build up.
That's the thing, it's not "easy to set up": it just has limited external adjustments, which is very much not the same. Jordi even mentioned it on the Vital podcast a couple weeks ago: a fork or shock with minimal external adjustments is much harder to get dialed because it relies on everything internally being pretty close to perfect already. More adjustments, while easier to screw up, is also the only way to make is possible to tweak without opening it up. Having minimal external adjustments isn't "set and forget", it's "forget about setting up".
I friggin LOVE that fork. Initial plushness? Check. Enough bottom out resistance to hold up to my fat ass over cooking a drop and landing flat? Check. Enough mid-stroke support for pushing into corners and heavy g-outs? Check.
Nice to have TT back!
Like MRP Ramp Control, just play with high and low air to dial things in. Love it diazsuspensiondesign.com/runt
Haven't tried this, but can't you also just dump excess grease in the air chamber of a rear shock?
Did you mean "crack open"?
Then. A week later when your bike feels weird at the same trails. ITS YOU. Not the bike. You already spent the time setting up.
Noting that constant spring rate does not mean constant spring force. The spring force increases with displacement even with the most perfectly linear spring rate.
Also random biker: I only buy telescopic forks! They totally aren't as linear as it gets and coils definitely don't work in them!
Correct me if I am wrong, but to my understanding, Negative Air Chamber helps to suck the shock into its initial stroke. A higher Negative air chamber volume (ie Less Meg Neg Bands) will require a higher pressure to achieve the same sag, and thus will further increase bottom out resistance, but will have less midstroke support than the same pressure with no MegNeg... I think.. So a Shock Full of Volume Spacers, with a MegNeg and 0 negative bands is the most progressive air spring you can create. From here, one way to increase midstroke support would be to add negative bands. Again, feel free to add or correct me if you confidently know more about the topic than I do, I think I have a good grasp on it, but i don't want to spread more misunderstanding. Also, thanks for that 12 year old video of awkward Levy.
There a many ways to get suspension set up for heavy hitters, but using all the pressure, all the spacers, and all the damping possible can't be "the solution".
But this is just my unchecked opinion. Could you share examples proving your point?
But only one of those (pressure) also effects early-stroke, and the other one (volume) effects end-stroke much much more.
Fork or shock: Not much.
Tire: Probably a flat, maybe a damaged rim.
As such, most people inflate their tires firmly enough to maintain a margin of safety, i.e. to prevent "getting full travel" out of the tire. Inserts can cushion the last part of the "travel" enough to prevent damage at "bottom out", allowing users to reduce tire pressure and allow more compression, more often. Downsides are weight, hassle, and cost.
But seriously, that's a bummer. In the pursuit of less weight, designers often sacrifice things that matter more than weight.
How does a "curve" "increase"?
Sag is a reference point, stop worrying about how much travel you use. Spring rate keeps the bike up, set your ride height via spring rate, adjust as required after the fact.
I've come to the realisation on modern day forks with minimal stiction (ie Fox 3
Also running a marz 55 ATA on my hardtail (Marzocchi, the O.G. 3 chamber air spring)
And My Shiv-air I build a few years ago is also running an ATA air cartridge!
(My ATA carts have all the mods, xring seals, increased PAR volume, coil spring in the negative chamber to lower breakaway force.)
Read AVA.