The Most Effective Style of Yoga to Increase Your Flexibility - Monthly Yoga With Abi
I’ve been teaching Yin Yoga to hundreds of surfers in Bali over the last few months and seen amazing results. There are lots of ways that yoga can support an intense athletic training program – from building core strength, to loosening up tight joints, reducing muscular pain, improving balance and training mental skills – but increasing flexibility may be the biggest game-changer and the hardest to achieve.
In Yin Yoga, you hold poses anywhere from 3 to 15 minutes. I know, it sounds pretty intense. The discipline required is actually much more mental than it is physical. You can think of it like a therapeutic dose of stretching.
A Brief History
Yin Yoga is one of the oldest forms of yoga practiced in the Indian Hatha tradition. It was initially designed to prepare the body for long periods of seated meditation without distraction from physical discomfort.
Yin was brought to North America in the late 1970s by Paulie Zink, a yoga teacher and martial arts champion who found that it was the most effective way for his students – who had developed strong but overly tight muscles – to improve their flexibility and achieve greater agility, power and endurance.
The Benefits of Yin Yoga
This style of yoga is ideal for complete beginners and requires no previous experience. The other primary benefits are:
- Increasing flexibility
- Loosening up tight joints
- Improving range of motion
- Easing aches and pains
- Improving posture
- Speeding up athletic recovery
- Building discipline
- Improving breath efficiency
- Relaxing the body
- Calming the mind
How To Do It
- Use a timer and hold each pose for at least three minutes on each side. Try to increase this time by 5-10 seconds each session to see continued improvement in your flexibility over time.
- Prop yourself up on as many cushions as you need, to feel comfortable and relaxed.
- Completely let go of tension and let gravity do the work. When your muscles are relaxed, they are much more receptive to stretching.
- Breathe in and out through your nose throughout the sequence. As you inhale, inflate the front, back and sides of your rib cage. On every exhalation, let all the air out as slowly as you can, drawing your belly button back towards your spine.
- As with all training, consistency is the key. This sequence will help you to relax if you do it every now and again but the real benefits are only going to come if you’re consistent. You can do the full sequence a couple of times a week or break it up into poses and do 15 minutes, 5 days a week.
- The best time to practice Yin is at the end of the day. I don’t recommend doing it before vigorous exercise as you’re more susceptible to injury after a deep stretching session.
- Be careful not to put your body in any position that causes you pain.
The Upgrade
This practice should ultimately be relaxing – if not a little uncomfortable at first – but there is a way you can take it to the next level. The breathing in Yin is fundamental and by maintaining a specific breathing pattern throughout the sequence, you can make it into both a breath training workout and a meditation.
Try counting in for 4 and exhaling for 8. This is hard to maintain for the full sequence but it's effective even if you maintain it for just a few poses.
The Poses
I’ll give you some pointers for each of the poses and you can head to my site: www.yoga15.com for more detailed instructions and video tutorials.
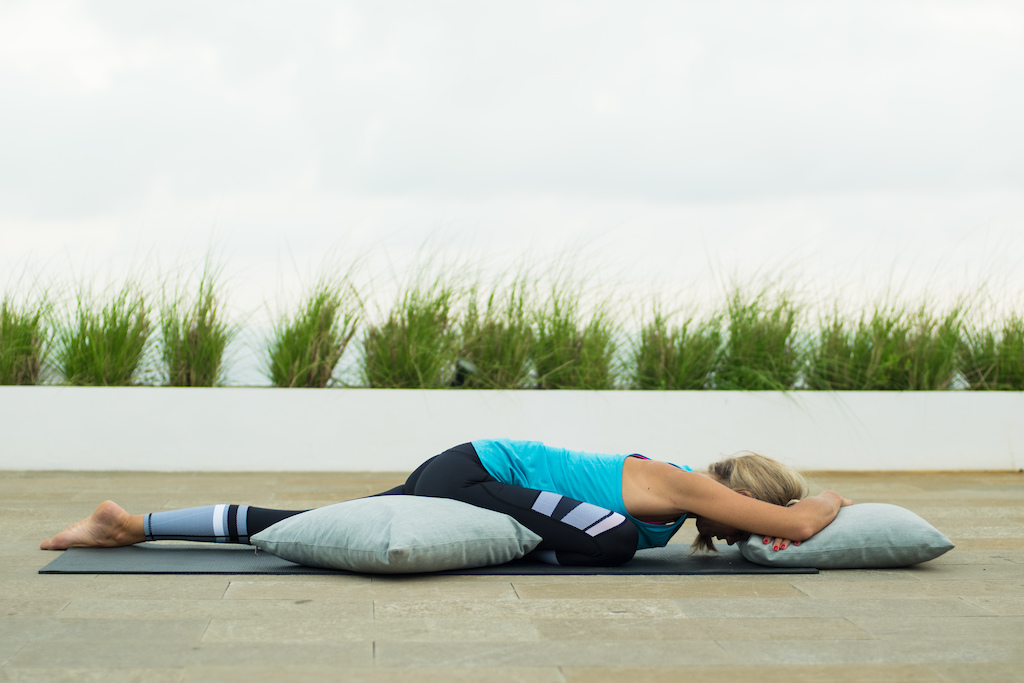
1. Child’s Pose
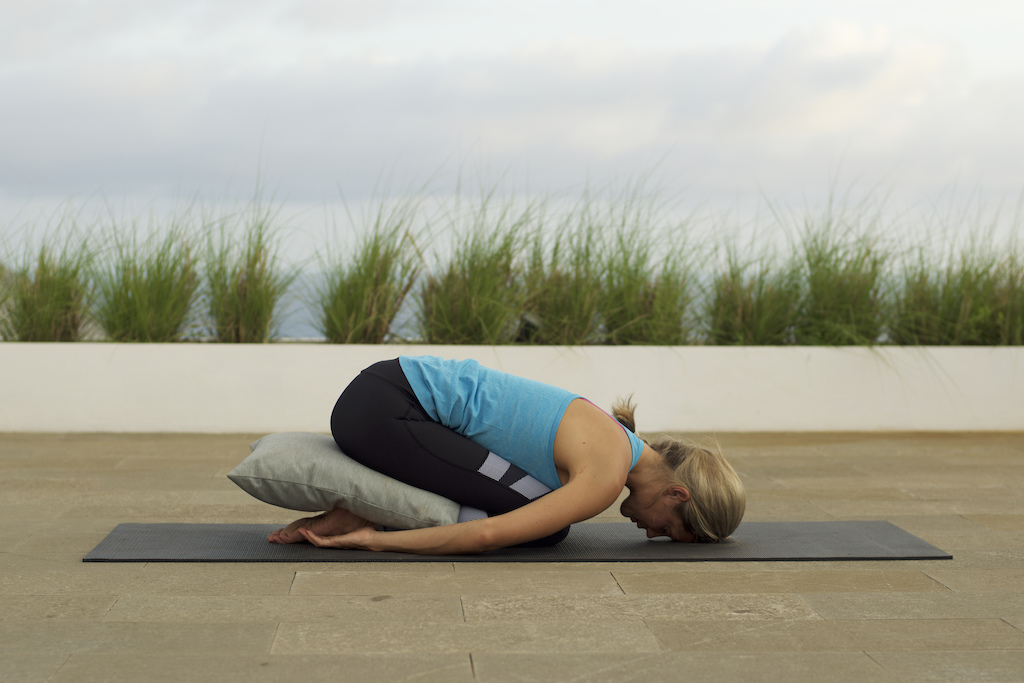 |
- Child’s pose gently stretches the upper back and shoulders and calms the mind.
- Bring your arms outside your knees and let go of all tension.
- If you can’t sit back comfortably on your heels, put a cushion or two between your calves and hamstrings.
- Breathe deeply into the front, back and sides of your rib cage.
2. Puppy With Hands In Reverse Prayer
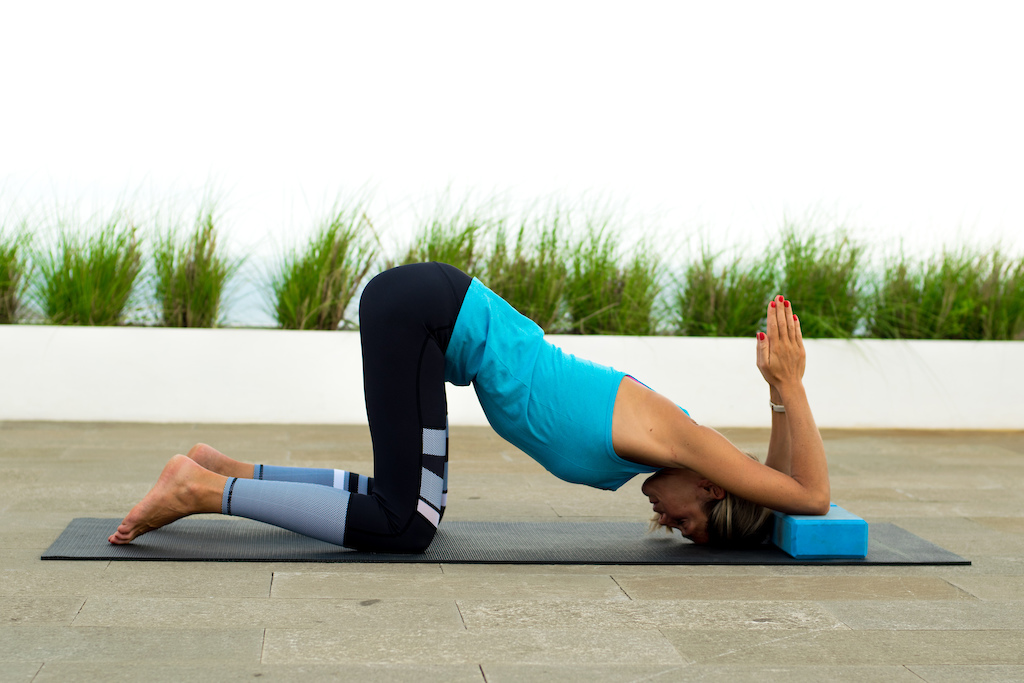
- Puppy pose decompresses the spine – making space between the vertebrae – and stretches the lats, shoulders, and triceps.
- Bring your knees hip-width apart directly and point your toes straight back. Check that your hips are directly underneath your knees.
- Pull your hips away from your elbows to feel the stretch in your triceps, shoulders and lats.
3. Scorpion
- Scorpion stretches the chest and shoulders and increases spinal mobility.
- Lie on your stomach with your hands underneath your shoulders. Bring your right arm straight out to the side in line with your shoulder, palm facing down. Bend your left leg at the knee.
- Press into your left hand and twist your body open to the left bringing your left foot flat to the mat behind your right leg.
- Support your head on a cushion if you feel any discomfort in your neck.
- Breathe deep into your abdomen.
- This pose should not be painful, so adjust yourself as you need to.
4. Reclining Hand To Toe
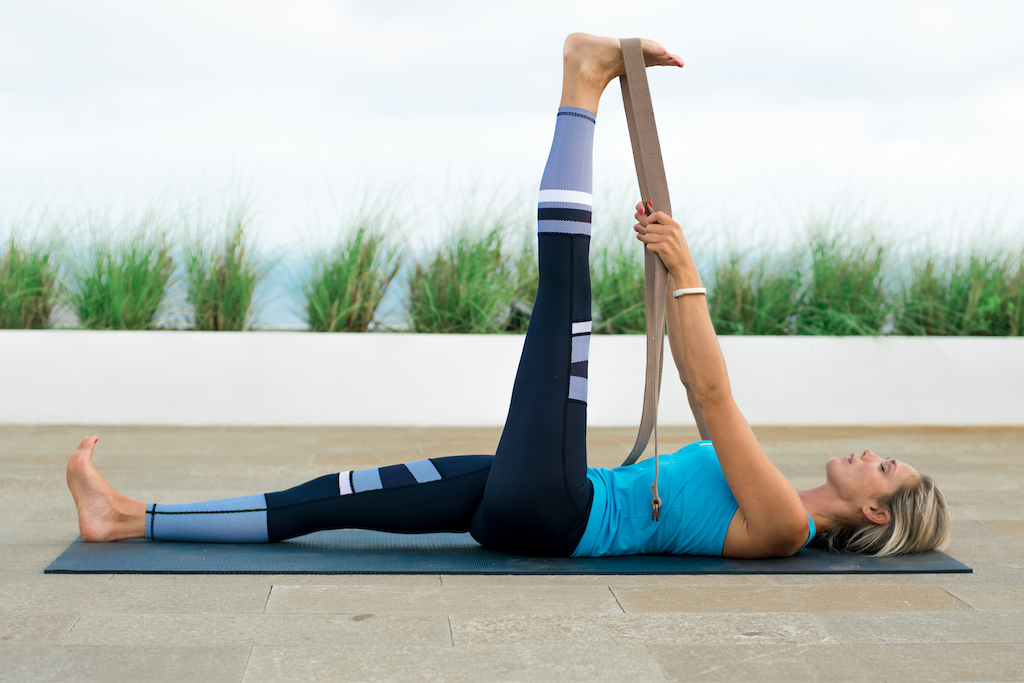
- Reclining Hand To Toe pose stretches the calves and hamstrings safely, without putting pressure on your lower back.
- Keep your raised foot flexed by pressing through your heel.
- If you find yourself straining in the pose, you can bend your bottom leg and bring the sole of your foot flat to the mat.
- This pose prepares you for hip openers.
- Use the weight of your arms to increase the intensity of the stretch.
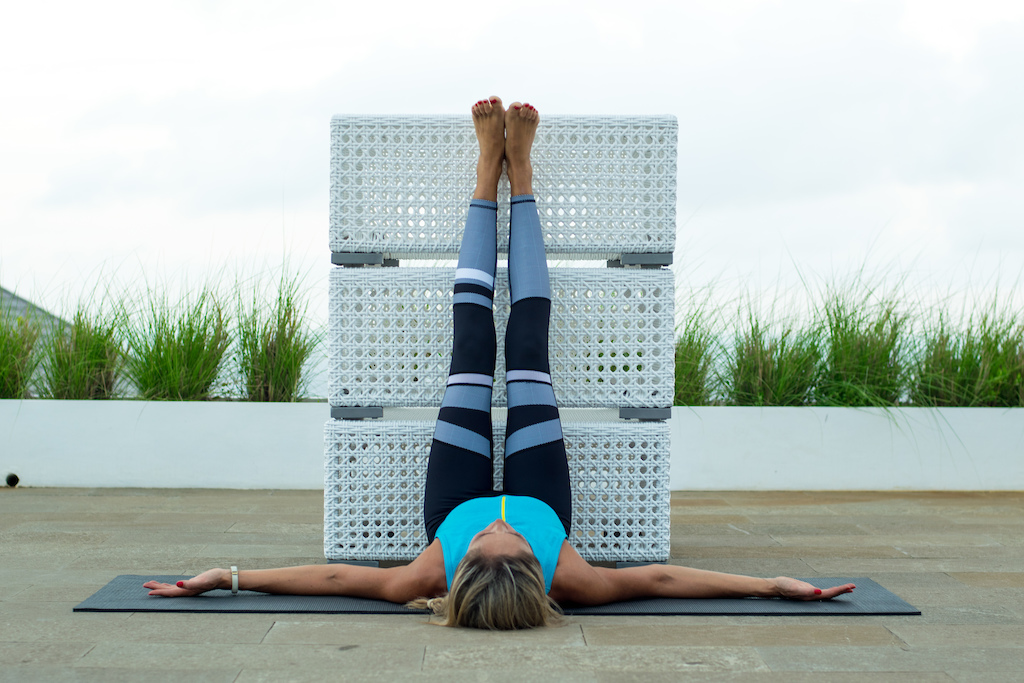
5. Supported Bridge
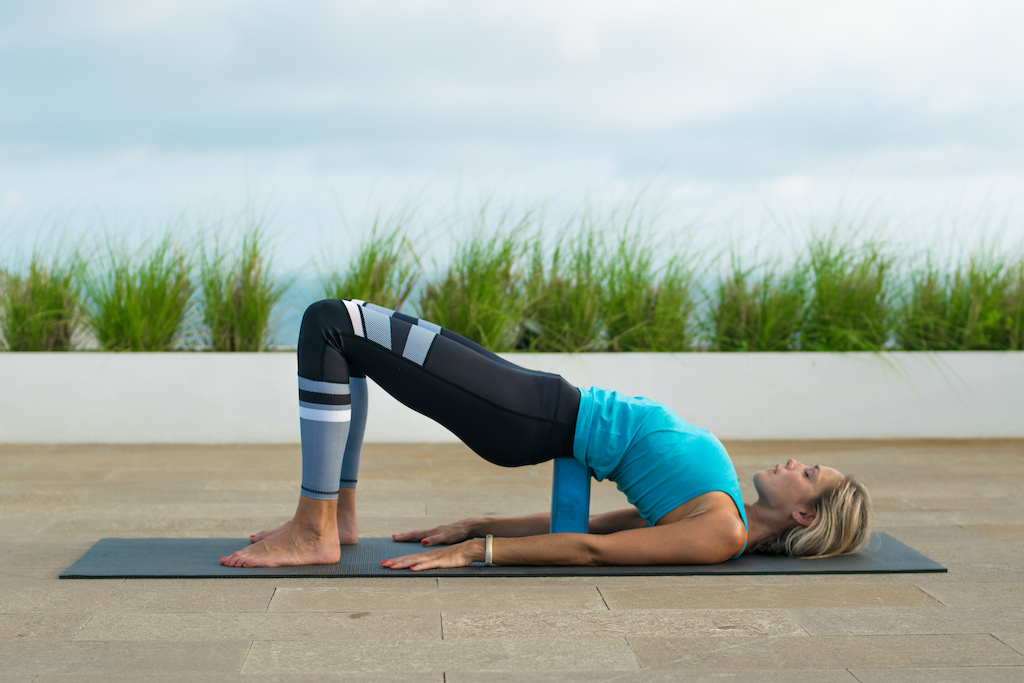
- Supported Bridge relieves tension at the lower back, releases the hip flexors and stretches the abs, chest, shoulders and the back of the neck.
- Make sure that your feet are hip-width apart and that your toes point straight ahead.
- Yoga blocks have 3 different heights, so only go as high as you’re ready for.
- Breathe deep into your belly to release your psoas.
- Supported Bridge is one of the most effective poses for relieving lower back pain, especially if you also suffer from tight hips.
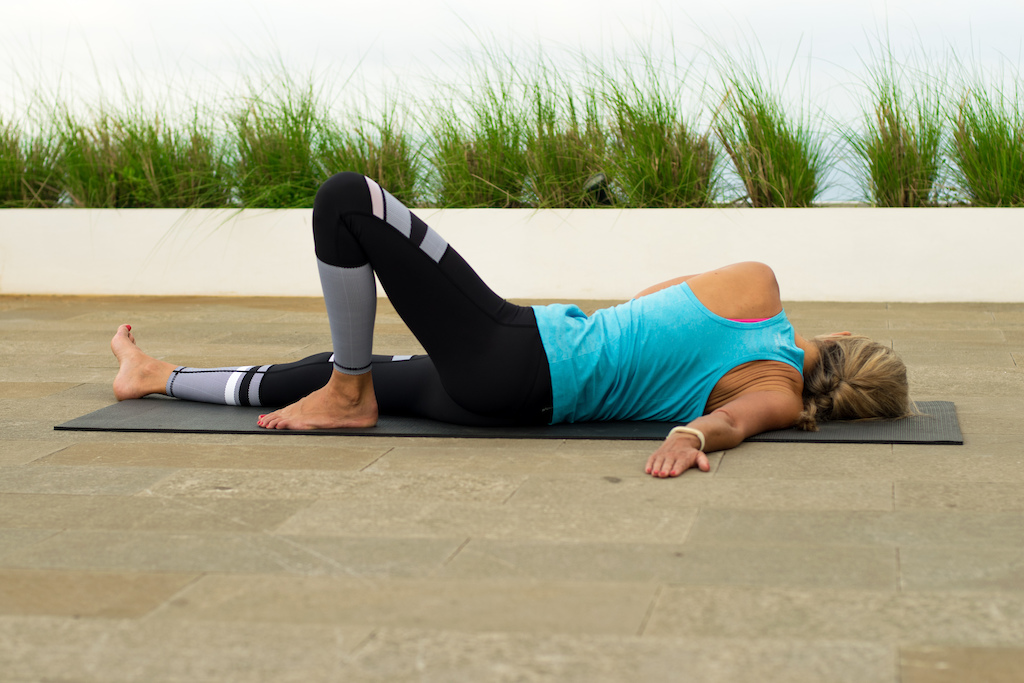
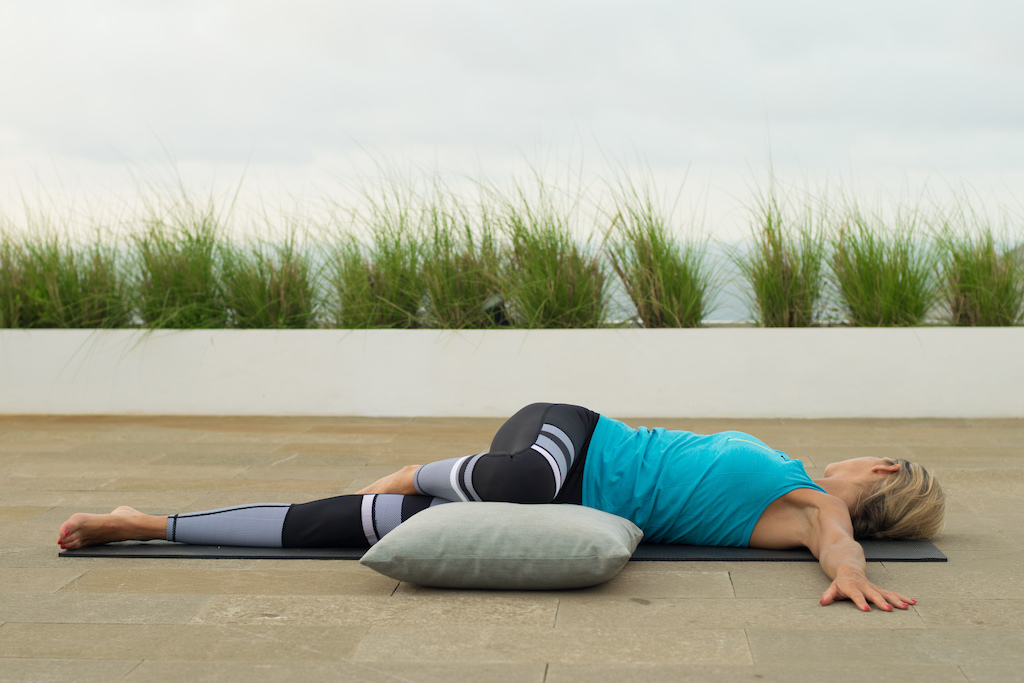
6. Dead Pigeon
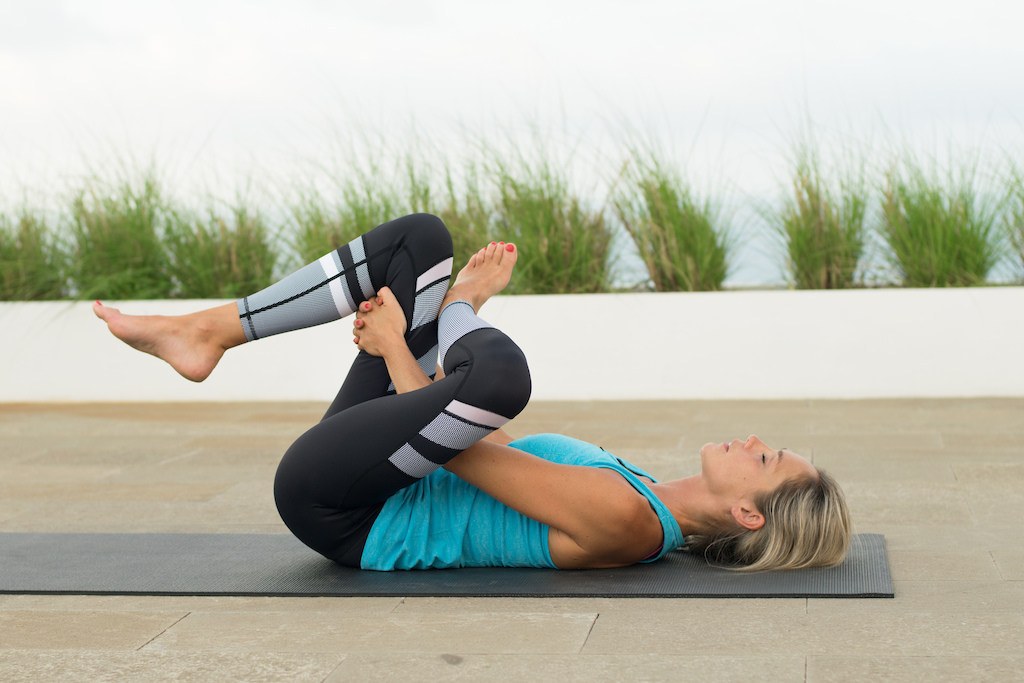
- Dead Pigeon releases the lower back and stretches the outer hips, glutes, groin, hamstrings, knees and ankles.
- You can take hold of the back of your thigh or reach through and interlace your fingers around your shin to increase the intensity of the pose.
- Press your lower back into the mat.
7. Reclining Butterfly
- Reclining Butterfly opens up the hips, releases tension in the mid-back and gently stretches the chest and shoulders.
- You can support your knees on cushions to completely let go of tension in your hips.
8. Reclining Spinal Twist
- Reclining Spinal Twist releases tension at the lower back and stretches the glutes, outer hips, lower back, abs, obliques, chest, and neck. It also increases spinal mobility.
- Try to let go of tension in your neck and shoulders.
- If your knee doesn’t come all the way down to the mat, you can support it on a cushion or two.
- This is another lovely pose to alleviate lower back pain.
9. Sleeping Pigeon
- Sleeping Pigeon is a deep hip opener that stretches the glutes and hip rotators on your bent leg and the hip flexors on your straight leg.
- You can't see it in this image, but the bottom part of your front leg should be positioned on the diagonal.
- If your hips are not level, you can put a cushion or two under the hip of your bent leg.
- Try to let go of any tension, thoughts or distractions.
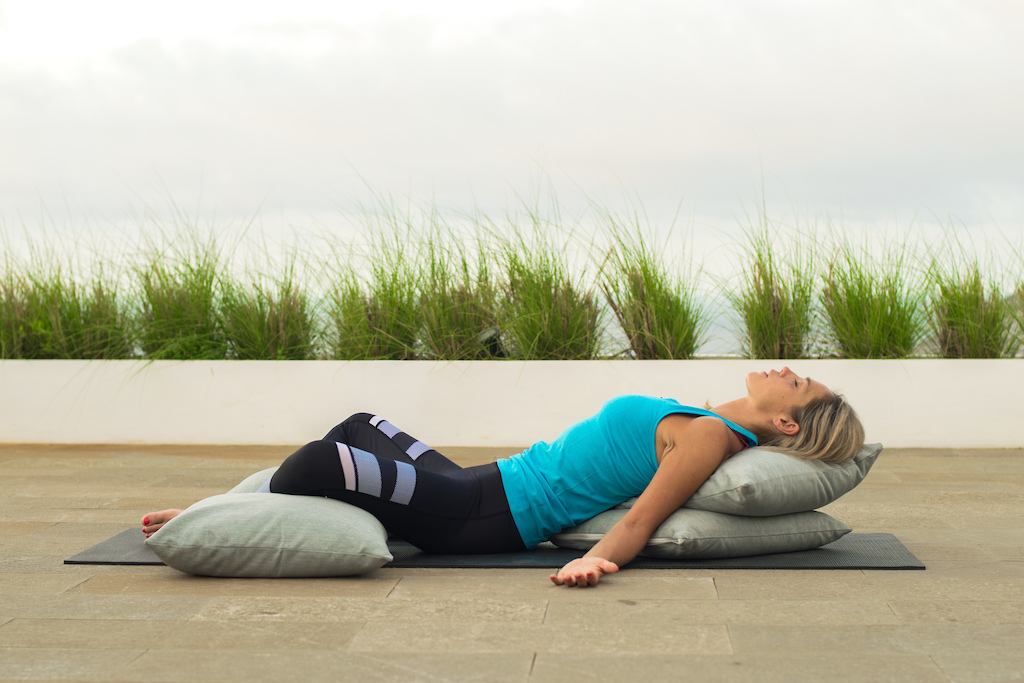
10. Final Resting Pose
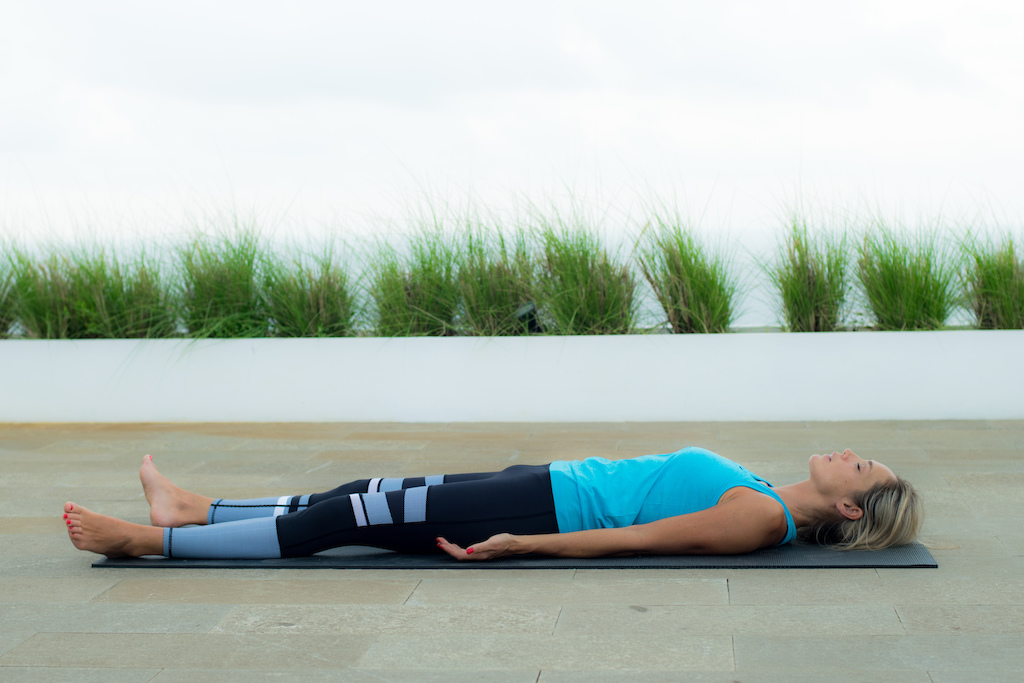
- Release your arms and legs and lie back in Final Resting Pose.
- Notice how your body feels and allow the stretches to sink in for a few minutes before moving back into your evening.
Drop me an email to abi@yoga15.com if you’d like me to send you the audio of a Body Scan Meditation to listen to in Final Resting Pose to help you fully relax. If you’re looking for a complete yoga program to support your training, you can download the Yoga For Mountain Bikers series here. And for more yoga motivation and tips, follow me on Instagram @yoga15abi.
Photo credit: Paul Baker
Previous Yoga with Abi:
Easy 15-Minute Yoga Routine To Loosen Up Tight Joints
How To Release Tight Quads And Increase Your Power
How To Release Chronically Tight Hamstrings
A Challenging One-Hour Yoga Flow Class
Take Control of Your Mind and Push Your Personal Limits
Yoga To Relieve Pain In Between The Shoulder Blades
15-Minute Routine To Unlock Tight Hips
15-Minute Yoga Routine To Build Core Strength
Short Yoga Routine To Help With Lower Back Pain in Bikers
15-Minute Yoga Routine To Enhance Balance and Agilityl
15-Minute Post-Ride Yoga Routine
8 Quick Yoga Stretches To Do At Work
MENTIONS: @yoga15app
Author Info:

 Member since Feb 18, 2015
Must Read This Week
Sign Up for the Pinkbike Newsletter - All the Biggest, Most Interesting Stories in your Inbox
PB Newsletter Signup
We've come a long way! Thanks for sticking with us, Abby! While helping most of us with our flexibility. You've helped a couple of us grow up a little too.
Those FishClips are handy. I've done the same!
SHE IS HOT!
www.yoga15.com/blog/3-advanced-balancing-poses-for-athletes
And these poses would be to increase your calf and hamstring flexibility:
www.yoga15.com/blog/a-complete-solution-for-releasing-tight-hamstrings
vimeo.com/ondemand/yogaforbikers
There is a Vimeo app that you can put on your phone to make it more streamlined.
Side note: I will start doing this exact routine every morning
Theyve very much helped me come around to the idea of complimentary training and finding solutions to the aches and pains . Will certainly be attending yoga with my GF now!
I also sought out a local exercise physiologist - which i cant recommend highly enough to anyone with any physical issues or pains.. After over a decade of MTB and not much else im a mess as im sure many are. Mainly hip flexors, quads, iliopsoas, lower trap, FABER, gluteal, levator, scapula, seratus anterior... ok so everything. This Yin yoga program seems perfect for some of these.
I just wanted to ask how you would recommend to engage and strengthen the transversus abdomini as most of my exercises call for it but i have no idea how or what it does.
Thanks again and keep up the awesome work☺
Here is a link that I think might help you learn how to engage your abs:
www.youtube.com/watch?v=4BOTvaRaDjI
I've started to work more flexibility in the pelvic area and it seems to be helping my lower back. Who'd think tight hip flexors would lead to lower back pain?!?!
Here's a couple for you to try:
www.yoga15.com/blog/3-advanced-balancing-poses-for-athletes
www.ourbodybook.com/your-at-home-yin-yoga-sequence-go-slow-to-go-fast
Which poses do you find as an mountain biker give you the most relief? Feel free to drop me an email at abi@yoga15.com if it's easier.
www.youtube.com/watch?v=TD6fHZ2yhtg