Avid Juicy 7 long term review
Well I’ve been using Avid Juicy 7’s for a few months now, so I figure it’s time for a long term review. Let me start off by saying that Avid Juicy 7’s are the first non-hope disc brakes I have ever owned. I have been using Hope disc brakes since day one. I’ve owned pretty much every single Hope brake – from the C2’s to the Enduro to the M4.So last year while building a new trail bike, I decided it was time for me to try some new disc brakes and after a lot of research I opted for some Avid Juicy 7's. Since it was for a trail bike, I decided to go with 160mm rotors front and rear. While building the bike I thought to myself: “Those rotors are pretty small – hope it will provide plenty of stopping power!”
The Juicy 7’s have a Speed Dial that allows you to dial in whatever lever feel you desire (i.e. Pad contact-point adjustment). On my DH bike I flipped the Speed Dial knobs upside down so they are under the lever, this way they are less prone to break in crashes, which I tend to do a lot.
Avid Juicy’s are also Ambidextrous, which mean you can switch the Right and Left levers anytime you want. When purchasing Juicy 7's, you have the choice of getting either 160, 185 or 203mm Polygon Rotors.
![photo]()
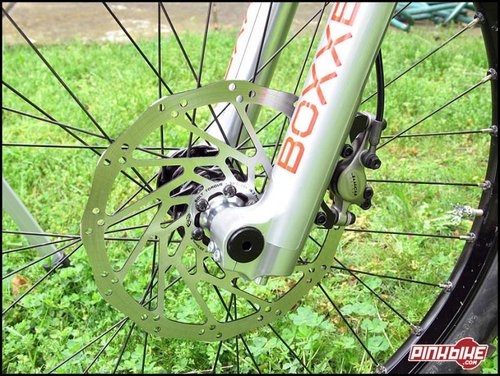
Front Avid Juicy 7 Caliper with 203mm Polygon rotor
Avid Juicy use Power Reserve Geometry. When you squeeze the levers of any brake – your fingers pull in the straight line, but the lever wants to move in an arc. Juicy’s allow the lever to move in a path that is more natural for your hand by creating a more hand-friendly arch that is closer to your fingers natural motion.
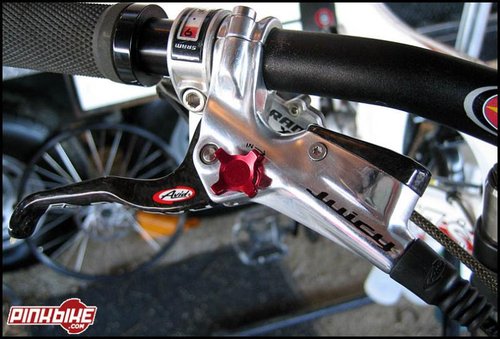
![photo]()
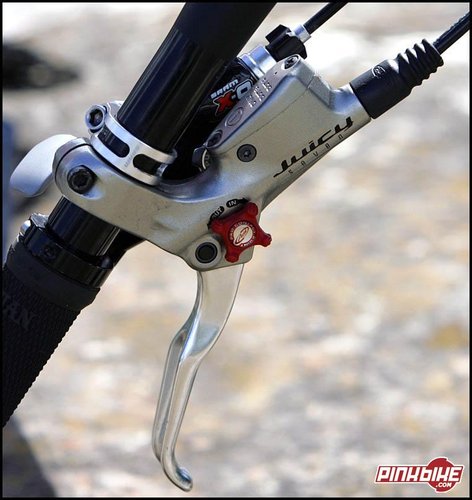
Avid Juicy 7 lever
You can also adjust the lever reach with the turn of one reach screw. Each indexation moves the lever 1mm.
The Avid’s have this feature called Bend Zone. Bend Zone means the lever absorbs and bends in a crash instead of the lever body, which is more expensive/difficult to replace. The lever can be carefully bent back into position to complete the ride. Another feature of the Juicy’s is that the levers can pop out (i.e. hyperextend) without damaging the inner parts in the event of a crash.
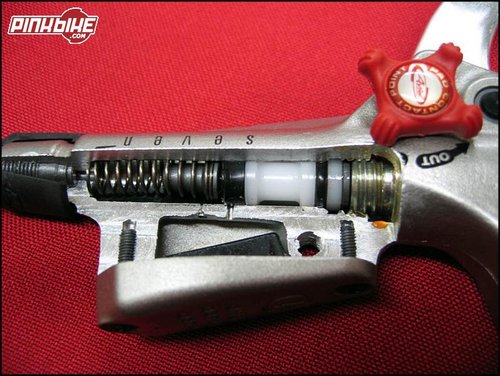
In the caliper the pistons roll in a seal, it doesn’t actually travel through a cylinder bowl. The seal open up and the piston will rock out, then and as you release the lever the seal pulls the piston back in.
As any other open system as the pads wear down the pistons switch out further and over their seals and they reset – so the pads clearance remains constant. What this does do is it advances the piston up and down in the master cylinder relative to the timing port that changes the effect of dead band to the lever – so you can have the brake engage early when you dial the piston in (which is actually moving it out). That will allow you to engage the brakes closer to the handlebars.
![photo]()
Cut out
• The distance between the lever’s pivot and the handlebar benefits of a smaller X Factor
• Reduces the lever’s inward travel
• Creates more hand-friendly geometry with an arc that’s closer to your finger’s natural motion
• Reduces hand fatigue because of the more natural motion.
• More leverage
• More power
Avid’s Juicy levers have the smallest X Factor of any brake in the industry
![photo]()
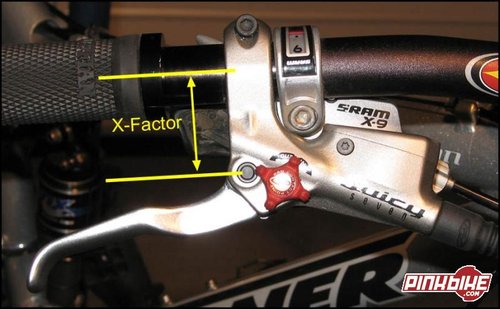
X-Factor is the distance from the center of the handlebar to the center of the lever pivot
The modulation is great, although I have to run my lever very close to the bar so I don’t lock them too easy. By modulation I mean that it's pretty easy to feather them and stop quickly without locking them up. BUT – with ease, you can lock up the brakes at full engagement if you choose too. This way, you can brake/slow down in a shorter distance. So in theory you can brake much later. If your brakes are weaker, you have to do your braking much sooner.
The Juicy’s impressed me so much that I literally upgraded all my bikes to them. Got a set for the DH bike and one for the DS bike The 160's that I have on my trail and DS bike are superb. Plenty of power for their size! I run the 203's on my DH bike, and it took me a while to get used too their brute power. Coming from Hopes, I’m used to grabbing a fist full of brake in order to stop – well you kind of want to avoid that with the Avid Juicy’s – especially with 203mm rotors or they will send you flying Superman style!
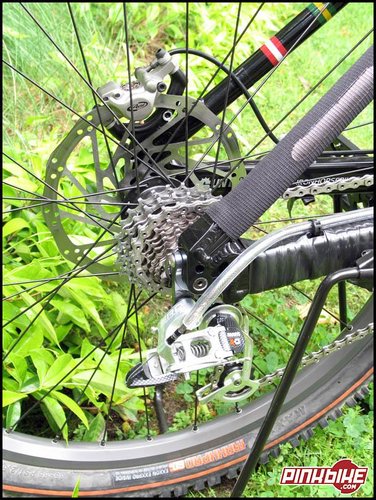
![photo]()
Rear Avid Juicy 7 Caliper with 203mm Polygon rotor
Lever pivots are not adjustable. By this I mean there is no way to tighten up the lever if play develops. Like on the Hope levers for example, you can tighten the lever pivot bolt and get rid of any lever wobble. It’s not a big deal and doesn’t take anything away for the great lever feel for the Juicy’s. Just something that I had control over with my Hopes, but not with the Juicy’s!
I just recently received a pair of the new 2006 Juicy Carbon’s which I can’t wait to try. They are so beautiful that you could almost wear them around your neck as jewelry. The new Juicy Carbons are a result of SRAM’s BlackBox race development program and go hand in hand with the new SRAM Carbon X.0 Triggers and rear derailleur.
The only downside I can see with the Juicy Carbon's is that now I'll have to upgrade all my bikes to them ;o)
![photo]()
BlackBox Carbon Juicy 7's used by Nathan Rennie this year
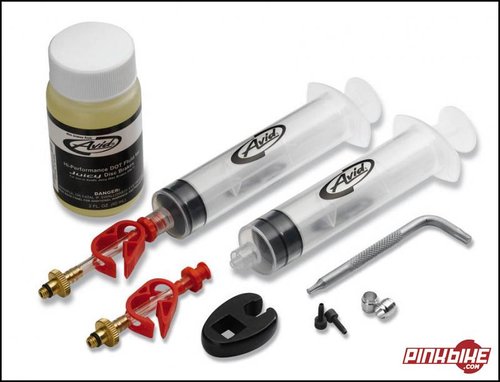
The Avid Bleed kit has absolutely everything you need to bleed your Avid Juicy 7 brakes. It contains 2 syringes, 2 fitting/clamp tubes, 2 compression ferrules, 2 barbed tubing inserts, 1 Torx-T25 L-wrench, 1 3/8"-drive 8mm crows-foot, 2oz bottle of DOT-4 brake fluid (5.1 also works), and instructions for bleeding Avid Juicy-7 and Juicy-5 hydraulic disc brakes.
![photo]()
2006 Avid Juicy 7 Bleed kit
The bleeding instruction included with the bleed kit can be overwhelming, so I decided to give you my simplified version. keep in mind that the following steps is how I BLEED THEM and is not "sponsored" by SRAM. Just an "unofficial" way I execute the bleed.
Acadian's Steps:
** First, make sure you have spare compression ferrules and hose barbs BEFORE cutting any line. These are part of the Avid Bleed kit.
** Cut lines at the lever, not the caliper
1 - Fill one bleed syringe 1/2 full with Fluid. Then de-gas (get air bubbles out) the fluid by clamping the syringe off and pulling a vacuum. As you do this, you’ll see gas bubbles float to the top. Make sure you’re holding the syringe upright. Pull and release the plunger until no more gas bubbles appear. Un-clamp, remove any excess air, and then re-clamp this syringe. Leave the other syringe empty and unclamped.
2 - Attach ½ full syringe to caliper
3 - loosen lever clamp – just enough to rotate, but not too much so it moves freely.
4 - position lever parallel to the ground
5 - attach empty syringe to lever
6 - position lever at 45 degree
7 - (Might have to open the lower syringe before doing this) Pull the brake lever completely to the bar and secure with a large rubber band.
8 - Draw a vacuum at the caliper. i.e. slowly and gently pull the plunger on the caliper syringe to draw a vacuum. Continue to draw a vacuum until no more air bubbles appear in the fluid.
9 - When no more air bubbles, close the lower syringe.
10 - release the lever (take rubber band off)
11 - Force fluid through the system by holding the lever syringe upright, release the clamp on the
caliper syringe and force fluid through the system into the lever syringe. Do this until the lever syringe is approximately 1/4 full, then re-clamp the caliper syringe.
12 - with both syringes closed, remove the caliper one and re-install the bleed plug
13 - Keep the top syringe upright, open it up and SLOWLY squeeze the brake lever halfway to the bar and release 5 or 6 times. This will displace any air bubbles within the master
cylinder into the master cylinder reservoir. If your bleed is right, it should be pretty crisp. You can also do the vacuum thing to make sure all the bubbles are out – but again be carful. While doing this step, you might want to also vary the position of the lever so to move all the bubbles out.
14 - Position lever parallel to the ground
15 - close and remove syringe
16 - top our the bleed hole and close.
17 - you are done.
Once the system is bled, you shouldn’t have to bleed the caliper or the line ever again. If you start feeling sponginess in the levers, simply bleed the lever (i.e. from step 13).
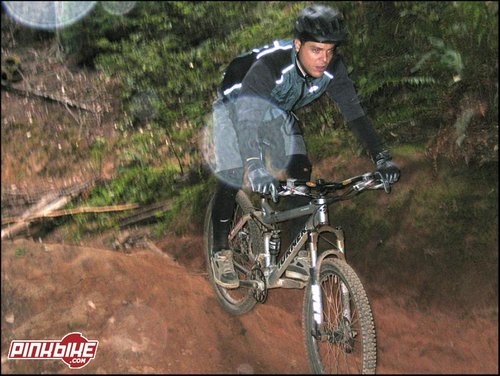
![photo]()
Me during a misty day at Skeggs
www.avidbike.com
www.sram.com
www.worldbicyclerelief.org - The Power Of Bicycles
Installation
Setup was a breeze and felt crisp right out of the box! They are so bloody easy to install – mounting and centering them is fool proof. The Tri-Align caliper positioning system aligns the caliper perfectly to the rotor - no shims and no special caliper half’s are required.The Juicy 7’s have a Speed Dial that allows you to dial in whatever lever feel you desire (i.e. Pad contact-point adjustment). On my DH bike I flipped the Speed Dial knobs upside down so they are under the lever, this way they are less prone to break in crashes, which I tend to do a lot.
Avid Juicy’s are also Ambidextrous, which mean you can switch the Right and Left levers anytime you want. When purchasing Juicy 7's, you have the choice of getting either 160, 185 or 203mm Polygon Rotors.
Lever feel/adjustments
I'm pretty anal about the feel of the levers - one reason I liked Hope brakes so much is that the lever feels perfect to me. Well I’m happy to say that the Avid Juicy 7 levers feel as good, if not better. Avid Juicy use Power Reserve Geometry. When you squeeze the levers of any brake – your fingers pull in the straight line, but the lever wants to move in an arc. Juicy’s allow the lever to move in a path that is more natural for your hand by creating a more hand-friendly arch that is closer to your fingers natural motion.
You can also adjust the lever reach with the turn of one reach screw. Each indexation moves the lever 1mm.
The Avid’s have this feature called Bend Zone. Bend Zone means the lever absorbs and bends in a crash instead of the lever body, which is more expensive/difficult to replace. The lever can be carefully bent back into position to complete the ride. Another feature of the Juicy’s is that the levers can pop out (i.e. hyperextend) without damaging the inner parts in the event of a crash.
In the caliper the pistons roll in a seal, it doesn’t actually travel through a cylinder bowl. The seal open up and the piston will rock out, then and as you release the lever the seal pulls the piston back in.
As any other open system as the pads wear down the pistons switch out further and over their seals and they reset – so the pads clearance remains constant. What this does do is it advances the piston up and down in the master cylinder relative to the timing port that changes the effect of dead band to the lever – so you can have the brake engage early when you dial the piston in (which is actually moving it out). That will allow you to engage the brakes closer to the handlebars.
X-Factor Defined
X-Factor is the distance from the center of the handlebar to the center of the lever pivot. If you read Avid’s documentation about the subject you will find the following info – this is just a re-ash of what they have in their catalogue.• The distance between the lever’s pivot and the handlebar benefits of a smaller X Factor
• Reduces the lever’s inward travel
• Creates more hand-friendly geometry with an arc that’s closer to your finger’s natural motion
• Reduces hand fatigue because of the more natural motion.
• More leverage
• More power
Avid’s Juicy levers have the smallest X Factor of any brake in the industry
How they work
Barely a few miles into my first ride, I was literally blown away by how well they worked. Not only did they provide a heap of braking power, they also took no time at all to break in! The modulation is great, although I have to run my lever very close to the bar so I don’t lock them too easy. By modulation I mean that it's pretty easy to feather them and stop quickly without locking them up. BUT – with ease, you can lock up the brakes at full engagement if you choose too. This way, you can brake/slow down in a shorter distance. So in theory you can brake much later. If your brakes are weaker, you have to do your braking much sooner.
The Juicy’s impressed me so much that I literally upgraded all my bikes to them. Got a set for the DH bike and one for the DS bike The 160's that I have on my trail and DS bike are superb. Plenty of power for their size! I run the 203's on my DH bike, and it took me a while to get used too their brute power. Coming from Hopes, I’m used to grabbing a fist full of brake in order to stop – well you kind of want to avoid that with the Avid Juicy’s – especially with 203mm rotors or they will send you flying Superman style!
What could be better
Clamping: Back in 2004, the Juicy 7’s had a split clamp design but for 2005 decided to go with a single clamp. I didn’t think it would bother me that much, but at times I wish it had the double clamp. Taking the levers off my bar required me to take my bar out of my stem and grips off my bars. Good news though – the split clamp design is back for 2006 – yay!!Lever pivots are not adjustable. By this I mean there is no way to tighten up the lever if play develops. Like on the Hope levers for example, you can tighten the lever pivot bolt and get rid of any lever wobble. It’s not a big deal and doesn’t take anything away for the great lever feel for the Juicy’s. Just something that I had control over with my Hopes, but not with the Juicy’s!
Conclusion
I’m sold…these brakes are a thing of beauty. Recently, just to compare to the Avid Juicy 7’s, I tried mounting some new Hope Mono M4’s that I had lying around. This little drill basically sealed it – they were such a pain in the “you know what” to install that I literally took them off and sold them without trying them.I just recently received a pair of the new 2006 Juicy Carbon’s which I can’t wait to try. They are so beautiful that you could almost wear them around your neck as jewelry. The new Juicy Carbons are a result of SRAM’s BlackBox race development program and go hand in hand with the new SRAM Carbon X.0 Triggers and rear derailleur.
The only downside I can see with the Juicy Carbon's is that now I'll have to upgrade all my bikes to them ;o)
Bleeding
Juicy’s are extremely simple to bleed - easiest brakes I've ever had to bleed. But then again all I've used before these brakes are Hopes. I highly suggest getting the Avid Bleed kit, which facilitates the entire process. With the Avid bleed kit, I can literally cut both lines and bleed both brakes in less than 30mins – and that’s with the brakes still on the bike. The bleed is pretty much drip-free The Avid Bleed kit has absolutely everything you need to bleed your Avid Juicy 7 brakes. It contains 2 syringes, 2 fitting/clamp tubes, 2 compression ferrules, 2 barbed tubing inserts, 1 Torx-T25 L-wrench, 1 3/8"-drive 8mm crows-foot, 2oz bottle of DOT-4 brake fluid (5.1 also works), and instructions for bleeding Avid Juicy-7 and Juicy-5 hydraulic disc brakes.
The bleeding instruction included with the bleed kit can be overwhelming, so I decided to give you my simplified version. keep in mind that the following steps is how I BLEED THEM and is not "sponsored" by SRAM. Just an "unofficial" way I execute the bleed.
Acadian's Steps:
** First, make sure you have spare compression ferrules and hose barbs BEFORE cutting any line. These are part of the Avid Bleed kit.
** Cut lines at the lever, not the caliper
1 - Fill one bleed syringe 1/2 full with Fluid. Then de-gas (get air bubbles out) the fluid by clamping the syringe off and pulling a vacuum. As you do this, you’ll see gas bubbles float to the top. Make sure you’re holding the syringe upright. Pull and release the plunger until no more gas bubbles appear. Un-clamp, remove any excess air, and then re-clamp this syringe. Leave the other syringe empty and unclamped.
2 - Attach ½ full syringe to caliper
3 - loosen lever clamp – just enough to rotate, but not too much so it moves freely.
4 - position lever parallel to the ground
5 - attach empty syringe to lever
6 - position lever at 45 degree
7 - (Might have to open the lower syringe before doing this) Pull the brake lever completely to the bar and secure with a large rubber band.
8 - Draw a vacuum at the caliper. i.e. slowly and gently pull the plunger on the caliper syringe to draw a vacuum. Continue to draw a vacuum until no more air bubbles appear in the fluid.
9 - When no more air bubbles, close the lower syringe.
10 - release the lever (take rubber band off)
11 - Force fluid through the system by holding the lever syringe upright, release the clamp on the
caliper syringe and force fluid through the system into the lever syringe. Do this until the lever syringe is approximately 1/4 full, then re-clamp the caliper syringe.
12 - with both syringes closed, remove the caliper one and re-install the bleed plug
13 - Keep the top syringe upright, open it up and SLOWLY squeeze the brake lever halfway to the bar and release 5 or 6 times. This will displace any air bubbles within the master
cylinder into the master cylinder reservoir. If your bleed is right, it should be pretty crisp. You can also do the vacuum thing to make sure all the bubbles are out – but again be carful. While doing this step, you might want to also vary the position of the lever so to move all the bubbles out.
14 - Position lever parallel to the ground
15 - close and remove syringe
16 - top our the bleed hole and close.
17 - you are done.
Once the system is bled, you shouldn’t have to bleed the caliper or the line ever again. If you start feeling sponginess in the levers, simply bleed the lever (i.e. from step 13).
Links of interest
www.sram.com
www.worldbicyclerelief.org - The Power Of Bicycles
Author Info:

Must Read This Week
To bleed my M4s it was a simple case of buying some dot 5.1 and a tube i picked up from ebay for 99p.
I now need to bleed my rear juicy 3 and i can buy another rear brake (2nd hand) for the same price as the bleed kit.
watev, this review was really helpful i think i'm gona go out and get a bleed kit and (with the help of a friend) bleed my juicy 7s for the first time!
yeh i love juicy 7's these are my first hydraulic brakes (so i guess i cant say much) but they will probably be my only hydraulic's
im looking forward to changing hose (red)
great review indeeeed
Great review. I have some juicy's. Not sure which model, though.