Stories posted under Pinkbike Community blogs are not edited, vetted, or approved by the Pinkbike editorial team. These are stories from Pinkbike users.
If a blog post is offensive or violates the Terms of Services, please report the blog to Community moderators.
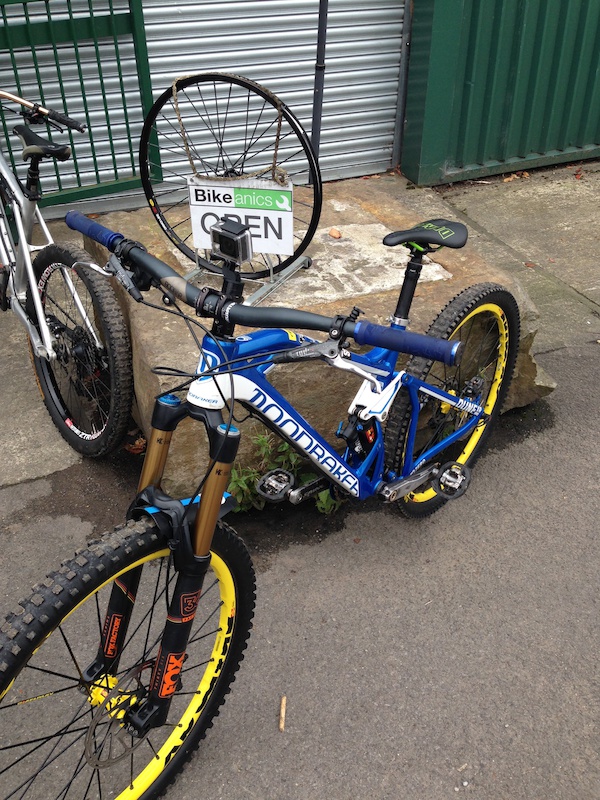
TopCap GoPro mount
My name is Jake Martin, I Study B Sc Product design at Huddersfield University an ride/race on the OneVision Global Racing Grass-roots team. Being a product designer and a rider,I have had a few ideas to develop and use when riding my bike, here is how it started.....![photo]()
I bought a GoPro 4 earlier this year to use at race events to film the track so i could watch it over to memorise the track when practise ended, that idea didnt last long as British cycling put the "No helmet/chesty cam" rule meaning riders are only able to film the track if the camera is mounted on the bike. Due to the current mounting hardware available, riders can only attach their cameras to handlebars and seat-posts making the POV either off centre to the bike or hidden behind the toptube, putting a weird angle on the viewing perspective.
i started to look at where else a mount could be placed that would be central to the bike, only the topcap came to mind so with a little research i found companies already making a mount for this position. after looking at the current available mounts on the market i found a gap in the market for those riders who rely on their footage to halp with memorising the track.
A few things i found "wrong" with current designs:
Although the mount is central with the bike, the lense is offset to the left of the bike, meaning the footage still isnt central.
Being cnc'd out of aluminium, naturally its a strong mount which is a drawback. if you crash with a metal mount, the camera is going to take a large hit and in turn posibly brake as the mount doesnt allow it to snap off.
This is where i started to draw up a couple of designs to overcome these problems.
![photo]() Mk1 Topcap mount
Mk1 Topcap mount
Firstly I drew up a simple Mk1 design on SolidWorks at home and had it 3D printed out at Uni, just to work out dimentions and how it fit to the bike, then the testing was under-way.With a week of riding and filming was able to outline a few areas to develop then go back to the drawing board and develop a Mk2 mount.
![photo]() Mk2 Development stage
Mk2 Development stage
After another weeks testing i found major floors in the design that needed to be fixed for example: the topcap plate was to thin so cracked under tightening the headset, meaning the headset often came loose, this is where the Mk3 development came in.
![photo]() Result of Mk2 over tightening
Result of Mk2 over tightening
![photo]() Mk3 fresh out the printer
Mk3 fresh out the printer
Testing is still under way but is proving to be good so far, with a strengthened topcap plate and a few minor aesthetic improvements added to the design.
I bought a GoPro 4 earlier this year to use at race events to film the track so i could watch it over to memorise the track when practise ended, that idea didnt last long as British cycling put the "No helmet/chesty cam" rule meaning riders are only able to film the track if the camera is mounted on the bike. Due to the current mounting hardware available, riders can only attach their cameras to handlebars and seat-posts making the POV either off centre to the bike or hidden behind the toptube, putting a weird angle on the viewing perspective.
i started to look at where else a mount could be placed that would be central to the bike, only the topcap came to mind so with a little research i found companies already making a mount for this position. after looking at the current available mounts on the market i found a gap in the market for those riders who rely on their footage to halp with memorising the track.
A few things i found "wrong" with current designs:
Although the mount is central with the bike, the lense is offset to the left of the bike, meaning the footage still isnt central.
Being cnc'd out of aluminium, naturally its a strong mount which is a drawback. if you crash with a metal mount, the camera is going to take a large hit and in turn posibly brake as the mount doesnt allow it to snap off.
This is where i started to draw up a couple of designs to overcome these problems.

Firstly I drew up a simple Mk1 design on SolidWorks at home and had it 3D printed out at Uni, just to work out dimentions and how it fit to the bike, then the testing was under-way.With a week of riding and filming was able to outline a few areas to develop then go back to the drawing board and develop a Mk2 mount.

After another weeks testing i found major floors in the design that needed to be fixed for example: the topcap plate was to thin so cracked under tightening the headset, meaning the headset often came loose, this is where the Mk3 development came in.


Testing is still under way but is proving to be good so far, with a strengthened topcap plate and a few minor aesthetic improvements added to the design.
Author Info:
 Member since Dec 19, 2013
Must Read This Week
Sign Up for the Pinkbike Newsletter - All the Biggest, Most Interesting Stories in your Inbox
PB Newsletter Signup
0 Comments
Login or Sign Up