Fox Float DRCV Shock Technology - Tested
Fox Racing Shox and Trek pooled their resources and know-how to work on a highly modified air shock that uses two air chambers in an effort to get the best out of both a smaller volume air spring and a more forgiving larger volume air canister. The result is the Fox Float DRCV RP-23 and RP-2 shocks that you'll find on select Trek full suspension bikes. Having logged too many miles to count throughout the 2008 and 2009 seasons on pre-DRCV Remedy's, I've now been able to put in some quality miles on a model equipped with the new DRCV technology. Inside you can see how the design works and read my thoughts on its performance.
Read on...
Fox DRCV Technology
![photo]()
Setting up the DRCV shock is similar to any other air shock, but an extra step is required during the process that you wouldn't have to do with a standard unit. The DRCV equipped Remedy that I've been putting time on came with a card that gave me a guideline as to where to start with air pressure for the spring rate, but if you don't have it handy it's also listed on the Trek website. You'll want to start with about 10 psi more than your body weight. I weigh in at 170 lbs and so I pumped until the gauge read 180 psi. Now comes the additional step required with the DRCV shock: it is very important for you to push the bike into 50% of its travel at this point in the setup. What you are doing is pressurizing the smaller secondary air chamber and you need to push the bike far enough into its travel so the plunger is activated and opens the airway between the two chambers.
Once this is done you’ll need to check sag with the nifty clip on sag meter that tells you what percentage of the travel you're sitting in. If you don’t have enough sag, you’ll need to take pressure out and vise versa if you have too much sag. If you look closely as your putting the pump on, you will see two pressure readings as you screw it on to re-check pressure. This is due to the two Schrader valve system that connects the different chambers to facilitate set up filling. Just make sure you screw it on fully and not stop at the first reading. The first pressure will read lower than the second pressure and it is the second pressure that correlates to the initial pressure you put in. Anytime you make a pressure adjustment you need to be sure to repeat these steps, not doing so will hinder setup and could result in a funky ride. With the recommended pressure in the shock I was sitting into 25% of the travel, a bit less than I thought I would eventually end up with, but a good place to start. As with any shock that uses a pedal assist, be sure to have the Pro Pedal fully open while going through the setup steps. Once the spring rate is in the ball park, you can adjust your rebound setting accordingly. Keep in mind that changes to the air pressure, which acts as your spring, may necessitate changes to rebound settings.
![photo]()
After spending most of the previous two seasons on multiple non-DRCV Remedys (they were equipped with an RP2 and a RP23), I certainly have enough experience on both types of dampers to properly compare the two. With a handful of rides that I used to dial in the DRCV shock's pressure and rebound settings, it was soon clear that there is a performance difference between this new damper and the older non-DRCV RP23 shock on my previous Remedy. When set to the same air pressure (I typically ran the DRCV shock with 5 psi less than the standard RP23 though) the shock was undeniably, slightly more active at the top of its stroke. I'm convinced that even though rotation at the upper shock mount is minimal, the addition of the sealed bearing in place of the usual DU bushing is the reason for this. On the trail the shock is more active and likely to absorb the small irregularities that can upset traction. The difference between the two shocks is very noticeable when compared back to back and on the first ride on the DRCV equipped bike I ended up stopping to check the pressure of my rear tire multiple times, not because I was rolling slower, but because the ride felt so much more forgiving that I quickly suspected a slow flat, which wasn't the case.
![photo]()
Despite the more active nature of the DRCV shock, it managed to remain composed in hard corners, a trait that I've always liked about the 150 mm travel Remedy. While not as noticeable as the improved small bump activity, the DRCV's ending stroke is also more forgiving as well. I wouldn't go so far as to say that the bike feels as if it has any more travel, but impacts that happen when the shock is already near the end of the stroke do not feel as harsh. The transition from only using the larger air chamber to both chambers is seamless when the bike is being ridden, and I never could feel the plunger being activated as it came in contact with the seal head, something that was a concern of mine at first. Older Remedy's had their Fox shocks equipped with an XV (extra volume) air canister that made for a very forgiving linear stroke, but did sometimes require higher air pressure to keep the bike from gobbling up its travel too quickly depending on the rider. Because the Float DRCV shock's main air chamber that is used for the first half of the stroke has smaller volume I found that I could run slightly less pressure than I had used on the standard Float, making for a more forgiving early stroke. While I would certainly tell you that there are advantages to the DRCV technology, you should take note of a few points before deciding if this technology is for you, one being that it is not possible to swap it out for any other damper due to the upper EVO Link's sealed bearing shock mount. You'll also only find Float DRCV shocks on Trek bikes. With this in mind, if something does go wrong, you're chances of walking into a shop and finding a shock are greatly reduced when compared to a shock that uses traditional mounting bolts. I've had zero reliability issues at all with mine, but it is something to keep in mind. The setup procedure is also slightly more involved, but I'd expect most riders who are dropping coin on a bike equipped with this technology to take the time to run through all setup steps... hopefully.
After countless miles on Trek Remedy's equipped with both the standard RP2 and RP23, as well as the newer DRCV shock, I can say that there is definitely a performance advantage to be had. The ride was smoother, I felt like I had more traction, and the bike was more forgiving when it reached the end of its stroke. It is hard to argue with any of that.
www.trekbikes.com
Foxracingshox.com
Read on...
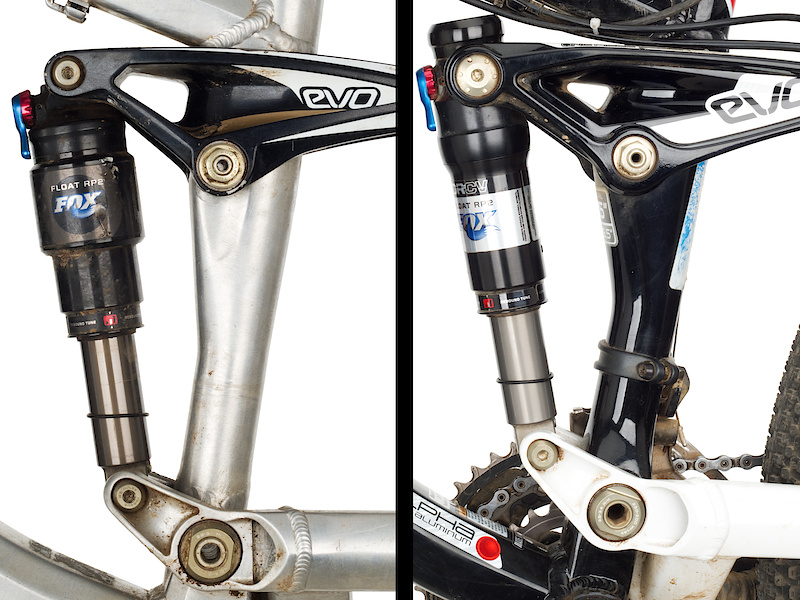
If you only had a quick glimpse at the Fox Float DRCV shock you may not notice the damper's extra length that is positioned above the upper mounting point. Another look though and it becomes obvious that there is certainly something very different going on here. The extra length at the top houses the smaller, secondary air spring chamber, which is partly where the DRCV name is derived from. The "DR" stands for Dual Rate, and is as simple as that. The two different air chambers provide two different rates depending on where the shock is at in its stroke. Connecting the two chambers is a plunger, or valve, that opens the airway between the two at a predetermined point in the travel. The plunger is referred to as the control valve, or the "CV" in DRCV. The goal with this technology is to be able to have your cake and eat it as well, meaning to have a lively but firm spring to push against that is provided by the main chamber, but benefit from the secondary chamber's ability to add a more linear and forgiving end to the stroke.
Setting up the DRCV shock is similar to any other air shock, but an extra step is required during the process that you wouldn't have to do with a standard unit. The DRCV equipped Remedy that I've been putting time on came with a card that gave me a guideline as to where to start with air pressure for the spring rate, but if you don't have it handy it's also listed on the Trek website. You'll want to start with about 10 psi more than your body weight. I weigh in at 170 lbs and so I pumped until the gauge read 180 psi. Now comes the additional step required with the DRCV shock: it is very important for you to push the bike into 50% of its travel at this point in the setup. What you are doing is pressurizing the smaller secondary air chamber and you need to push the bike far enough into its travel so the plunger is activated and opens the airway between the two chambers.
Once this is done you’ll need to check sag with the nifty clip on sag meter that tells you what percentage of the travel you're sitting in. If you don’t have enough sag, you’ll need to take pressure out and vise versa if you have too much sag. If you look closely as your putting the pump on, you will see two pressure readings as you screw it on to re-check pressure. This is due to the two Schrader valve system that connects the different chambers to facilitate set up filling. Just make sure you screw it on fully and not stop at the first reading. The first pressure will read lower than the second pressure and it is the second pressure that correlates to the initial pressure you put in. Anytime you make a pressure adjustment you need to be sure to repeat these steps, not doing so will hinder setup and could result in a funky ride. With the recommended pressure in the shock I was sitting into 25% of the travel, a bit less than I thought I would eventually end up with, but a good place to start. As with any shock that uses a pedal assist, be sure to have the Pro Pedal fully open while going through the setup steps. Once the spring rate is in the ball park, you can adjust your rebound setting accordingly. Keep in mind that changes to the air pressure, which acts as your spring, may necessitate changes to rebound settings.
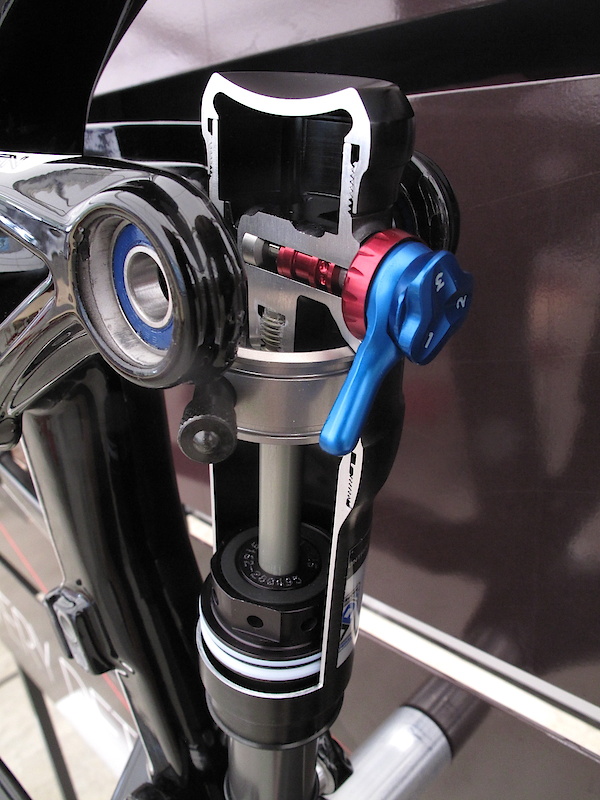
This photo of a Fox Float DRCV shock cutaway clearly shows the larger air chamber below (with the damping rod running vertically in the middle of it) and the smaller secondary air chamber located above. Hidden behind the Trek bike's EVO link is the plunger that opens and closes the airway between the two. In the early stages of the travel the shock is working solely with the main air spring, at the 50% point of the stroke the plunger comes in contact with the seal head and is pushed up, opening the airway between the two air chambers and effectively creating one large chamber. The plunger is spring loaded so that when the shock rebounds, it retracts and closes the airway once again, leaving the smaller air chamber pressurized to the same psi as before. Getting deeper into things, the Boost Valve compression characteristics have been tuned with a Light Velocity Tune and 175 psi. DRCV shocks have all used a modified rebound circuit to deal with the shock's dual spring rate, but the new 2011 models have been tweaked to add more end stroke control while not effecting the small bump response. You can also see the sealed bearing upper shock mount that Trek uses to mount the DRCV damper, making things a touch smoother. While all that can sound quite complicated, all that matters to most riders is how it performs on the trail.
After spending most of the previous two seasons on multiple non-DRCV Remedys (they were equipped with an RP2 and a RP23), I certainly have enough experience on both types of dampers to properly compare the two. With a handful of rides that I used to dial in the DRCV shock's pressure and rebound settings, it was soon clear that there is a performance difference between this new damper and the older non-DRCV RP23 shock on my previous Remedy. When set to the same air pressure (I typically ran the DRCV shock with 5 psi less than the standard RP23 though) the shock was undeniably, slightly more active at the top of its stroke. I'm convinced that even though rotation at the upper shock mount is minimal, the addition of the sealed bearing in place of the usual DU bushing is the reason for this. On the trail the shock is more active and likely to absorb the small irregularities that can upset traction. The difference between the two shocks is very noticeable when compared back to back and on the first ride on the DRCV equipped bike I ended up stopping to check the pressure of my rear tire multiple times, not because I was rolling slower, but because the ride felt so much more forgiving that I quickly suspected a slow flat, which wasn't the case.
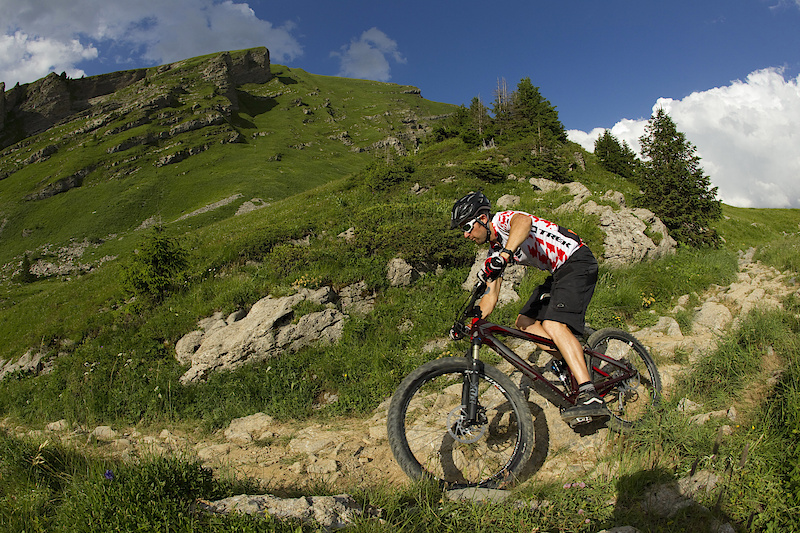
This sort of rocky terrain is where one can really feel the difference between the standard shock and the newer Float DRCV.
Despite the more active nature of the DRCV shock, it managed to remain composed in hard corners, a trait that I've always liked about the 150 mm travel Remedy. While not as noticeable as the improved small bump activity, the DRCV's ending stroke is also more forgiving as well. I wouldn't go so far as to say that the bike feels as if it has any more travel, but impacts that happen when the shock is already near the end of the stroke do not feel as harsh. The transition from only using the larger air chamber to both chambers is seamless when the bike is being ridden, and I never could feel the plunger being activated as it came in contact with the seal head, something that was a concern of mine at first. Older Remedy's had their Fox shocks equipped with an XV (extra volume) air canister that made for a very forgiving linear stroke, but did sometimes require higher air pressure to keep the bike from gobbling up its travel too quickly depending on the rider. Because the Float DRCV shock's main air chamber that is used for the first half of the stroke has smaller volume I found that I could run slightly less pressure than I had used on the standard Float, making for a more forgiving early stroke. While I would certainly tell you that there are advantages to the DRCV technology, you should take note of a few points before deciding if this technology is for you, one being that it is not possible to swap it out for any other damper due to the upper EVO Link's sealed bearing shock mount. You'll also only find Float DRCV shocks on Trek bikes. With this in mind, if something does go wrong, you're chances of walking into a shop and finding a shock are greatly reduced when compared to a shock that uses traditional mounting bolts. I've had zero reliability issues at all with mine, but it is something to keep in mind. The setup procedure is also slightly more involved, but I'd expect most riders who are dropping coin on a bike equipped with this technology to take the time to run through all setup steps... hopefully.
After countless miles on Trek Remedy's equipped with both the standard RP2 and RP23, as well as the newer DRCV shock, I can say that there is definitely a performance advantage to be had. The ride was smoother, I felt like I had more traction, and the bike was more forgiving when it reached the end of its stroke. It is hard to argue with any of that.
www.trekbikes.com
Foxracingshox.com
Author Info:

Must Read This Week
Sign Up for the Pinkbike Newsletter - All the Biggest, Most Interesting Stories in your Inbox
PB Newsletter Signup
As far as my speculation goes: Trek just felt that they can fit something up there over the evo link instead of just throwing on reservoir-equipped air shock and make their suspension system even more... theirs - and there's nothing wrong about that if you ask me
I'm going to remain neutral about it because I like the idea of a dual inline aircan design, however how is it different from the DHX air as stated above.
A Float DRCV is said to weigh 324g.
Eitherway,it's a great idea and from what i've read about it,it works great as well.
I'm all for it! Unfortunately I've already bought my bike for 2010 maybe in a couple of years... Cool stuff Fox/Trek!