Make your bike stand out.
I chose my first bike because of its low-maintenance and strength. When I got my 224 I was not happy with the way it looked. As an industrial designer I wanted to do something about it. First I changed parts to match the color scheme of the bike, I changed my stem, bars, grips, seat and seat post. But even after that I felt like the bike was missing something. The 224 looks like it is bombproof, but the frame design concept seems to be from the early 2000's or even from the 90's, so I thought I could do something about it. Obviously I could not change the frame design, so I started to consider a paint job and stickers.
You don't need to spend a lot of money to make your bike stand out. Here are a few design tips and a tutorial on how you can design awesome graphics and paint jobs on your bike.Here are some tips on how to design:
Don't use small illustrations because they are hard to cut out. If you need to use small illustrations you can use printed stickers which can also be cut out, but they are a little bit more expensive than standard cut out stickers. Try not to use too many colors if you don't want your bike to look like everybody else's. Nowadays in the downhill scene the illustrations are a little scrambled (expect POC) and everybody tries to look like an MX-racer. Could it be the time to make the downhill scene a little bit different and something new?
Things you need:
- digital camera
- extra flash(es)
- Adobe Photoshop or equivalent
- Adobe indesign or equivalent
- Colour chart. If you have a RAL design color slides it helps you to pick the colors. Usually aluminum frames are powder coated with standard RAL-colours or they're anodized. Here is a tutorial on how to paint your bike. I recommend that you get a professional to do this, as it's worth it. For painting technique I recommend powder coating because it doesn't add too much weight on your bike, it's the most durable, and the finished product looks good every time without any varnishing. Basically it is a "plastic skin" on your bike.
- Sticker samples of the colors which you are about to use. There are different thicknesses of stickers. If you have a lot of welds on your bike like I do, you should use the thinner stickers because the thicker ones will not sit on the bike as nicely.
![photo]()
Step 1
First you need to take a photo of your bike. If you don't have a studio, try to shoot it on a white wall using a stand. You can use a table as I did on my example. If you can use an extra flash and shoot it to the wall behind the bike so that it's easier to cut the bike out of the picture. If you can use a studio, shoot the bike on white paper and try to burn the background to white. Then open the photo in Photoshop.
![photo]()
Step 2
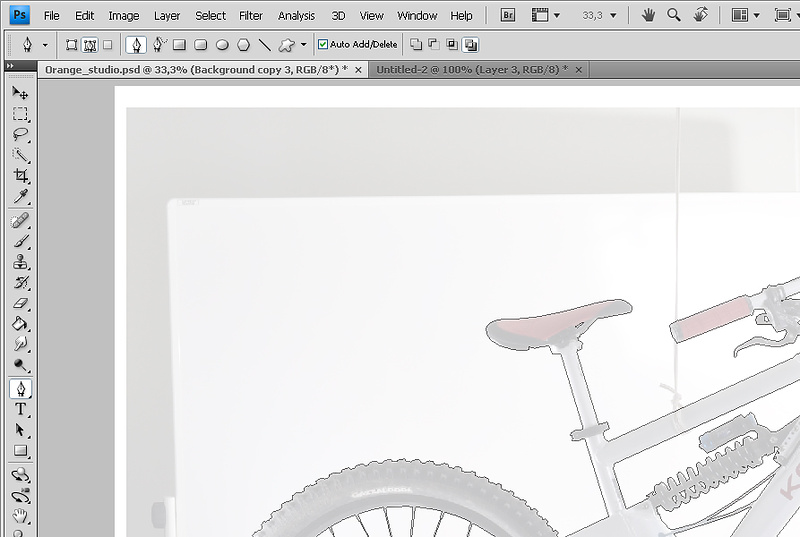
This is the most time consuming and boring part of the job. Cut out the bike with pen tool with shape layers on. With this technique you don't lose your data and you can change it afterwards. If you did shoot the bike in studio you don't need to cut out the whole bike with tyres.
![photo]()
![photo]()
Step 3
Make a new layer and paint over the old graphics with clone stamp (it would be better if you remove the decals before you take the picture).
![photo]()
Step 4
Find interesting shapes or draw them with adobe illustrator. Why illustrator? Illustrator is a vector based graphics design software. Vectors can be used to cut the decals. Copy and paste them in Photoshop as smart objects and using layer masks (make the masks with the same technique as in step 2) fit the graphics on your bike. Try to use layer opacity and blending modes to show the structure of the bike.
![photo]()
Here are a couple of choices where you can see the point. I added some sweet skulls because I didn't find any machine guns!
![photo]()
![photo]()
Step 5
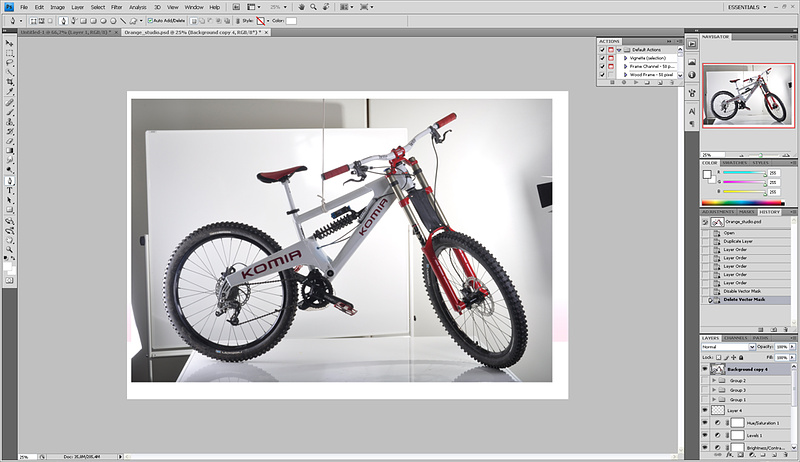
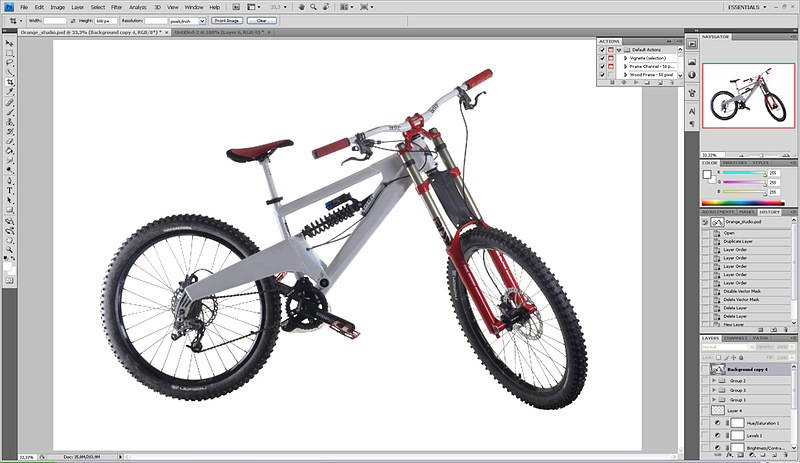
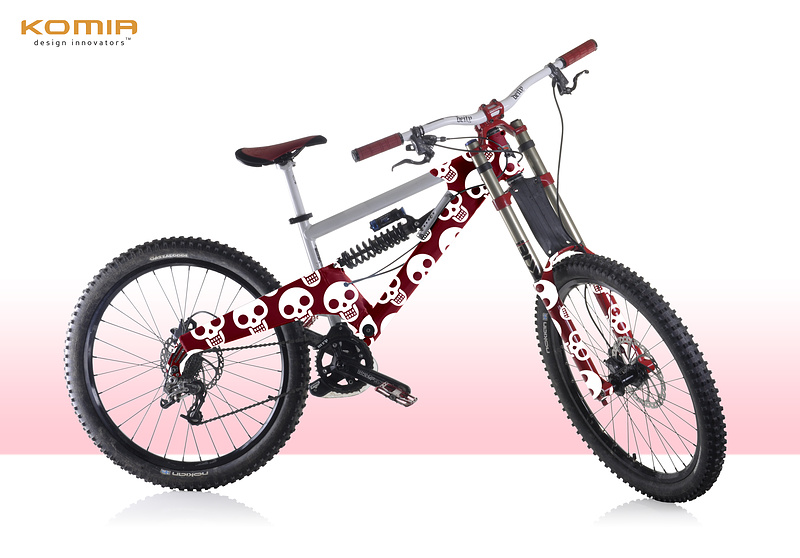
Take the measurements from your bike referring to the illustration you have made. Take the illustrator files and stretch the shapes to actual size. Order the decals from a sticker factory and use mild soapy water when putting the decals on your bike. Wipe the air bubbles out and leave the bike alone for few hours. Then take a money shot in the studio and send the picture to me.
![photo]()
The whole thing cost me about 180€. It would have been cheaper if I would have removed the the old paint from the bike myself. I think you can do the whole paint job and stickers for under 100€. The paint job is done by powder coating and the stickers are 3M 30-series. If you have any questions about the techniques, just google them with the technique name. There will be more than a bunch of good tutorials out there.
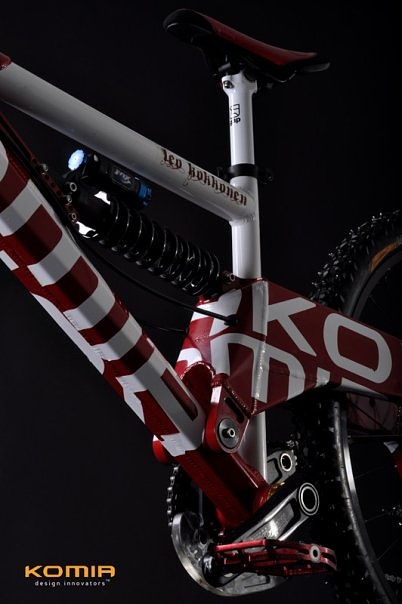
Here are the money shots of my bike:
![photo]()
![photo]()
![photo]()
![photo]()
![photo]()
All but the last picture were taken by myself. The last one is ©Markus Palminen's.
You don't need to spend a lot of money to make your bike stand out. Here are a few design tips and a tutorial on how you can design awesome graphics and paint jobs on your bike.Here are some tips on how to design:
Don't use small illustrations because they are hard to cut out. If you need to use small illustrations you can use printed stickers which can also be cut out, but they are a little bit more expensive than standard cut out stickers. Try not to use too many colors if you don't want your bike to look like everybody else's. Nowadays in the downhill scene the illustrations are a little scrambled (expect POC) and everybody tries to look like an MX-racer. Could it be the time to make the downhill scene a little bit different and something new?
Things you need:
- digital camera
- extra flash(es)
- Adobe Photoshop or equivalent
- Adobe indesign or equivalent
- Colour chart. If you have a RAL design color slides it helps you to pick the colors. Usually aluminum frames are powder coated with standard RAL-colours or they're anodized. Here is a tutorial on how to paint your bike. I recommend that you get a professional to do this, as it's worth it. For painting technique I recommend powder coating because it doesn't add too much weight on your bike, it's the most durable, and the finished product looks good every time without any varnishing. Basically it is a "plastic skin" on your bike.
- Sticker samples of the colors which you are about to use. There are different thicknesses of stickers. If you have a lot of welds on your bike like I do, you should use the thinner stickers because the thicker ones will not sit on the bike as nicely.

Here is a photo of my 224 before I started the process.
Step 1
First you need to take a photo of your bike. If you don't have a studio, try to shoot it on a white wall using a stand. You can use a table as I did on my example. If you can use an extra flash and shoot it to the wall behind the bike so that it's easier to cut the bike out of the picture. If you can use a studio, shoot the bike on white paper and try to burn the background to white. Then open the photo in Photoshop.
Step 2
This is the most time consuming and boring part of the job. Cut out the bike with pen tool with shape layers on. With this technique you don't lose your data and you can change it afterwards. If you did shoot the bike in studio you don't need to cut out the whole bike with tyres.
Step 3
Make a new layer and paint over the old graphics with clone stamp (it would be better if you remove the decals before you take the picture).
Step 4
Find interesting shapes or draw them with adobe illustrator. Why illustrator? Illustrator is a vector based graphics design software. Vectors can be used to cut the decals. Copy and paste them in Photoshop as smart objects and using layer masks (make the masks with the same technique as in step 2) fit the graphics on your bike. Try to use layer opacity and blending modes to show the structure of the bike.

Here are a couple of choices where you can see the point. I added some sweet skulls because I didn't find any machine guns!

Step 5
Take the measurements from your bike referring to the illustration you have made. Take the illustrator files and stretch the shapes to actual size. Order the decals from a sticker factory and use mild soapy water when putting the decals on your bike. Wipe the air bubbles out and leave the bike alone for few hours. Then take a money shot in the studio and send the picture to me.

The whole thing cost me about 180€. It would have been cheaper if I would have removed the the old paint from the bike myself. I think you can do the whole paint job and stickers for under 100€. The paint job is done by powder coating and the stickers are 3M 30-series. If you have any questions about the techniques, just google them with the technique name. There will be more than a bunch of good tutorials out there.
Here are the money shots of my bike:


All but the last picture were taken by myself. The last one is ©Markus Palminen's.
Author Info:
Must Read This Week
Sign Up for the Pinkbike Newsletter - All the Biggest, Most Interesting Stories in your Inbox
PB Newsletter Signup
aksus.pictures.fi/kuvat/Urheilu/Laajavuori+Talvi-DH+28.3.2010/DSC08049.jpg
picasaweb.google.fi/110178741159536063075/CommencalWinterCup_27_03_10#5454054304600022370
this crack me up lolol.
Think what you could buy for that kind of money that would actually have some kind of performance gain.
Pretty. But unbelieveably expensive.
As for worrying about crime?...crime is crime do I really need to go there? If you spend all your time worrying about chavs and feel held back in life due to the existence of them, then you might as well leap off a cliff now. Dunno where on earth you're going with the fraud idea but wow, I definitely recommend reading the article when you've had some sleep.
HOWEVER, if you don't like your bike and have a new one in your sights (though just out of your price range), then paint your bike to make it look like it's worth $1000 more than it really is. (You could try to make it look like a newer model, which, if you have a Kona, can't be that hard. You don't need to fool anyone serious about biking, just an insurance agent.) Once you have that done, get your bike noticed by some chavs by biking past them while on the way to your riding spot or LBS. Once you're done that, just look up your bike with a cheap lock and wait for the chavs to grab the bolt cutters from their garages. BAM, you're the value of your bike + $1000 richer and didn't even have to put your bike on the buysell.
Your point about people modifying everything doesn't really apply here since the weight of paint and stickers is completely negligible on cars, motorbikes, etc. I find it really dumb to add weight to a frame when you pay so much for light components. (Well, maybe a factory paint job weighs only a few grams, but I'm sure a personal spray won't fare so well when it comes to saving weight.)
As for the insurance scam, it was just one way to justify painting a bike. I do not recommend actually doing it, though if money is that important to you, go ahead and try. If they fall for it, they are a bad insurance company and deserve to lose money. If they do not fall for it... well, technically, you are a criminal for doing that and if they get you into trouble for being bad, then you deserve it.
I just look at a bike and judge it based on its parts and ride-ability. If the bike is absolutely amazing but an artistic disaster.... I really will not be concerned, I will just ride the bike. Maybe I just have my priorities mixed up.
edit: Somehow, I do not think that an amateur powdercoat will be as good looking or weight-efficient as a professional powdercoat. That's just me though.