Technical Tuesday: How To Remove And Install Your Pedals
For the third episode of Technical Tuesday we'll tackle a quick job that only requires one tool: removing and installing pedals. With the right tool and technique you should be able to finish this one in only a few minutes. Inside you'll find a great How-To video to guide you through the process, as well as step by step instructions with a few tips that could save the skin on your knuckles.
Read on...Replacing your pedals should be a relatively simple job when you compare it to other mechanical work that you may have to perform on your bike. After all, it only requires one tool and there are only a few steps. So why is it that a lot of riders run into trouble when they have a go at removing their pedals? What seems like it should be a quick a simple job can sometimes turn into a nightmare of bloody knuckles and confusion. Below you'll find out how to avoid going down that road when the time comes to do this job.
Watch the video to learn how to easily remove and install your pedals!
Step By Step Pedal Removal And Installation Instructions
Tools needed: Pedal wrench (a 15 mm open end wrench or 6/8 mm allen key will work with some pedals as well), and grease
![photo]()
You will find it much easier to work your way through this job if you keep your bike right side up on its wheels as you follow these steps. When talking about loosening or tightening the pedals I'll use the terms clockwise and counter clockwise as if you were facing the side that you're working on.
Before you go ahead and tackle this job, you'll need to familiarize yourself with how to loosen your pedals. Sounds easy enough, right? The curve ball is that the left pedal (non-drive side) is left hand thread, meaning that you turn it clockwise to loosen it from the crank arm. The right pedal (drive side) is standard right hand thread, turn it to the left to loosen. One more time: Turn the non-drive pedal clockwise to loosen it, turn the drive side pedal counter clockwise to loosen it.
![photo]()
1.Unlike a lot of other repair jobs, I find this one much easier to perform with the bike on the ground. The reason for this is that it sometimes takes a good hard push to break the pedals free and sometimes a stand has enough flex to make this difficult. Also, having the bike on the floor should give you much better leverage as you can use your body weight to help you.
![photo]()
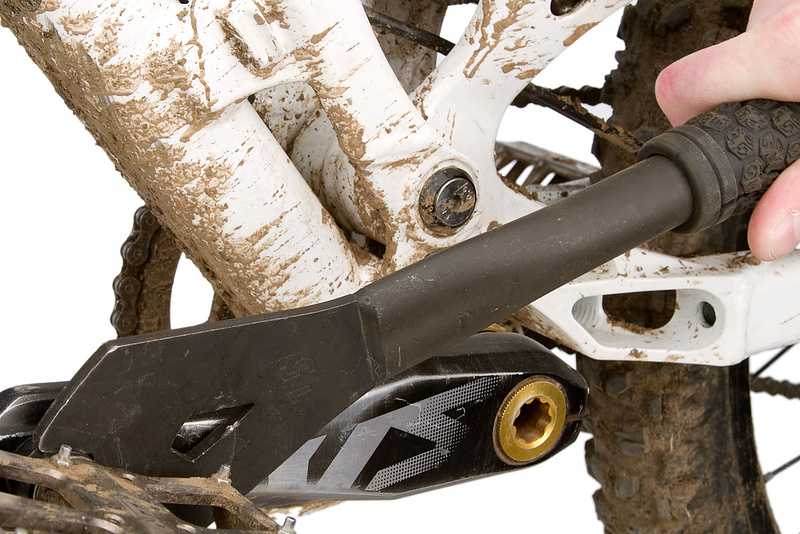
2.Let's start with the drive side pedal. Align your drive side crank arm so that it is at the 3 o'clock position or close to it. Some pedals will have four wrench flats (located on the spindle, just outboard of the crank arm) that will make it easier to position the pedal wrench in such a way that will make it easier to loosen. Yours may only have two opposing wrench flats. Ideally the wrench should be close to parallel, if just above, the crank arm. Because you are turning the wrench counter clockwise to loosen the pedal, this will allow you to push down from above and use your body weight to break it free. Be weary of hitting your knuckles on the chain rings or chain guide as the pedal loosens. Once it is free you can spin it all the way off, being sure not to lose the pedal washer if there is one.
![photo]()
3.Now we'll remove the non-drive side pedal. Turn your crank arm so that it is at the 9 o'clock position or close to it. Again, this will allow you to apply more leverage once you place the pedal wrench in the same way that you did when you removed the drive side pedal. Turn the wrench down and clockwise, using your body weight to help. When it's loose spin it all the way off, taking note not to lose the pedal washer if one is present.
![photo]()
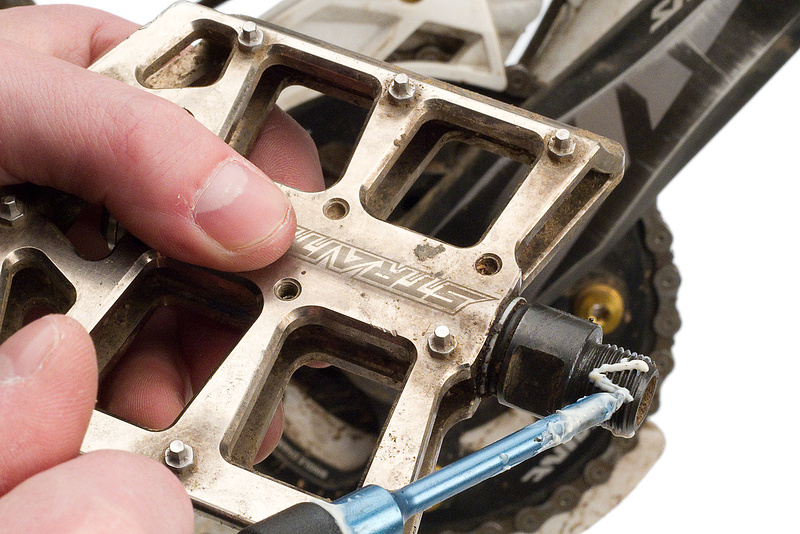
4.Before reinstalling your pedals, take a minute to clean any dirt out of both the crank and pedal threads. Apply a small amount of grease to the pedal threads before you begin the install as it will make it easier to remove them again down the road and minimize the chance of any creaks developing.
![photo]()
5.Always begin threading your pedals back in by hand to reduce the chances of damaging the threads. Turn the drive side pedal clockwise to tighten. Turn the non drive side pedal counter clockwise to tighten. Finish tightening the pedals using your pedal wrench. Always be sure to double check that you've tighten them, as losing a pedaling on the trail could spell disaster!
Did you find this episode of Technical Tuesday helpful? If you have any tips that you'd like to share, add them below!
Technical Tuesday #1 - How to install a new tube
Technical Tuesday #2 - How to set up your SRAM rear derailleur
Read on...Replacing your pedals should be a relatively simple job when you compare it to other mechanical work that you may have to perform on your bike. After all, it only requires one tool and there are only a few steps. So why is it that a lot of riders run into trouble when they have a go at removing their pedals? What seems like it should be a quick a simple job can sometimes turn into a nightmare of bloody knuckles and confusion. Below you'll find out how to avoid going down that road when the time comes to do this job.

Tools needed: Pedal wrench (a 15 mm open end wrench or 6/8 mm allen key will work with some pedals as well), and grease
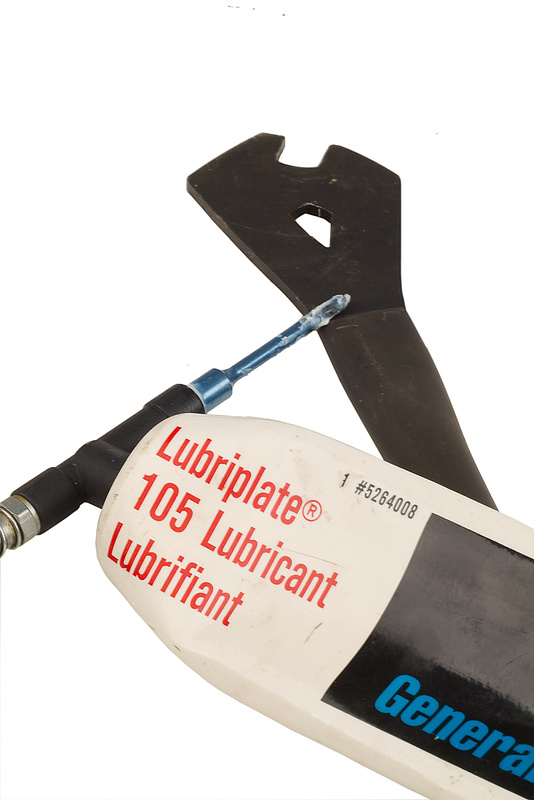
All you'll need is a pedal wrench and some grease
You will find it much easier to work your way through this job if you keep your bike right side up on its wheels as you follow these steps. When talking about loosening or tightening the pedals I'll use the terms clockwise and counter clockwise as if you were facing the side that you're working on.
Before you go ahead and tackle this job, you'll need to familiarize yourself with how to loosen your pedals. Sounds easy enough, right? The curve ball is that the left pedal (non-drive side) is left hand thread, meaning that you turn it clockwise to loosen it from the crank arm. The right pedal (drive side) is standard right hand thread, turn it to the left to loosen. One more time: Turn the non-drive pedal clockwise to loosen it, turn the drive side pedal counter clockwise to loosen it.
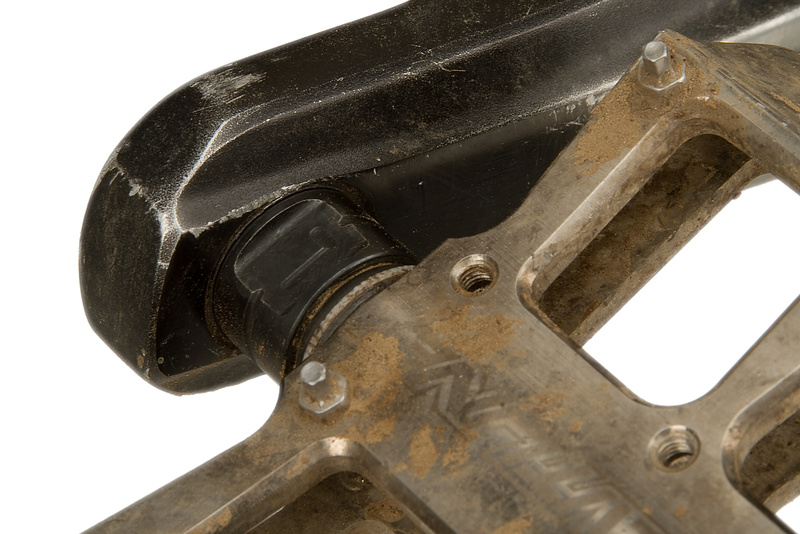
Some pedals have four wrench flats which will make it easier to position the pedal wrench in the correct spot. Some also have a 6 mm or 8 mm allen access in the backside of the spindle. These pedals only have two wrench flats
1.Unlike a lot of other repair jobs, I find this one much easier to perform with the bike on the ground. The reason for this is that it sometimes takes a good hard push to break the pedals free and sometimes a stand has enough flex to make this difficult. Also, having the bike on the floor should give you much better leverage as you can use your body weight to help you.
By aligning the crank and pedal wrench in this position you'll be able to use your body weight to help you break the pedal free
2.Let's start with the drive side pedal. Align your drive side crank arm so that it is at the 3 o'clock position or close to it. Some pedals will have four wrench flats (located on the spindle, just outboard of the crank arm) that will make it easier to position the pedal wrench in such a way that will make it easier to loosen. Yours may only have two opposing wrench flats. Ideally the wrench should be close to parallel, if just above, the crank arm. Because you are turning the wrench counter clockwise to loosen the pedal, this will allow you to push down from above and use your body weight to break it free. Be weary of hitting your knuckles on the chain rings or chain guide as the pedal loosens. Once it is free you can spin it all the way off, being sure not to lose the pedal washer if there is one.

Align the drive side pedal in the 3 o'clock position
3.Now we'll remove the non-drive side pedal. Turn your crank arm so that it is at the 9 o'clock position or close to it. Again, this will allow you to apply more leverage once you place the pedal wrench in the same way that you did when you removed the drive side pedal. Turn the wrench down and clockwise, using your body weight to help. When it's loose spin it all the way off, taking note not to lose the pedal washer if one is present.
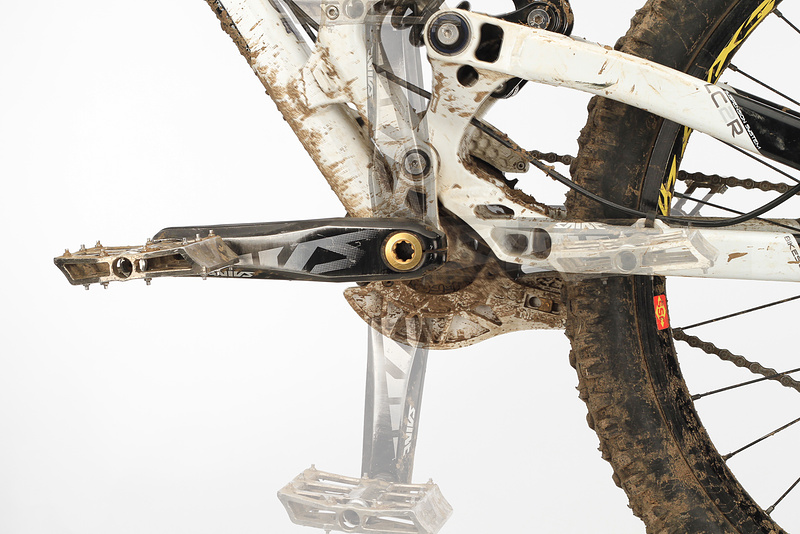
Turn the non-drive side pedal to the 9 o'clock position
4.Before reinstalling your pedals, take a minute to clean any dirt out of both the crank and pedal threads. Apply a small amount of grease to the pedal threads before you begin the install as it will make it easier to remove them again down the road and minimize the chance of any creaks developing.
5.Always begin threading your pedals back in by hand to reduce the chances of damaging the threads. Turn the drive side pedal clockwise to tighten. Turn the non drive side pedal counter clockwise to tighten. Finish tightening the pedals using your pedal wrench. Always be sure to double check that you've tighten them, as losing a pedaling on the trail could spell disaster!
Did you find this episode of Technical Tuesday helpful? If you have any tips that you'd like to share, add them below!
Technical Tuesday #1 - How to install a new tube
Technical Tuesday #2 - How to set up your SRAM rear derailleur
Author Info:

Must Read This Week
Sign Up for the Pinkbike Newsletter - All the Biggest, Most Interesting Stories in your Inbox
PB Newsletter Signup
MOST of you should know this as we have mostly been through/or in school, before a class can get furtur you have to bring the slow up to speed. what is the point of them telling us how to do shit, if they can't put a pedal on with out stripping it, that would be like a trick tutorial going teaching you how to 180 before bunny hop, your missing steps in the path to understanding how a bike is engineered by jumping to the complicating stuff, the change a tire thing, LOTS of people don't know how to use those tire levers correctly. but tonnes of people buy them.
I think pinkbike is pretty well rounded site, and appeal to a large demographic of riders from many places of many ages and expiernece levels, in order to keep things appealing to THE MASSES they have to keep them simple and build up. it's common sense really. only about 50 out of 100 users post messages on ANYTHING on this site. so it's not just about what you think or what you know, cause they have will probably build up a TECHNICAL TUESDAY TAB or something that you re-read all the stuff, like a gradual repair database, the world wasn't built in a week according to Darwin.
please, i am not a bike mechanical, or anything, but a person who cant figure out by its own how to do this stuff shouldn't be doing then at all...
Teach us how to change forks oil or how to assemble or disassemble our hubs, not how to bolt stuff...
Tell me, Caiokv... is that something so logical that a 5 year old would know?
If you payed any attention you would see that they are starting with the basics and then getting more technical every week. So just give it time.
Stop acting as though everyone should know this. People honestly do not know everything about a bicycle. I'm not going to go into the article about rebuilding your suspension if/when it comes out and call you all idiots just because i know how to do it and some people don't.
When I first removed my pedals there was nobody to teach me, I saw the L, standing for Left, and the R, guess what? standing for Rigth!
I wondered why, got my tools and started to remove them. As you said it wouldnt go un-clock wise, so what?
I did the logical and tried to turn it to the other side!
Magically it worked!
It gets a lot of blindness to force a pedal agaisnt the cranks to get them stripped...
And like someone else already said, anyone can teach how to change a pedal or a tube.
Also, check the overall feedback!
Pinkbike users are willing for harder or more specific stuff, it is not only me...
and for the kids asking how to "tune your fork" its common sense rebound and compression, , possibly high and low speed if u know enough to look in the manual to take off your pedals, look into your owners manual on how to do these adjustments, they are no more diffucult than turning a knob or two.... yet again common sense, its not any harder, it just seems harder. and if u wana get really technical on how to set up your suspension send to a company that specializes in suspension and they can set your stuff up for rider weight, riding style, suspension design etc.
these tech tuesdays are very useful, mike's one of the best mechanics out there, be respectful hes trying to help out the riding community with these videos
In the first third, where he explaines the "intellegent" thread direction he says: "This is, to avoid that the pedaly come loose.." or so. BUT THAT'S WRONNGGG IF YOU THINK ABOUT IT!!
If turn your right crankarm as if you were riding, your pedal practically "turns to the left", and that's the way how you loosen it. Same thing on the other side and even on your BB.
PLEASE CORRECT ME WHEN WRONG... SUPER CURIOUS WHERE MY BRAIN FOOLS ME.
@Downhilldro: here's my point: how do you know if your bolt is overtightened if you don't feel any (or almost) resistance while torquing it? On a dry thread, you can snap a bolt head buy torquing it like a mofo. If the thread is greased, then you'll more likely strip the threads instead of snapping the head, since there's little to no friction on your threads.
(who the hell keeps on neg props me? That's what you get for admitting not understanding something? Way to go PB...)
ps In the old days as a mechanic one of the worst repairs to deal with was ally seatposts fused into steel frames because they had never been greased.
How to wipe your own ass