Shred-Ventures On The Cheap

Bikepacking on a Budget
Words and Photography // Patrick Logan
You have probably seen and heard about bikepacking by now. Plenty of Pinkbikers may see bikepackers as people (normally with beards) take their nice 30lb bike and load it up with another 30lb+ of expensive gear. They then ride around, struggle up the climbs and camp out since with all the extra weight they couldn’t make it back to their car in time. If this is your opinion on bikepacking you need to re-evaluate.
A couple years ago a friend and I went on a bikepacking trip on the Sunshine Coast. We shredded sick loamy singletrack, made our own gear, had a blast camping and even hit up Coast Gravity Park and no, we don’t have beards. Bikepacking is probably more fun than you think. If you get satisfaction from doing a nice long ride at your local trail center, imagine what you feel after 5 days out on the bike (other than soreness).
Now, getting into bikepacking can be an expensive and confusing ordeal with all the different bags and equipment you need but it doesn't have to be.
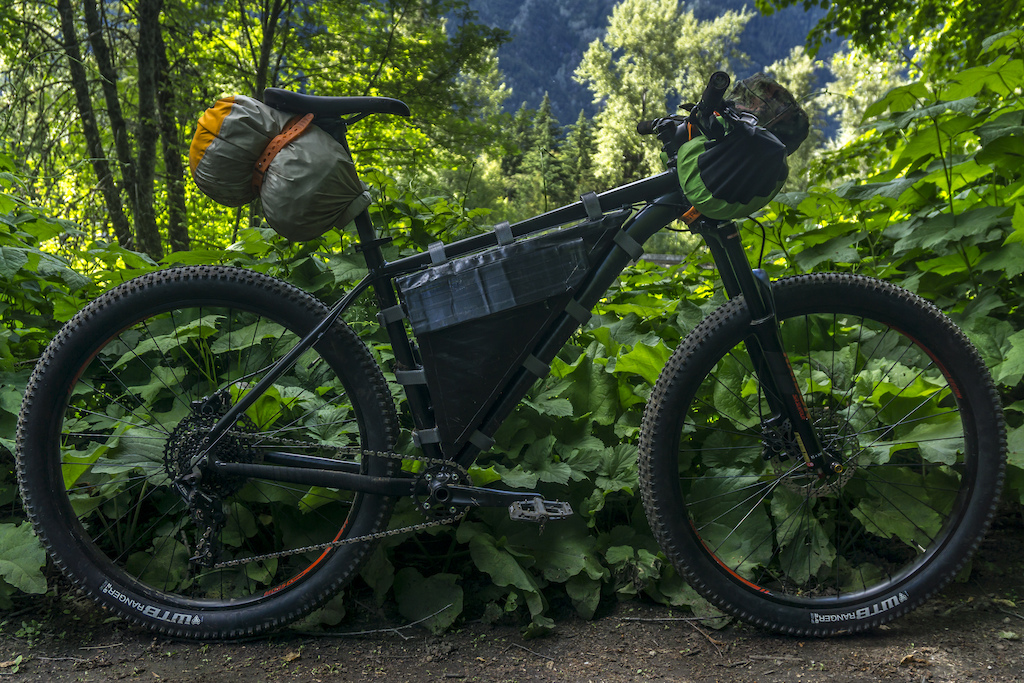
The whole setup (minus the bike and camping gear) cost me around $110 Canadian or roughly the price of a store-bought frame bag.
The first thing you need is a bike. The cheapest bike is the one you already own but if you are in the market, short travel plus size hardtails are the best. I personally use the Rocky Mountain Growler. It has solid geometry and spec for an affordable price. The plus size offers a comfier ride for longer distances and helps grip and float with the extra weight and the BB height is low enough for corners but not low enough that I’m constantly smacking my pedals on a loaded bike.
Once you have the bike you need to keep in mind that with all that extra weight you’re going to have to stiffen your suspension and maybe add some air to those tires. You should also tape up any spots where the bags may rub on your bike to avoid scuffing up your precious.
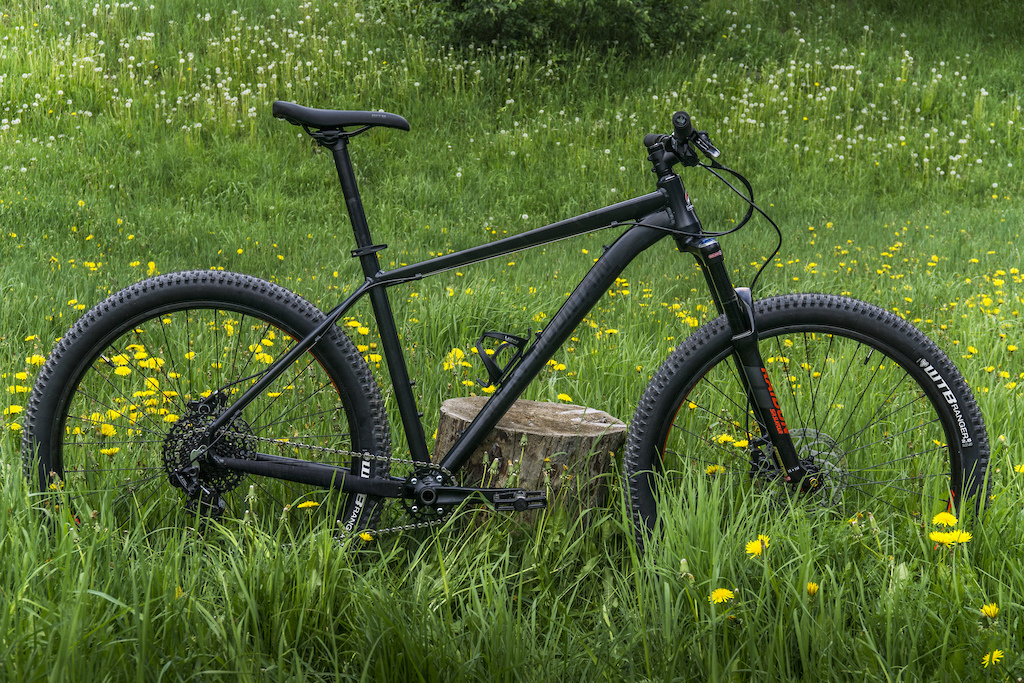
The Growler is a solid option if you have the dough to spend on a dedicated bikepacking rig.
Now for the bags. Most bikepackers use 3 main bags. At the back of the bike, we have the seat bag (or saddlebag if you prefer). Out of all the bags this is the one bag that I recommend buying and not making. A “real” seat bag has less swing then the budget way I’m going to show you but also costs a lot more. For $30 you can pick up a dry sack and a ski strap. All you have to do is load up the dry sack and strap it around the post (careful with droppers), then take your ski strap and strap it around your seat rails.
Make sure you pack your lightest stuff in it to minimize sway. This is a good spot for your sleeping bag. Full suspension bikes may have trouble with bottoming out and buzzing the bag so make sure you have enough clearance. For my setup, I used a 20 litre bag but I would recommend going a little smaller to 15 or even 10 litre bag.

The budget seat bag. I had to really make sure the ski strap was tight to avoid the bag bouncing down onto my tire and buzzing.
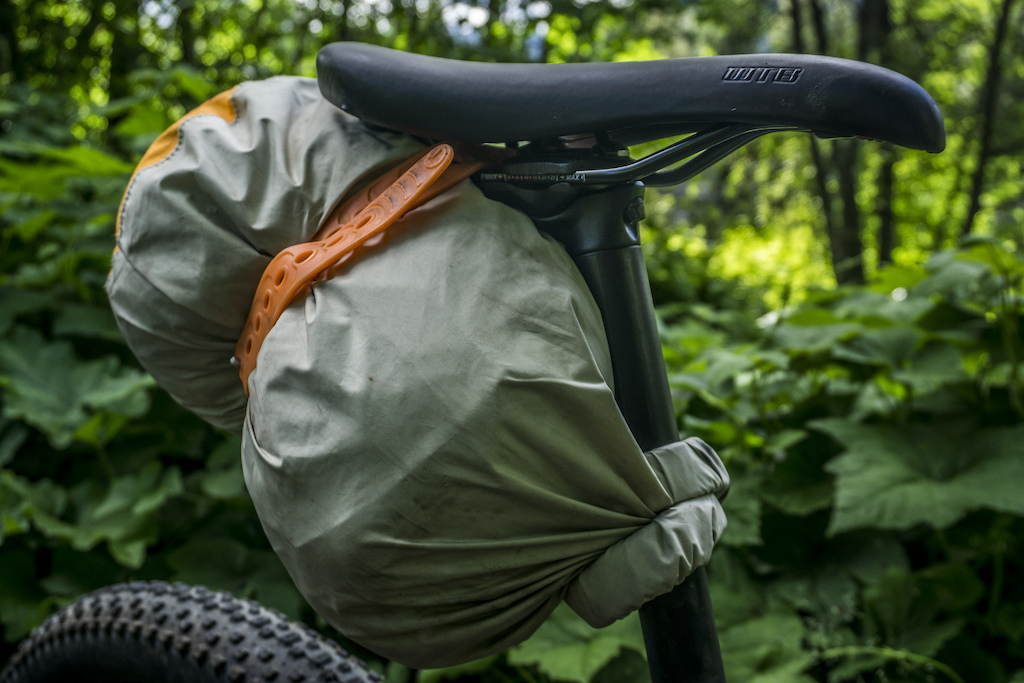
I found it was very important to double wrap the opening of the drybag around the seat post to avoid movement.
Next up is the frame bag. This is the most important bag and also where you can save the most money. For the price of a roll of duct tape, your choice of political sign and some Velcro you can make a custom fit and waterproof-ish frame bag - I will post a mini tutorial on how I made this. This is the bag you want to load with the heavy stuff since it will help keep the center of gravity down.

A fully weathertight frame bag for $25.
Finally, we have the handlebar bag. This is the second most important bag. With a few $10 ski straps and a $20 dry bag, you can have a rock solid place to put clothing and a tent. I normally use a 20L bag for this. It has almost no wiggle if you put one strap in the middle around only the dry bag and one on either end around the bars. Then feed your last strap through the middle strap and around the headtube. It is also important to make sure you aren’t accidentally crimping your brake cable. Taping up your headtube is also a good idea so you don’t rub the paint off your bike.

The not so complicated way of attaching your bar bag. Note the duct taped headtube and fork.

I got away with using 3 ski straps by omitting the middle one. I also found this neat bag that had daisy chains which I threaded the straps through to hold it on. You could probably do this with your enduro fanny pack once next years model is released and your is outdated.
Next, we need to store water since unless you have, as Mike Levy eloquently put it “a Giardia Catcher” or bottle cage on your downtube because you've probably covered up where you normally put your bottle with bags. You can buy special bottle cages that mount anywhere on your bike but in my experience, the best way to do this is to tape a bottle cage to the bottom of your bike. This way you can spend $5 on a cage instead of $40 for some special cage that does the same thing. If possible, it is nice to get a bottle cage that you can bend to fit a 1L water bottle. Make sure you pad your cage with an old tube so you don’t scratch paint and ensure you have enough clearance between the bottle and your front tire if you bottom out. You do not want to get arrive at camp only to find out you need to ride back another 10 kilometers to the nearest creek for water because you've taken your bottle cap off with your front tyre.
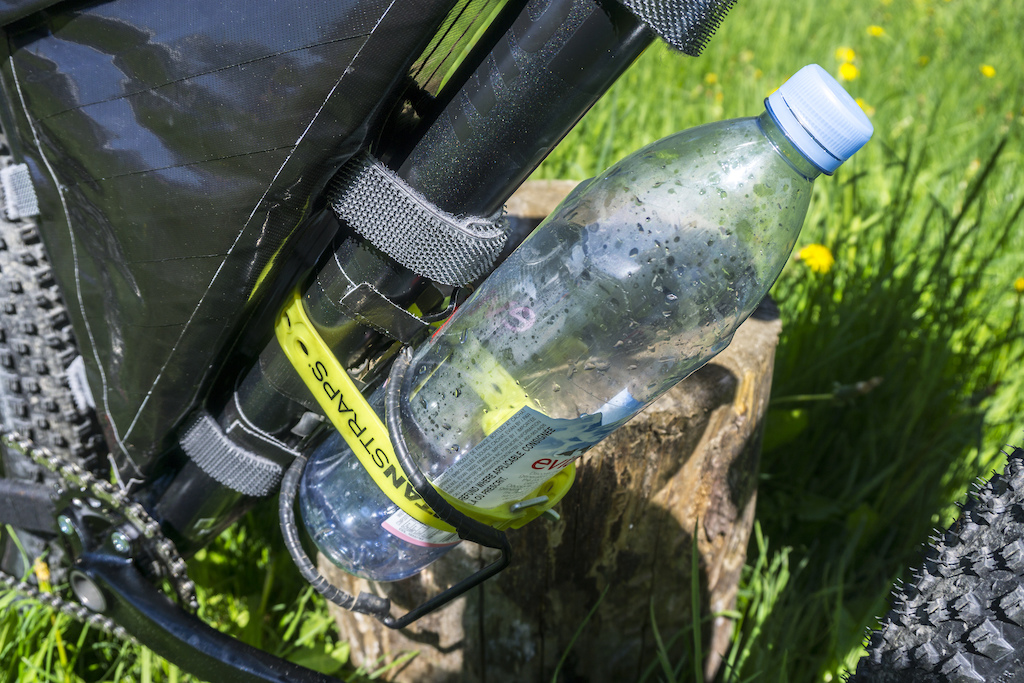
My giardia catcher taped on. Like most things that people tend to fix with tape, more tape is better.
Time to load up your bike with gear. I won’t go into too much depth with this since it depends a lot on what you want to do and where you live. This is also where a lot of your money will end up going but if you shop smart you can get big savings here. It doesn’t have to be fancy stuff and a lot of it you probably already own. Make sure you search the internet and thrift stores for good deals. There are also a few things that you can make to save money. With an aluminum can you can make an ultralight alcohol stove. You can cook over it hobo-style by using an old soup can.
Here is a simplified gear list by bag to give you an idea of how you should pack your bike and what you need to pack.
Seat bag:
Sleeping bag
Frame bag:
Repair kit with tools
Sleeping mat
Food
First aid
Stove and Mess Kit (Don’t forget a lighter, cold un-rehydrated dehydrated food is nasty)
Water Filter or Tablets
Handlebar Bag:
Tent
Spare clothing
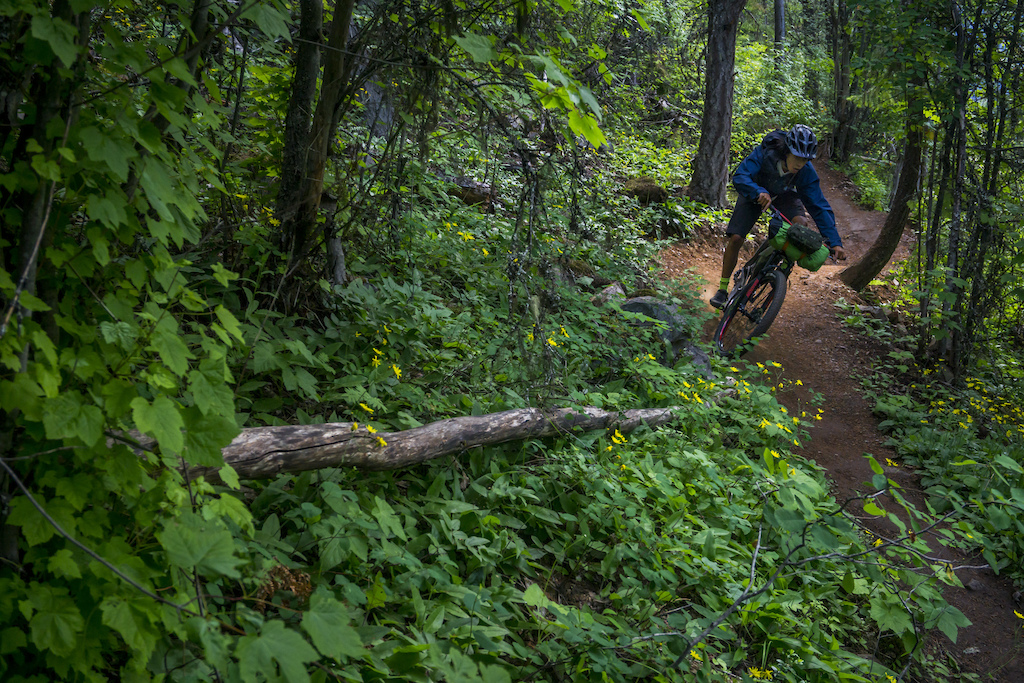
Yes, you can still ride your bike hard with it loaded up.
When it's time for some grub, there are some useful money-saving tips. You will want to save space but those freeze-dried $12 meal packages can get pricey. For a 5 day outing, you could be paying more than $200 if you go with those. I recommend doing some research online and learning how to dehydrate your own meals. It’s easy to do and can save you lots of money. One of the easiest meals to dehydrate is a good old Hamburger Helper. Keep in mind how many calories are in a meal too. You should be shooting for 700 or more per meal.
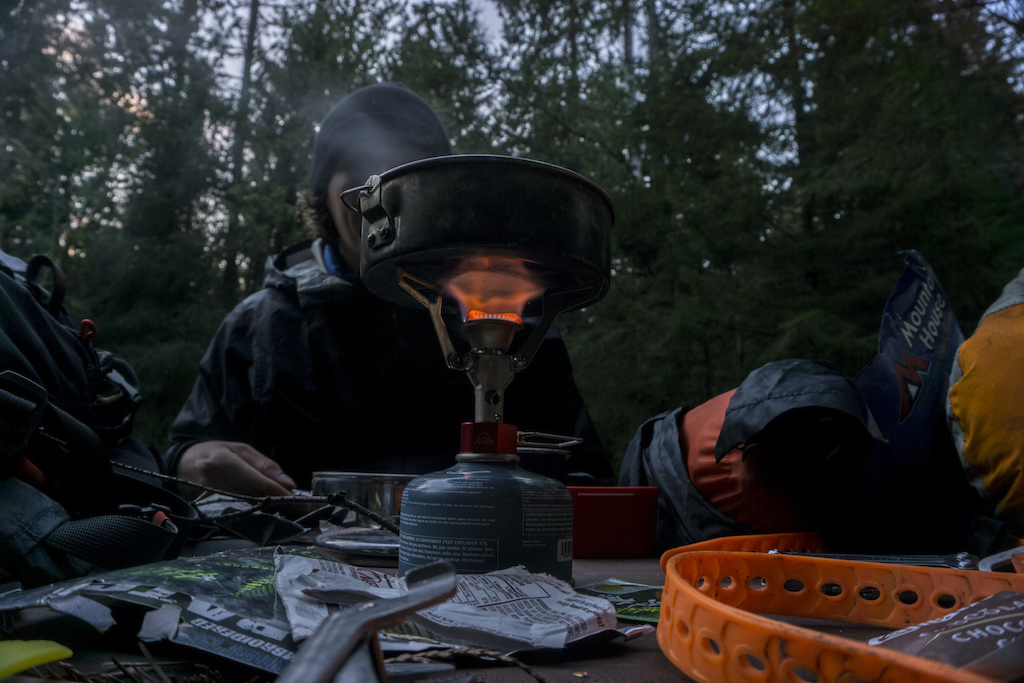
Make sure you fully rehydrate your meals. I now pack my meals in a vacuum sealed bags. When I'm ready to eat I cut it open, pour boiling water into it and put it in a reflective pouch I made out of a dollar store cooler to make sure its rehydrated.
Now with the bike loaded you need to get out and ride. Start off riding your local trail center with the bike fully loaded to get a feel for it. They do handle a little different with all this stuff strapped to it. Once you are used to it you’ll realize the bike is still fully shredable. I also recommend starting off with a simple overnighter. Ride up a gravel road or camp out at the parking lot of your trail center. It is key to test your gear BEFORE you get out there and in trouble.
I strongly recommend you start off with a little weekend overnighter. This will help you figure out flaws in your setup. Trailforks is a great way to find routes. Using the Trailforks website you can piece together a route or search routes. There may also be pre-existing routes that you can find online. For example depending on where you live you may be able to ride a section of the Great Divide. Another classic bikepacking go-to trip is grabbing your fishing rod and riding out to a remote lake for a quiet fishing trip (just don’t rely on your fishing skills for food, you're probably not as good as you think!).

get out and shred. A loaded up bike is still a fun bike.

Example campsite that you can get to by bike.
Hopefully, now you have everything you need and need to know in order to get out on a bikepacking adventure. Go online and find a route near you or just try link up all the trails in your local trail center into an overnight adventure. Have fun with it. Bikepacking lets you explore more than you ever thought you could with your bike.
For more photos check out Gravity_Candy.
Author Info:
 Member since Sep 14, 2015
Must Read This Week
Sign Up for the Pinkbike Newsletter - All the Biggest, Most Interesting Stories in your Inbox
PB Newsletter Signup
Thanks for this content !
Trying out a quick overnighter is as simple as grabbing a burrito on the way out of town and spending a night under the stars.
If you enjoy that, you might want to start investing (money or time) in more gear, but it shouldn't be a barrier.
That said, I've never tried proper frame / seat bags.
buy the 150$ walmart BBQ along with the 150$ sleeping bag and the 50$ camping chair and just bring it back 3 days later when you're done with your trip.
Hell, just buy a solar panel and a 24" 4K TV and bring it back as well