Product Feature: 2007 RockShox Totem Coil
In 2004 RockShox announced a new damping system dubbed Motion Control, which was first featured on the Reba and Pike. For 2006 RockShox totally redesigned the BoXXer by incorporating all the cool new technologies such as Solo Air, Maxle DH system and Motion Control damping. 2007 is the year of the Mission Control!Before entering the Freeride market, RockShox made sure they had a product that fulfilled the rider’s need, looked very cool and most importantly, offered high performance features. The Totem has been in the works for a few years and RockShox made sure it was thoroughly tested before releasing it to the masses. The Totem has been put through its paces by some of the best Freeriders in the world.
![photo]()
Ever since attending the 2007 SRAM product launch back in June – I couldn’t wait to get my dirty French hands on one of those Totems.
![photo]()
Mission Control
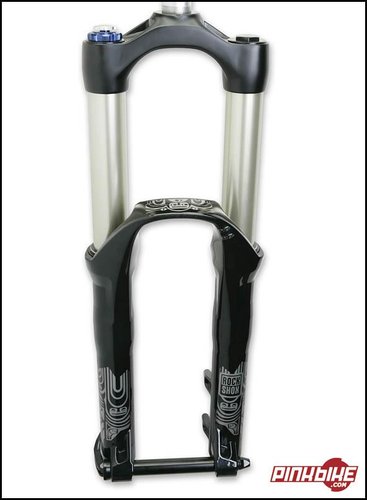
The Totem is a 180mm single crown Freeride (or should I say black diamond ;o) fork with 40mm taper wall 7000 series aluminum stanchions and colossal magnesium lower casting - this bad boy redefines the term “burly”!! So burly in fact that RockShox uses the term power bulges when referring to those massive bulges on each side of the lower casting.
Forged 66-TV aluminum crown, aluminum 1.5" or 1 1/8" steerer tube, post disc mount (203 min rotor and 210 max), 20mm Maxle 360, galvanized or glossy black colors and SpeedLube ports pretty much tops off the long list of Totem features.
![photo]()
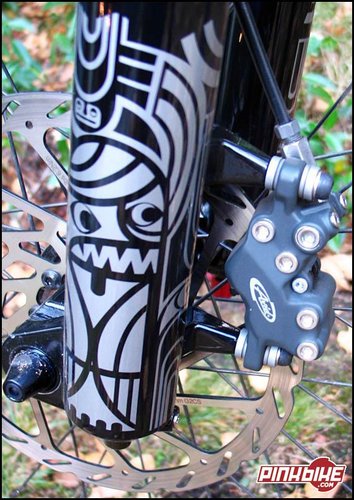
Post Mount with 203mm Avid Code
Solo Air:
The Solo Air version is quite simple to dial in. Break out the shock pump and fill up this single Schrader valve sitting on the top of spring leg. This will simultaneously fill both positive and negative air chambers which gives you a plush ride. Simply set and forget! Use the air chart located on the back or the casting as a guideline. And always remember to adjust air pressure in the maximum travel setting (applicable to the 2-Step Air version)
I would like to point out that just like Solo Air fork RockShox make; you can adjust the travel of the Totem Solo Air via All-Travel spacers.
2-Step Air:
Just like the Solo Air, the 2-Step Air spring leg is adjusted via a single Schrader valve – but unlike the Solo Air, the 2-Step Air the valve is located UNDER the spring leg. The main feature of the 2-Step Air is the option of switching from one travel setting to another with a simple twist of an adjuster knob located on top of the spring leg. By simply turning the adjuster 60 degrees clockwise then compressing the fork you will be able to reduce the Totem’s travel by 45mm (e.g. from 180mm to 135mm of usable travel). Turn the adjuster 60 degrees counterclockwise and the fork will return to full height.
Coil:
The Coil version, which is the one featured in this article, has a coil spring in the left leg with adjustable preload. There are a few springs to choose from to accommodate different rider weight:
• White: 140 lbs and less
• Silver: 140-160 lbs rider
• Blue (stock): for 160-180 lbs rider
• Yellow: for 180-200 lbs rider
• Red: for 200 + lbs rider
Totem Axle to Crown:
• 565mm
Weight:
• My 1.5” Totem Coil came in at a hair over 6.3 lbs.
• Totem Solo Air: Claimed 5.9 lbs for the 1.5” version
• Totem 2-Step Air: Claimed 6.3 lbs for the 1.5” Version
** The 1 1/8th steerer configuration is heavier by 0.2 lbs (90 grams).
Totem Solo Air:
• 1 1/8 Galvanized or 1.5 Galvanized
@ $1,060 USD
+ Fork
+ 5 page Sticker job decal kit
+ SpeedLube kit
+ User Manual
+ High pressure pump
Totem 2-Step Air:
• 1 1/8 Galvanized or 1.5 Galvanized
@ $1,150 USD
+ Fork
+ 5 page Sticker job decal kit
+ SpeedLube kit
+ User Manual
+ High pressure pump
Totem Coil:
• 1 1/8 Glossy Black or 1.5 Glossy Black
@ $995 USD
+ Fork
+ 5 page Sticker job decal kit
+ SpeedLube kit
+ User Manual
+ Extra Preload spacers
![photo]()
Totem Sticker Pack
![photo]()
Hello - my middle name is "burly"
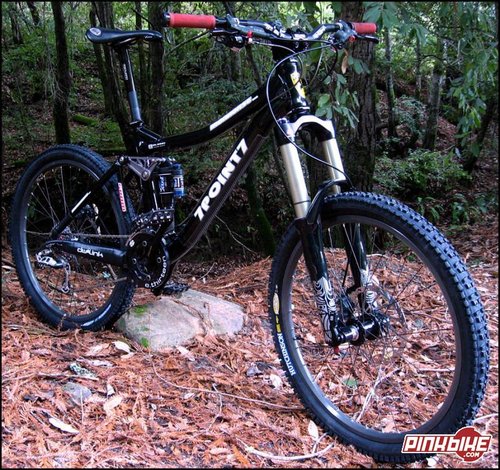
I know a lot of you out there like to keep that front end low – so you’re thinking “I’ll just get the 1 1/8 fork and run zero stack reducer cups”. Well in many cases this setup will make contact with the downtube. In my case, the Totem was going on an Iron Horse 7Point7, which features a 1.5 headtube. My options were 1 1/8 with a standard headset or 1.5 with headset cups. The 1.5 version is lighter, 20% stiffer under bending, which is fore and aft movement and 10% stiffer torsionally than the 1 1/8th version. The choice was easy.
When I purchased my Iron Horse 7Point7 last year, it came with a 1.5 headset. I never ended up using it since I ran e.thirteen zero stack reducers and a BoXXer WC – so in the spare parts bin it went! The day I got the Totem I went and dug out the 1.5 headset out of my spare parts bin and proceeded with the install. Unfortunately, only after I’d pressed in the headset that I realized it was an FSA Orbit Extreme Pro 1.5R (R stands for reducer).
![photo]()
FSA Orbit Extreme Pro 1.5
Thinking I needed to buy a new headset I called FSA up. To make a long story short – the FSA Orbit Extreme Pro 1.5 can be run both ways by swapping out a few small parts. Nice to have the option of running either a 1.5 or 1 1/8 using the same headset.
Installing a 1.5 fork when there are no 1.5 tools available (e.g. Crown race setter, Star nut setter, cutting guide) can be an interesting challenge. Especially for a guy that like me who likes to use the proper tools to get the job done. To set the crown race I could have used a hammer and screwdriver – but instead I made my own 1.5 crown race setter with a big metal pipe and big 1.5 washer, which I had to dremel a bit. The star nut I simply eyeballed and I made a cutting guide using some drill press vices.
![photo]()
Mounted and ready to rip!
![photo]()
The Totem comes with a nicely packaged SpeedLube kit (pictured above) which contains:
• Speed Lube Instruction Sheet
• Syringe and Syringe Lube Fitting
• 10/25 Torx™ Wrench
• O-rings (4)
Simple instructions to changing the oil in the Totem:
1. Remove front wheel and brake caliper.
2. Remove Speed Lube bolts (one in each fork leg).
3. Drain oil.
4. Rotate bike in stand so fork is elevated at 45˚.
5. Prepare Speed Lube syringe with 20cc of 15wt fork oil.
6. Thread syringe into left fork leg and slowly inject oil. Repeat for right fork leg.
7. Replace o-ring.
8. Re-install Speed Lube bolts until fully seated. Tighten to 4.3-6 in-lbs (.5-.7 Nm). Be careful not to over-tighten.
9. Re-install front wheel and brake caliper.
If you choose to buy a SpeedLube kit just by itself, it will look like this:
![photo]()
Photo by John Shafer @ www.photographyreview.com
On the trail the fork feels amazing and the Mission Control settings work as claimed! A good starting point is to turn both the low and high speed controls 4 clicks in. With that setting the fork feels nice and stable on long climbs and doesn’t dive when getting close and personal with the front brake. From there I suggest playing with the settings to find out what combo suits your riding style the best. If the fork is still bobbing too much when you pedal, then add more Low Speed – if it’s too stiff, simply back the Low Speed out.
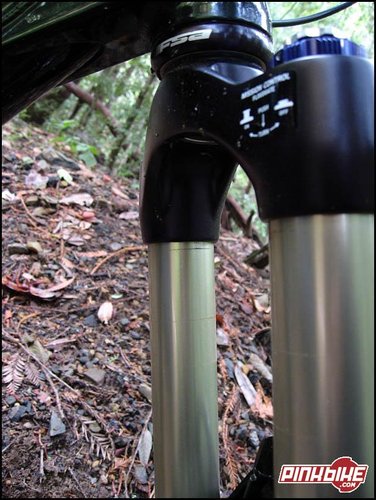
During my second ride I was going back and forth between 2 and 3 click of high speed compression. Anything more than that felt harsh to me when riding rough sections at high speeds. Like mentioned above, the Totem Coil’s travel is pretty linear and during my last few rides I noticed how quickly it goes through its travel - especially at high speeds. Feels great on smaller bumps, but on drops and high speed jumps it uses its travel fairly quickly. Using some high speed compression helps but the drawback is that if you use too much, the fork will start feeling harsh (spike) on big hits.
At one point I was thinking of tying the next spring up, but I highly doubt a stiffer spring would work for me. It might perform a bit better on larger size drops, but I’m convinced that it will adversely affect the small bump performance. It’s almost like dual rate spring would work best – maybe something to think about for future forks? The Solo Air Totem might perform better in that respect, since air forks tend to be progressive by nature.
The Totem is one of the best feeling suspension fork I’ve ridden to date – maybe it’s because I haven’t ridden coil in so long, but after every ride I simply can’t stop talking about how great that fork is! I also can’t take that smile off my face! See, told you this came with the fork ;o)
![photo]()
Getting pretty close to full travel
Although I don’t use it often, I would like to point out that the floodgate works great – especially for long sustained climbs. I also have to comment on the stiffness of the Totem, it’s as stiff, if not stiffer than my 06 WC BoXXer – amazing!
Last but not least - the Maxle 360 system which allows you to position the lever wherever you want it! SWEET – I for one am pretty stoked about that! Ever since they introduced the Maxle, I’ve been asking RockShox for that feature – and from reading various MTB forums, I wasn’t the only one. Pretty nice to see that RockShox takes customer feedback seriously!
![photo]()
not so great way of taking an action shot - where is PJ when you need him
There are many forks available in this price range (e.g. $995 - $1,150), and for that price you can get a nice dual crown fork, but like mentioned above, not everyone wants that. The Totem may or may not be for you. I’m not a big fan of adjustable-travel forks – I have the “set and forget” mindset. Even at full 180mm I had no problems climbing technical sections. Having independent control of the Low and High speed compression is a key feature for me – it really allows you to dial the fork to suit your riding style.
Eric Schutt @ SRAM
Sam Burkhardt @ FSA
John Shafer @ www.photographyreview.com
www.sram.com
www.rockshox.com
www.fullspeedahead.com
Bikes are cool - get out and ride! Go FLAT out....
Ever since attending the 2007 SRAM product launch back in June – I couldn’t wait to get my dirty French hands on one of those Totems.
Features
I’ll briefly go over the Totem main features but won’t go into great details about RockShox’s Mission Control Technology since I’ve already filled you guys back in June.
The Totem is a 180mm single crown Freeride (or should I say black diamond ;o) fork with 40mm taper wall 7000 series aluminum stanchions and colossal magnesium lower casting - this bad boy redefines the term “burly”!! So burly in fact that RockShox uses the term power bulges when referring to those massive bulges on each side of the lower casting.
Forged 66-TV aluminum crown, aluminum 1.5" or 1 1/8" steerer tube, post disc mount (203 min rotor and 210 max), 20mm Maxle 360, galvanized or glossy black colors and SpeedLube ports pretty much tops off the long list of Totem features.
Versions
The RockShox Totem is offered in 3 tasty flavors: Solo Air, 2-Step Air and Coil. All 3 version share RockShox’s Mission Control Damping, which lives inside the right leg. The left spring leg is where the differences lie.Solo Air:
The Solo Air version is quite simple to dial in. Break out the shock pump and fill up this single Schrader valve sitting on the top of spring leg. This will simultaneously fill both positive and negative air chambers which gives you a plush ride. Simply set and forget! Use the air chart located on the back or the casting as a guideline. And always remember to adjust air pressure in the maximum travel setting (applicable to the 2-Step Air version)
I would like to point out that just like Solo Air fork RockShox make; you can adjust the travel of the Totem Solo Air via All-Travel spacers.
2-Step Air:
Just like the Solo Air, the 2-Step Air spring leg is adjusted via a single Schrader valve – but unlike the Solo Air, the 2-Step Air the valve is located UNDER the spring leg. The main feature of the 2-Step Air is the option of switching from one travel setting to another with a simple twist of an adjuster knob located on top of the spring leg. By simply turning the adjuster 60 degrees clockwise then compressing the fork you will be able to reduce the Totem’s travel by 45mm (e.g. from 180mm to 135mm of usable travel). Turn the adjuster 60 degrees counterclockwise and the fork will return to full height.
Coil:
The Coil version, which is the one featured in this article, has a coil spring in the left leg with adjustable preload. There are a few springs to choose from to accommodate different rider weight:
• White: 140 lbs and less
• Silver: 140-160 lbs rider
• Blue (stock): for 160-180 lbs rider
• Yellow: for 180-200 lbs rider
• Red: for 200 + lbs rider
Vital Numbers
Here are some most requested fork measurements. If there’s any other specific measurements you would like to see posted here – simply leave a comment and I’ll update the article accordingly.Totem Axle to Crown:
• 565mm
Weight:
• My 1.5” Totem Coil came in at a hair over 6.3 lbs.
• Totem Solo Air: Claimed 5.9 lbs for the 1.5” version
• Totem 2-Step Air: Claimed 6.3 lbs for the 1.5” Version
** The 1 1/8th steerer configuration is heavier by 0.2 lbs (90 grams).
What’s in the box and how much
Unfortunately skills don’t come packaged with the fork – but I’m convinced the Totem will put a huge grin on your face. In addition to good times, here is what you get with each fork.Totem Solo Air:
• 1 1/8 Galvanized or 1.5 Galvanized
@ $1,060 USD
+ Fork
+ 5 page Sticker job decal kit
+ SpeedLube kit
+ User Manual
+ High pressure pump
Totem 2-Step Air:
• 1 1/8 Galvanized or 1.5 Galvanized
@ $1,150 USD
+ Fork
+ 5 page Sticker job decal kit
+ SpeedLube kit
+ User Manual
+ High pressure pump
Totem Coil:
• 1 1/8 Glossy Black or 1.5 Glossy Black
@ $995 USD
+ Fork
+ 5 page Sticker job decal kit
+ SpeedLube kit
+ User Manual
+ Extra Preload spacers

Installation
One thing you should keep in mind before purchasing one of these long travel single crown fork is the bike it’s going on and what headset setup you plan on running. Depending on the combo you run, the Mission Control adjustment knobs might hit your downtube in certain settings.
I know a lot of you out there like to keep that front end low – so you’re thinking “I’ll just get the 1 1/8 fork and run zero stack reducer cups”. Well in many cases this setup will make contact with the downtube. In my case, the Totem was going on an Iron Horse 7Point7, which features a 1.5 headtube. My options were 1 1/8 with a standard headset or 1.5 with headset cups. The 1.5 version is lighter, 20% stiffer under bending, which is fore and aft movement and 10% stiffer torsionally than the 1 1/8th version. The choice was easy.
When I purchased my Iron Horse 7Point7 last year, it came with a 1.5 headset. I never ended up using it since I ran e.thirteen zero stack reducers and a BoXXer WC – so in the spare parts bin it went! The day I got the Totem I went and dug out the 1.5 headset out of my spare parts bin and proceeded with the install. Unfortunately, only after I’d pressed in the headset that I realized it was an FSA Orbit Extreme Pro 1.5R (R stands for reducer).

Thinking I needed to buy a new headset I called FSA up. To make a long story short – the FSA Orbit Extreme Pro 1.5 can be run both ways by swapping out a few small parts. Nice to have the option of running either a 1.5 or 1 1/8 using the same headset.
Installing a 1.5 fork when there are no 1.5 tools available (e.g. Crown race setter, Star nut setter, cutting guide) can be an interesting challenge. Especially for a guy that like me who likes to use the proper tools to get the job done. To set the crown race I could have used a hammer and screwdriver – but instead I made my own 1.5 crown race setter with a big metal pipe and big 1.5 washer, which I had to dremel a bit. The star nut I simply eyeballed and I made a cutting guide using some drill press vices.
SpeedLube
Freeriders (well most riders) don’t like spending too much time servicing their equipment, but like anyone else, they like it when their forks are running nice and smooth. Less time in the garage means more time on the trails. SpeedLube drastically reduces the steps needed to change the oil in your fork. SRAM suggests changing the oil in your Totem every 25 hours of riding.
The Totem comes with a nicely packaged SpeedLube kit (pictured above) which contains:
• Speed Lube Instruction Sheet
• Syringe and Syringe Lube Fitting
• 10/25 Torx™ Wrench
• O-rings (4)
Simple instructions to changing the oil in the Totem:
1. Remove front wheel and brake caliper.
2. Remove Speed Lube bolts (one in each fork leg).
3. Drain oil.
4. Rotate bike in stand so fork is elevated at 45˚.
5. Prepare Speed Lube syringe with 20cc of 15wt fork oil.
6. Thread syringe into left fork leg and slowly inject oil. Repeat for right fork leg.
7. Replace o-ring.
8. Re-install Speed Lube bolts until fully seated. Tighten to 4.3-6 in-lbs (.5-.7 Nm). Be careful not to over-tighten.
9. Re-install front wheel and brake caliper.
If you choose to buy a SpeedLube kit just by itself, it will look like this:
 |  |
Ride Impressions
Out of the box the Totem felt sticky – I was baffled since every single one I tried at the product launch were buttery smooth! Adding a few drops of Teflon based oil at the seals remedied the problem. Guess the seals were a bit dry. The fork has a very linear feel to it - bouncing around on it I can almost get full travel out of it. For the past two years I’ve mostly been riding air sprung forks, I had forgotten how good coil forks feel! 
On the trail the fork feels amazing and the Mission Control settings work as claimed! A good starting point is to turn both the low and high speed controls 4 clicks in. With that setting the fork feels nice and stable on long climbs and doesn’t dive when getting close and personal with the front brake. From there I suggest playing with the settings to find out what combo suits your riding style the best. If the fork is still bobbing too much when you pedal, then add more Low Speed – if it’s too stiff, simply back the Low Speed out.
During my second ride I was going back and forth between 2 and 3 click of high speed compression. Anything more than that felt harsh to me when riding rough sections at high speeds. Like mentioned above, the Totem Coil’s travel is pretty linear and during my last few rides I noticed how quickly it goes through its travel - especially at high speeds. Feels great on smaller bumps, but on drops and high speed jumps it uses its travel fairly quickly. Using some high speed compression helps but the drawback is that if you use too much, the fork will start feeling harsh (spike) on big hits.
At one point I was thinking of tying the next spring up, but I highly doubt a stiffer spring would work for me. It might perform a bit better on larger size drops, but I’m convinced that it will adversely affect the small bump performance. It’s almost like dual rate spring would work best – maybe something to think about for future forks? The Solo Air Totem might perform better in that respect, since air forks tend to be progressive by nature.
The Totem is one of the best feeling suspension fork I’ve ridden to date – maybe it’s because I haven’t ridden coil in so long, but after every ride I simply can’t stop talking about how great that fork is! I also can’t take that smile off my face! See, told you this came with the fork ;o)
Although I don’t use it often, I would like to point out that the floodgate works great – especially for long sustained climbs. I also have to comment on the stiffness of the Totem, it’s as stiff, if not stiffer than my 06 WC BoXXer – amazing!
Last but not least - the Maxle 360 system which allows you to position the lever wherever you want it! SWEET – I for one am pretty stoked about that! Ever since they introduced the Maxle, I’ve been asking RockShox for that feature – and from reading various MTB forums, I wasn’t the only one. Pretty nice to see that RockShox takes customer feedback seriously!
Conclusion
The Totem is one hell of a fork! Many people ask me why run a Totem, which has 1” less travel but same AC measurements when compared to a BoXXer? Well first of all not everyone wants to run a dual crown fork on their freeride bike. A dual crown fork prevents you from doing x-ups and the turning radius isn’t as good. Yeah – the turning radius issue is something that could be debated all day, but some people want more – so I say let them have it! Also if you want to take advantage of features that the Mission Control offers, the Lyrik or Totem are your only choices.
There are many forks available in this price range (e.g. $995 - $1,150), and for that price you can get a nice dual crown fork, but like mentioned above, not everyone wants that. The Totem may or may not be for you. I’m not a big fan of adjustable-travel forks – I have the “set and forget” mindset. Even at full 180mm I had no problems climbing technical sections. Having independent control of the Low and High speed compression is a key feature for me – it really allows you to dial the fork to suit your riding style.
Thanks
Sam Burkhardt @ FSA
John Shafer @ www.photographyreview.com
Related Links
www.rockshox.com
www.fullspeedahead.com
Author Info:

Must Read This Week
Sign Up for the Pinkbike Newsletter - All the Biggest, Most Interesting Stories in your Inbox
PB Newsletter Signup
As for me review nothing but SRAM bits what can I say – I’ve been using SRAM components for years! So when new stuff comes out, it’s pretty easy for me to see if the new offerings have noticeable improvements. In the past (and even as recent as last month) I tried approaching other manufactures for components to test – but they haven’t been responsive to my requests. I'm pretty much game to ride whatever..
To satisfy my curiosity, I’ve bought other non RockShox dampers in the past so I could try them out and compare to shocks/forks I was currently using. But I’ve either been 1) disappointed with the performance or 2) had horrible customer service when trying to get info/help about the product. I’m not a vindictive person – so instead of writing an article about how crappy company X’s customer service is, I simply got rid of the product.
There is no denying it - SRAM has an awesome line of products. They also have a great PR department that really takes care of Media folks – by that I mean they take the time to answer questions, provide brochures, return e-mails, phone calls, etc.. that’s really helpful when trying to write a detailed and accurate piece.
Sorry if I’m not making sense – we had out office potluck and I’m pretty horsed right now ;o)
Happy Holidays!
- Luc
Thanks,
Nikoli
If i had a bike to fit that fork to i would probably allready have one...maby my next bike will be "big" enough for a Totem....Rockshox rocks! (i own two Argyle 409 forks)
it's on my X-mas wish list but not sure i have been that good a boy this year to get it under my X-mas tree