Rockshox Revelation U-Turn Spring Swap (Part 2)
Last week I wrote about a mishap with my 2010 Rockshox Revelation Team U-turn fork that occurred while doing some XC riding at the local trails (See Rockshox Revelation U-Turn Spring Swap (Part 1)). To recap, the U-turn air spring failed and somehow blew out the lower leg dust wiper... My plan then was to swap the U-turn air spring with a standard dual-air spring unit. Yes, I'll be losing the ability to externally adjust the fork's travel, but I never really used that feature, and I'm hoping that the standard dual-air will be more reliable and more plush. I suspect that this same swap would work just as well on some other Rockshox models that are available in both dual-air and air U-turn versions, but probably not all. The Rockshox spare parts catalog was a big help in figuring out if this would and what parts I would need to pull it off (see Rockshox 2012 Spare Parts Catalog)
Well, the parts came in on Friday (three days after the initial failure), and I was able to begin the rebuild and air spring swap on Saturday afternoon. I realized right away that the standard air top cap I was hoping would be included in one of the spare parts kits was nowhere to be seen. Unfortunately, the U-turn top cap could in no way be converted to work with a standard dual air spring, so I was going to have to wait for one more piece to finish the job. No matter, I began by pulling the fork off the bike and prepping my workspace for the job. Here's the complete list of parts I needed to finish the job:
Rockshox part number followed by a description:
1) 11.4310.290.000 Tora/Recon/Revelation/Argyle Dust Seal/Foam Ring Kit
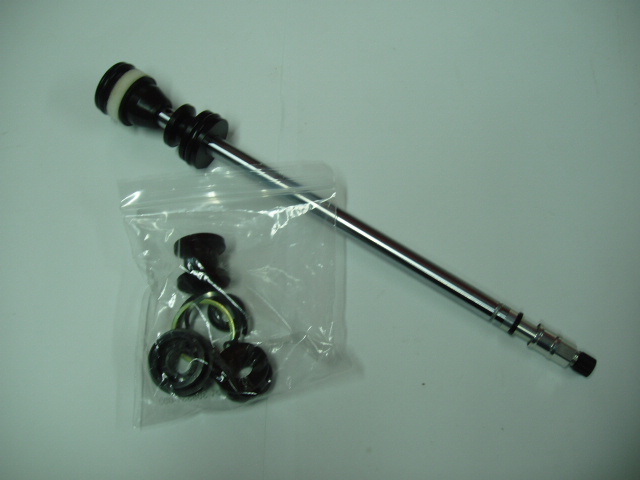
2) 11.4015.394.000 Air Spring Assembly, Dual Air - 2010-2011 Revelation
3) 11.4015.298.020 Air Top Cap Assembly, 32mm, Black 2012 (all 32mm air forks w/ alum upper tubes)
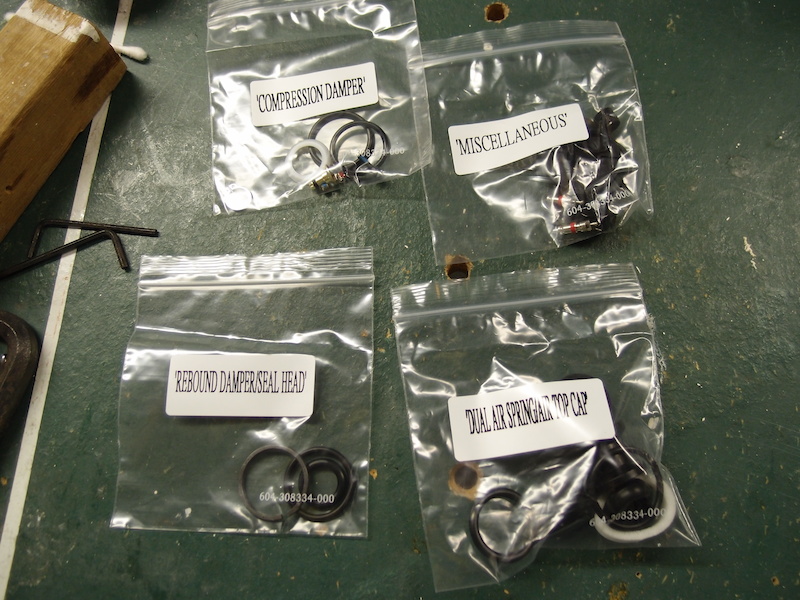
4) 11.4015.406.000 Service Kit, Dual Air/Motion Control - 2010-2011 Revelation (not strictly necessary for the spring swap, but a good idea if you're going to pull the whole fork apart anyway)
![photo]()
Replacement air spring assembly from Rockshox
![photo]()
Rebuild kit from Rockshox
I chose to do a full rebuild of the fork, including service of the compression and rebound dampers by removing and replacing all of the appropriate seals and o-rings and putting in a fresh dose of 5wt fork oil. I won't go into the damper service as it is pretty straight forward and is detailed clearly in the Rockshox technical manual, which can be found on SRAM's website HERE; besides, that's not really what this article is about. The manual includes instructions for servicing their entire 2010 fork and shock lineup, as well as their dropper seatposts, and of course it includes a list of required tools for each job. Time to begin...
Step 1: Make sure you have the appropriate tools and supplies
or at least some tools that can be substituted for what is recommended. Here's a list of the tools I used compared to what is recommended by the technical manual:
- Allen key set. You'll really only need a 5mm to perform the air-spring swap, but I also needed a 1.5mm to remove the floodgate knob from the damper side. You'll need others if you have a remote lockout on your fork as well.
- 10mm deep-well socket. Used to loosen the air spring shaft from the lower leg.
- Wood block. This replaces the plastic mallet recommended by Rockshox. I found a piece of 2x2 nominal lumber works great for unseating the rebound and spring shafts from the fork lowers.
- Large-ish flat-head screwdriver or tire lever. For prying out your dust seals (only required if you plan on replacing your dust seals while the fork is apart).
- Something to press your dust seals back in. Rockshox recommends their specialty tool, I used the cap of a fork oil bottle. Pretty much anything hollow that fits around the lip of the dust seal and is strong enough to lean on will work. The idea is to press the seal into the fork evenly (again, only required if you plan on replacing your dust seals while the fork is apart).
- 24mm hex wrench. Rockshox recommends a 24mm socket, I used an open-ended craftsman wrench.
- Internal and external snap-ring pliers. Only the internal ones will be necessary for the spring swap. The external ones will come in handy if you decide to service the air U-turn assembly itself.
- Something sharp to remove o-rings. Rockshox recommends a pick, I used an exacto knife in some cases, a small flat-head screwdriver in others (again, only required if you plan on doing a full rebuild).
- Grease and fork oil. Only 15wt oil is needed for the spring swap (to replenish the lower leg oil), but 5wt will come in handy for the damper side if you're doing a full rebuild.
-Small funnel. Rockshox recommends a nifty little oil injector/syringe to get the 15wt fork oil into the lower legs, but I just made a small funnel by rolling up a sheet of thin plastic (that stubborn plastic packaging that everything comes in these days works well).
Step 2: Remove the lower legs of the fork
This is described well by the tech manual, but here's a quick run-down. Basically, just loosen the allen bolt on the damper side and the ten millimeter nut on the spring side a few turns each, then smack the bolts with your mallet (or block of wood). This un-seats the spring shaft and damper shaft from the bottom of the lower legs. Get ready for a mess... you need to have a drip pan under the fork when you do this, because oil will drain quickly from the lower legs (BTW, don't do this job in your mom's living room. If you don't have access to a workshop, do it outside). Once the shafts are un-seated, unscrew the bolt and nut all the way and slide the lowers off of the upper legs and pour any remaining oil into your drip pan.
![photo]()
Negative air schrader valve after removing the 10mm nut and un-seating the shaft with my wood block
![photo]()
Step 3: Remove all air pressure from the fork
First, depress the schrader valve on the bottom of the fork leg to remove all pressure from the negative air chamber, then do the same to the positive air chamber. THIS IS VERY IMPORTANT. You don't want to pull the air spring apart with 100+ psi of pressure inside.
Step 4: Remove the U-Turn adjustment knob
You should already have your schrader valve caps removed, so the next thing to do is pop off the circlip that's fitted around the shrader valve stem. This is kind of a pain in the ass, as you have to apply downward pressure to the knob itself while you use a pick or small flat-head screwdriver to pop the clip off. It makes you feel like you need three hands. Once you have the clip removed, pull the knob off and you'll see a bunch of small springs and ball bearings sitting in the top cap. If you plan on saving these, use a magnet to pull them out individually. If you don't care because you're going to replace the top cap with a non-U-Turn version, then just turn the fork upside down and try to catch them in your hand (you'll probably drop a couple).
Step 5: Remove the top cap
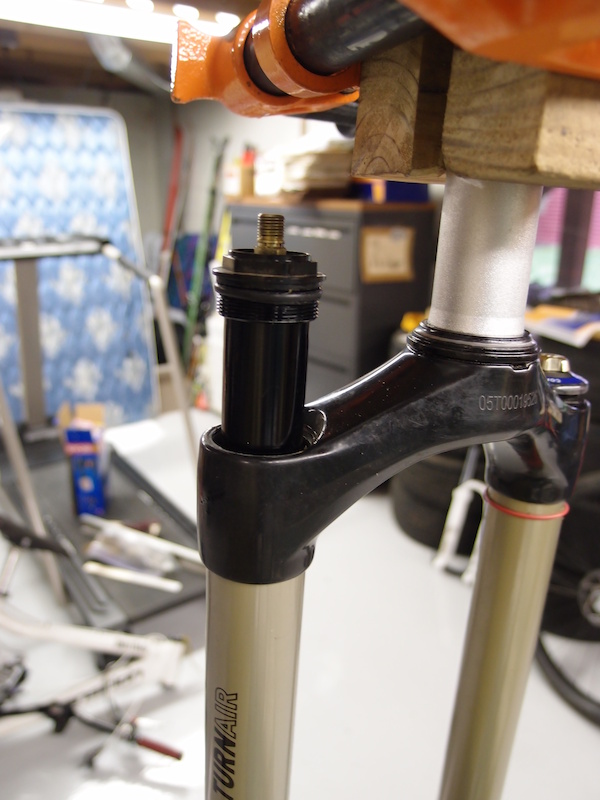
Use your 24mm wrench to loosen the top cap and un-thread it from the upper tube. The air U-turn air spring assembly is attached to the U-turn specific top cap so you can slide the whole unit out in one piece after you've unscrewed it. BE CAREFUL not to scratch the inside of the upper tubes while you are removing the air U-turn. Since the standard dual-air assembly uses the inside of the tubes to create a seal, scratches can hurt the performance of the fork. The U-turn assembly is basically a self contained air spring that sits inside of the fork... it doesn't rely on the upper tube of the fork to function except that the upper tube keeps your positive air pressure from escaping. Otherwise, it has all the same parts as a standard dual-air spring housed inside of a separate tube inside the fork. This is why an air U-turn fork is heavier than a standard dual-air fork of the same model.
![photo]()
Top cap loosened with the U-turn air assembly partially lifted out of the upper fork tube
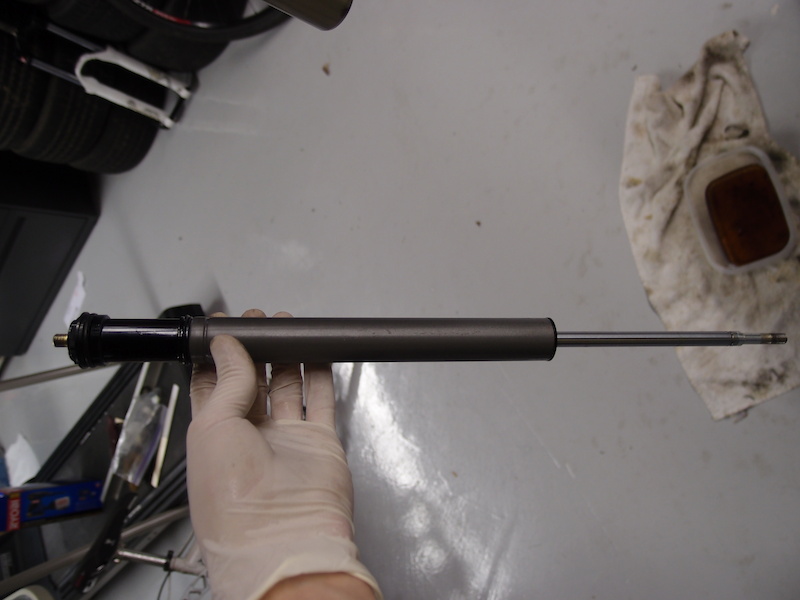
![photo]()
U-turn air assembly removed from the fork
If your air U-turn assembly is still functioning properly, you can try to pawn it off on a friend for a few bucks, sell it on ebay, or come up with a creative use for it around the house... maybe you could fashion an automatic opener for you beer fridge.
Step 6: Remove the base plate
To do this, first you have to remove the snap-ring from the bottom of the upper tube. This is where those snap-ring pliers will come in handy. Now you'll need a dowel to poke the base-plate out from above. It's best to use something plastic or wood, or that has a rubber tip to avoid scratching the inside of the upper tube. Stick the dowel into the top of the upper tube and push the base plate out through the bottom. The base plate is one of the few items that will be going back into the air spring side of the fork, so be careful not to damage it, and take a moment to remove and replace both the inner and outer o-rings. You'll need to apply fresh grease to the new o-rings before you install the new air spring, but that's best left until you assemble the new air spring shaft in step 7.
![photo]()
Looking up at the base plate and snap ring
Now that the upper tube is empty, take a minute to clean the inside thoroughly. Spray some isopropyl (rubbing) alcohol inside the upper tube then wipe it down. Rockshox recommends using a plastic or wood dowel with a rag wrapped around it to wipe out the inside, but I had better luck just twisting up a rag and stuffing it inside the tube.
Step 7: Configure your new dual-air spring assembly
This is one area where I was a little iffy while doing the work. Since this is the first time I've dealt with either U-turn air or dual-air assemblies, and I was replacing a U-turn air with a dual-air, I didn't know what the dual-air spring was supposed to look like, nor how it was supposed to be configured for my particular fork and desired travel. The tech manual has a couple of small diagrams showing the proper configuration for the different fork models, so I worked off of those. Interestingly, the 2010 tech manual differs from the 2011 tech manual in this area, adding to the confusion (the 2011 manual shows the "all travel" spacers below the negative air piston whereas the 2010 manual shows them above the top out bumper). I decided to work from the 2010 manual, though I'm sure it would work fine either way.
With the U-turn air spring, I ran my fork at 120mm almost all of the time, so I decided to keep the front end low using Rockshox "all travel spacers" with the new dual-air spring. Basically, these are spacers that prevent the spring shaft from extending fully, therefore removing some of the fork's travel (they come in 10mm and 20mm thicknesses and are included in the replacement air spring assembly kit). I decided to go with one 20mm spacer to keep the travel down to 130mm instead of the full 150mm that the Revelation is capable of.
My configuration is as follows (from top to bottom starting just below the air piston-head):
-One 20mm spacer
-Top-out bumper
-Negative air piston (be sure to apply grease to the inner o-ring before sliding it onto the spring shaft)
-Base plate bumper
-Base plate (be sure to apply grease to the inner o-ring before sliding it onto the spring shaft)
There was some ambiguity in the tech manual as to whether or not the wavy washer and the flat washer should be installed on the Revelation (they would go just above the base plate). I left them out this time, but if something goes wrong, I'll know it was a mistake (I've already put 10 fairly hard trail miles on the fork at the time of this writing, with no issues or problems to speak of).
Unfortunately, at this point in the process, I was getting anxious to get my bike back on the trail, so I forgot to keep taking pictures. Refer to the tech manual to help identify the individual parts that go on the air spring shaft.
Step 8: Install the dual-air assembly
First, apply a generous amount of grease to all of the o-rings and the spring shaft itself. The 2011 tech manual also recommends applying grease to the inside of the bottom of the upper tube as well (basically as far up as you can stick your finger inside the tube)... probably not a bad idea, but I didn't do this since I was working from the 2010 manual which omits this information. Basically, it's a good idea to apply plenty of grease in the interest of preventing stiction in the spring assembly.
Now slide the dual-air assembly into the upper tube from the bottom (obviously you want it to be right-side up, i.e. schrader valve at the bottom). It takes considerable force to get the negative piston into the upper tube.
Press the base plate up into the lower leg so that you can see the snap-ring notch at the bottom. Re-install the snap-ring using your snap-ring pliers. This is easiest if you push the spring shaft up into the upper tube so that only a few inches are showing (you'll need to depress the schrader valve on the bottom while you push on the spring shaft to prevent it from creating a vacuum... otherwise it will push itself back down when you let go).
Step 9: Install the standard air top cap
As I mentioned, you can't use the air U-turn top cap with a standard dual-air spring. Apply some grease to the threads and the o-ring on the top cap, then thread it into the upper tube by hand. Tighten it with your 24mm wrench to 65 in-lbs.
Congrats! You're basically done with the spring swap! Now is a good time to perform any other maintenance you might want or need, and also to pump some air into the fork to check that everything is sealing properly. Once you've completed the rest of your maintenance, the only thing left to do is reinstall the lower legs. The tech manual provides plenty of info on this, so I won't get into it.
Once that's all done, reinstall the fork on your bike and get out and ride! It should feel plusher than ever! I know mine sure does.
-Spencer Jacobs
![photo]()
Back out at the trailhead
Well, the parts came in on Friday (three days after the initial failure), and I was able to begin the rebuild and air spring swap on Saturday afternoon. I realized right away that the standard air top cap I was hoping would be included in one of the spare parts kits was nowhere to be seen. Unfortunately, the U-turn top cap could in no way be converted to work with a standard dual air spring, so I was going to have to wait for one more piece to finish the job. No matter, I began by pulling the fork off the bike and prepping my workspace for the job. Here's the complete list of parts I needed to finish the job:
Rockshox part number followed by a description:
1) 11.4310.290.000 Tora/Recon/Revelation/Argyle Dust Seal/Foam Ring Kit
2) 11.4015.394.000 Air Spring Assembly, Dual Air - 2010-2011 Revelation
3) 11.4015.298.020 Air Top Cap Assembly, 32mm, Black 2012 (all 32mm air forks w/ alum upper tubes)
4) 11.4015.406.000 Service Kit, Dual Air/Motion Control - 2010-2011 Revelation (not strictly necessary for the spring swap, but a good idea if you're going to pull the whole fork apart anyway)
I chose to do a full rebuild of the fork, including service of the compression and rebound dampers by removing and replacing all of the appropriate seals and o-rings and putting in a fresh dose of 5wt fork oil. I won't go into the damper service as it is pretty straight forward and is detailed clearly in the Rockshox technical manual, which can be found on SRAM's website HERE; besides, that's not really what this article is about. The manual includes instructions for servicing their entire 2010 fork and shock lineup, as well as their dropper seatposts, and of course it includes a list of required tools for each job. Time to begin...
Step 1: Make sure you have the appropriate tools and supplies
or at least some tools that can be substituted for what is recommended. Here's a list of the tools I used compared to what is recommended by the technical manual:
- Allen key set. You'll really only need a 5mm to perform the air-spring swap, but I also needed a 1.5mm to remove the floodgate knob from the damper side. You'll need others if you have a remote lockout on your fork as well.
- 10mm deep-well socket. Used to loosen the air spring shaft from the lower leg.
- Wood block. This replaces the plastic mallet recommended by Rockshox. I found a piece of 2x2 nominal lumber works great for unseating the rebound and spring shafts from the fork lowers.
- Large-ish flat-head screwdriver or tire lever. For prying out your dust seals (only required if you plan on replacing your dust seals while the fork is apart).
- Something to press your dust seals back in. Rockshox recommends their specialty tool, I used the cap of a fork oil bottle. Pretty much anything hollow that fits around the lip of the dust seal and is strong enough to lean on will work. The idea is to press the seal into the fork evenly (again, only required if you plan on replacing your dust seals while the fork is apart).
- 24mm hex wrench. Rockshox recommends a 24mm socket, I used an open-ended craftsman wrench.
- Internal and external snap-ring pliers. Only the internal ones will be necessary for the spring swap. The external ones will come in handy if you decide to service the air U-turn assembly itself.
- Something sharp to remove o-rings. Rockshox recommends a pick, I used an exacto knife in some cases, a small flat-head screwdriver in others (again, only required if you plan on doing a full rebuild).
- Grease and fork oil. Only 15wt oil is needed for the spring swap (to replenish the lower leg oil), but 5wt will come in handy for the damper side if you're doing a full rebuild.
-Small funnel. Rockshox recommends a nifty little oil injector/syringe to get the 15wt fork oil into the lower legs, but I just made a small funnel by rolling up a sheet of thin plastic (that stubborn plastic packaging that everything comes in these days works well).
Step 2: Remove the lower legs of the fork
This is described well by the tech manual, but here's a quick run-down. Basically, just loosen the allen bolt on the damper side and the ten millimeter nut on the spring side a few turns each, then smack the bolts with your mallet (or block of wood). This un-seats the spring shaft and damper shaft from the bottom of the lower legs. Get ready for a mess... you need to have a drip pan under the fork when you do this, because oil will drain quickly from the lower legs (BTW, don't do this job in your mom's living room. If you don't have access to a workshop, do it outside). Once the shafts are un-seated, unscrew the bolt and nut all the way and slide the lowers off of the upper legs and pour any remaining oil into your drip pan.
Step 3: Remove all air pressure from the fork
First, depress the schrader valve on the bottom of the fork leg to remove all pressure from the negative air chamber, then do the same to the positive air chamber. THIS IS VERY IMPORTANT. You don't want to pull the air spring apart with 100+ psi of pressure inside.
Step 4: Remove the U-Turn adjustment knob
You should already have your schrader valve caps removed, so the next thing to do is pop off the circlip that's fitted around the shrader valve stem. This is kind of a pain in the ass, as you have to apply downward pressure to the knob itself while you use a pick or small flat-head screwdriver to pop the clip off. It makes you feel like you need three hands. Once you have the clip removed, pull the knob off and you'll see a bunch of small springs and ball bearings sitting in the top cap. If you plan on saving these, use a magnet to pull them out individually. If you don't care because you're going to replace the top cap with a non-U-Turn version, then just turn the fork upside down and try to catch them in your hand (you'll probably drop a couple).
Step 5: Remove the top cap
Use your 24mm wrench to loosen the top cap and un-thread it from the upper tube. The air U-turn air spring assembly is attached to the U-turn specific top cap so you can slide the whole unit out in one piece after you've unscrewed it. BE CAREFUL not to scratch the inside of the upper tubes while you are removing the air U-turn. Since the standard dual-air assembly uses the inside of the tubes to create a seal, scratches can hurt the performance of the fork. The U-turn assembly is basically a self contained air spring that sits inside of the fork... it doesn't rely on the upper tube of the fork to function except that the upper tube keeps your positive air pressure from escaping. Otherwise, it has all the same parts as a standard dual-air spring housed inside of a separate tube inside the fork. This is why an air U-turn fork is heavier than a standard dual-air fork of the same model.
If your air U-turn assembly is still functioning properly, you can try to pawn it off on a friend for a few bucks, sell it on ebay, or come up with a creative use for it around the house... maybe you could fashion an automatic opener for you beer fridge.
Step 6: Remove the base plate
To do this, first you have to remove the snap-ring from the bottom of the upper tube. This is where those snap-ring pliers will come in handy. Now you'll need a dowel to poke the base-plate out from above. It's best to use something plastic or wood, or that has a rubber tip to avoid scratching the inside of the upper tube. Stick the dowel into the top of the upper tube and push the base plate out through the bottom. The base plate is one of the few items that will be going back into the air spring side of the fork, so be careful not to damage it, and take a moment to remove and replace both the inner and outer o-rings. You'll need to apply fresh grease to the new o-rings before you install the new air spring, but that's best left until you assemble the new air spring shaft in step 7.

Now that the upper tube is empty, take a minute to clean the inside thoroughly. Spray some isopropyl (rubbing) alcohol inside the upper tube then wipe it down. Rockshox recommends using a plastic or wood dowel with a rag wrapped around it to wipe out the inside, but I had better luck just twisting up a rag and stuffing it inside the tube.
Step 7: Configure your new dual-air spring assembly
This is one area where I was a little iffy while doing the work. Since this is the first time I've dealt with either U-turn air or dual-air assemblies, and I was replacing a U-turn air with a dual-air, I didn't know what the dual-air spring was supposed to look like, nor how it was supposed to be configured for my particular fork and desired travel. The tech manual has a couple of small diagrams showing the proper configuration for the different fork models, so I worked off of those. Interestingly, the 2010 tech manual differs from the 2011 tech manual in this area, adding to the confusion (the 2011 manual shows the "all travel" spacers below the negative air piston whereas the 2010 manual shows them above the top out bumper). I decided to work from the 2010 manual, though I'm sure it would work fine either way.
With the U-turn air spring, I ran my fork at 120mm almost all of the time, so I decided to keep the front end low using Rockshox "all travel spacers" with the new dual-air spring. Basically, these are spacers that prevent the spring shaft from extending fully, therefore removing some of the fork's travel (they come in 10mm and 20mm thicknesses and are included in the replacement air spring assembly kit). I decided to go with one 20mm spacer to keep the travel down to 130mm instead of the full 150mm that the Revelation is capable of.
My configuration is as follows (from top to bottom starting just below the air piston-head):
-One 20mm spacer
-Top-out bumper
-Negative air piston (be sure to apply grease to the inner o-ring before sliding it onto the spring shaft)
-Base plate bumper
-Base plate (be sure to apply grease to the inner o-ring before sliding it onto the spring shaft)
There was some ambiguity in the tech manual as to whether or not the wavy washer and the flat washer should be installed on the Revelation (they would go just above the base plate). I left them out this time, but if something goes wrong, I'll know it was a mistake (I've already put 10 fairly hard trail miles on the fork at the time of this writing, with no issues or problems to speak of).
Unfortunately, at this point in the process, I was getting anxious to get my bike back on the trail, so I forgot to keep taking pictures. Refer to the tech manual to help identify the individual parts that go on the air spring shaft.
Step 8: Install the dual-air assembly
First, apply a generous amount of grease to all of the o-rings and the spring shaft itself. The 2011 tech manual also recommends applying grease to the inside of the bottom of the upper tube as well (basically as far up as you can stick your finger inside the tube)... probably not a bad idea, but I didn't do this since I was working from the 2010 manual which omits this information. Basically, it's a good idea to apply plenty of grease in the interest of preventing stiction in the spring assembly.
Now slide the dual-air assembly into the upper tube from the bottom (obviously you want it to be right-side up, i.e. schrader valve at the bottom). It takes considerable force to get the negative piston into the upper tube.
Press the base plate up into the lower leg so that you can see the snap-ring notch at the bottom. Re-install the snap-ring using your snap-ring pliers. This is easiest if you push the spring shaft up into the upper tube so that only a few inches are showing (you'll need to depress the schrader valve on the bottom while you push on the spring shaft to prevent it from creating a vacuum... otherwise it will push itself back down when you let go).
Step 9: Install the standard air top cap
As I mentioned, you can't use the air U-turn top cap with a standard dual-air spring. Apply some grease to the threads and the o-ring on the top cap, then thread it into the upper tube by hand. Tighten it with your 24mm wrench to 65 in-lbs.
Congrats! You're basically done with the spring swap! Now is a good time to perform any other maintenance you might want or need, and also to pump some air into the fork to check that everything is sealing properly. Once you've completed the rest of your maintenance, the only thing left to do is reinstall the lower legs. The tech manual provides plenty of info on this, so I won't get into it.
Once that's all done, reinstall the fork on your bike and get out and ride! It should feel plusher than ever! I know mine sure does.
-Spencer Jacobs

Author Info:

Must Read This Week
Sign Up for the Pinkbike Newsletter - All the Biggest, Most Interesting Stories in your Inbox
PB Newsletter Signup
That doesn't include the cost of fork oil or grease, but those aren't too expensive (you'll need some 15wt fork oil for the lower legs, and some grease for the spring assembly... you'll only need 5wt fork oil if you decide to refresh the damper side oil while you're at it).
I rode this fork for several years assembled as noted above with no issues. It performed better than the original UTurn setup, that's for sure. I've done minor service on it since then and it still rides great to this day (it's on my loaner bike now). One upgrade that I made later on was to add a few bottomless tokens to the air spring, which really helped to keep the fork from diving into its travel on steep descents.
Per your comment about the air spring kit photo, I'm fairly certain that's spacer for reducing the travel. If they had sent a replacement base plate, I would've used it.
I see there is a Dual Air Spring Assy with top cap kit (11.4015.546.060) 2012 Revelation 26". Does anyone know if this air spring kit is the same as ordering the 2 separate parts? I found an online price a little cheaper for this kit vs the 2 separate part numbers.
Thanks for the writeup!
However, at this point I would recommend buying the dual air assembly, and then pick up one of the Bottomless Tokens and Air Top Cap Kit (11.4015.032.002). It comes with a different top cap that is compatible with bottomless tokens along with 5 tokens. That way you get the added benefit of being able to tune how progressive it is. I actually made this upgrade years after my original rebuild, and it works great. Really improved the feel of the fork, especially on steep descents where it originally wanted to dive too far into its travel.
BTW, I think the part number is 11.4018.032.002. I didn't find anything for the 4015 part.