Tech Tuesday: Six measurements that every rider should know.
Those who travel with their bikes, or anyone who has had to borrow a bike in a pinch will understand that knowing a few basic measurements, like saddle height and the distance from the handlebar to the saddle, could save a lot of setup time and prevent some mid-ride frustration. In this Tech Tuesday, Pinkbike covers six basic measurements that every rider should memorize (or keep handy) that will make it possible to set up a reasonably correct sized bike to fit your body and riding style.
Use these measurements to get your personal bike perfect after shipping, or to adjust an unfamiliar bike to fit you as closely as possible. Remember that small differences in geometry and component spec can make big changes in your position on a different bike. In this situation, Pinkbike's setup guides will get you close to optimum in the shortest amount of time. If you require perfection to ride a borrowed bike for one day, don't expect your friends to circle around in the parking lot for an hour waiting for Mister Fuss Butt. Consult a psychotherapist and a bike-fit professional.
![tools]()
What you'll need:
- Measuring tape
- A Sharpie or other permanent marking pen
- Sturdy writing paper that will stand the test of time in your wallet
- Your personal bike, set up exactly how you like it (you'll be measuring this)
- Positive, winning attitude
Step one: Get a pen and paper ready and find a place where you can prop your bike up on level ground. The level ground part is important.
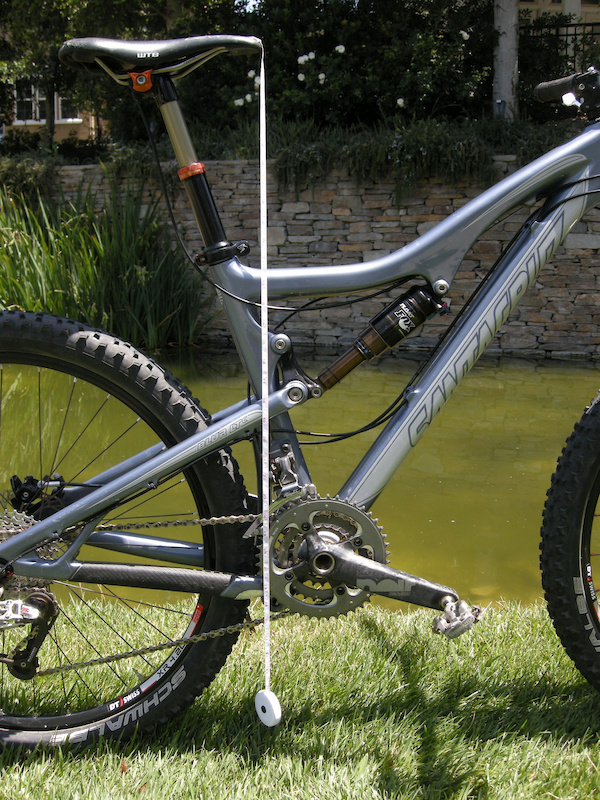
Step two: Measure the distance from the imaginary center of the bottom bracket axle to the center of the top of the saddle. You will have to guess where the middle of the saddle is, or pick the point where an imaginary line through the center of the seatpost intersects the top of the saddle. Write this down.
![seat height full]()
![Seat height]()
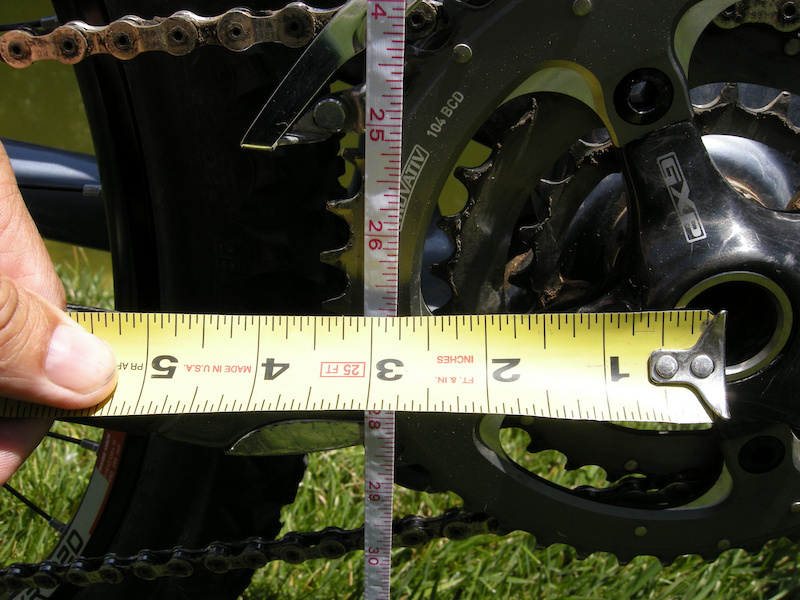
Step three: Measure your saddle setback from the bottom bracket center to compensate for different seat tube angles. Use the measuring tape as a plumb line from the tip of the saddle. Mark the crankset with a Sharpie where the edge of the tape passes behind the bottom bracket axle and then measure the distance horizontally from the mark to the center of the bottom bracket - write this down. First, set your proper seat height, and then use this measurement to establish if the saddle needs to be moved fore or aft on the seat post. I would not recommend worrying about this unless you plan to race XC or ride trail for extended distances.
![pendulum]()
![seat offset]()
Step four:Measure the distance between the nose of the saddle and the center of the handlebar where it passes through the stem and jot it down. In most cases, you won't be able to change out your stem, so try to slide the saddle on the seat post to get this distance as close as possible. Your bike will steer and handle better if you get this measurement right, and in most cases, it's better to abandon the step-three measurement in favor of step four.
![top tube]()
Step five: Most bikes have too many spacers between the stem and fork steerer tube, but in this case, it’s a good thing. Measure from the ground to the handlebar and switch the spacers around to achieve a bar height that approximates your own bike.
Tip: A more accurate bar height reading is to measure the top of the saddle to the ground and subtract that number from the bar height. This compensates for various BB heights, but because they only vary by ¾ of an inch, it’s a moot point for a one-day ride.
![Bar to ground]()
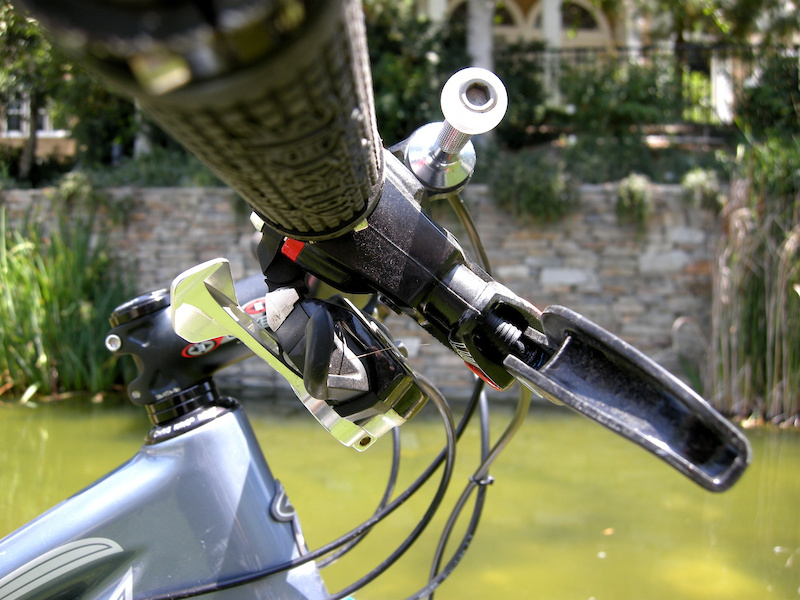
Step six: Before you set out, check these three component adjustments. Measure where the distance between the kink in the brake lever blade and the inboard edge of the grip. Memorize the angle of the brake levers by sight, and count how many clicks you use to set your clipless-pedal engagement tension (providing there is such an adjustment).
Tip: Most shifters work best when angled about the same as, or a little steeper than the brake levers.
![lever set]()
![lever angle]()
![Pedal]()
Got any more tips to make that quick bike setup even easier? Pinkbike would like to hear about them.
Use these measurements to get your personal bike perfect after shipping, or to adjust an unfamiliar bike to fit you as closely as possible. Remember that small differences in geometry and component spec can make big changes in your position on a different bike. In this situation, Pinkbike's setup guides will get you close to optimum in the shortest amount of time. If you require perfection to ride a borrowed bike for one day, don't expect your friends to circle around in the parking lot for an hour waiting for Mister Fuss Butt. Consult a psychotherapist and a bike-fit professional.

What you'll need:
- Measuring tape
- A Sharpie or other permanent marking pen
- Sturdy writing paper that will stand the test of time in your wallet
- Your personal bike, set up exactly how you like it (you'll be measuring this)
- Positive, winning attitude
Step one: Get a pen and paper ready and find a place where you can prop your bike up on level ground. The level ground part is important.
Step two: Measure the distance from the imaginary center of the bottom bracket axle to the center of the top of the saddle. You will have to guess where the middle of the saddle is, or pick the point where an imaginary line through the center of the seatpost intersects the top of the saddle. Write this down.

Step two

Step two detail
Step three: Measure your saddle setback from the bottom bracket center to compensate for different seat tube angles. Use the measuring tape as a plumb line from the tip of the saddle. Mark the crankset with a Sharpie where the edge of the tape passes behind the bottom bracket axle and then measure the distance horizontally from the mark to the center of the bottom bracket - write this down. First, set your proper seat height, and then use this measurement to establish if the saddle needs to be moved fore or aft on the seat post. I would not recommend worrying about this unless you plan to race XC or ride trail for extended distances.
Step three - first part
Step three - second part
Step four:Measure the distance between the nose of the saddle and the center of the handlebar where it passes through the stem and jot it down. In most cases, you won't be able to change out your stem, so try to slide the saddle on the seat post to get this distance as close as possible. Your bike will steer and handle better if you get this measurement right, and in most cases, it's better to abandon the step-three measurement in favor of step four.

Step Four
Step five: Most bikes have too many spacers between the stem and fork steerer tube, but in this case, it’s a good thing. Measure from the ground to the handlebar and switch the spacers around to achieve a bar height that approximates your own bike.
Tip: A more accurate bar height reading is to measure the top of the saddle to the ground and subtract that number from the bar height. This compensates for various BB heights, but because they only vary by ¾ of an inch, it’s a moot point for a one-day ride.

Step Five
Step six: Before you set out, check these three component adjustments. Measure where the distance between the kink in the brake lever blade and the inboard edge of the grip. Memorize the angle of the brake levers by sight, and count how many clicks you use to set your clipless-pedal engagement tension (providing there is such an adjustment).
Tip: Most shifters work best when angled about the same as, or a little steeper than the brake levers.

Step Six - A
Step Six - B

Step Six - C
Got any more tips to make that quick bike setup even easier? Pinkbike would like to hear about them.
Author Info:

 Member since Mar 23, 2011
Must Read This Week
Sign Up for the Pinkbike Newsletter - All the Biggest, Most Interesting Stories in your Inbox
PB Newsletter Signup
I could have misread the article though..........
The point of this TT is that to get those small things right in order to be comfortable on your bike, not to tweek the shit out of it and then not be able to put it as it was. Although I think every rider can get these things nailed without having to measure everything with a meter and writing it down. The only thing I write down is my suspension tuning.
rather than telling people how to set up a bike (which is all down to personal preferance) can we please get back to the proper how to strip and rebuild videos?
Personally i'd rather a know how to strip the rebound cartridge on a set of 2011 40s or something usefull like that. Not how to move my brake levers....
Maybe your rideing angles change if bigger bike you get longer chainstay longer wheelbase get everything dialled and go to ride:>
You could use the 'by halves' method that can be used for setting damping. Roll your bars quite forward to some arbitrary 'Position 1'. Then roll it heaps backwards to some arbitrary 'Position 2'. If '2' feels better than '1', then position '3' is halfway between 1 and 2. So which feels better, position 2 or 3? If position 2 still feels better, then position 4 is halfway between 2 and 3. Which feels better, 2 or 4? And so on going half-way between the good and the not-as-good until you get to the final point. Using this method qualifies you as a bike nerd.