To the Point: Torque Specifications
As carbon fiber becomes increasingly common in the mountain bike world, and components get lighter and lighter, it's more important than ever to ensure bolts are tightened to the proper torque spec. Simply tightening a bolt until it's "snug" isn't enough - under or over-tightening can lead to damaged components or rider injury. We asked Jay Seiter, an R&D engineer at Pedro's North America, to fill us in on the basics of torque spec and proper torque wrench usage.
 What is torque? How is it measured?
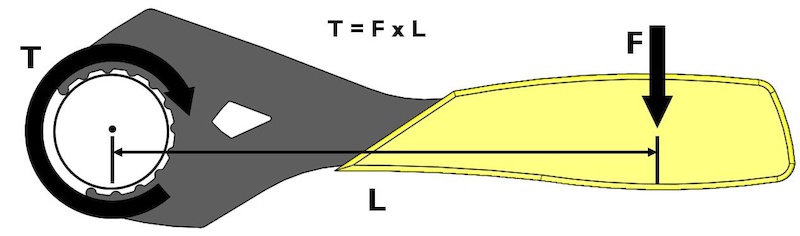
Torque is calculated by multiplying the amount of force (F) by the length (L) of the lever.
Why is knowing the proper torque spec important for bicycle components? What happens if you over-tighten a bolt?
![photo]()
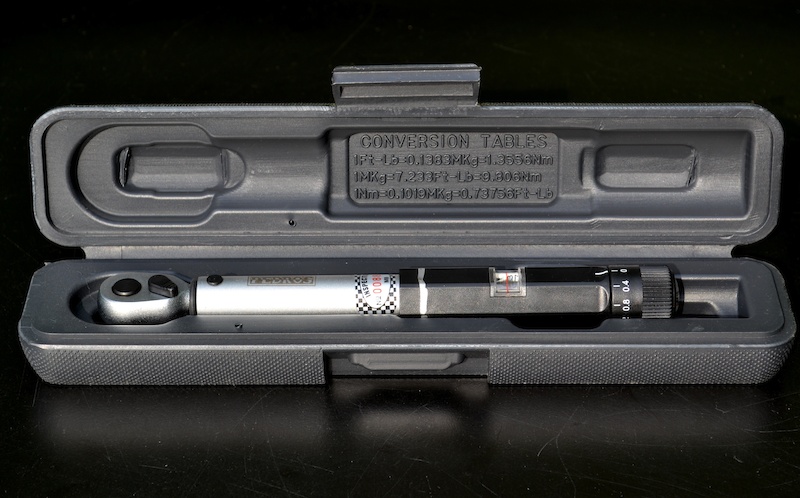
A click type torque wrench, one of the three most common types of torque wrench.
How does a torque wrench work? Are there different types?
What is the proper technique for using a torque wrench?
![photo]()
Stem bolts, crank bolts, even lock-on grips should be tightened to the proper torque spec to avoid damaging components.
What about storage? Does a torque wrench need to be at a certain setting before putting it away?
How often does a torque wrench need to be calibrated? How is this done?
Occasionally, you'll hear someone say “I don't need to use a torque wrench – I can just tell when it's tight enough." Any thoughts on this statement?
www.pedros.com
 What is torque? How is it measured?
 In simple terms, torque is a twisting force that is likely to cause an item to rotate.Torque
is calculated as force multiplied by length with the length being the distance between the
rotational axis and the point where the force is applied. Torque is measured most commonly
as Newton meter (Nm), pound-inch (lb-in), or pound-foot (lb-ft) units. The last two are common
in the U.S. but are often referred to as inch pounds and foot pounds. Newton meters are
standard on most bicycle components. As it relates to bicycle mechanics, torque is most
often related to component fasteners. These fasteners are threaded, which converts the torque
into a linear force used to hold components in place or to provide a clamping force to hold two
components together. A common example of this is the interface between a stem and handlebar.

Torque is calculated by multiplying the amount of force (F) by the length (L) of the lever.
Why is knowing the proper torque spec important for bicycle components? What happens if you over-tighten a bolt? As a human powered vehicle, the weight of a bicycle is a major contributor to performance. This
requires engineers to push the limits of each material and design they choose. The engineer must
factor in material properties, part shape, riding conditions, product life, and more. The torque
specification provided with a bicycle or component makes sure the forces applied to these parts
are within the intended limits. If the torque is too low, a component is likely to slip or fall off. Conversely,
if the torque is too high, the component or fasteners may be over-stressed and fail. In either case,
significant injury could result. While torque specifications are important with all type of materials,
the growing number of carbon fiber components has led to an increasing focus on torque and the use
of torque wrenches. While carbon fiber allows for more optimal design and provides a far higher strength
to weight ratio compared to steel and aluminum, it is also more susceptible to crushing and cracking
when improperly set up. Simply put, the margin for error is much smaller. For this reason, using a
torque wrench has become essential.
 How does a torque wrench work? Are there different types?
The general principle of a torque wrench is that as torque is applied to a fastener, the
torque wrench uses a calibrated mechanism to display the torque applied or otherwise
indicate when a specified torque has been reached. The three most common types of
torque wrenches are beam type, click type, and digital. A beam type torque wrench
uses two parallel rods, one being the wrench handle, and the second having a torque
display scale. The handle rod is designed to bend as torque is applied to the fastener.
The torque display scale remains unbent allowing the relative angle between each rod
to indicate the torque. These are the least expensive and simple type of torque wrench,
but rely on the user to constantly look at the torque scale. This may be challenging in
some bicycle applications where wrench positioning is limited.
A click type torque wrench is the most common type offered in the cycling industry.
This type of torque wrench uses a calibrated clutch mechanism and connected pivoting
head to indicate when a preset torque has been reached. When the torque setting is
reached, the head displaces slightly and makes a clicking noise as a result. Click type
torque wrenches are available in fixed setting, specific to a single torque value, and
adjustable setting, which can be set to a range of torque values. Pedro’s Demi Torque
Wrench and Pro Torque Wrench are click type wrenches adjustable from 3 Nm to 15 Nm
and 6 Nm to 30 Nm respectively. We chose to offer this type of torque wrench because
we felt it was the best blend of accuracy, ease of use, ease of calibration, and value. A
digital torque wrench uses a strain gauge attached to a torsion rod to measure torque and
convert it into the common torque units using a processor. The digital torque wrenches work
on similar principles as a beam type torque wrench, but are more advanced, displaying the
torque value digitally as the fastener is tightened. In addition, many digital torque wrenches
sounds a digital alarm when a preset torque value is reached. These types are the most
expensive.
What is the proper technique for using a torque wrench? The technique for using each type of torque wrench varies, but the general principles are the
same. First, read any technical documents provided to determine torque specification and
thread treatment indicated by the manufacturer. Second, set your torque wrench to the specified
torque and double check the torque units. There is a huge difference between 10 inch pounds
and 10 foot pounds! A handy trick, though a bit finicky, is that Google search will do unit
conversions for you. Try it out by entering “5 newton meters in pound inches” and see what
you get. Worst case, you’ll find many free conversion tools. Third, apply treatment, such as
grease or threadlock, to the fastener threads if required by the manufacturer. Fourth, while
holding the torque wrench by its handle, begin tightening the fastener. When the correct torque
is reached, as indicated by the torque scale on a beam type, or by the click/alert on click or
digital types, stop tightening the fastener. Do not continue to tighten the fastener. This is
especially important on click/digital types as continuing beyond the set torque can damage
the torque wrench.
These four steps will cover the basics of using a torque wrench. When tightening components
using multiple fasteners, as commonly found on stems, it is very important to tighten them
using an alternating method, tightening half a turn or less before moving back to the other
fastener, and repeating this until both are tightened to the specified torque. This is important
because when one fastener is tightened, it loosens the others. Using a torque wrench, each
fastener should be tightened to the torque specification, and then re-checked for torque after
the other fasteners are tightened, repeating for each fastener until all meet the specified torque.
Just as important, this alternating method should be using when removing torque specific
hardware as well because when one bolt is loosened, the other is tightened which can lead
to thread damage. If there are four or more fasteners, they should be tightened in a crossing
pattern by moving to the fastener opposite to the one just tightened whenever possible. This is
the same technique used for tightening lug nuts on a car wheel ensuring equal tension on all
fasteners.
 What about storage? Does a torque wrench need to be at a certain setting before putting it away?
 As a calibrated device, all torque wrenches should be used with care and stored in a protective case. For
adjustable click type torque wrenches, the wrench should be set to its lowest torque setting or approximately
20% of the maximum torque. For example, the Pedro’s Demi Torque should be set to 3 Nm for storage as this
is 20% of the maximum torque of 15 Nm. If the wrench has be unused for a long period of time, set the wrench
to 50% of the maximum torque and operate the click mechanism five to ten times before using the wrench on
a fastener. This is also suggested before the first use of a new torque wrench.
How often does a torque wrench need to be calibrated? How is this done?Calibration is most important for click type torque wrenches. The exact process varies from wrench to
wrench but the process typically involves adjusting preload on a calibrated spring inside the wrench.
The wrench is then checked against a device with a known and calibrated torque. We suggest having
Pedro’s torque wrenches be calibrated every three to six months with heavy (daily) usage. The occasional
user could likely wait longer if the wrench is treated well and hasn’t been dropped or abused. We also
strongly recommend wrench owners work with a professional calibration service to ensure the proper
equipment and techniques are employed. We have had good luck with ESSCO Lab located in
Massachusetts but any similar calibration service should be able to provide calibration or at very
least determine if the wrench is calibrated within tolerance.
Occasionally, you'll hear someone say “I don't need to use a torque wrench – I can just tell when it's tight enough." Any thoughts on this statement? Most mechanics are guilty of not using a torque wrench at least some of the time. However,
bicycles and riding itself have changed considerably in a very short time. Considering the
variables of fastener material, multiple fastener clamps, component material, wrench size,
thread treatment, component design, etc., there is simply no way to get a torque specification
correct by feel. Many mechanics still disagree, arguing that their years of experience have
given them the "feel" needed to properly torque hardware, but test after test has shown this
is rarely true.
www.pedros.com
Author Info:

Must Read This Week
attach.kawiforums.com/2007/09/08/20070908124551-0-1940.jpg
I tightened a carbon stem to carbon bar with the recommended torque specs, and the bar slipped during the first ride. Sometimes carbon has a break in-adjustment also, so don't assume it's tight or will stay tight.
The article failed to mention break in adjustments, failed to mention the importance of friction cream when tightening carbon to carbon, and
failed to mention the value of anti-seize in some tightening situations.
The article went into detail about how to tighten a face plate on a stem but forgot one important detail that's is sometimes overlooked: make sure the gap between the face plate and the stem is equal on both sides or you can damage your threads, crack the face plate (Thompsen!), or not provide even clamping force.
There are other fasteners on my bike (especially my DH bike) that I exceed spec on, but I will not divulge that info because I don't endorse it. Over time you just learn what needs to be set to "good and tight" spec.
My rule is to be real careful on grips, cranks, stems, fork crowns etc - anything you need to leave a gap basically. Whereas something like a shock or pivot bolt with a nut on I tighten as much as possible (within reason).
Pedros Pro Torque Wrench: $102 (on sale on jensonusa.com)
Cracking carbon frame because you're too cheap to spend an extra 4% so you can properly torque your bike: PRICELESS!
And if its not calibrated its useless.
Also the thing about "the feel" not accurate but our body can be trained to recognize and measure forces, like knowing what 100g in weight feels like. Given its a set force it doesn't matter what materials its being applied to so long as the proper technique is used (greasing threads etc).
Bikes should be assembled and maintained under clean room condition 5 with full dustsuit and breathing mask;-)
And if chris king actually knows what they are talking about then they would also recommend that you never use it for lubricating anything ...Especially bearings of all things.
Nothing wrong with a good squirt of WD40 to clean the shit off bolts & threads, wipe off the excess, then stick some grease on.
If some one is stupid enough to use it as a lube then I doubt they are smart enough to use it for cleaning/degreasing.
Sometimes, rather than a proper clean, I give my whole bike the once over with WD40 & a rag - the equivalent of a whore's bath if you like
I think you may have discovered another proper use of WD40....
If used for its proper function e.g, as a penetrant for seized fastenings and a water dispursant fro smaller mechanical assemblies then why shouldent it be used in a bike workshop? Im a bike mechanic and it sits proudly on the shelf besides gt-85 and a pot of cv grease.
The industry needs more mechanics and not just part fitters talking the talk....
sorry for the slight correction on the naming of the product
"WD-40" (water displacer - 40) was named because it was the 40th formulation the company (Rocket Chemical Company) tried before their founder / chemist Mr Larsen found the correct formulation for their application (preventing corrosion in Atlas rocket boosters)
Its a fantastic product for the right application, but I would not use it near any bicycle...
For those working in a bike shop: it is always nice when a piece breaks when using a torque wrench. Had a crank arm snap near the bolt at 8Nm that was rated at 12-14Nm. Called to warranty without hesitation. Company claimed they had never heard of that happening before, but you cannot argue with the torque wrench.
1. for home use, calibration of your tool is not critical (you won't be using it enough). in a pro bike workshop you need to keep a log of typical usage patterns (or even just when you bought the tool!) as torque wrenches will drift off calibration when used daily, for weeks / months
2. when setting a torque wrench, always take the value slightly above the intended value, and then back it down the intended value. many fail to do this, and get a false reading.
Doing this sets the torque more accurately. As an example, if you want to torque a bolt to 10nm, take the tool to 12-15nm and then back down to 10nm. If you just take it straight to 10nm, you can actually read this as 7-8nm with a bolt torque measurement tool.
3. always back the torque off when storing the tool. Nothing annoys a pro mechanic more than people leaving his / her torque wrenches set at high values, as it stretches the spring out and causes premature drift of calibration
4. NEVER use a torque wrench to loosen a bolt. Some torque wrenches have a reverse switch to allow left / right handed thread torque setting, but mechanics will abuse this (because they don't have to pick up another tool) and use the wrench to loosen a torqued bolt.
you should always use an allen key or torx to loosen a bolt, as you don't know how tight the torque is on this item, and using a torque wrench to loosen stubborn bolts is a sure fire way to stretch to spring
5. if you drop a torque wrench on a hard surface (concrete floor or steel base of a work stand) do not trust the torque calibration. dropping it onto a rubber floor mat won't do much harm
too much grease under the 'head' or washer or a bolt being torqued will give a false reading. Ideally you want the substance on the bolt threads and none under the head.
personally I prefer cleaning using ISO alcohol and prepping with shimano anti-seize because it eliminates creaks, prevents seizure, I was taught "grease is only for bearings, everything else uses anti-seize or loctite"
anti-seize does not affect torque values in the same way that grease or lubricants can. I would only use blue loctite for vibration sensitive applications (I have found loctite tends to dry / crack over time causing creaks): www.bike24.com/i/p/4/4/8744_00_d.jpg
The only issue is the range of torque settings on a bike means you typically need two wrenches to cover everything.
This is my low torque wrench:
www.torpedo7.com.au/products/T7TOWN0WS/title/torpedo7-1-4-inch-drive-torque-wrench-set
Looks remarkably similar to the pedro, rebrand or cheap chinese knockoff?
^^ your torque wrench is a common item produced in China, and sold under many "brand names" all over the Globe including "Pedro's"
we have the same item branded as this in the UK: www.roadcyclinguk.com/news/images/pro_torqwrench_1_hi.jpg
or not using a torque wrench, results in an injury, you leave yourself wide open to a negligence lawsuit. The legal system looks to assign blame in order to receive compensation. Don't give them a reason to look in your direction over something so simple as using the right tool for the job.
^^ that's about it really.
EVERY single bolt we torque on our customer's bikes is set with a torque wrench to the correct torque
our PDI sheets (pre-delivery sheets) even have records of this information
if a component fails, we can assume rider abuse or component failure, rather than a mechanic forgetting to torque a bolt correctly
I am still shocked at the number of bike stores in the UK (both chain stores and independants) who actually have torque wrenches but the mechanics cannot be bothered to use them
*seems legit*
I think that every bolt with a max torque indication should add "don't let other people do it" after the number.
(All in in/LBS 'Murica)
Derailleur Hanger Bolts 30-45
Rear Derailleur 70-86
Handlebar Binder Bolt 150-180
Stem Binder Bolt 175-260
Seatpost Binder Bolt 150-180
Saddle Clamp Bolts 175-250
Seatpost Binder Bolt 150-180
center lock rotors 350 in /lbs
disc calipers 60in/lbs
Chainring Bolts 88-132
crank holding 106-122 in/lbs
left crank 106-122 in/lbs
bb cups 305-435 in/lbs
Through axle bolts 125-130 in/lbs
Shock bolts 85-95 in/lbs
Pivot Bolts 125-150
Alum shoulder bolts 135-150
I just wanted to add this. My permanent reminder to make sure everything is tightened to the correct value!
www.pinkbike.com/photo/9283347
something to understand about Carbon Fibre (whether bars, stem, seatpost, cranks, frame, etc.) is that carbon fibre does not have elasticity like cromoly steel, titanium or aluminium alloy
each of the metal alloys I mentioned have a feedback mechanism in that the structure actually has elasticity, you can feel this when you start loading torque on a fixing, with a hex wrench or allen key
with CF, you get no warning as there is no elasticity (no local deformation), its very easy to take the torque slightly too high and the CF will suddenly fail with a load pop / crack
we always use torque wrenches and fibre grip paste when working on CF because our customers don't appreciate having their expensive CF parts broken, and neither do our employers?
if its your own bike or parts, then obviously do whatever you feel comfortable with. But personally I have torque wrenches at home because even when working on both my carbon bikes I don't want to be fixing them with improper torque
no problem!
I have too many first hand experiences of customers buying expensive CF finishing kit (bars, seatpost, etc.) proclaiming they don't need / want a torque wrench and then coming back the next week with the seatpost or bars cracked, and sheepishly admitting they used a multi-tool or p-handle to tighten the seat clamp or stem fitments
in those instances, we would usually sell them another seatpost or bars at our cost (out of goodwill) and also an affordable torque wrench, and give them some basic instruction in its usage
with the correct fitment (HT2 or Shimano / ISIS pattern adapters for BB units) plus suitable torque wrench (typically automotive with 10-70nm range)
like this: www.motorcyclenews.com/upload/262880/images/Halfords-torque-wrench.jpg
we also use this tool and suitable adapters for cassette lockrings which use 40nm
Even better: righty tighty, lefty loosey.... when in doubt, use your teeth to torque fasteners.