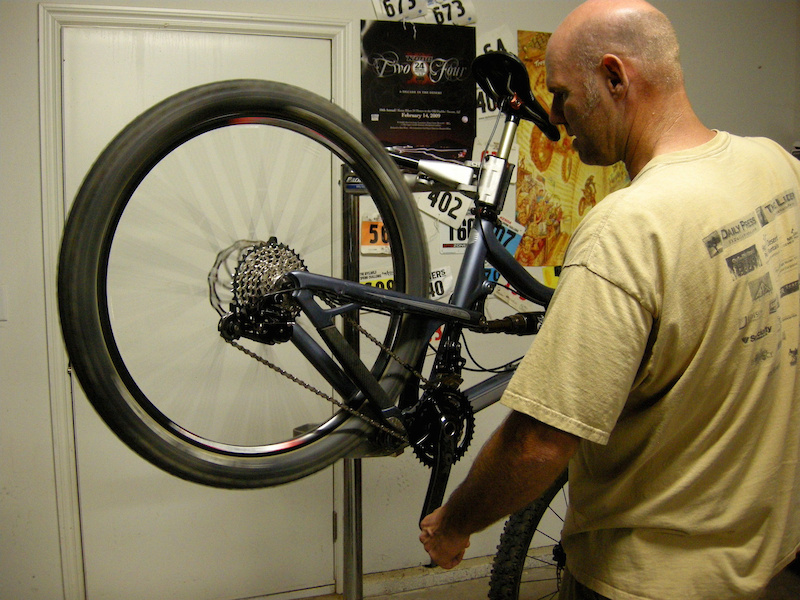
Tech Tuesday: Install a SRAM X.0 Two-By-Ten Crankset
SRAM’s 2011 X.0 two-by crankset with its carbon fiber arms is among the lightest offering for all-mountain/trailbike use. In this week’s Tech Tuesday, Pinkbike takes you through the steps required to install an X.0 crankset, including the necessary chain and derailleur adjustments. Our guide is Eddy (Big Ring) Rea, the go-to guy for mountain bikers in Southern California’s High-Desert. The tools required are minimal, and the installation is quite easy, so grab your new XO crankset and a Truvativ GXP bottom bracket, and let’s get started.
![XO crank and chain]()
What you’ll need
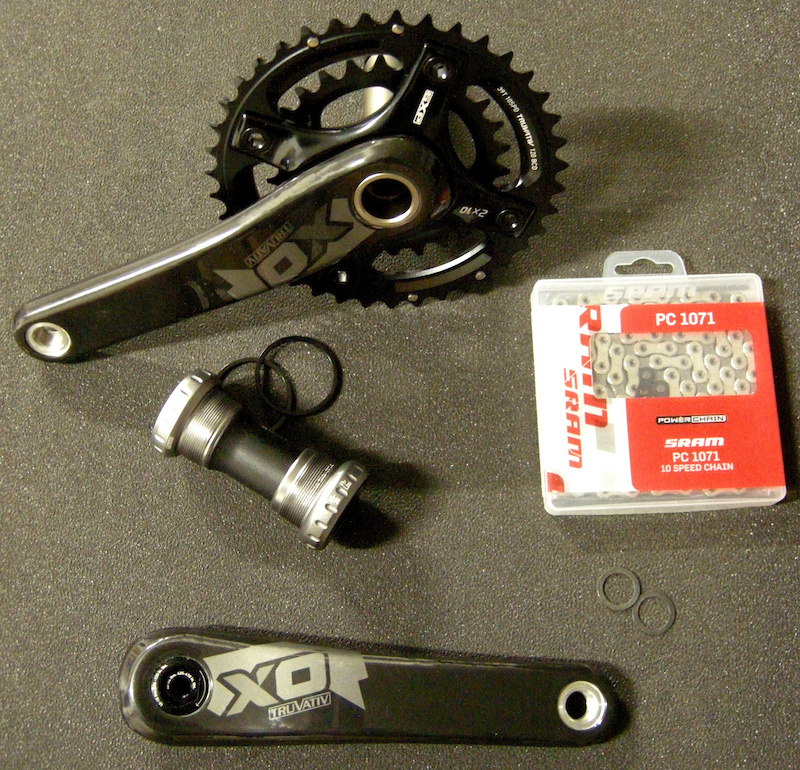
(clockwise) X.0 crankset, Truvativ GXP bottom bracket (the BB spacer rings are included), and a new 10-speed chain (we used a SRAM PowerChain 1071). It is worth noting that SRAM's 2012 X.0 crankset is a good choice for trail and AM because it has a replaceable spider which allows for lower gearing options than our test bike's 39 x 26-tooth combination.
![Tools you ll need]()
Your tool kit for the day
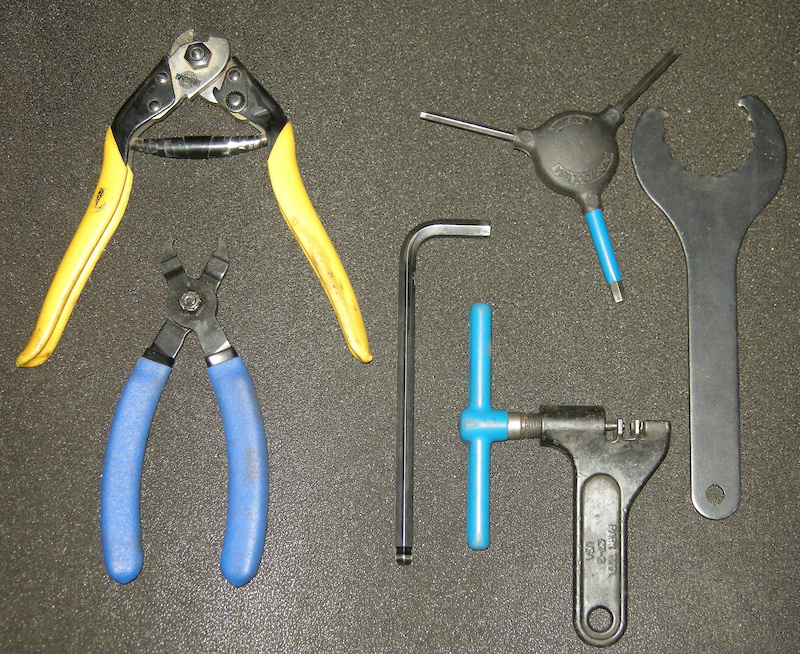
-Cable cutter in case you need to replace the front derailleur cable.
-Allen wrenches from 3mm to 8mm
-Shimano TL-FC32 bottom bracket cup wrench
-Chain breaker tool
-Park MLT-1 master link pliers. (Not necessary, but so cool we had to show it off.)
-Light grease
-Clean shop towels
-Bike stand
Tips: Installing a new crankset is best done with the bike in a good stand so you can work near eye level. Give the bike a good cleaning before you start to ensure that your efforts will result in a long-lasting build. It is worth noting here that SRAM recommends the GXP bottom bracket for use with the XO crankset for AM/trail purposes.
![clean threads]()
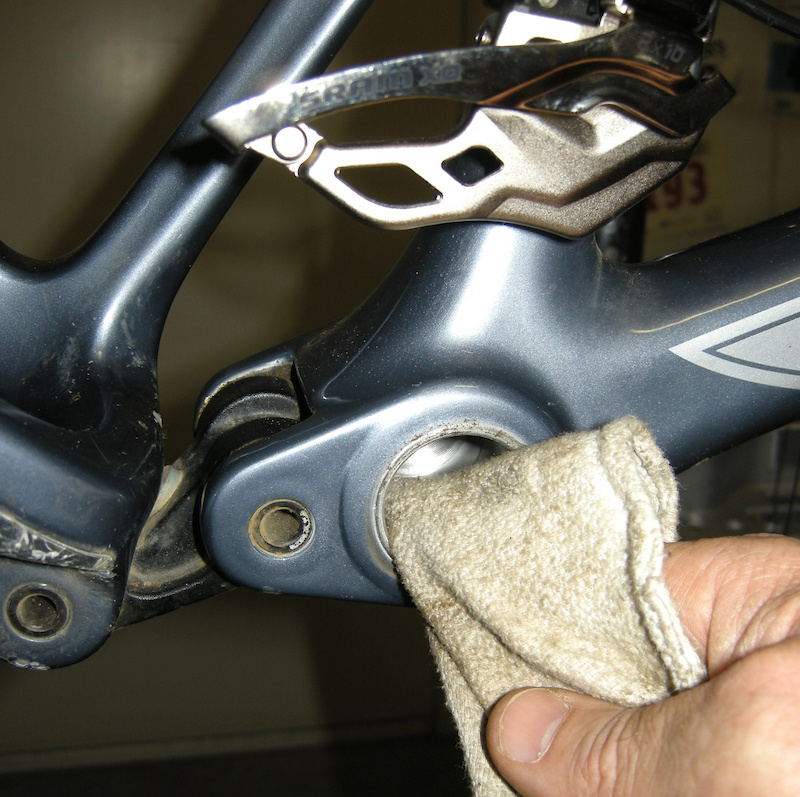
Step one: Remove old crankset and then clean any grease and dirt from the bottom bracket threads with a shop towel.
![grease threads]()
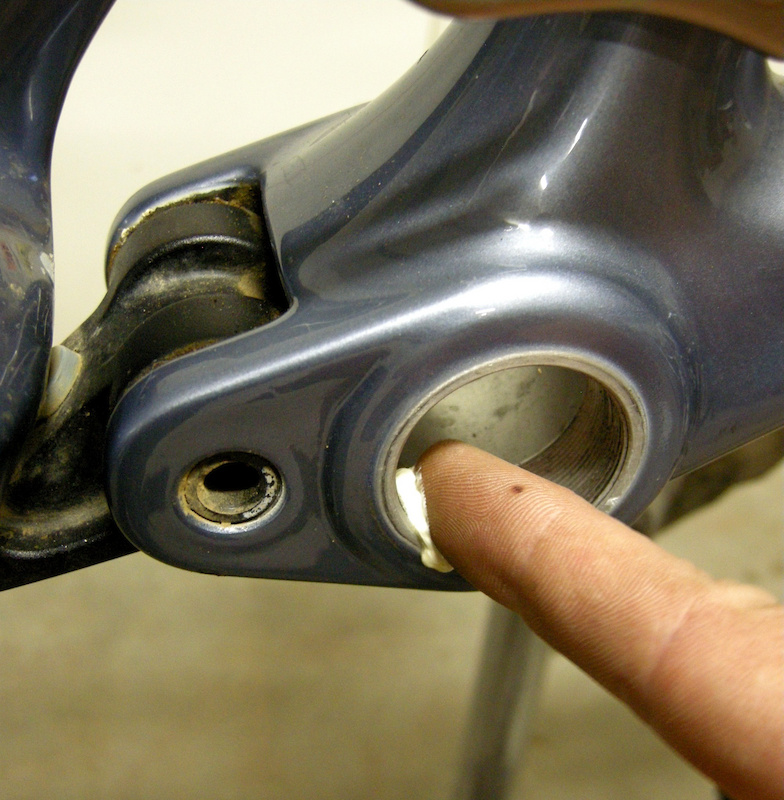
Step two: Lightly grease the bottom bracket threads, making sure that you get a little around the entire circumference for about a half inch.
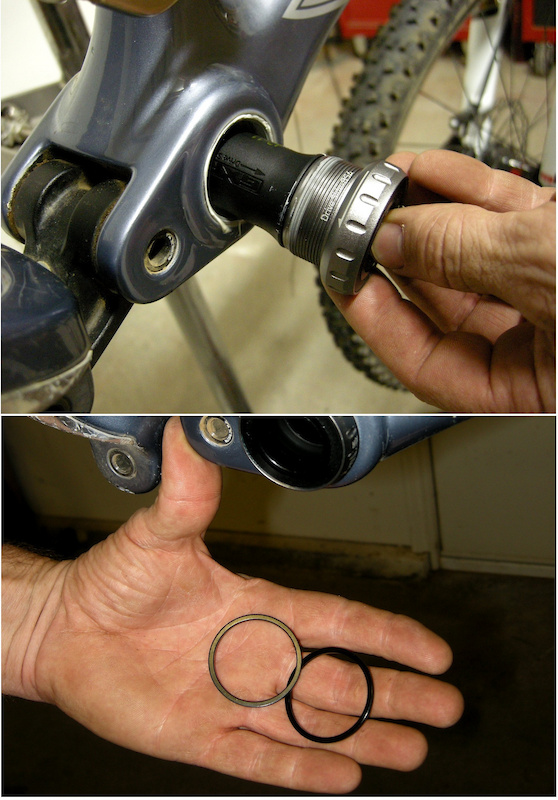
![install left cup]()
Step three: Measure the width of the bottom bracket shell (it will be either 68mm or 73mm) If it is 68mm wide, then slide one 2mm spacer between the cup and BB shell. Insert the cup with the spacer into the frame and then screw in the right-hand cup counter clockwise by hand, very carefully, so as not to bungle the threads. Stop at the first hint of binding and retry until the cup threads in easily. If your frame has a 73mm-wide BB shell, use no spacers.
![screw in left cup]()
Step four: Repeat with the left-side cup but remember that the left side screws in clockwise. Pop off the sealing end cap with your finger (see step 7) because otherwise, it will get knocked to the floor when you insert the bottom bracket axle.
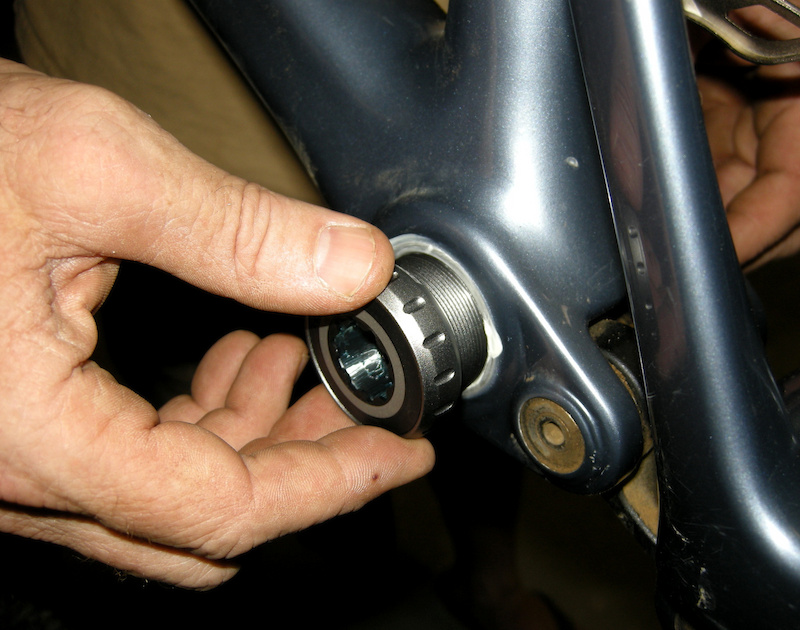
![Tighten BB cupc]()
Step five: Tighten the bottom bracket cups securely with the Shimano FC32 bottom bracket wrench. Remember, the left side cup tightens clockwise and the right side cup tightens counter clockwise.
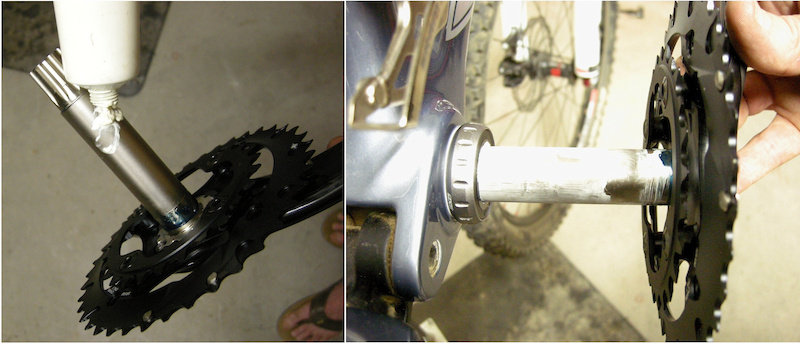
![grease shaft]()
Step six: Grab the left crankarm and then lightly grease the bottom bracket shaft. Next, slide the shaft through the BB cups. Give the outside of the crankarm a firm rap with the palm of the hand to ensure that the axle is seated against the right-side BB bearing.
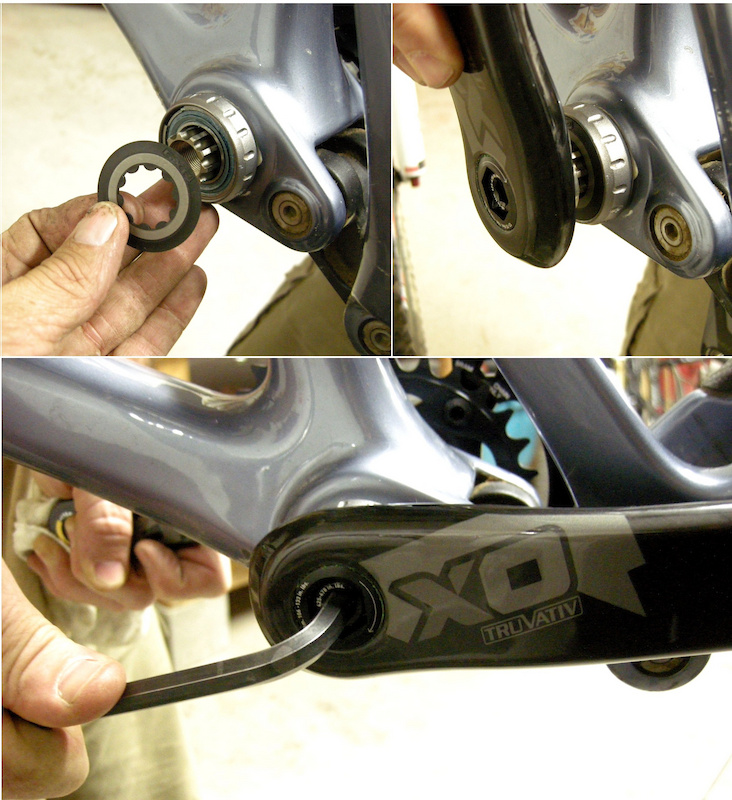
![install left arm]()
Step Seven: Slide the left side dust washer onto the BB axle spline and then snap it into place in the bearing cup. Next, slide the left crankarm onto the BB shaft (make sure to align it opposite to the right arm) and tighten securely with an 8-millimeter Allen wrench.
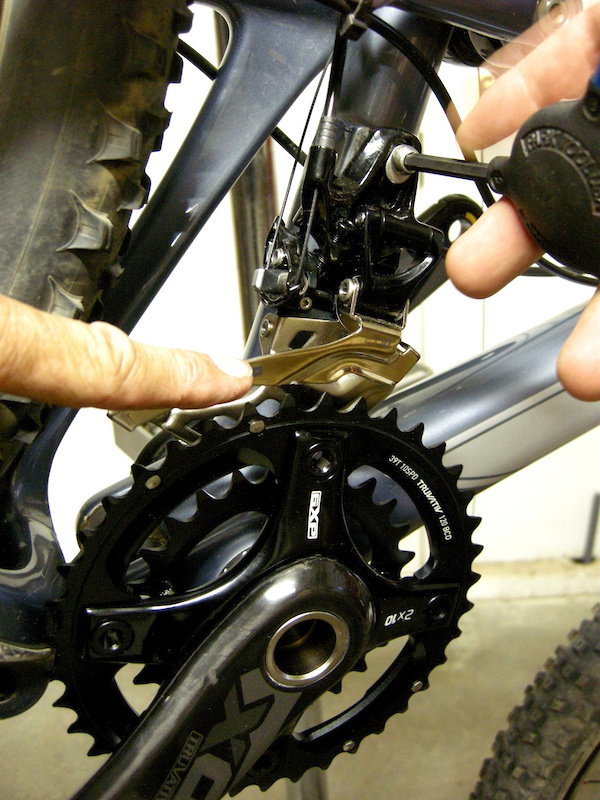
![set der above chainring]()
Step eight: Loosen the front derailleur cable and clamp bolt and then slide the derailleur down until the outer cage sits 2 millimeters above the teeth of the large chainring. Check from above that the outer cage plate lines up parallel with the big chainring and tighten the clamp (or in this case, the fixing bolt. Make sure that the left shift lever is in the small-chainring position and then pull any slack from the derailleur cable. Tighten the cable fixing bolt with a 5mm Allen wrench.
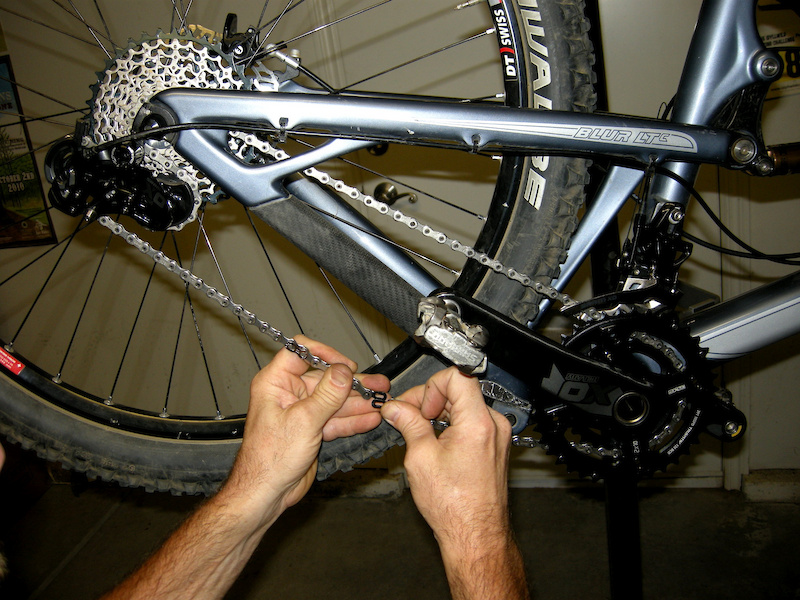
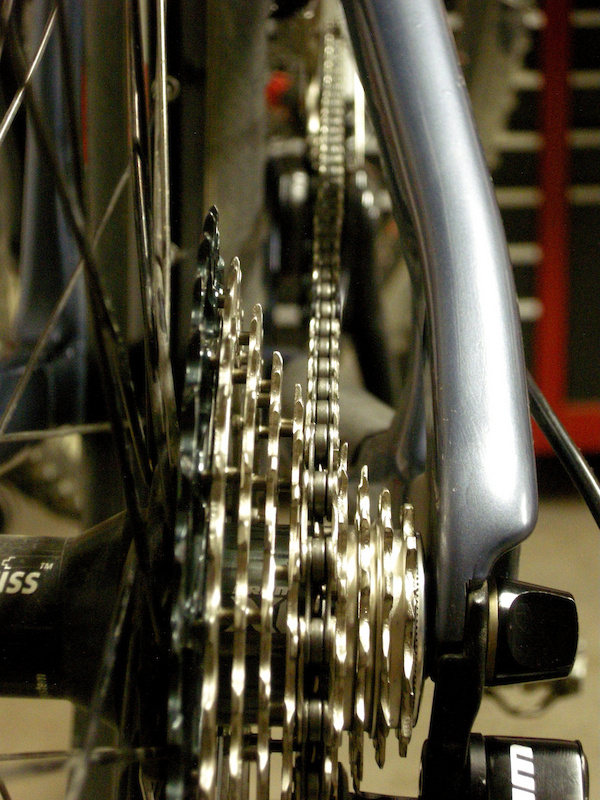
![chain length]()
Step nine: Assuming that your bike has a fresh SRAM 10-speed 11/36 cassette, you should install a new chain to ensure that the drivetrain lives a long and healthy life. Shift the derailleurs into the small chainring and to the small cassette cog position, and then thread a 10-speed chain through the derailleurs and around the small sprockets. Pull just enough tension into the chain to tension the rear derailleur’s pulley cage so that it rides parallel to the ground (or thereabouts). Use pedaling pressure to set the SRAM PowerLink.
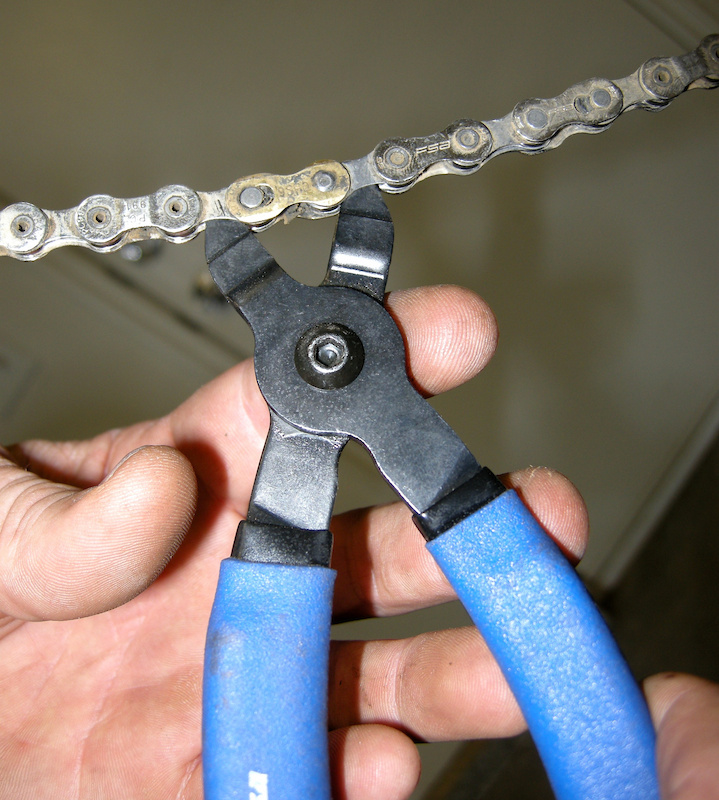
![chain pliers]()
Step ten: Shift the bike to the big/big cross-over combination and recheck the chain tension. The rear derailleur should be extend forward slightly, but not stretched. Use the Park master link pliers to release the PowerLink and add or subtract links as needed. Extending the chain will require a second PowerLink.
Hint: A longer chain will shift better when you are using the extreme, big/big cross-over sprocket combination.
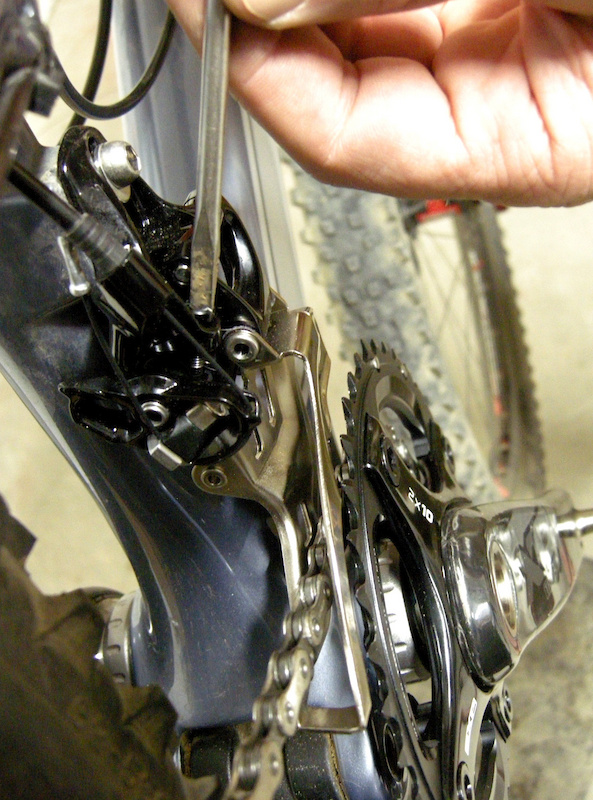
![Set der stops]()
Step eleven: Shift the transmission into low gear (small/front and big/rear sprockets) and use a 3mm Allen or a screwdriver to adjust the front derailleur’s inner plate so it just misses the chain while the bike is being pedaled in the stand. Next, shift into the small/rear and big/front combination and set the derailleur’s limit screw to limit the travel of the outer plate to about 1 or 2 millimeters away from the chain.
![Run through the gears]()
Step twelve: Spin the crankset and run the bike through the gears a few times to ensure that the front derailleur shifts well. If the chain rubs the front derailleur in the low/low combination or overshifts in the high/high position, use ¼ turn limit-screw adjustments to make the necessary corrections until you achieve perfect shifts.
![chain line check]()
Step thirteen: Shift the chain up to the fifth cog from the right and into the big chainring. Sight down the chain from the rear of the bike to check for a perfect chain-line. The chain should make a straight line from the number five cog to the big ring. If it doesn’t, the transmission may rattle or shift poorly in the cross-over gear selections. Add or remove the left-side bottom bracket spacer to remedy the problem.
Note: While bikes with 73-mm bottom bracket shells can be assembled without any spacers, frames with 68mm shells must have at least one. You may have to move the spacer on the left side in such cases.
![side shot crank]()
So that’s all there is to it. Visit the Park Tool website to find the perfect implements for building and maintaining bicycles, and don't forget to jot down any tips you may have for installing a crankset below.
Past Tech Tuesdays:
Technical Tuesday #1 - How to change a tube.
Technical Tuesday #2 - How to set up your SRAM rear derailleur
Technical Tuesday #3 - How to remove and install pedals
Technical Tuesday #4 - How To Bleed Your Avid Elixir Brakes
Technical Tuesday #5 - How To Check And Adjust Your Headset
Technical Tuesday #6 - How To Fix A Broken Chain
Technical Tuesday #7 - Tubeless Conversion
Technical Tuesday #8 - Chain Wear
Technical Tuesday #9 - SRAM Shift Cable Replacement
Technical Tuesday #10 - Removing And Installing a Headset
Technical Tuesday #11 - Chain Lube Explained
Technical Tuesday #12 - RockShox Totem and Lyric Mission Control Damper Mod
Technical Tuesday #13 - Shimano XT Crank and Bottom Bracket Installation
Technical Tuesday #14 - Straightening Your Derailleur Hanger
Technical Tuesday #15 - Setting Up Your Front Derailleur
Technical Tuesday #16 - Setting Up Your Cockpit
Technical Tuesday #17 - Suspension Basics
Technical Tuesday #18 - Adjusting The Fox DHX 5.0
Technical Tuesday #19 - Adjusting The RockShox BoXXer World Cup
Technical Tuesday #20 - Servicing Your Fox Float Shock
Technical Tuesday #21 - Wheel Truing Basics
Technical Tuesday #22 - Shimano Brake Pad Replacement
Technical Tuesday #23 - Shimano brake bleed
Technical Tuesday #24 - Fox Lower Leg Removal And Service
Technical Tuesday #25 - RockShox Motion Control Service
Technical Tuesday #26 - Avid BB7 Cable Disk Brake Setup
Technical Tuesday #27 - Manitou Dorado Fork Rebuild
Technical Tuesday #28 - Manitou Circus Fork Rebuild
Technical Tuesday #29 - MRP G2 SL Chain Guide Install
Technical Tuesday #30 - Cane Creek Angleset Installation
Technical Tuesday #31 - RockShox Maxle Lite DH
Technical Tuesday #32 - Find Your Tire Pressure Sweet Spot
Technical Tuesday #33 - Three Minute Bike Preflight Check
Technical Tuesday #34 - MRP XCG Install
Technical Tuesday #35 - Stem Choice and Cockpit Setup
Technical Tuesday #36 - Handlebars - How Wide Affects Your Ride
Technical Tuesday #37 - Repairing A Torn Tire
Technical Tuesday #38 - Coil spring swap
Technical Tuesday #39 - Trailside help: Broken Shift Cable
Technical Tuesday #40 - Installing a Fox Float Air-Volume Spacer
Technical Tuesday #41 - Replace the Seals on Your 2011 RockShox Boxxer World Cup Fork
Technical Tuesday #42 - Clean and Lubricate Your Fox F32 Dust Wiper Seals
Visit Parktool.com to see their entire lineup of tools and lubes
What you’ll need
(clockwise) X.0 crankset, Truvativ GXP bottom bracket (the BB spacer rings are included), and a new 10-speed chain (we used a SRAM PowerChain 1071). It is worth noting that SRAM's 2012 X.0 crankset is a good choice for trail and AM because it has a replaceable spider which allows for lower gearing options than our test bike's 39 x 26-tooth combination.
Your tool kit for the day
-Cable cutter in case you need to replace the front derailleur cable.
-Allen wrenches from 3mm to 8mm
-Shimano TL-FC32 bottom bracket cup wrench
-Chain breaker tool
-Park MLT-1 master link pliers. (Not necessary, but so cool we had to show it off.)
-Light grease
-Clean shop towels
-Bike stand
Tips: Installing a new crankset is best done with the bike in a good stand so you can work near eye level. Give the bike a good cleaning before you start to ensure that your efforts will result in a long-lasting build. It is worth noting here that SRAM recommends the GXP bottom bracket for use with the XO crankset for AM/trail purposes.
Step one: Remove old crankset and then clean any grease and dirt from the bottom bracket threads with a shop towel.
Step two: Lightly grease the bottom bracket threads, making sure that you get a little around the entire circumference for about a half inch.
Step three: Measure the width of the bottom bracket shell (it will be either 68mm or 73mm) If it is 68mm wide, then slide one 2mm spacer between the cup and BB shell. Insert the cup with the spacer into the frame and then screw in the right-hand cup counter clockwise by hand, very carefully, so as not to bungle the threads. Stop at the first hint of binding and retry until the cup threads in easily. If your frame has a 73mm-wide BB shell, use no spacers.
Step four: Repeat with the left-side cup but remember that the left side screws in clockwise. Pop off the sealing end cap with your finger (see step 7) because otherwise, it will get knocked to the floor when you insert the bottom bracket axle.

Step five: Tighten the bottom bracket cups securely with the Shimano FC32 bottom bracket wrench. Remember, the left side cup tightens clockwise and the right side cup tightens counter clockwise.
Step six: Grab the left crankarm and then lightly grease the bottom bracket shaft. Next, slide the shaft through the BB cups. Give the outside of the crankarm a firm rap with the palm of the hand to ensure that the axle is seated against the right-side BB bearing.
Step Seven: Slide the left side dust washer onto the BB axle spline and then snap it into place in the bearing cup. Next, slide the left crankarm onto the BB shaft (make sure to align it opposite to the right arm) and tighten securely with an 8-millimeter Allen wrench.
Step eight: Loosen the front derailleur cable and clamp bolt and then slide the derailleur down until the outer cage sits 2 millimeters above the teeth of the large chainring. Check from above that the outer cage plate lines up parallel with the big chainring and tighten the clamp (or in this case, the fixing bolt. Make sure that the left shift lever is in the small-chainring position and then pull any slack from the derailleur cable. Tighten the cable fixing bolt with a 5mm Allen wrench.
Step nine: Assuming that your bike has a fresh SRAM 10-speed 11/36 cassette, you should install a new chain to ensure that the drivetrain lives a long and healthy life. Shift the derailleurs into the small chainring and to the small cassette cog position, and then thread a 10-speed chain through the derailleurs and around the small sprockets. Pull just enough tension into the chain to tension the rear derailleur’s pulley cage so that it rides parallel to the ground (or thereabouts). Use pedaling pressure to set the SRAM PowerLink.
Step ten: Shift the bike to the big/big cross-over combination and recheck the chain tension. The rear derailleur should be extend forward slightly, but not stretched. Use the Park master link pliers to release the PowerLink and add or subtract links as needed. Extending the chain will require a second PowerLink.
Hint: A longer chain will shift better when you are using the extreme, big/big cross-over sprocket combination.
Step eleven: Shift the transmission into low gear (small/front and big/rear sprockets) and use a 3mm Allen or a screwdriver to adjust the front derailleur’s inner plate so it just misses the chain while the bike is being pedaled in the stand. Next, shift into the small/rear and big/front combination and set the derailleur’s limit screw to limit the travel of the outer plate to about 1 or 2 millimeters away from the chain.
Step twelve: Spin the crankset and run the bike through the gears a few times to ensure that the front derailleur shifts well. If the chain rubs the front derailleur in the low/low combination or overshifts in the high/high position, use ¼ turn limit-screw adjustments to make the necessary corrections until you achieve perfect shifts.
Step thirteen: Shift the chain up to the fifth cog from the right and into the big chainring. Sight down the chain from the rear of the bike to check for a perfect chain-line. The chain should make a straight line from the number five cog to the big ring. If it doesn’t, the transmission may rattle or shift poorly in the cross-over gear selections. Add or remove the left-side bottom bracket spacer to remedy the problem.
Note: While bikes with 73-mm bottom bracket shells can be assembled without any spacers, frames with 68mm shells must have at least one. You may have to move the spacer on the left side in such cases.
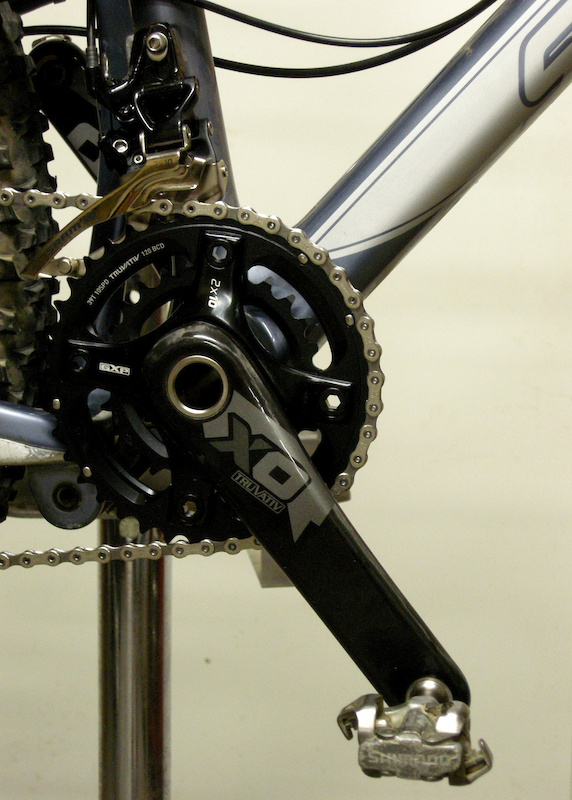
Two rings are better than three. Switching out the old Truvativ triple crankset with the X.0 double made a huge improvement, with faster, more intuitive shifting -- and it looks sharp too.
So that’s all there is to it. Visit the Park Tool website to find the perfect implements for building and maintaining bicycles, and don't forget to jot down any tips you may have for installing a crankset below.
Past Tech Tuesdays:
Technical Tuesday #1 - How to change a tube.
Technical Tuesday #2 - How to set up your SRAM rear derailleur
Technical Tuesday #3 - How to remove and install pedals
Technical Tuesday #4 - How To Bleed Your Avid Elixir Brakes
Technical Tuesday #5 - How To Check And Adjust Your Headset
Technical Tuesday #6 - How To Fix A Broken Chain
Technical Tuesday #7 - Tubeless Conversion
Technical Tuesday #8 - Chain Wear
Technical Tuesday #9 - SRAM Shift Cable Replacement
Technical Tuesday #10 - Removing And Installing a Headset
Technical Tuesday #11 - Chain Lube Explained
Technical Tuesday #12 - RockShox Totem and Lyric Mission Control Damper Mod
Technical Tuesday #13 - Shimano XT Crank and Bottom Bracket Installation
Technical Tuesday #14 - Straightening Your Derailleur Hanger
Technical Tuesday #15 - Setting Up Your Front Derailleur
Technical Tuesday #16 - Setting Up Your Cockpit
Technical Tuesday #17 - Suspension Basics
Technical Tuesday #18 - Adjusting The Fox DHX 5.0
Technical Tuesday #19 - Adjusting The RockShox BoXXer World Cup
Technical Tuesday #20 - Servicing Your Fox Float Shock
Technical Tuesday #21 - Wheel Truing Basics
Technical Tuesday #22 - Shimano Brake Pad Replacement
Technical Tuesday #23 - Shimano brake bleed
Technical Tuesday #24 - Fox Lower Leg Removal And Service
Technical Tuesday #25 - RockShox Motion Control Service
Technical Tuesday #26 - Avid BB7 Cable Disk Brake Setup
Technical Tuesday #27 - Manitou Dorado Fork Rebuild
Technical Tuesday #28 - Manitou Circus Fork Rebuild
Technical Tuesday #29 - MRP G2 SL Chain Guide Install
Technical Tuesday #30 - Cane Creek Angleset Installation
Technical Tuesday #31 - RockShox Maxle Lite DH
Technical Tuesday #32 - Find Your Tire Pressure Sweet Spot
Technical Tuesday #33 - Three Minute Bike Preflight Check
Technical Tuesday #34 - MRP XCG Install
Technical Tuesday #35 - Stem Choice and Cockpit Setup
Technical Tuesday #36 - Handlebars - How Wide Affects Your Ride
Technical Tuesday #37 - Repairing A Torn Tire
Technical Tuesday #38 - Coil spring swap
Technical Tuesday #39 - Trailside help: Broken Shift Cable
Technical Tuesday #40 - Installing a Fox Float Air-Volume Spacer
Technical Tuesday #41 - Replace the Seals on Your 2011 RockShox Boxxer World Cup Fork
Technical Tuesday #42 - Clean and Lubricate Your Fox F32 Dust Wiper Seals
Visit Parktool.com to see their entire lineup of tools and lubes
Author Info:

Must Read This Week
Sign Up for the Pinkbike Newsletter - All the Biggest, Most Interesting Stories in your Inbox
PB Newsletter Signup
obviously don't grease your chain because that's a stupid idea
and i'm not just running off some idiotic internet kid's idea, i'm running off facts here, not opinions.
I'm not sure it is ok to use antiseze on bearing and bushing, i think it' a good way to destroy them. Antiseize contains some metals inside, so i think it's not adapted to moving parts.
Dude wat.
How about 5?
This is another good Tech. article for PB. The only thing I would add, make sure the outer surface of your bottom bracket (where the cups tighten up against) are faced off or machined perpendicular to the crank shaft. You should never have to force a crank shaft through B.B. bearings with a hammer or more then a tap of you hand when installing. If you need more force then that, it means your B.B. cups are not aligned properly. Just my 2 cents.
Use a 7/16" bolt head (nice fit into 11-12 mm opening) to tighten the retainer. Or,
Use a wrench on a 7/16" nut/locknut to hold the crank retainer nut stationary, insert the 8mm hex wrench through the nut to loosen the lock/extractor bolt. It helps on some nuts to grind the rounded shoulder off one end to maximize the contact area.
Great and thorough instructions - thanks!
www.sram.com/sites/default/files/techdocs/95-6115-006-000_rev_e_mtb_cranksets.pdf