Reader Story: Making a Custom Bike By Recycling Old Frames

Oct 31, 2023 at 17:08
by Jackson Green  
photo

Words: Jackson Green
Photos: Blissfield Photography and Jackson Green

Many Pinkbike readers may have a few, cracked, out of warranty, or out of date frames frames lying around. They no longer have a use, but you remember the good times you had and you can't bear to throw them away. Well, how about turning them into something you really want?

I have built bicycle frames for a long time. I started building frames using steel so my partner and I could feed our tandem riding addiction. That is a good story too, but building frames that way is pretty slow. Once I became a dad and started building bikes for my kids, I wanted a way to make frames more quickly.

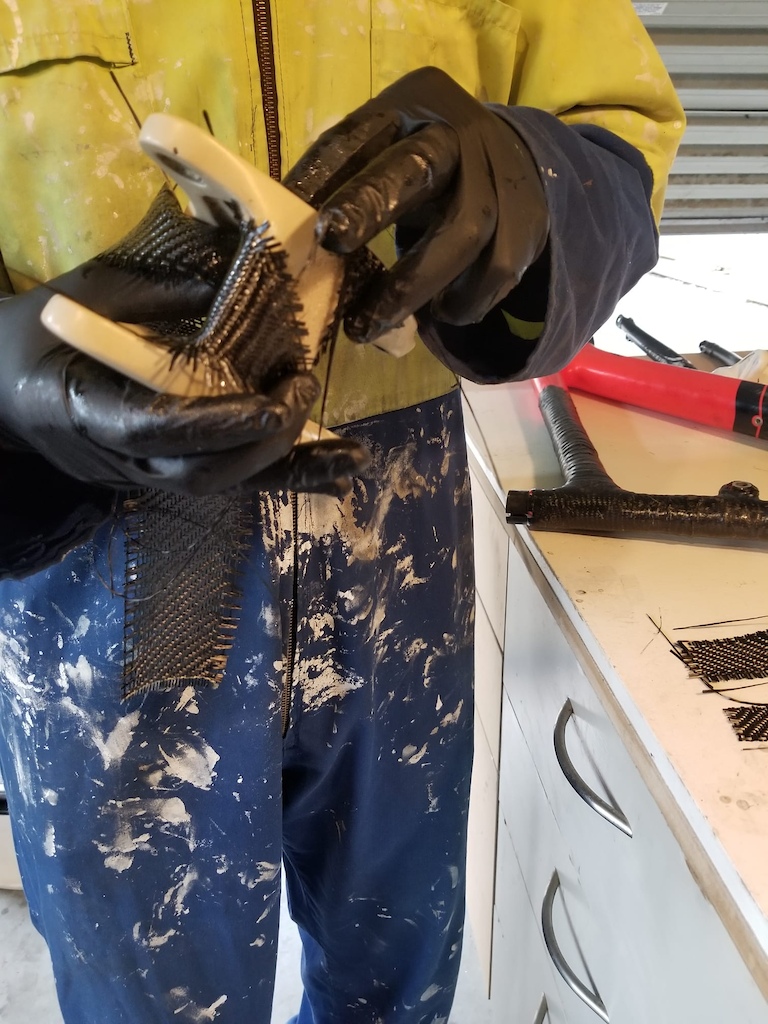
Most of the time building a frame is spent mitering tubes and making small, uninteresting parts like chainstay yokes and bearing seats. By using old frames, ready made parts can be put straight into the jig to give whatever geometry and suspension design is required. Wet layup carbon fibre, like you might use to build a sailboat, allows these parts to be stitched together with sections of tube formed in-situ in the frame jig - no mitering required.

photo
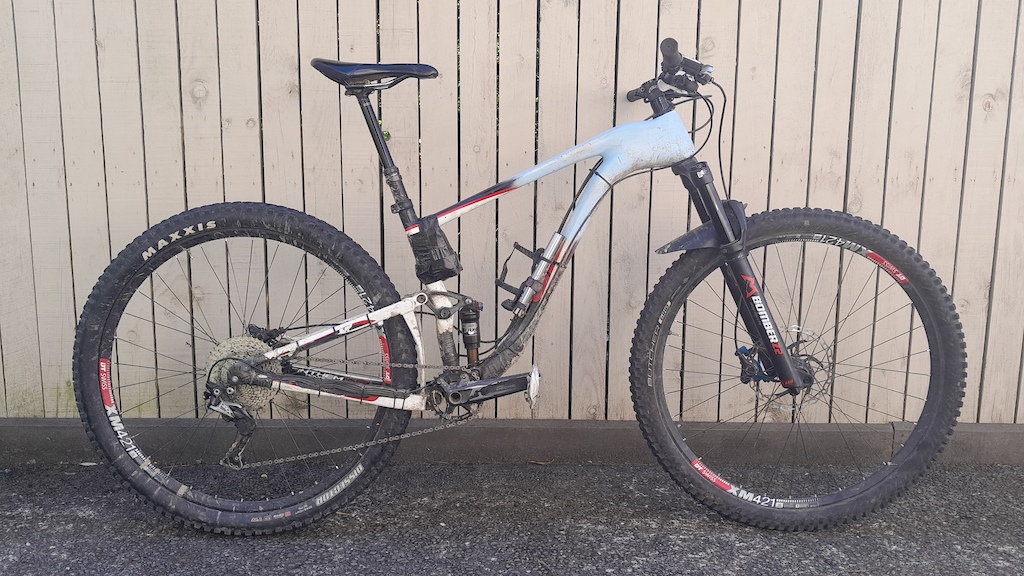
Some other bikes made with the same process. This one longer, lower, slacker...
photo
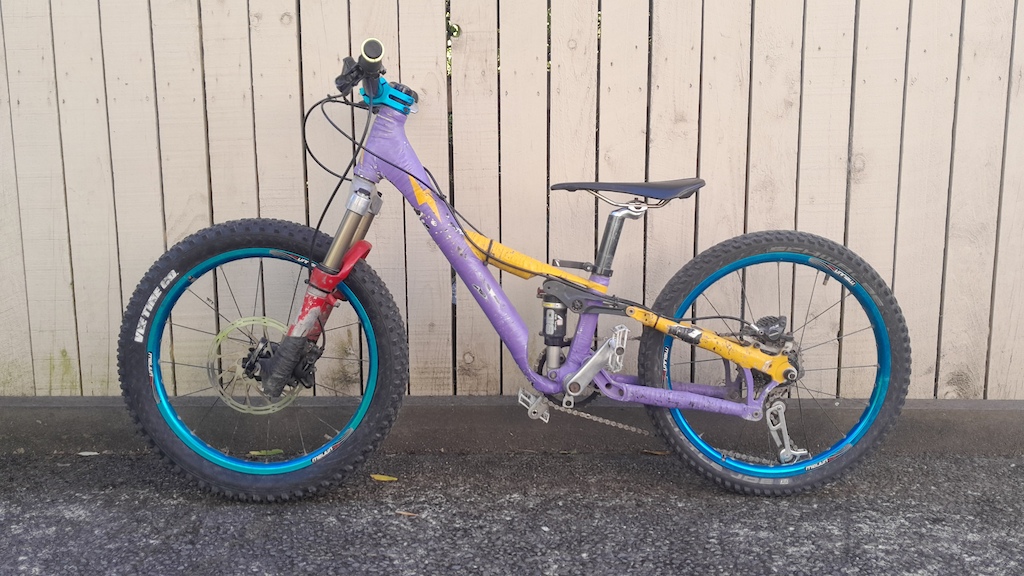
And this one shrunk from a size large to a 20", including shrinking the fork!

Design Process
The Pinkbike comment section is full of people with opinions on mountain bike geometry and suspension design. By making my own bike, I get to put my ideas in to practice.

I used BikeChecker's excellent Linkage software to help with the design process. This software made it really easy to start with an existing frame and tweak the geometry by simply changing the numbers on the geometry chart. It also allowed me to visualize the suspension curves of my old bike and other bikes I had ridden to help understand exactly what each suspension characteristic felt like. In particular, my old bike with a dual short link design had too much antisquat at full extention, but not enough antisquat deep in the travel. This produced a bike that pedaled well if you could stay close to sag, but that would collapse into its travel or hang up at full extension if you pedaled while the suspension was moving. That is, it was fine on a smooth road, but not so good for technical climbing. I wanted something with similar antisquat at sag but with a much flatter curve. After playing around with different designs I realized that a bog standard Horst link gave the suspension curves I wanted.
Geometry
Reach: 478mm
Chainstay: 448mm
Head angle: 63.5°
Seattube angle: 77.5°
Stack: 633mm
BB Height: 347mm

photo
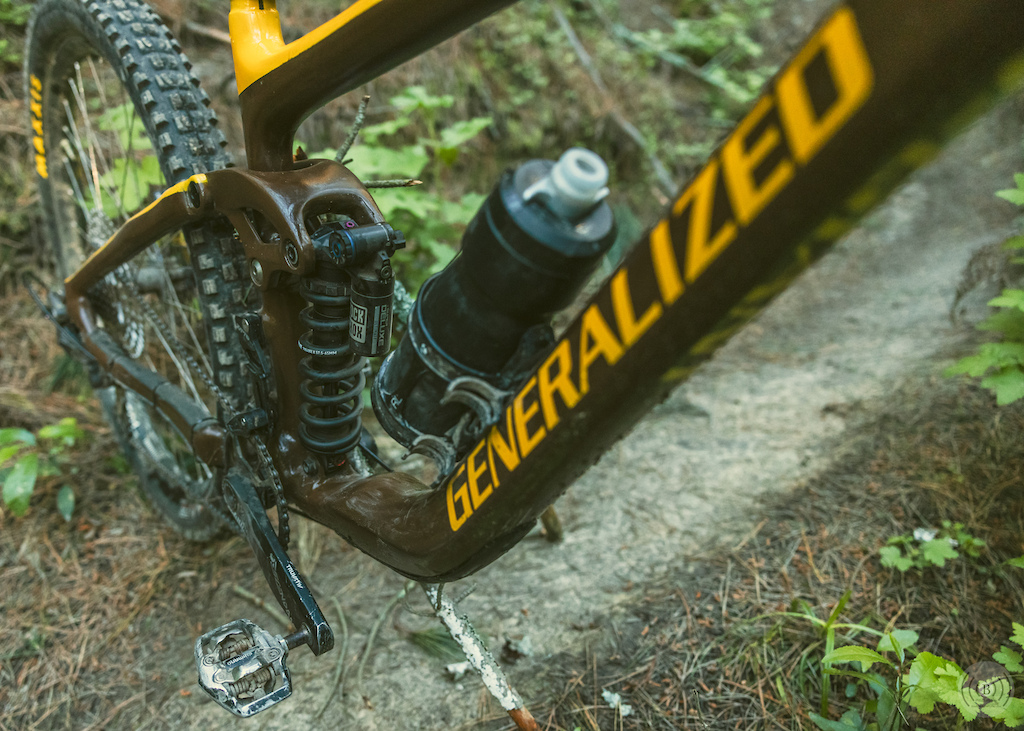
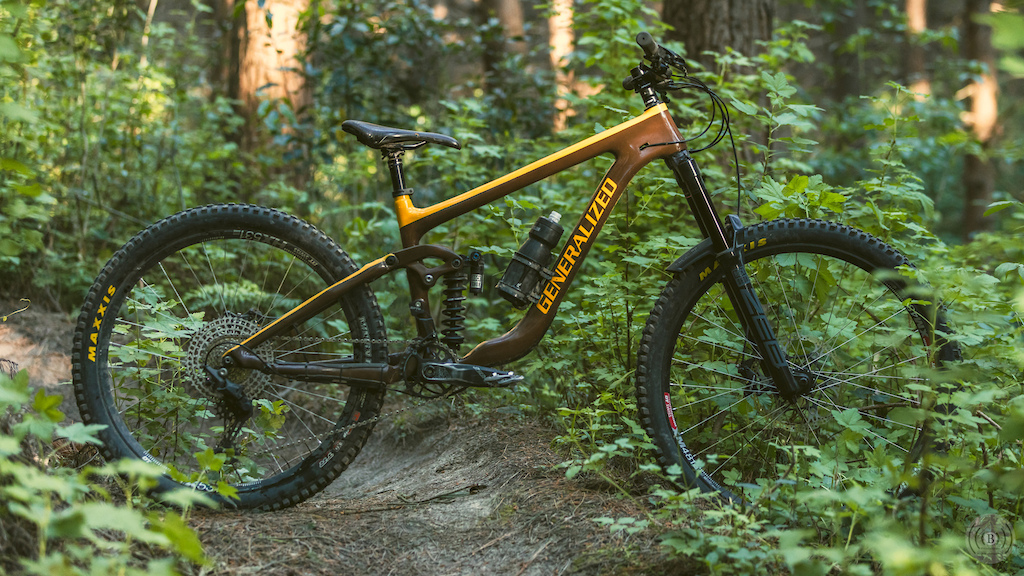
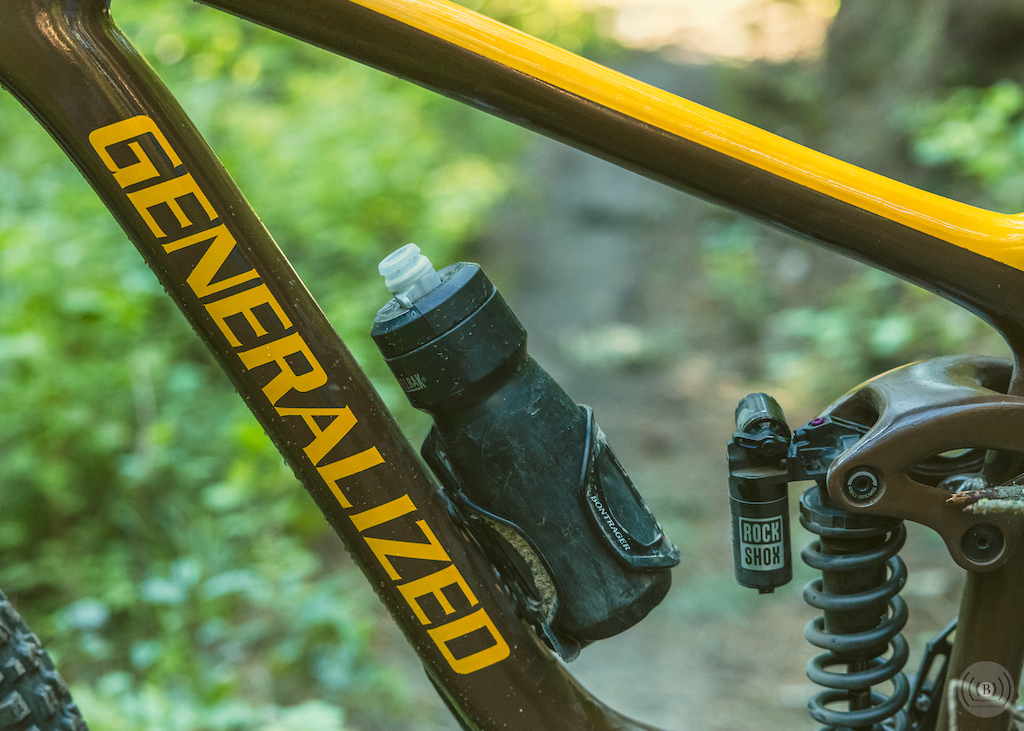
"Of course there's room for a water bottle. Do I look like an imbecile?" - Jackson Green

bigquotesI just took the characteristics I liked from a bunch of other bikes and tried to fit them all into one bike. Turns out that makes something really normal.Jackson Green

photo
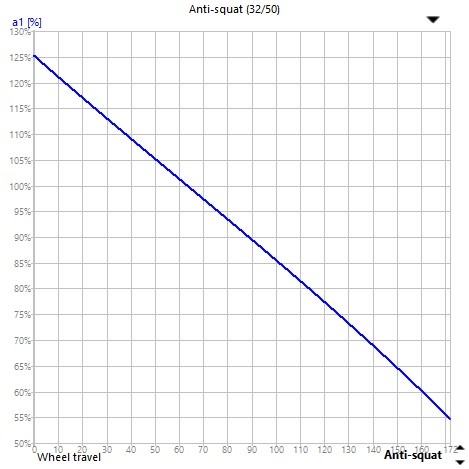
Antisquat close to 100% at sag.
photo
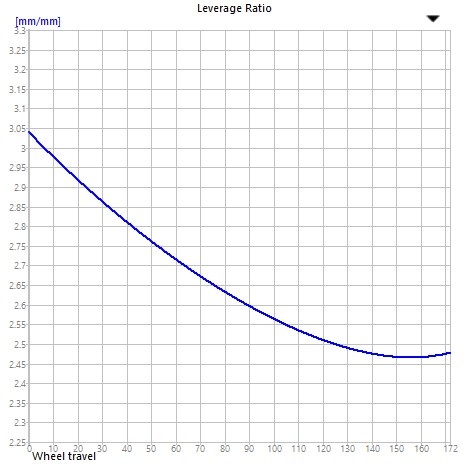
A moderately progressive leverage curve.
photo
Axle path close to vertical.

Generalized Mountain Bike
Frame: Horst link, carbon front triangle, carbon/aluminum rear triangle, 170mm travel
Shock: Rockshox Super Deluxe Coil Ultimate, 205x65mm, 450lb/in spring
Fork: Rockshox ZEB select with Charger 3 damper, 170mm, 56psi, 0 tokens
Wheels: Mullet
Tires: Maxxis Assegai front / Minion DHF rear
Drivetrain: Shimano Deore wide range 11 speed with Sram NX crankset and SUNSHINE 11/50 cassette
Brakes: TRP DH Evo, Hope 225mm front rotor, TRP 203 rear rotor
Cockpit: 25mm rise Spank Vibrocore 35 bars with 40mm Spank Split 35 stem
Size: It fits me nicely
Weight: 17.0 kg (37.5 lb) as pictured

photo
A moderately long chainstay helps with weight balance on flat corners.

Construction Details
The frame is made primarily using the remnants of a cracked 2017 Giant Reign Advanced cut into many pieces. The BB shell, chainstays and chainstay pivots were modified from an aluminium Stumpjumper circa 2005. Finally, the rocker from a 2019 Reign, which had been cracked but only needed to be repaired, not modified.

All the critical points were held in place in a frame jig. My jig uses a base of 100x100 square hollow section as the reference for horizontal and vertical. Fixtures are then clamped to the base using woodworking clamps. Most of my jig fixtures are made from simple steel plates with axles and cones to hold the frame parts, but the headtube and seattube fixtures use extruded aluminum sections for additional stiffness.

photo
Ready for the test ride.

Once the critical points were all jigged up, forms for new tube sections were made using florists' foam and held in place with hot glue. The pieces were then joined using wet layup carbon fiber wrapped directly around the frame pieces and foam. After a first layer to provide enough strength for handling, the frame was de-jigged and a second layup was performed to achieve the desired composite thickness and strength. Each layup was wrapped in peel ply or insulation tape to compress the laminate and squeeze out excess resin. The tape was removed before the resin was fully cured.

After a bit of trimming the bike was structurally finished so I was able to take it for a test ride. Once it was confirmed that everything worked the way I wanted, I stripped the frame for finishing and painting.

photo
In the jig with most of the parts already tacked together.
photo
Ensuring adequate chainring/chainstay/tire clearance is one of the hardest parts of a frame build.

photo
The bike uses a standard rocker link from a 2019 Giant Reign. This one just had to be reinforced because it was cracked.
photo
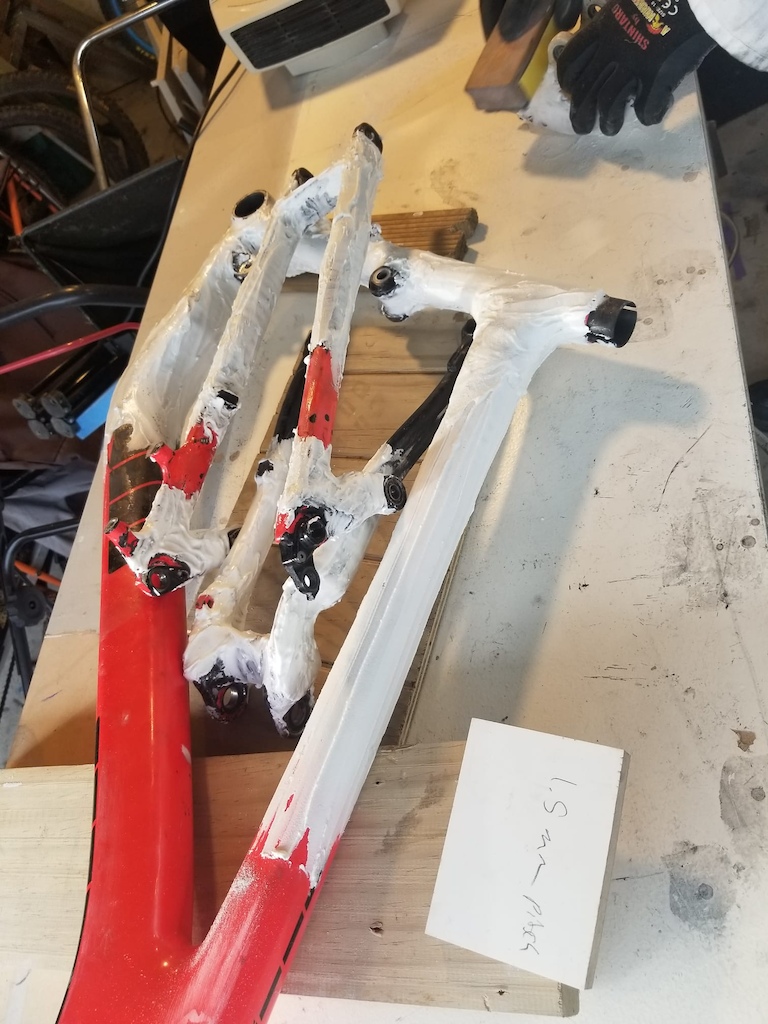
The insulation tape composite compression method works well but leaves a poor finish that needs a lot of fill. Does anyone else think it looks like toothpaste?

How does it ride?
The Mountain Bike's middle-of-the-road geometry gives a very familiar feel right from the first ride. It is an all-rounder with no outstanding strengths and no glaring weaknesses.

bigquotesIt's just a bike really. Normal bikes work well.Jackson Green

While climbing, the cockpit feels short but not cramped, with a relaxed, upright riding position. The moderately long chainstays help to keep weight on the front wheel and avoid excessive vague feelings while cornering on less steep terrain. The antisquat hovers around 100% giving a neutral feel with plenty of grip, and no need to reach for the climb switch. With 170mm of travel and burly tires, the Mountain Bike doesn't have the pep of a cross country race machine, but it climbs well for a bike in this category and is very comfortable tackling all day epics with elevation measured in the thousands of metres.

The Mountain Bike also delivers no surprises while descending. It's reach and chainstay length centre the rider on the bike, helping to weight the front wheel and giving a confidence-inspiring feeling while cornering. The moderately progressive suspension design combines well with the Super Deluxe Coil's hydraulic bottom out to provide a predictable and supportive platform. It is reasonably sensitive off the top with good traction, but has enough midstroke support to provide a platform for jumping and pumping. On rougher ground and through g-outs it rides high enough in its travel to keep something in reserve for bigger hits.

On the other hand, the rear end is on the flexible side for a bike in this category. While this flex feels great on natural terrain but can be a bit vague in high g-force bike-park terrain. That trait suits me fine as I have a DH bike for the park, but had I wanted to make the rear end stiffer I could have added extra carbon fibre to the chain and seat stays, or have sourced the chainstays from something more burly than an 18 year old Stumpjumper.

photo
Mostly made of Giants.
photo
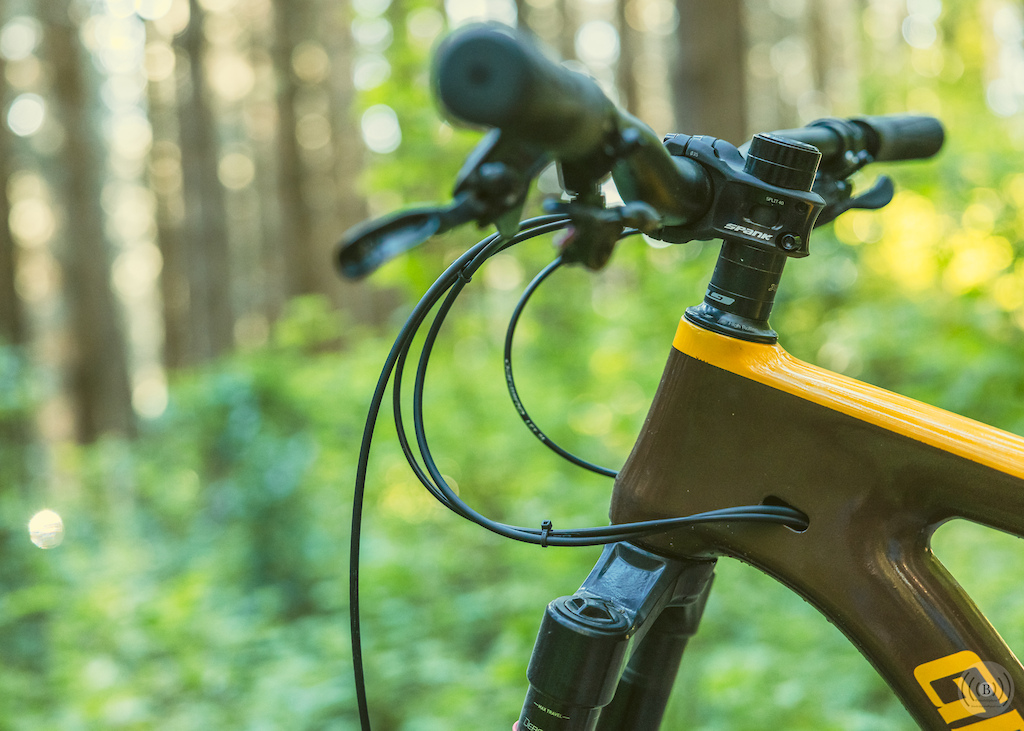
Still working out the ideal handlebar height.

photo
The donor bike for the bottom bracket didn't have chainguide tabs so I went for direct mount chainguide instead.
photo
It wouldn't hurt to find a longer shock bolt.

photo
The logos were masked using vinyl stencils printed by a local sticker shop.

Building a custom frame this way certainly won't be for everyone. Unlike construction using steel, there are few rules of thumb or established practices to ensure the frame will be strong enough. Instead, the framebuilder has to decide for themselves how much carbon fibre cloth to add, what weight and weave to use, and at what orientation. A conservative approach is required to ensure the result is safe. Nevertheless, for an experienced builder it delivers good results in little time. It is also very satisfying to be able to creatively re-use frames that would otherwise go to landfill.

Ride Safe

Jackson Green

photo


Author Info:
jacks0n0 avatar

Member since Aug 21, 2011
5 articles
Must Read This Week
Sign Up for the Pinkbike Newsletter - All the Biggest, Most Interesting Stories in your Inbox
PB Newsletter Signup

142 Comments
  • 393 4
 This is what we need more of. Much more interesting to read than another generic review.
  • 57 1
 This article from a few years ago is worth a read too: www.pinkbike.com/news/building-a-custom-bike-frame-at-home.html
  • 8 24
flag pugafi (Nov 10, 2023 at 20:03) (Below Threshold)
 I really think my nuts deserve more care. A comuter bike made this way would let me sleep calm. Riding a no pinned grenade, not so much. Dont get me wrong, i fabricate my own skis, and shred them to pieces, but this is a whole lot riskier...
  • 19 6
 @pugafi: mmmm because factory made bikes are much stronger and safer and never break?
Errr correct me if I'm wrong - but this is made from a bunch of broken factory made frames
  • 4 0
 @IllestT: want to bet a beer on what people here would trust to ride more...a garage repaired carbon frame or a new factory bike? (and no offense to Mr. Green, this looks awesome, but there's a reason repaired carbon frames sell for less).
  • 5 0
 @hatton: Just like a wrecked car that has been repaired sell for less. Still works the same if done properly.
  • 10 0
 @hatton: I agree. I'm confident with my frame, but no way I'd expect you to be confident it nor would I be confident with one you made.
  • 149 0
 BRB, after reading I'm motivated to go cut my bike apart and then glue it back together how I want.
  • 47 0
 I fear the Cronenberg horror my handyness would result in.
  • 118 0
 his is one of the most interesting and inspiring things I've seen on PB in awhile.
  • 21 0
 100% love this. Great work, Jackson.
  • 49 0
 I assume that to make a second unit you need to crack this one, build two bikes from the pieces, crack them both again and make four and so on
  • 46 0
 Large scale mitosis
  • 47 0
 If Han Solo can aggressively lean on berms like the 1st picture the bike must be legit...
  • 4 0
 Ha, I see it
  • 13 0
 Exactly my thought! He's making that bike look GOOD! And he has a perfect scruffy nerf herder aesthetic.
  • 42 0
 The real business opportunity: "Generalized" and "G-works" decals
  • 23 0
 nope, you do not want Spesh to go after you Big Grin I would be even scared using those fonts
  • 5 0
 @valrock: ho! ho! This guy remembers
  • 4 0
 @valrock: Placing a parody of a brand on something you made for your own use isn't trademark infringement
  • 13 0
 @boozed: neither is the name of a town. Still, specialized!
  • 7 0
 @boozed: You're right. They would be in the wrong. But that absolutely won't stop Specialized from threatening legal action in an attempt to intimidate and scare you into submission. It's called abusive litigation or legal bullying. (Just google "Cafe Roubaix Specialized lawsuit")
  • 8 2
 @Muscovir: Santa Cruz "Solo" turned 5010 thanks to Star Wars.
  • 3 1
 @spaceofades: Wasn't Cannondale infatuated enough to try to trademark the word "freeride" as if they invented anything related to it?
  • 4 0
 @Barkit: They did. That's why Rocky Mountain had the FroRiders.
  • 2 0
 I must have that s-giant logo. Brand snobs beware I am coming for your logos
  • 4 0
 @coachnpt: no I’m pretty sure Rocky Mountain had a gravel bike called SOLO before the 5010 came out and that is why they changed the name…not Star Wars
  • 7 0
 @Muscovir: man, as someone who lived/worked in that city when that kicked off. Specialized did the right thing. Guy was absolutely capitalizing of the brand name. I had customers bring me the wheels, asking for spares because they 100% believed they were specialized wheels.

Guy didn’t run a copyright check, guy didn’t do anything to protect himself and guy didn’t do anything to control the narrative that they weren’t actually specialized wheels. He was just selling generic carbon wheels and touting them as some sort of upgrade. They were sketchy and trash wheels, with decal on them that confused customers in the market, especially the secondary market. Can’t imagine giving some rando stacks of cash for some shitty wheels to begin with, but those uninformed customers did and I’m not fully sure they ever knew they weren’t from specialized.
  • 11 0
 @coachnpt: holy shit, it's taken me this long to realize SC has still spelt "solo" but with numbers
  • 1 0
 @Muscovir: i have Heard the rumour that Specialized was named like this because they were importing french cranksets of Spécialités TA in the US. Those cranksets were on the 1981 Stumpjumper, so i am wondering if the story is true or not.
  • 16 1
 For a sport that tries to have an environmental aspect we sure do throw away a lot of stuff. Tip of the hat to you for bucking that trend. I've rescued a couple of dumpstered frames from landfills and rebuilt them into perfectly fine bikes but not like that! Inspiring
  • 3 0
 Your version takes way less time though.
  • 4 0
 @pugafi: I turn junk frames into ski bikes, then donate whatever usable but not for me parts to a coop... im good on triple chainrings and 7 speed freewheels.
  • 19 0
 Amazing project!!!
  • 12 0
 This is by far one of the coolest stories I have seen here. Just a thought... instead of floral foam, 3D print the connections out of PVA. This would be stiff enough to allow vacuum bagging the carbon layup and could later be rinsed out of the frame with warm water.
  • 12 0
 Why are you using new tires? For sure you need to cut up bits of old tires and vulcanize a set to go with this bike, proposed name maxsis
  • 13 0
 I propose max-SUS
  • 10 0
 Reconst-inental?
Ree Tire Co?
Schwalbwas?
  • 8 0
 Shwalbeen.
  • 7 0
 @nozes:
Badyear
  • 2 0
 Reglue my 5tens with a new sole made out of old maxxus tires.
  • 10 0
 Man this makes me want to go and actually do my stupid plan for bamboo bike V2.. The full sus!
V1... m.pinkbike.com/u/scar4me/blog/so-can-joe-average-build-a-bike-frame.html
  • 5 0
 Nice write up. Is the bike still going strong now? I'd love to see you do a V2
  • 2 0
 @jacks0n0: I retired the frame after a years worth of hard abuse. The tip of the crank arm had started notching the driveside chainstay slightly, and the bb lateral flex meant it had killed a couple of cransksets already. Was awesome to ride, but went for the safety move to retire it. Still have it up in the roof of my shed
  • 13 0
 Some Mad Max /MacGyver level awesomeness going on right here!
  • 10 0
 Genuinely the best PB article I've read in a longggg time, really impressive stuff. Kudos to you Jackson!!!
  • 5 0
 This is wicked cool. I just broke the seat stay on a Process. 3rd Kona seat stay, all of them near the weld for the link, and of course they denied the warranty on this, so it's hanging from my fence as lawn art. Being alloy, probably not a lot of chance of reusing it, maybe I can find a place that'll actually recycle it (since aluminum is a pretty reusable material).
  • 5 0
 Awesome! I've been kicking around a similar Idea for my square tube 05' Turner DHR. I've designed a carbon fiber subframe for seat tube area that would bolt right up after cutting the original off. Then just in the past week I was looking at it trying to figure out how to make the front end longer with either an extended headtube that would use an external oval shaped piece with about a 35mm offset bore for the headset. The original head tube would have the front half removed so you fit the new headtube extension into the newly created pocket. It would be secured with fasteners, industrial epoxy, then wrap with carbon for good measure. There's a few other bits that would get altered but nothing as significant. The rear dropout uses an insert to accept thru axle, there's enough room to make an offset insert to gain about 5mm on the chainstay length and then you can take a couple of mm out of chainstay yoke and there's no issues running 27.5 DH tires. Though I would prefer to run it as a 26"/27.5 mullet. This article just got me on the other side of the fence. Also have an old steel p1chromo from 07' that would work perfectly for a short travel ripper and I've been working out ideas for that as well. Looks like it's time get my hands dirty. Thx for the inspiration to get off my ass and make it happen.
  • 7 0
 Awesome! That kind of inspiration is exactly why I wanted to write the article. Thanks for sharing.
  • 4 0
 Everyone should check out that tandem bike video link.
Pretty certain this is the couple I watched from inside the broadcast truck when cameras were being tested, racing the Crankworx Rotorua DH track a few years back.
Everyone inside that truck was cheering, was cool/exciting/terrifying all at the same time.
Love it!
  • 7 0
 This is just pure gold. @brianpark give this man a weekly weekly spot on pinkbike: extreme frame makeovers.
  • 4 0
 yo dawg, i heard you like frames so i put a frame in your frame so you can ride two frames at once
  • 4 0
 "to ensure the frame will be strong enough. Instead, the framebuilder has to decide for themselves how much carbon fibre cloth to add, what weight and weave to use, and at what orientation. A conservative approach is required to ensure the result is safe."
As much as I'd love to see a single-layer carbon fiber frankenbike in craction, I believe he meant "liberal approach."
  • 4 0
 "I became a dad so all of a sudden i had the time to start hacking and frankensteining bikes together!" hahah im kidding been following this guy for a while pretty rad stuff, although I think the allocation of time to dollars is a bit mismatched lol. Since having my first i've barely had time to do anything outside of wiping butts and cleaning. Lets get a highlight on the wife too, shes clearly a big part of making this happen
  • 3 0
 This article should include this disclaimer: Do NOT try bonding carbon to an aluminum frame. This could result in galvanic corrosion and catastrophic failure. Over time, the 2 parts will be bonded by nothing but loose white powder, oxidized aluminum. It's not intuitive, but carbon fiber is an electrical conductor. Hence the galvanic corrosion.
  • 6 0
 Yes, that does happen eventually. I reduce the rate of it by priming any exposed aluminium before wrapping. Provided you've got an appropriate bonding texture on the aluminium for the epoxy to form a mechanical bond, a rattle can primer seems to be fine. Some people use a layer of fibreglass under the first layer of carbon fibre, but I don't bother for myself because the galvanic failure seems to take years and the frame will have broken in another way by then anyway. In my experience it is about the same level of problem as using aluminium spoke nipples. Maybe if I lived by the sea or in the UK where my bike was always wet then it would be more of an issue.
  • 3 0
 @jacks0n0: While you may be aware of the risk, this article may inspire someone to try bonding carbon to aluminum without knowledge of the risk. They might skip the primer. I'm going to guess that a failure between 2 bonded pieces of a bike frame might be more dangerous than a spoke failure. Yes, it might take years, but I'd be nervous about a weakening bond that's invisible to the rider. In addition, sometimes your frame ends up somewhere you didn't predict years down the line.

Many years ago, I bought a road bike at a garage sale that had carbon fiber tubes bonded to aluminum lugs. On my first test ride, the frame snapped in half under me. The tube / lug bond had corroded, and that put stress on another part of the frame that snapped. Sometimes a weakened bond one place can cause a dangerous failure elsewhere.

I'd be curious to hear from someone with more expertise evaluate your risk assessment. The bike industry has tried bonding carbon to aluminum in the past, and it seems like they stopped. I'd hate to see someone get hurt because they didn't know the risks.
  • 1 0
 @jacks0n0: Just curious champ, why not anodise prior to bonding? I don't know about the electrical properties of anodising... but based on the little knowledge I do have, it could work
  • 1 1
 @enjin9: build ONE bike frame with your own hands and THEN you get to talk to this guy.
  • 2 0
 @venturavin: I dunno. I think my comment contributes something meaningful. I stated my reasoning, Jacks0n0 stated their own. As a result people can make a more informed decision about a risk. Seems like a positive to me.
  • 1 0
 @enjin9: Yeah, your comments are great. Constructive and respectful criticism. Thanks for the input.
  • 5 0
 > The Pinkbike comment section is full of people with opinions on mountain bike geometry and suspension design.

I resemble that remark!
  • 6 0
 Pretty sure I sold him this cracked frame! Jackson, was this my XL frame with the hair crack in near the lower shock mount?
  • 7 0
 Not your frame sorry. For this bike I used frames I cracked myself.
  • 7 1
 This looks excellent to bumble down the trail and then upload my footage to youtube.
  • 2 0
 Doesn't aluminium + carbon equal corrosion and failure in the long term?

I think I remember a long time ago that a number of frames which were made with an aluminium bottom bracket shell would fail if the aluminium to carbon interface wasn't properly insulated (by resin I presume?).
  • 1 0
 if you use electrical tape for compression you need to pull it tight so it is at the limit of almost breaking. keep the overlap small so you slowly squeeze it out, you will go through about a roll for a 6 inch section of frame
  • 4 0
 I've had much better luck getting adequate compression on clomplex shapes using insulation tape rather than vacuum bagging. It is very easy to put on multiple layers to achieve the desired compression.
  • 2 1
 "a moderately progressive leverage curve"

...that would not be super friendly to a coil of other fairly linear spring. It actually nicely demonstrates why just the percentage difference alone is far from the whole story. That flat bottom and then regression at the end means you'll know exactly when you bottom out. And those hard bottoms will not be infrequent for a given level of mid stroke support compare you something actually progressive (as in the rate of change of the leverage rate increase as the leverage itself decreases).
  • 2 0
 It'll be hitting the bottom out bumper before it turns regressive, and probably a fair chunk of the linear will be covered by the bumper too.
  • 2 0
 Probably having to use a slightly stiffer spring with a lower level of sag than on a bike designed for coil - then that hbo is probably doing a lot of work on drops and jumps to avoid harsh bottom out.
  • 1 0
 Double post edited
  • 3 0
 He was so preoccupied with whether or not he could he didn't stop to think if he should. It's fine, though. Turns out he should.
  • 1 0
 I'm building a Scott Gambler with a seat plate of prefabulated amulite, surmounted by a malleable logarithmic casing in such a way that the two main spurving bearings were in a direct line with the panametric pivot. The chain is consisted simply of six hydrocoptic marzlevanes, so fitted to the ambifacient lunar waneshaft that side fumbling was effectively prevented. The main linkage was of the normal lotus-o-deltoid type placed in panendermic semi-boloid slots in the stator, every seventh conductor being connected by a nonreversible tremmie pipe to the differential girdlespring on the "up" end of the grammeters. Thoughts? LOL!
  • 1 0
 "Your scientists were so preoccupied with whether or not they could that they didn't stop to think if they should."

Awesome article and awesome work. I don't know if I could trust a frame I built myself but I am not a composite fabricator.
  • 1 0
 in the era of bikes that dont always match what the consumer wants (i do not want a 5000mm reach 29er thanks) AND more importantly when there is a lot of us that are concerned about the environment this is a really sick project to see
  • 4 0
 more articles like this please!
  • 1 0
 Awesome work! Finished product doesn't look like a Frankenbike at all. But can we get a geo table? You wetted the nerd's appetites by providing suspension curves, but no geometry? Please?
  • 3 0
 Normally I scroll trough articles pretty quick, but this one is a must read! Great job
  • 1 0
 In rough form, but this is the future. As the world (too) slowly moves towards being more sustainable, these tecniques will become more common and more relevant, more popular and more refined. Great job!
  • 3 0
 Most interesting thing I’ve read on the home page in years.
  • 3 0
 Watch Specialized file a law suit against this guy in 3, 2, 1...
  • 1 0
 Super kool, if you have that sort of fabrication skills... I must admit, I wouldn't ride anything created by myself in that manner... dear me
  • 1 1
 This is a great story, but the only way I'd ride such a bike is if it was steel. Repaired carbon? I'm not even confident in unrepaired carbon!
  • 2 0
 Awesome work, that little bike needs a little derailleur though.
  • 1 0
 Aaaaaaaand now I feel like I should just keep by old frame around just to build it back up later ha
  • 3 1
 the piss n' poop color scheme is hilarious!
  • 6 0
 drink water if your piss is like that, see a doctor if your poop is like that Big Grin
  • 2 0
 Reminiscent of a local "low cost" beers color scheme. It's a kiwi icon!
  • 3 1
 Lawyers at Speshy are filing lawsuits soon as they saw this.
  • 3 1
 Specialized is definitely going to sue him for trademark violations. Lol
  • 1 0
 I’ve always wanted to see a vtg steel hardtail chopped/recycled into something modern
  • 1 0
 Shed tech of the year goes to you, Jackson. Fantastic and inspiring project!
  • 1 0
 Just get an aluminum version of that same Reign and throw a Cascade link on it, and a 170 29er fork. Big time sleeper!
  • 1 0
 60mm or 80mm rise bars make it perfect too. Oh, and hurry with that Cascade link cuz they're discontinued.
  • 1 0
 Yes, yes, yes!! Please make a series that covers people riding and building older/revitalised bikes
  • 2 0
 Had to check, of course he's a Kiwi. Grouse job mate.
  • 1 0
 Love this! Had thought about it but never dared. Probably quicker turnaround time than waiting for my custom Marinos
  • 1 0
 Today I am reminded that I am stupid and unmotivated, also not great at positive self talk
  • 1 0
 Nice! Be very interesting if u can do a modern retro GT LTS design!
  • 1 0
 I don’t know what to say… I’m stunned!
  • 2 0
 Hats off!!
  • 1 0
 Great job, dude. Looks great!
  • 1 0
 Well done! Very impressive.
  • 2 0
 Nice!
  • 1 0
 Way more of this type of content, please!
  • 2 0
 Way to go Jackson!
  • 2 0
 Well done Mr. Green!!
  • 1 0
 Stellar work and fun read!
  • 2 0
 Generalized So good.
  • 1 0
 Great craftsmanship AND humour. Very well done.
  • 1 0
 custom is that the new terminology for a Frankunstabike?
  • 2 0
 There's always one.
  • 1 0
 This is an awesome article, really inspiring!
  • 1 0
 Awesome work. Many splinters?
  • 2 0
 Santa Reuze?
  • 1 0
 good article
  • 1 1
 You could have called Frankenbike !
  • 3 1
 Or Wreck.
  • 1 0
 Nuke-d!
  • 1 0
 nice story
  • 1 0
 Brilliant!
  • 1 1
 I focken love it. I whish I could make shit like this with my hands!!!!!!
  • 2 1
 Neat!!!
  • 1 0
 "The emperor is naked!"
  • 1 0
 Speed and Power
Below threshold threads are hidden


Copyright © 2000 - 2024. Pinkbike.com. All rights reserved.
dv56 0.096861
Mobile Version of Website