Tech Tuesday - Fixing Rim Dents

Jul 10, 2012 at 0:04
Jul 10, 2012
by Mike Levy
 
You must login to Pinkbike.
Don't have an account? Sign up

Join Pinkbike  Login

Tech Tuesday - fixing rim dents
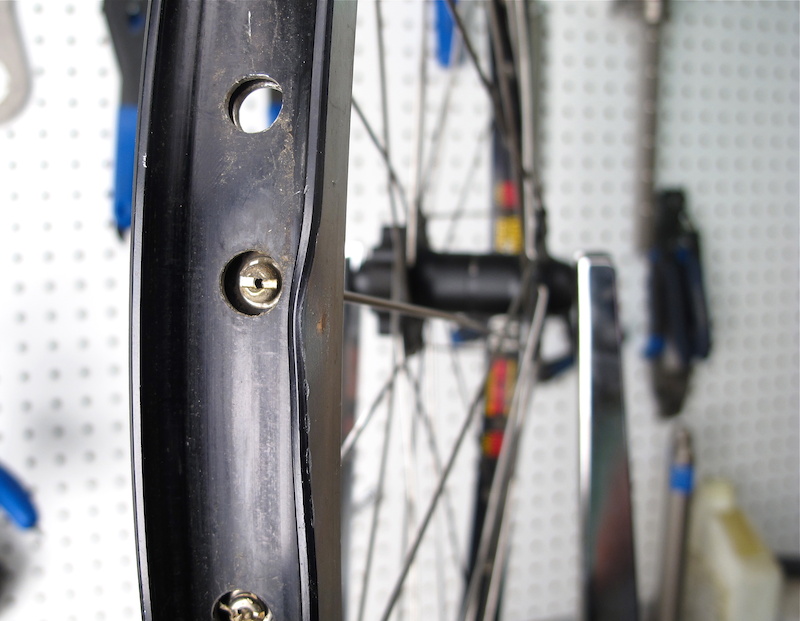
A sizeable dent like the one shown above may look fatal, but there is a good chance that the damaged rim still has a lot of life left in it. While disc brakes may have lessened the consequences of denting a rim sidewall, it is still good practice to pull out the damaged section. Why? Many dents are bad enough to actually compromise a tubeless setup's ability to hold air, allowing pressure and sealant to leak out at the site of the damage. In extreme cases, the tire's bead may not even be held in place safely.
Tech Tuesday - fixing rim dents
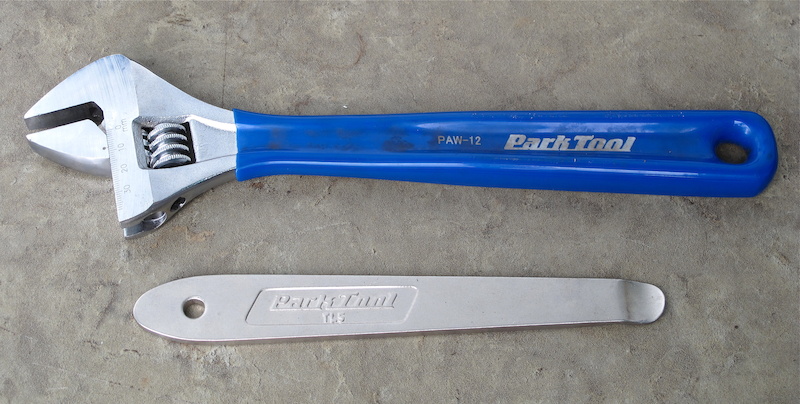
While some repair jobs require very specific tools to perform, fixing a dented rim only demands the basics: a large adjustable wrench and metal tire lever.
Tech Tuesday - fixing rim dents
Want to use the correct tools for the job? Morningstar Tools manufactures this clever item, their ''Rim 'Rench'', that is specifically designed to pull out inward dents on rims. It is shaped to not harm the rim wall, and is thin enough to pull out the smallest of imperfections. It can be found on the Morningstar website for $16 USD.

What's needed:
• Adjustable wrench
• Metal tire lever
• Felt marker
Some helpful pointers:
• Using a metal tire lever (or any other thin metal object) between the outer rim wall and the wrench will prevent the edges of the wrench from damaging the rim. It will also help to keep you from bending the rim wall out too far.
• Much like straightening a brake rotor, this repair job is all about going in small increments. You'll just make more work for yourself if you try to bend too much too soon.
• It's mentioned again below, but we can't stress this enough: inspect the rim for cracks after fixing the dent. Although it is unlikely to occur, a rim sidewall blowout, especially up front, will likely spell disaster on the trail.

Tech Tuesday - fixing rim dents
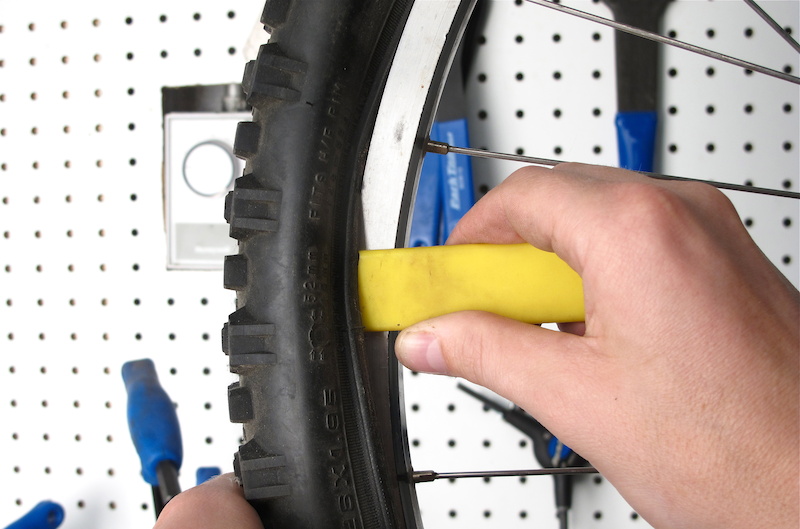
Step 1 - Star by taking the damaged wheel off of your bike and removing the tire. It is also a good idea to slip off the rim strip if you are not using a stick-on, tubeless rim tape. If you are, be careful during the repair so as not to damage the tape.
Tech Tuesday - fixing rim dents
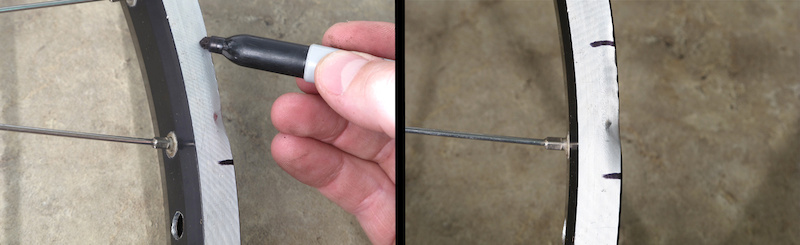
Step 2 - Locate the damaged section of rim wall and use a felt pen (or a white-out pen if the rim is black) to mark the points where the damage begins and ends. This makes it easy to see where you have to work your magic, as well as allow you to easily find the dent as you progress.
Tech Tuesday - fixing rim dents
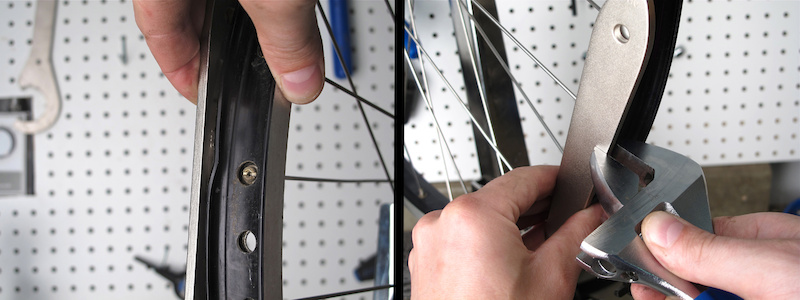
Step 3 - Take your metal tire lever and place it up against the outer rim wall, directly over top of the dent. Next, starting at one end of the dent, close down your adjustable wrench over top of both the damaged rim wall and the tire lever. Hold your thumb down firmly onto the wrench's adjustment wheel.
Tech Tuesday
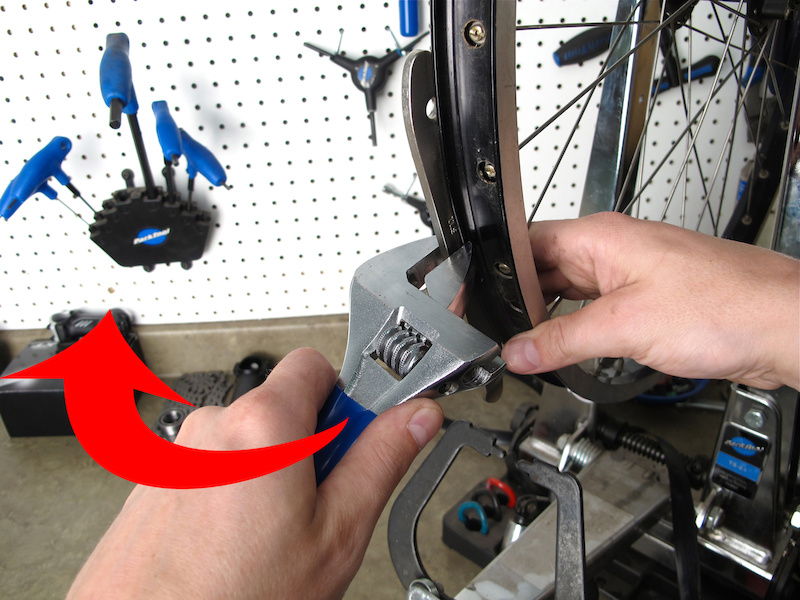
Step 4 - With one hand holding the metal tire lever in place, use the other to pull the rim wall out. Start with small motions, working your way along the offending area.
Tech Tuesday - fixing rim dents
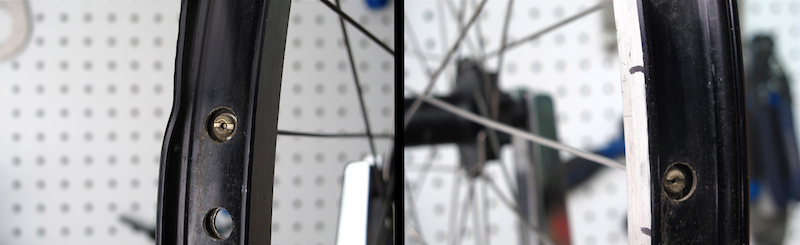
Step 5 - Inspect your work before reinstalling the tire, tube, and rim strip. Look for hairline cracks that run lengthwise along the inner rim wall - a single crack requires the rim to be replaced as a rim failure on the trail can have dire consequences. If you left the wheel's tubeless rim strip on during the repair, be sure to check it for any tears that may have been caused by the wrench. The photo above shows a before (left) and after (right) view of the damage and the repair.


Past Tech Tuesdays:
TT #1 - How to change a tube.
TT #2 - How to set up your SRAM rear derailleur
TT #3 - How to remove and install pedals
TT #4 - How To Bleed Your Avid Elixir Brakes
TT #5 - How To Check And Adjust Your Headset
TT #6 - How To Fix A Broken Chain
TT #7 - Tubeless Conversion
TT #8 - Chain Wear
TT #9 - SRAM Shift Cable Replacement
TT #10 - Removing And Installing a Headset
TT #11 - Chain Lube Explained
TT #12 - RockShox Totem and Lyric Mission Control Damper Mod
TT #13 - Shimano XT Crank and Bottom Bracket Installation
TT #14 - Straightening Your Derailleur Hanger
TT #15 - Setting Up Your Front Derailleur
TT #16 - Setting Up Your Cockpit
TT #17 - Suspension Basics
TT #18 - Adjusting The Fox DHX 5.0
TT #19 - Adjusting The RockShox BoXXer World Cup
TT #20 - Servicing Your Fox Float Shock
TT #21 - Wheel Truing Basics
TT #22 - Shimano Brake Pad Replacement
TT #23 - Shimano brake bleed
TT #24 - Fox Lower Leg Removal And Service
TT #25 - RockShox Motion Control Service
TT #26 - Avid BB7 Cable Disk Brake Setup
TT #27 - Manitou Dorado Fork Rebuild
TT #28 - Manitou Circus Fork Rebuild
TT #29 - MRP G2 SL Chain Guide Install
TT #30 - Cane Creek Angleset Installation
TT #31 - RockShox Maxle Lite DH
TT #32 - Find Your Tire Pressure Sweet Spot
TT #33 - Three Minute Bike Preflight Check
TT #34 - MRP XCG Install
TT #35 - Stem Choice and Cockpit Setup
TT #36 - Handlebars - How Wide Affects Your Ride
TT #37 - Repairing A Torn Tire
TT #38 - Coil spring swap
TT #39 - Trailside help: Broken Shift Cable
TT #40 - Installing a Fox Float Air-Volume Spacer
TT #41 - Replace the Seals on Your 2011 RockShox Boxxer World Cup Fork
TT #42 - Clean and Lubricate Your Fox F32 Dust Wiper Seals
TT #43 - Thread Locker Basics
TT #44 - Install a SRAM X.0 Two-By-Ten Crankset
TT #45 - VPP Suspension Bearing Service
TT #46 - Rotor Straightening
TT #47 - Finding and fixing that creak
TT #48 - Bleed and Service Magura Marta Disc Brakes
TT #49 - Cup and Cone Hub Basics
TT #50 - Install and Adjust Pedal Cleats
TT #51 - Cup and Cone Hub Rebuild
TT #52 - Converting Mavic Crossmax SX Axles
TT #53 - Cassette Removal and Installation
TT #54 - Cane Creek AngleSet Installation
TT #55 - American Classic Tubeless Conversion
TT #56 - Wider Rims Are Better and Why Tubeless Tires Burp Air
TT #57 - Pedal Pin Retrofit
TT #58 - Bleed RockShox Reverb Remote Lines
TT #59 - Cutting Carbon
TT #60 - Silence That Squeaky Disc Brake
TT #61 - Five Minute Wheel True
TT #62 - Removing Bike Rack Rattle
TT #63 - Inside Shimano's Shadow Plus Mech and How To Adjust It
TT #64 - Steerer tube length
TT #65 - Marzocchi 44 Rebuild
TT #66 - RockShox BoXXer TLC
TT #67 - Ghetto Tubeless Tire Inflator
TT # 68 - RockShox BoXXer Seal Replacement
TT #69 - Ghetto Dropper Post
TT #70 - FSA Orbit Option Install
TT #71 - How to Bleed Formula Disc Brakes
TT #72 - Crankbrothers Kronolog Cable Replacement
TT #73 - Three Ways to Save A Leaky Tubeless Tire
TT #74 - Chain Length Basics
TT #75 - Tech Tuesday: DH Helmet vs. Motocross Helmet
TT #76 - RockShox Vivid Air Tuning 2012
TT #77 - Cartridge Bearing Service and Re-Grease
TT #78 - Bleeding Hayes Prime Brakes
TT #79 - BB30 Bottom Bracket Overhaul
TT #80 - Specialized Command Post Blacklite Maintenance

Must Read This Week


53 Comments

  • + 32
flag specialized15 (Jul 10, 2012 at 0:10)
 That tool is legit! i swear they make a tool for bikes like they do apps for iPhones
  • + 0
flag Protour (Jul 10, 2012 at 8:04)
 No! That tool is not legit, and this article doesn't exhibit the best way to remove a dent from a rim. It exhibits the best way to turn a dented rim into a cracked rim.

The best way to remove a dent is to put a flat, steel surface on each side of the dent (the small, flat Park 8, 10, or 12m wrenches work good). Squeeze them together with Vice Grips and the dent is flattened, instead of re-bent the other direction.

If it's a really bad dent or a real strong rim you may not be able to completely flatten it, but dont use that tool!
  • + 15
flag aoneal (Jul 10, 2012 at 8:18)
 Heck, down in Oklahoma they just use some good ol' Bondo. On the really BIG dents they might throw in some bailing wire pieces to act as rebar.
  • + 34
flag trozei (Jul 10, 2012 at 9:38)
 No no, guys. You've got it all wrong. Duct tape.
  • + 1
flag misspent-youth (Jul 10, 2012 at 10:34)
 That tool works great if you use it right!!!
  • + 3
flag bowness8 (Jul 10, 2012 at 10:47)
 trozei - duct tape is so 1990's, zip ties are the answer!
  • + 1
flag Protour (Jul 10, 2012 at 10:52)
 I forgot to mention that for larger dents, after you squeeze the vice grips on the flat wrenches over the dent you have to pry it over to regain the original shape. The flat wrenches give you some insurance against cracking the rim since there isn't nearly as much pressure isolated directly on the bend, like there is when you use the tool to bend it back. It's just too easy to crack the rim with that tool, and you can't risk that,.especially with if you run tubeless.
  • + 3
flag robc10 (Jul 10, 2012 at 13:14)
 Isnt it just easyer and safer to just buy another rim ? I wouldn't like to ride dh with a rim that has a weakspot that could possibly crease on a hard impact
  • + 9
flag Russell1994 (Jul 10, 2012 at 14:04)
 Safer to buy another rim - YES.
Economical to buy another rim - NO.
Can't fix it? - RIDE IT UNTIL IT DIES tup
  • + 1
flag trozei (Jul 10, 2012 at 20:16)
 Browness8, refer to this video: www.pinkbike.com/video/266854

Zip ties are not the answer.
[Reply]
  • + 19
flag Burnhardx (Jul 10, 2012 at 1:45)
 Or just leave it as it is. Aslong as the tire stays on, I wouldn't try to fix a dent. There is always a chance of doing more harm than good bending metal.
  • + 2
flag ridenz (Jul 10, 2012 at 2:02)
 Yeah, crack the rim and it's aaalll over
  • + 4
flag iamamodel (Jul 10, 2012 at 4:06)
 True, but if you go in small increments you can usually see the tell-tale stress lines appear. When they start to appear, I stop and go no further - and they don't always appear. In most cases this tip will keep a rim going that little bit longer which I don't mind at all because you can slam stuff that little bit harder knowing your rim is done for anyway. Great tech Tuesday. Good for the wallet and environment.
  • + 1
flag betsie Plus (Jul 10, 2012 at 15:09)
 100% spot on for any hard anodized rim.
If the tyre stays on, leave the ding.
Better that than to crack the rim!
[Reply]
  • + 10
flag turnerburton (Jul 10, 2012 at 3:27)
 That Morningstar tool works really well, just be patient and don't try to take the bend out in one pop. You can get a used wheelset with some dings for a fraction of their price and fix them for $16. Hubs are usually in great shape too on used DH wheels, glad to see this Tech Tuesday tip.
[Reply]
  • + 1
flag Dally666 (Jul 10, 2012 at 14:39)
 Interesting tech info. Apprears to be mixed opinions on this. I think I'd be too freaked to try myself. I would probably leave it to my shop guys. I love tech tues though. I run high psi to reduce problem. Ounce of prevention= more $$$ in my pocket.
[Reply]
  • + 5
flag vwcabrio82 (Jul 10, 2012 at 3:01)
 nice idea with the tire lever... never thought of that...
[Reply]
  • + 1
flag thenotoriousmic (Jul 11, 2012 at 16:04)
 That's the worst kind of advice I've ever seen on this site by a million miles... Never bend back metal especially aluminium. What you need it's two blocks of timber a couple of spacers and wedges and two or three G clamps / vices to put pressure on the dent flattening the fault not bending it back.
  • + 1
flag PHRANQUY (Jul 17, 2012 at 7:30)
 The problem is the metal has already been stretched weakening it's structure. Doing the job one way or another is not going to make a difference if you take your time and do it right.
[Reply]
  • + 3
flag Benji-man (Jul 10, 2012 at 9:50)
 I got three numbers for you "721"

If you mess one of these rims up.. then spend the £30 on a new one and stop being such a damn hoonigan!!
  • + 1
flag bmbracing (Jul 10, 2012 at 14:59)
 Aye, seconded. Good solid and decent-value rim, I have a 721 out back and a 12-year-old (!!!) 521 up front, both with several dents like that one above but I've just left them, no cracks and I don't run tubeless (prob never will). Some DH pros preferred these rims due to the large rim-brake sidewall apparently making the rim more resistant to cracking and able to absorb dents without damaging the core structure of the rim.
  • + 1
flag betsie Plus (Jul 10, 2012 at 15:13)
 721.... gave up with them when tyres started falling off them when cornering hard and 4 broke, one a weld fail, causing a horrible OTB! Currently on ZTR's but they are prone to cracking at the nipples when tightened poorly, but never had one fail on me yet.
[Reply]
  • + 2
flag gclarida (Jul 10, 2012 at 10:25)
 lol i would never do this, moving metal or aluminum weakens it, if it has already been dented, moving the metal will only weaken the rim further.
  • + 2
flag Chadderz (Jul 10, 2012 at 12:15)
 *Aluminium Wink
[Reply]
  • + 2
flag kixx (Jul 10, 2012 at 14:54)
 this method works on softer and thinner alloy rims. try to pull this stuff on spank/easton/mavic ... it's a 50/50 chance to work and not make a big a*s crack ...
[Reply]
  • + 0
flag milfhunter (Jul 16, 2012 at 1:51)
 Once again, the numpties in the PB office have struck again. This is the daftest thing I have heard on PB. And I've heard a lot. You really don't want to be stuck in the middle of nowhere with a banana shaped rim. Do not fix your rims, if it has a dent bin it. By trying to save a few quid it could end up costing you a lot more.
[Reply]
  • + 5
flag Ro-11 (Jul 10, 2012 at 8:46)
 What!, no hammers?
[Reply]
  • + 1
flag tommylee (Feb 26, 2013 at 5:57)
 I can't find any info on how to fix dented hub sidewalls. Please reply if someone know how before i kill it with a hammer. Smile
[Reply]
  • + 2
flag six66 (Jul 10, 2012 at 15:35)
 This works for carbon rims too, right? Haha
[Reply]
  • + 2
flag ascurtis (Jul 10, 2012 at 20:45)
 How to fix a bent piece of metal: bend it back. C'mon now.
[Reply]
  • + 2
flag dmadness (Jul 11, 2012 at 16:49)
 I prefer to use a Shaped Charge Explosion... Blast it back into shape Smile
[Reply]
  • + 1
flag MrBrycicle (Jul 10, 2012 at 5:51)
 thanks for that.

p.s theres another dint on the other side of the rim. ; )
[Reply]
  • + 1
flag gizmogunner (Jul 10, 2012 at 5:27)
 finally i know how to get rid of this pesky dint in my rear tornado rim i dont have to go to a shop now
[Reply]
  • + 2
flag loaded (Jul 10, 2012 at 7:24)
 WARNING to all, DONT try this with any DT Swiss hoop!
[Reply]
  • + 1
flag Colin994 (Jul 10, 2012 at 8:44)
 haaaaaaaaah i cracked my rim doing this and have been running it for a season and a half. whooops.
[Reply]
  • + 2
flag patatta (Jul 10, 2012 at 6:53)
 if you bent the rim to much it will crack!
[Reply]
  • + 1
flag thenotoriousmic (Jul 11, 2012 at 16:12)
 Whys my comment been removed?
[Reply]
  • + 1
flag mrbrett Plus (Jul 10, 2012 at 12:39)
 Now that's a rim job I can get behind!
[Reply]
  • + 1
flag baca262 (Jul 10, 2012 at 7:02)
 do you really need to be told how to do this?
[Reply]
  • + 1
flag drop20 (Jul 10, 2012 at 10:59)
 That is pretty legit. That tool is pretty rad as well.
[Reply]
  • + 2
flag fatlarry (Jul 10, 2012 at 9:23)
 I miss the videos.
[Reply]
  • + 0
flag GarlandPhotography (Jul 10, 2012 at 5:23)
 the most useful tech tuesday yet
  • + 5
flag sicsoma (Jul 10, 2012 at 14:10)
 ...until they finally show us how to properly install a kickstand
[Reply]
  • + 1
flag thenotoriousmic (Jul 11, 2012 at 16:12)
 ...
[Reply]
  • + 1
flag Riskax (Jul 10, 2012 at 1:55)
 i have done this alot xD
[Reply]
Below threshold threads are hidden

Post a Comment


Copyright © 2000 - 2013. Pinkbike.com. All rights reserved.
dv42 0.034860