Tech Tuesday - Make a Ghetto Tubeless Tire Inflator
This Tech Tuesday we learn how to channel air from a fully inflated tire into a neighboring tubeless tire to help seat the bead and get to air up without the assistance of an air compressor. The device can be assembled from parts you have laying around the garage - or for about 12 bucks from off-the-shelf items purchased at your local bike shop and an auto-parts store. 'Why bother? Well, I am assuming that a few PB riders are a little short on cash and may not posses a spotless mechanical man-cave, where every cycling related tool that can be purchased, hangs over its outline on a peg-wall above a clean Formica work surface, framed by a double headed pneumatic bike stand, alphabetically indexed stackable trays of spare parts - and an air compressor. For less fortunate PB riders, the ones who must make do with the few tools they own (most of which are probably stashed in a hydration pack), I present: 'Ghetto Tech Tuesday.'
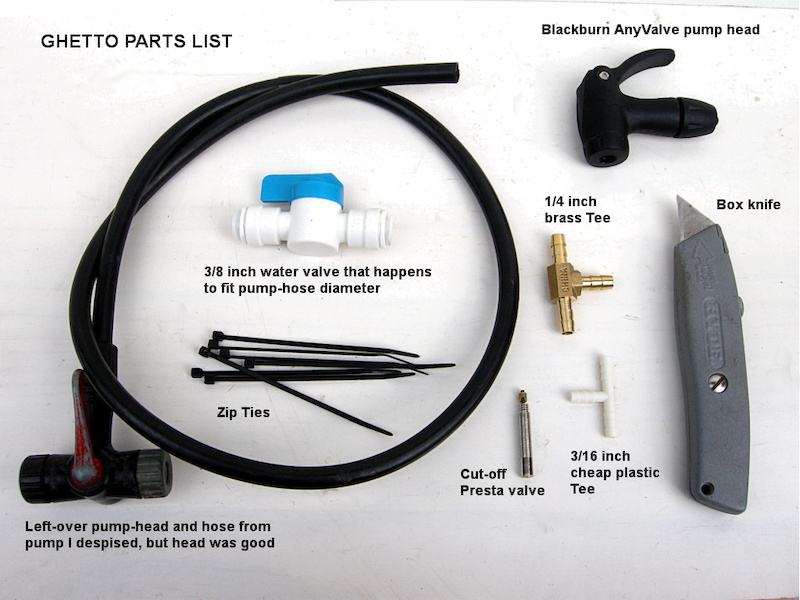
![Parts list]()
What You'll Need:
• Two floor pump heads (LBS - 3.50 each)
• Valve (optional) (Hardware store - 3.00)
• *1/8 or 1/4 inch Tee (Auto store - 2.00)
• *1/8 or 1/4 tubing (Auto or hardware store - 1.00)
• Zip ties (Auto or hardware store - 1.00)
• Cut-down Presta valve stem (free from old tube or crappy tubeless stem)
• Floor pump (You should already have one, but you can use a mini-pump in a pinch)
• Spare wheel that holds air and hopefully has a removable valve core.
• Something sharp to cut the rubber tubing with.
*Match your tubing and Tee barbs with the size required for your pump heads.
How to Make a Ghetto Tubeless Tire Inflation Device
Most of us have an old floor pump that gave up the ghost a long time ago. If the head and hose are serviceable, cut the hose off and you are half way done. Otherwise, assemble two pump heads, one on each side of a piece of tubing between 24 and 30 inches long. Most modern pump heads use 3/8 inch OD tubing with a smallish, 3/16-inch ID (5mm). This tubing can be purchased at auto parts stores (fuel emission tube). Silca pump heads fit standard 1/4-inch ID rubber tubing.
![Cut Hose]()
![How to assemble the Blackburn pump head.]()
![Cut and install Presta valve]() .
.
![Valve]()
![Zip Tie junctions]()
![Finished transfer tube]()
Mounting and Inflating a Tubeless Tire With Your Ghetto Device
The point of this inflation device is two-fold: First, to transfer as much air to the unmounted tubeless tire as possible in a steady stream, which is far better than a series of weak huffs from a floor pump. Second, to allow you to use both hands to manipulate the tire around the rim to affect a seal while air is rushing into the tire. Once the bead is seated, you can add air with the floor pump through the in-line Presta stem to seat the bead. To make this happen you'll need to remove the valve cores from both the host tire and the one that you are trying to seat. This also ensures that your transfer tube will pass the greatest volume of air. It's showtime.
![Ready to rock - my Ghetto Tubeless Inflator.]()
![remove valve cores then close in-line valve and connect hose to the host tire so you can pressurize it.]()
![Hook up the floor pump to the Presta valve on the Tee and than inflate the host tire to its maximum rated pressure.]()
![Pumping up the host tire.]()
![Open the valve and inflate the tubeless tire. Once air is flowing you are free to manipulate the bead where it has not sealed on the rim.]()
![Close valve.remove pump head and install Presta valve core.]()
![Topping off the tubeless tire.]()
Past Tech Tuesdays:
Visit Parktool.com to see their entire lineup of tools and lubes
What You'll Need:
• Two floor pump heads (LBS - 3.50 each)
• Valve (optional) (Hardware store - 3.00)
• *1/8 or 1/4 inch Tee (Auto store - 2.00)
• *1/8 or 1/4 tubing (Auto or hardware store - 1.00)
• Zip ties (Auto or hardware store - 1.00)
• Cut-down Presta valve stem (free from old tube or crappy tubeless stem)
• Floor pump (You should already have one, but you can use a mini-pump in a pinch)
• Spare wheel that holds air and hopefully has a removable valve core.
• Something sharp to cut the rubber tubing with.
*Match your tubing and Tee barbs with the size required for your pump heads.
Most of us have an old floor pump that gave up the ghost a long time ago. If the head and hose are serviceable, cut the hose off and you are half way done. Otherwise, assemble two pump heads, one on each side of a piece of tubing between 24 and 30 inches long. Most modern pump heads use 3/8 inch OD tubing with a smallish, 3/16-inch ID (5mm). This tubing can be purchased at auto parts stores (fuel emission tube). Silca pump heads fit standard 1/4-inch ID rubber tubing.
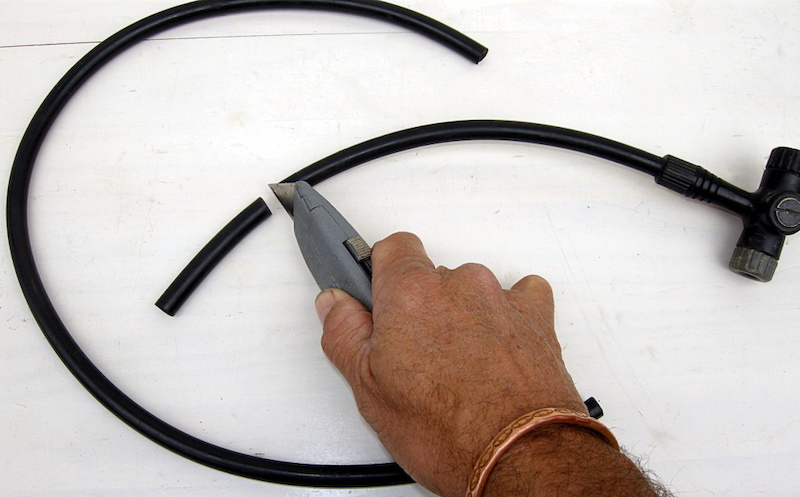
Step 1 -Measure about a foot out from one pump head and cut the tubing there. Cut a three-inch piece and set it aside. Reconnect the two pump heads with the Tee fitting. Next, slip the three-inch rubber hose onto the upright barb of the Tee.
Tip: The smallest brass Tee you will find is probably 1/4 inch, which is a tight fit on the small ID tube that fits most pump heads. You can manhandle it on the 1/4 inch barbs with some force and the assistance of a little chain lube or bodily fluid. Smaller OD plastic tees are sold at auto parts stores on the fuel emissions rack that make the job easier, but the plastic ones can be fragile.
Tip: The smallest brass Tee you will find is probably 1/4 inch, which is a tight fit on the small ID tube that fits most pump heads. You can manhandle it on the 1/4 inch barbs with some force and the assistance of a little chain lube or bodily fluid. Smaller OD plastic tees are sold at auto parts stores on the fuel emissions rack that make the job easier, but the plastic ones can be fragile.
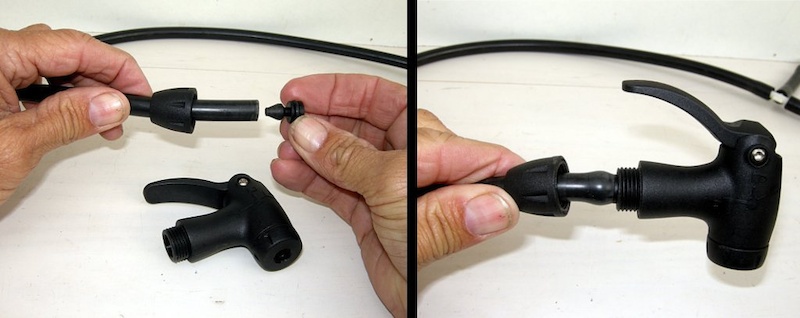
Just in case you need to know, this is how the Blackburn AllValve pump head assembles.
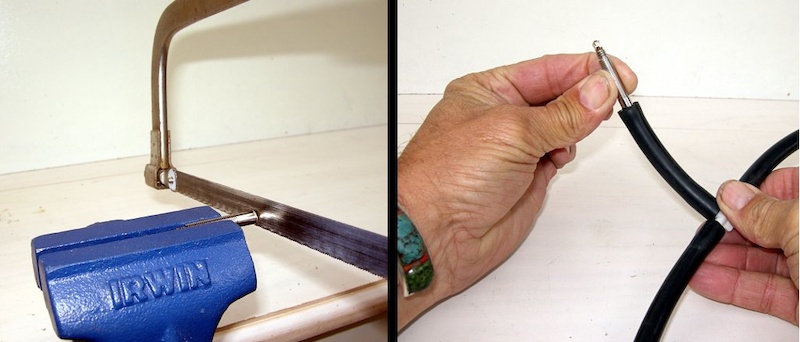
Step 2 -Clamp a Presta valve stem carefully in a vice or equivalent and using a fine-tooth hack saw, cut the bulb off the foot of the valve stem. Deburr the valve stem and blow out the metal chips, and then slip it into the short tube sticking out of the Tee
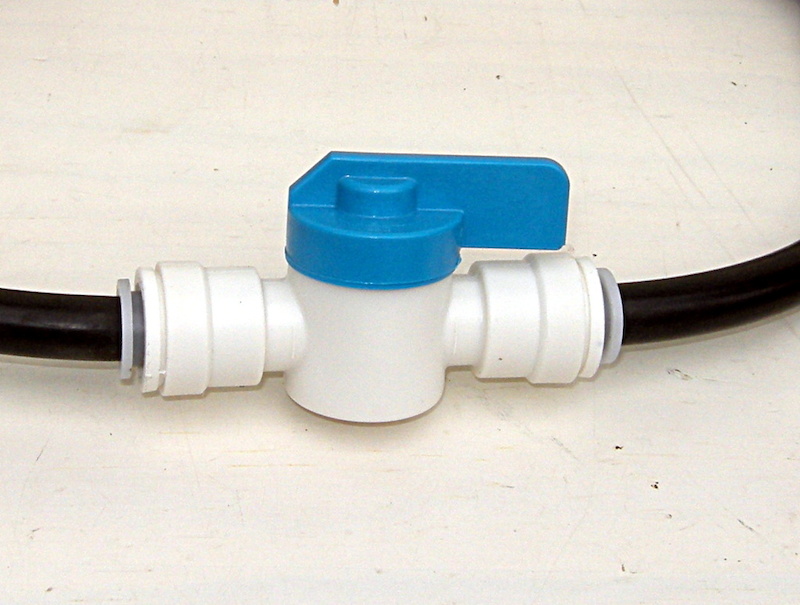
Step 3 -If you found a valve to fit your hose, then now is the time to install it. Cut the hose about six inches inboard from the Presta-valve Tee and install the valve.
Tip: Don't have a valve? No worries. Clamping the rubber hose with Vice-Grip pliers set just tight enough to cut off the flow of air will work fine.
Tip: Don't have a valve? No worries. Clamping the rubber hose with Vice-Grip pliers set just tight enough to cut off the flow of air will work fine.
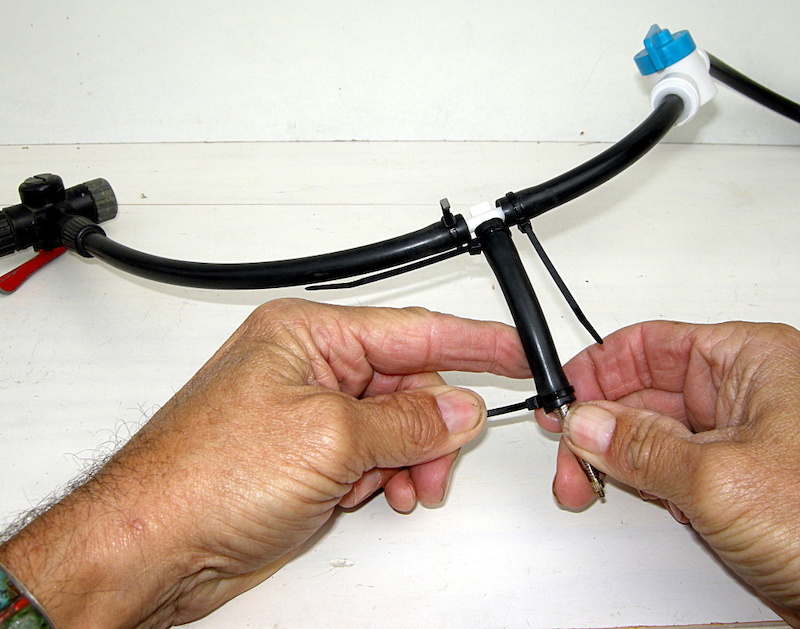
Step 4 -Use small zip ties at each hose junction to retain the assembly. Clip the free ends with a knife or side cutters as close as possible and you are ready for your tubeless experiment.
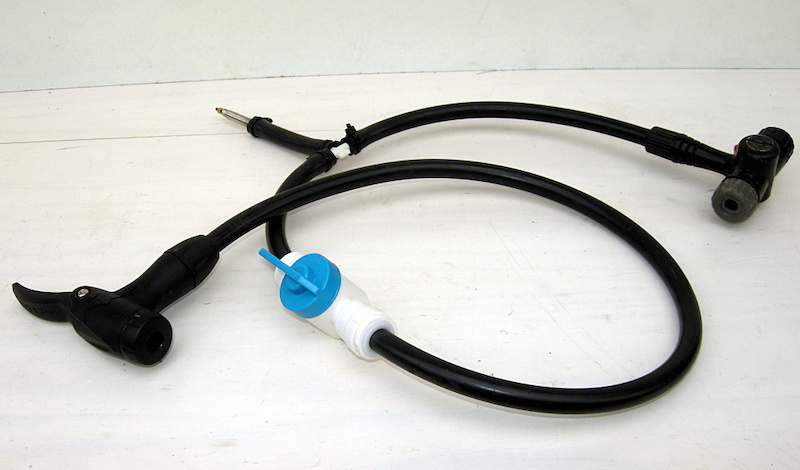
The finished product should look similar to this.
The point of this inflation device is two-fold: First, to transfer as much air to the unmounted tubeless tire as possible in a steady stream, which is far better than a series of weak huffs from a floor pump. Second, to allow you to use both hands to manipulate the tire around the rim to affect a seal while air is rushing into the tire. Once the bead is seated, you can add air with the floor pump through the in-line Presta stem to seat the bead. To make this happen you'll need to remove the valve cores from both the host tire and the one that you are trying to seat. This also ensures that your transfer tube will pass the greatest volume of air. It's showtime.
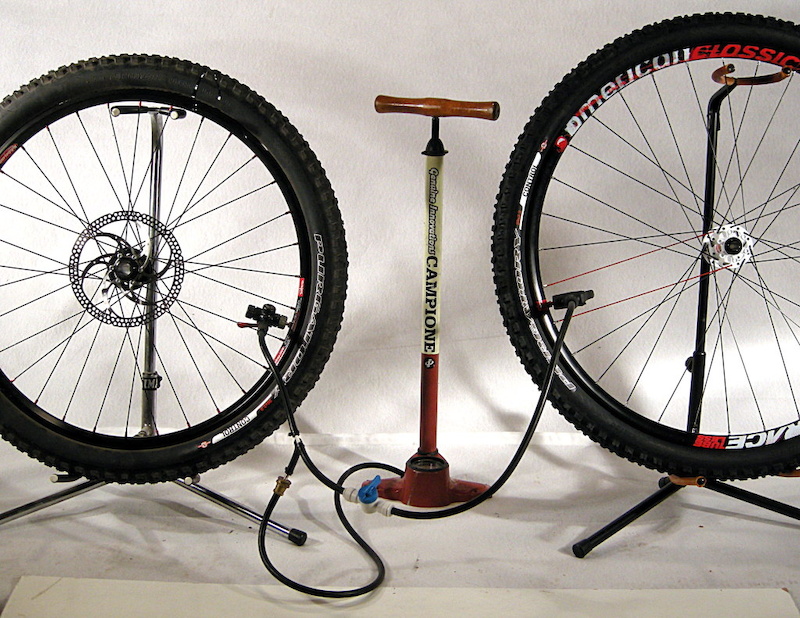
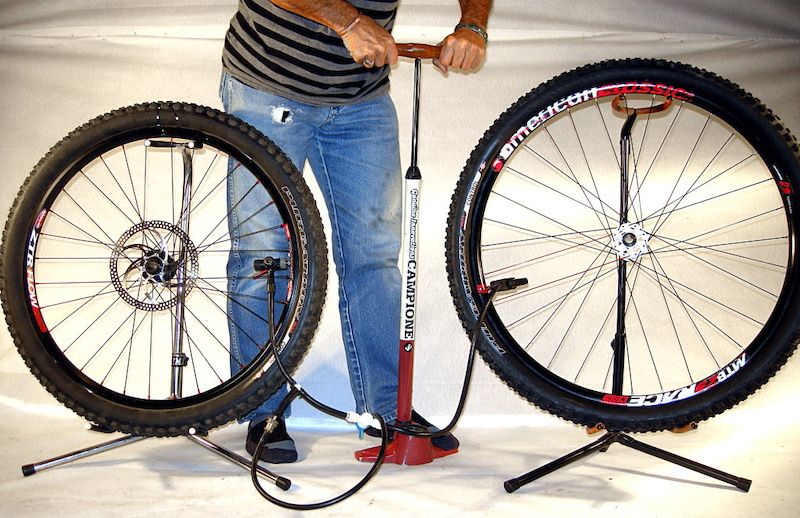
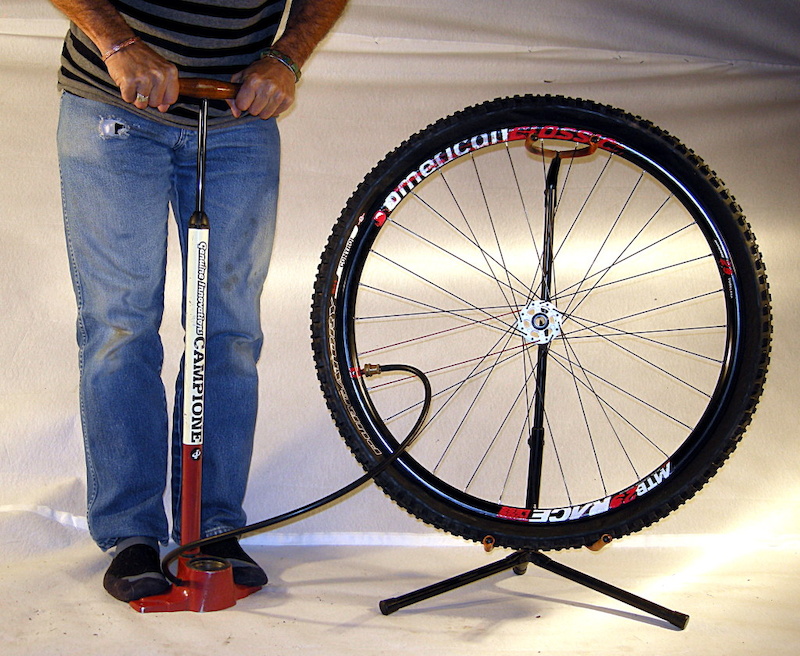
This is how the transfer line looks when it is hooked up and ready to rock. The host tire is the 26er on the left, the 29er on the right is the one we will be mounting up.
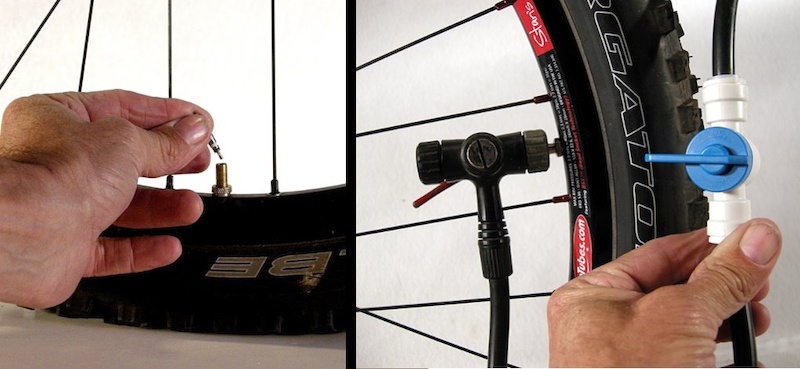
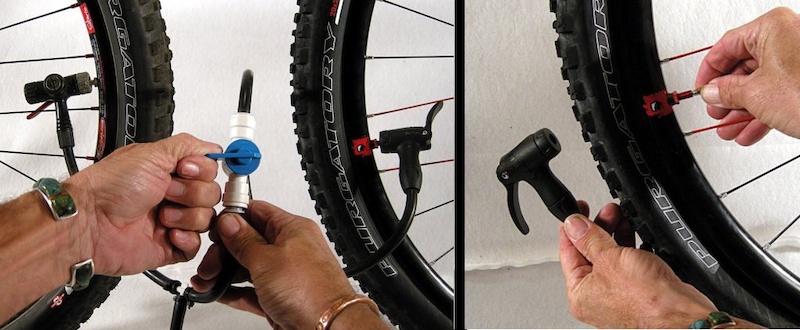
Step 1 -Remove the valve cores from both the host wheel and the one you are attempting to inflate and set them aside where they can be easily accessed. Install the pump head with the Tee closest to the host wheel (the one which will supply the compressed air) and either close the valve or pinch the hose slightly inboard of the wheel you will be working on. Make sure that the tire is mounted correctly and the wheel is horizontal, with nothing contacting the tire. (We stood our test wheel on end for photo purposes.)
Tip: It's best to have the host wheel in a bike stand or at least away from danger so you can safely deflate it without unseating the bead. Also, if there is sealant in the host tire, ensure that the wheel is upright and the valve stem is at either a 3 o'clock or a 9 o'clock position to keep the juice from passing through the transfer tube.
Tip: It's best to have the host wheel in a bike stand or at least away from danger so you can safely deflate it without unseating the bead. Also, if there is sealant in the host tire, ensure that the wheel is upright and the valve stem is at either a 3 o'clock or a 9 o'clock position to keep the juice from passing through the transfer tube.
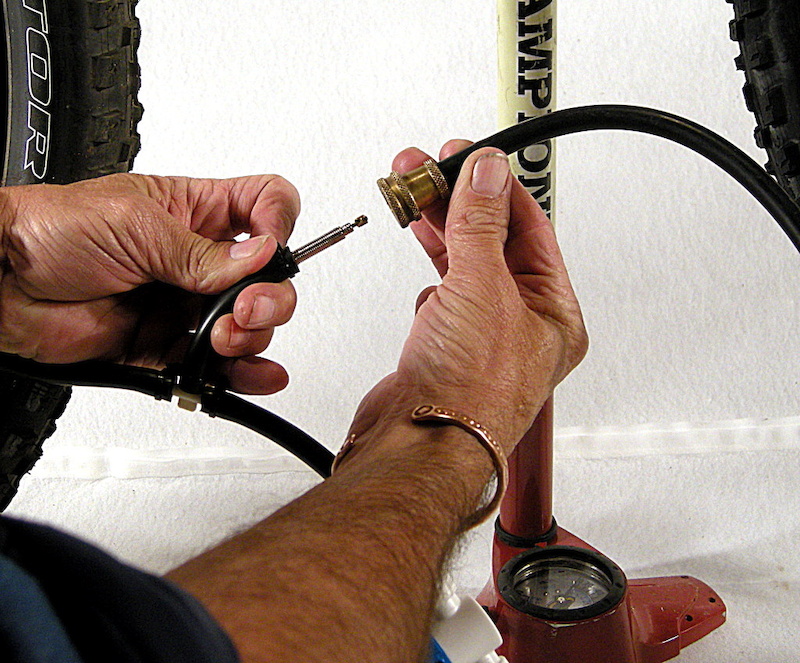
Step 2 -Slip your floor pump head on the in-line Presta valve and inflate the host tire to its maximum posted pressure (read this information on the tire's sidewall) leave the pump in position, you'll be using it to top off the tire after the bead seats.
Pumping up the host tire. With the in-line valve closed as it is in this picture, the floor pump fills the host tire on the left. Opening the in-line valve inflates the tire on the right.
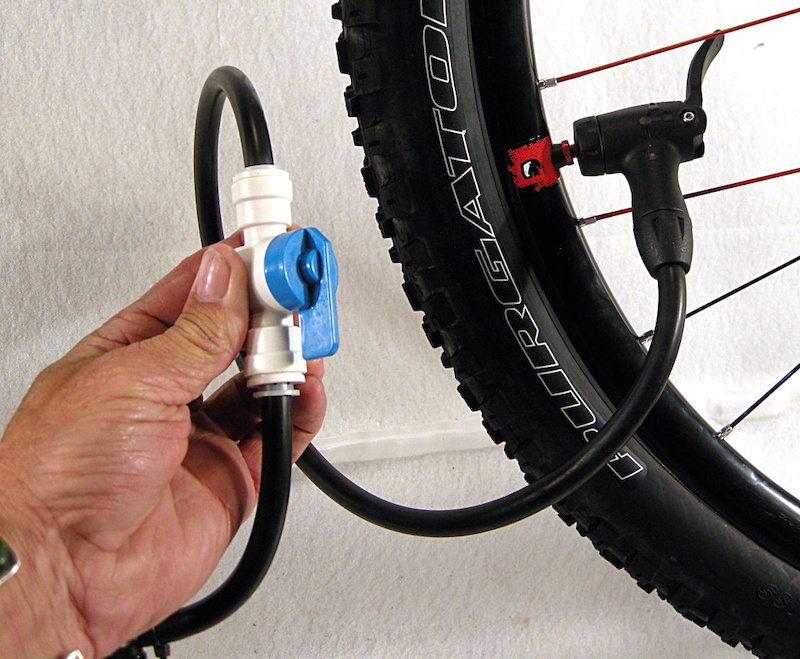
Step 3 -Open the valve quickly, or let loose the Vice-Grip pliers and get to the task of seating the bead immediately. Sometimes giving the wheel a little vertical shake is all it takes to seat the beads, other times you'll need to listen for where the leaking is and lift the tire slightly to get it to seat. Yes? Once the bead seats, start pumping the floor pump. It will be inflating both the host tire and the newly seated one, but that will not matter. The bead on the newly seated tire will pop into place at the same pressure (approximately 32psi). No? repeat the previous step and give 'er a go again.
Tip: If you purchase a dual-type pump head, you can use the larger volume of an automotive spare tire, which can give you a minute longer to wrestle with an unwilling tire and rim combination.
Tip: If you purchase a dual-type pump head, you can use the larger volume of an automotive spare tire, which can give you a minute longer to wrestle with an unwilling tire and rim combination.
Step 4 -Clamp the tube or switch off the valve. Next, remove the pump head from the just-mounted tire and quickly screw in the valve core. Repeat this process with the host tire, inflate both tires to your riding pressure and you are good to go. Put your Ghetto Tubeless Device in your car or toolbox for a future tubeless emergency.
Top off your tires to your riding pressure and you are done. It was fun making the Ghetto Tubeless Tire Inflator, and since then, it has kicked butt on every tire we've used it to mount. Cheers!
Past Tech Tuesdays:
Visit Parktool.com to see their entire lineup of tools and lubes
Author Info:

 Member since Mar 23, 2011
Must Read This Week
Sign Up for the Pinkbike Newsletter - All the Biggest, Most Interesting Stories in your Inbox
PB Newsletter Signup
• Two CO2's (LBS - 3 pack 6.00)
OR
• Two floor pump heads (LBS - 3.50 each)
• Valve (optional) (Hardware store - 3.00)
• *1/8 or 1/4 inch Tee (Auto store - 2.00)
• *1/8 or 1/4 tubing (Auto or hardware store - 1.00)
• Zip ties (Auto or hardware store - 1.00)
• Cut-down Presta valve stem (free from old tube or crappy tubeless stem)
• Floor pump (You should already have one, but you can use a mini-pump in a pinch)
• Spare wheel that holds air and hopefully has a removable valve core.
• Something sharp to cut the rubber tubing with.
Spend a little money or a ton of time and money. What would you do?
but i see a huge benefit in having such a device.
living and for a small bike shop in Germany that at the moment has no compressor and just use a floor pump this is a huge benefit. we would not have the money to buy a CO2 cartridge for each customer nor for a compressor and because we are in Germany everyone generally has a full set (4) car wheels, due to the changing from summer to winter tires and back.
the price for one tire would be around 12.00 using a CO2 pump and around 10.00 using the self made pump with limitless uses (excluding: valve, zip ties, pump and host wheel)
and maybe its just me but i enjoy working on such small projects from time to time
Cost of materials for Richard Cunningham's "poor man's portable air tank:" about $20
Cost of actual portable air tank that will work every time: about $30
Not being "that" guy at races when you roll up with this contraption that never works quite right: priceless
www.google.com/products/catalog?q=portable+air+tank&oe=utf-8&rls=org.mozilla:en-US:official&client=firefox-a&um=1&ie=UTF-8&tbm=shop&cid=16024120167459361889&sa=X&ei=iDJNT5nbCcqZiALsnJXGDw&ved=0CKMBEPMCMAI
theteamrobot.blogspot.com/2012/02/good-ideabad-idea.html
Firstly, you need a plastic bag. You can usually pick these up for free from your own kitchen. Unfortunately I do not have a photo to attach.
Next you need a straw, or several depending on how far away from you your 'ghetto camelback' you will be.
I have found McDonalds straws hold the best structure and provide more fluids than bendy straws, however bendy straws can sometimes be directed more towards your mouth.
Bluetack or bubblegum optional for on and off valve.
And Lastly, a sturdy rubber band to hold the bag closed and conceal your precious H2O.
For anyone who has a little bit of money, it is well worth while getting a ziplock bag for this. They can be sturdier, however you are usually limited to the amount of water you can have in it. I measured the capacity and it's the same amount as a ham and cheese sandwich, but for your new 'ghetto camelback' you will be using water instead of sandwiches
singletrackworld.com/forum/topic/ghetto-tubeless-inflator-total-cost-9p
On the other hand, I've discovered that a Topeak Joe Blow Mtn floor pump has luck seating beads, but it's one of those mtn bike specific ones with a larger volume barrel. It's not rated for high pressures that road tires need, but w/e.
Hope that this may be a simplier and less complicated way than PinkBike have suggested.
Adding soapy water to the sidewall/bead area helps, it acts as a "lubricant". I'm almost certain that normal soap is non reactive with sealant, so no worries there.
A run down poor side of town or when something is jerry-rigged and looks like it was made in a half-assed fashion.
1. That side of town is a ghetto.
2. Replacing a broken window with a trashbag and ducttape is ghetto
Source: Urbandictionary.com
Then rims: proper UST rims available on aftermarket are bad mmkay? You can only get narrow Mavics making your lightweight tyres wobbly and easy to tear off the rim. They also cost a lot. All this UST drilling keeping clean inner wall for the sake of not using something as simple as a rim stripe with adhesive? I was believing otherwise but after 2 years on proper full-on UST setup rims+tyres I came to a conclusion that it is not worth the money.
I'll try it!
+free
+easy
+doesnt make you look like a cheapskate
+faster