The Good, The Bad, and The Ugly: Pinkbike Editors' Favorite Shop Tools
Pinkbike's tech editors spend countless hours out on the trail testing bikes each year, which means that almost as much time is spent in the shop / garage / basement preparing, adjusting, and fixing those bikes. Many of us have also spent time as professional mechanics, the glamorous profession where you can gain the skills necessary for brake bleeds and suspension rebuilds along with learning how to straighten out a bent steel rim with a hammer, how to install a kickstand, and how to remove the disgusting film of sweat and energy gel that coats the top tube of almost every triathlon bike.
Needless to say, we all have a tool or two that's become our favorite over the years. For some, it's a high-end, precision instrument, while for others it's a crude yet efficient item that gets the job done.
![photo]()
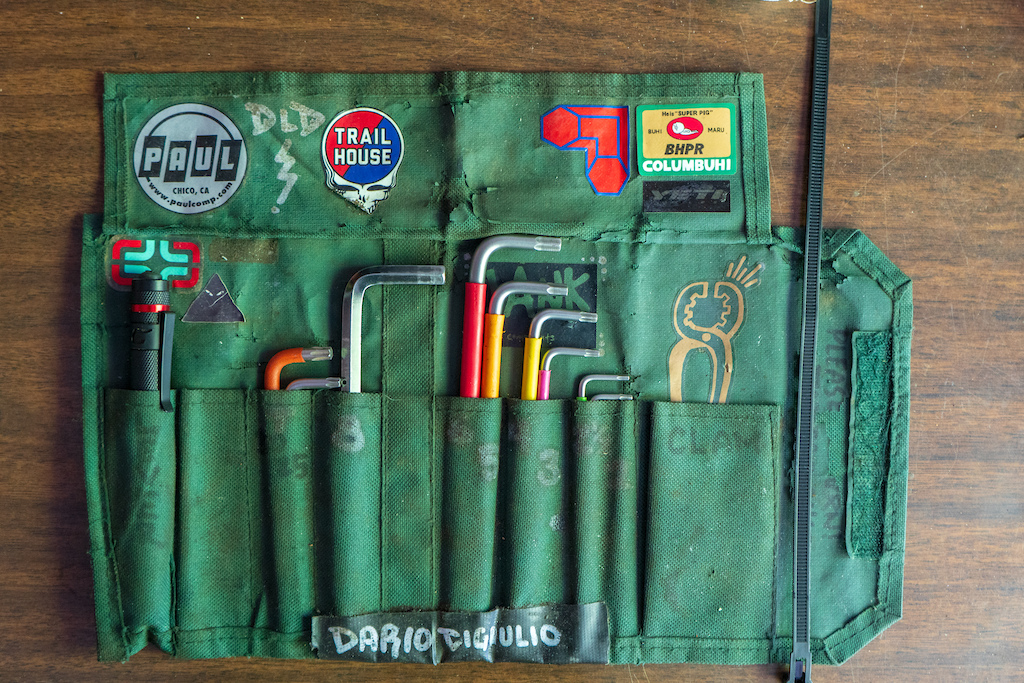
I've had this set of Wera L-Keys for about 7 years now, and they've probably been used almost every day over that span. Any inscription on them has long worn off, but luckily the colors are so ingrained in my mind there's never a hesitation as to which one to grab. The ball end is critical, and these have a clever little retention element that holds the bolt you're working with on the end of the key, so you can free up your other hand. The short side has "hex-plus" technology, which just means they're better at not stripping out poor tolerance bolts.
![photo]()
![photo]()
Honorable mention goes to the gift of sight. In this case, that sight is enhanced/provided by this Coast inspection beam, which is basically a flashlight with no focal adjustment and a very small flat circular beam. It's a great help when fishing cables through frames, setting up brakes, and when hunting for that goddamn tiny bolt that fell on the ground. I picked this up fairly recently, and it's quickly become a key piece in my dark and wonderful garage shop.
Second honorable of course goes to Knipex pliers, but as you'll see in Henry's bit below, that's far from a brave opinion.
![photo]()
![photo]()
![photo]()
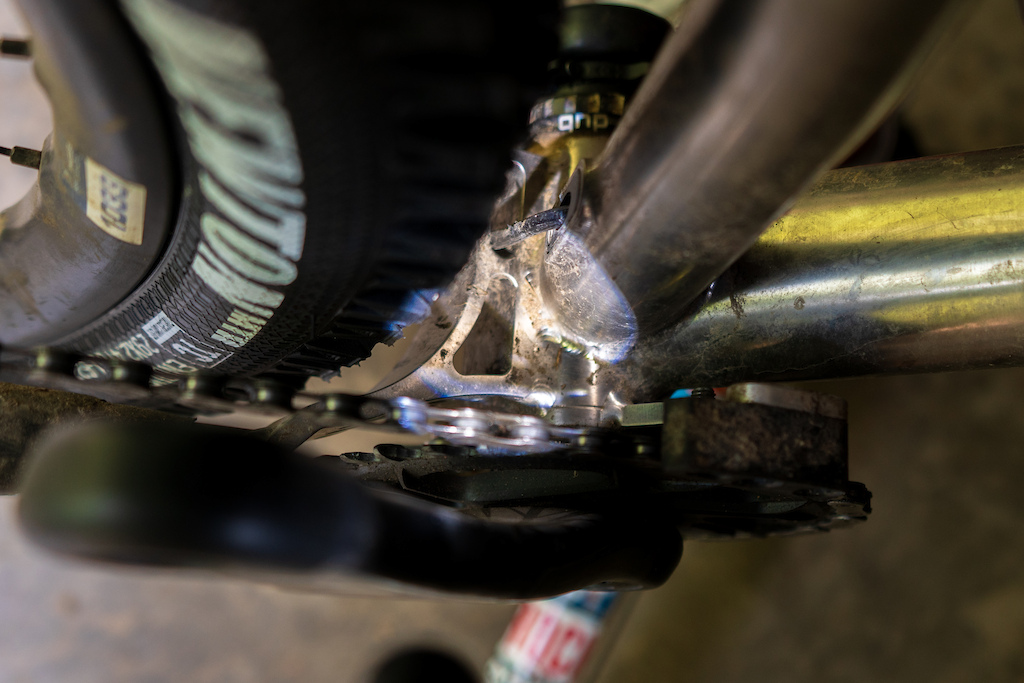
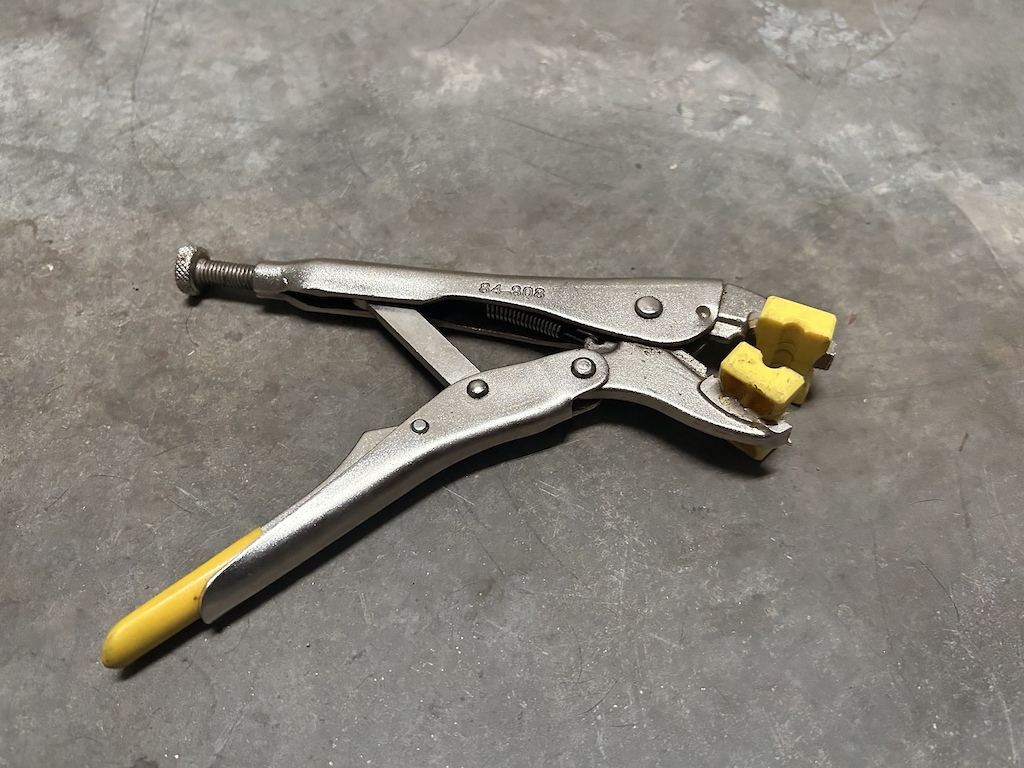
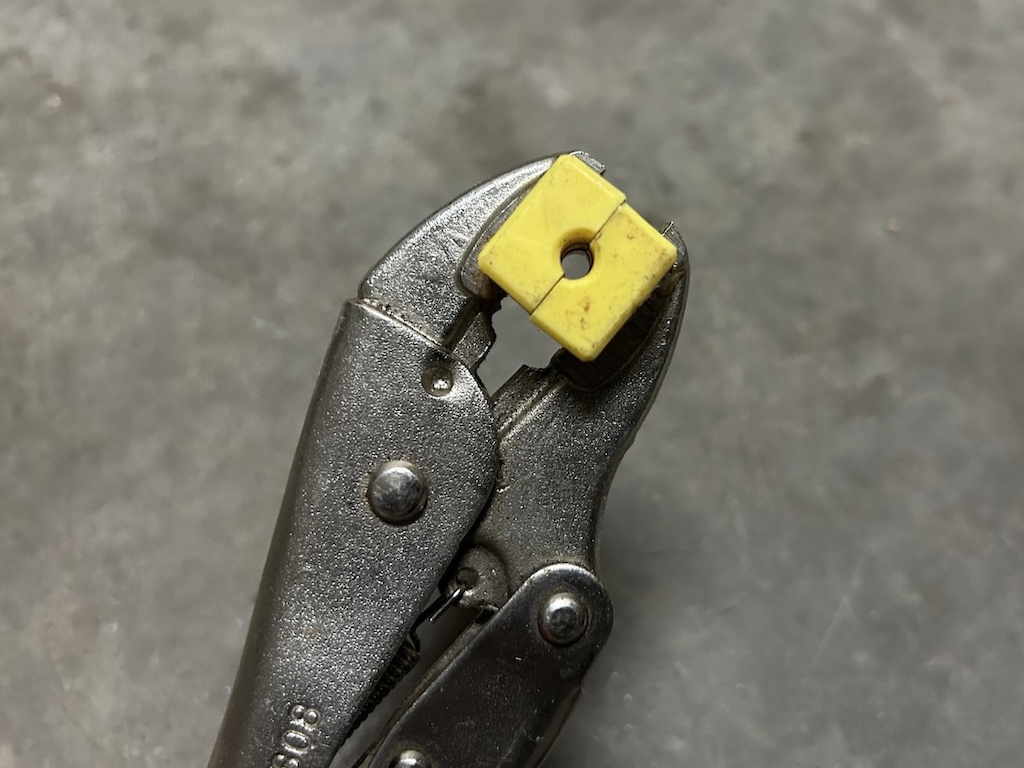
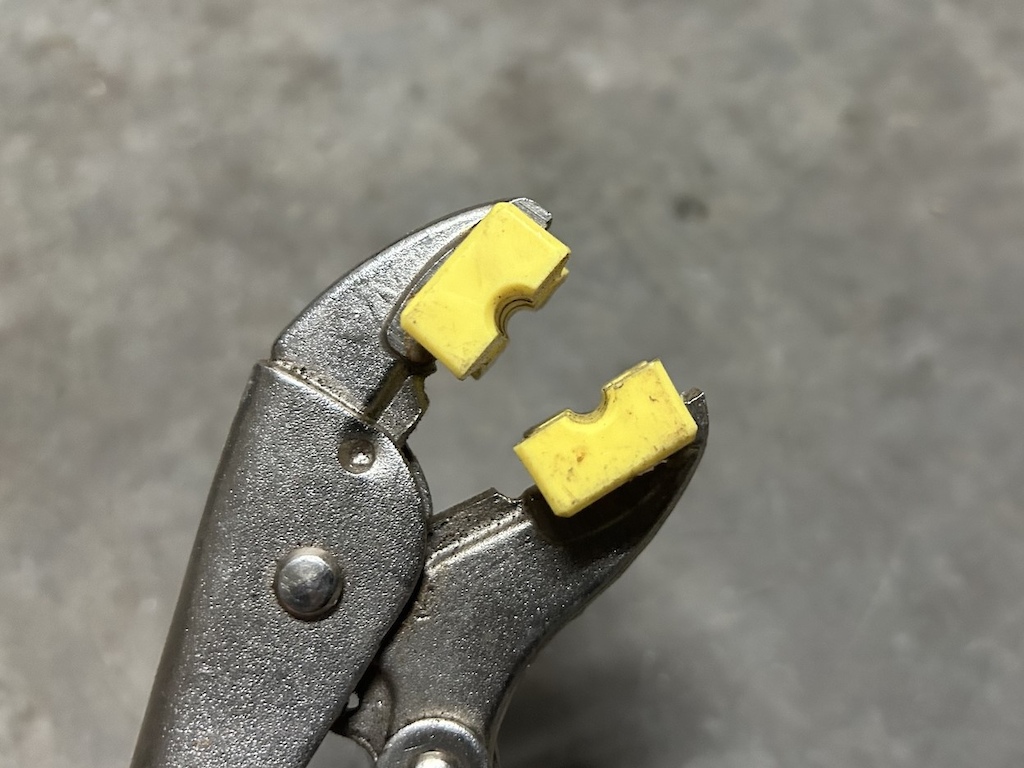
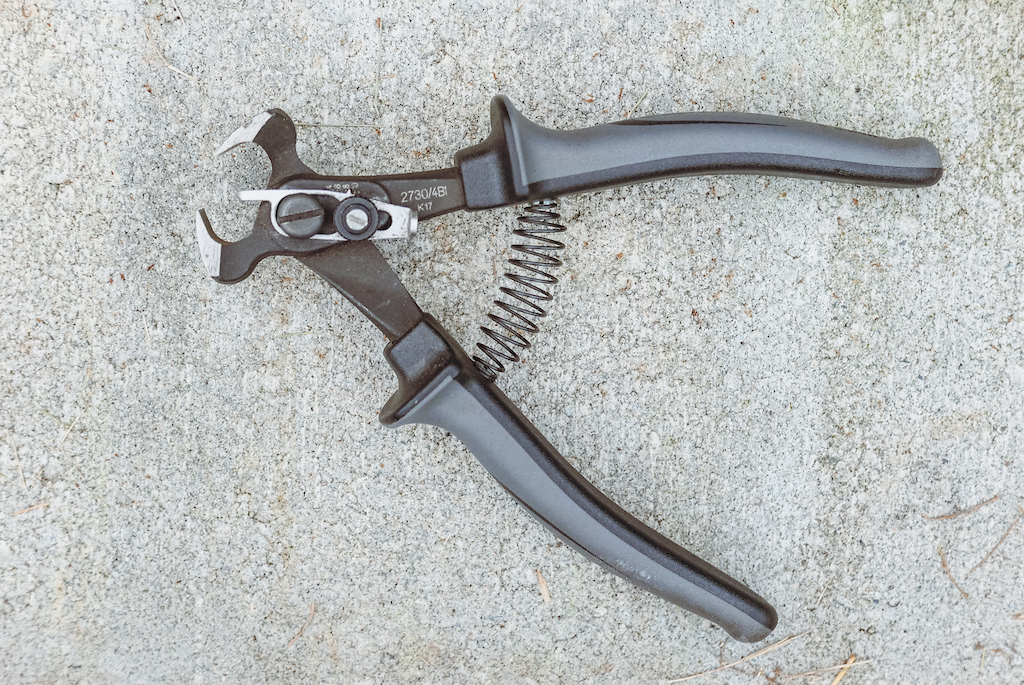
I've fallen foul of this myself, undoubtedly. But I'm a silly boy with lots of growing up to do. Instead, I present to you something shonkier, worse looking and far less useful - the HQ-high-tech hose clamps. The result of bonded premium plastic and 20 minutes with a hacksaw, hammer, and chisel.
These clamps, always at the right size to clamp the hose, make aligning and straightening hoses an absolute breeze and can help you get cleaner and less cluttered cables, all while avoiding frames or headtubes with just the lightest of twists. In fact, until SRAM brought out their haywire line of brakes, they could make any front end look sharp and tidy. But alas, there are limits to this tool's power.
![photo]()
Once the three blades are positioned between, and around, crown and race, the handle at the top of the main tube pushes on the fork’s steer tube to pull the whole apparatus up. The satisfying process relieves the race of its press fit on the lower portion of the steer tube without any bloodshed or unsightly marks on your fork.
![photo]()
![photo]()
![photo]()
![photo]()
They can also be used to straighten out a bent rim or rotor, push in DU bushings on a shock, unscrew the bottom of a dropper post to service it - the list goes on. I'm a fan of the 180mm version, since they're large enough for most bike-related tasks, and small enough to toss into a basic roadtrip tool kit.
![photo]()
![photo]()
Honorable mention goes to these Schwalbe-branded tire tread cutters that are manufactured by Unior. They do work to cut down mud spikes or do other tire modifications – there's even a depth gauge to make sure every cut is the same height – but I've only done that a couple of times. Instead, I use them as a zip-tie trimmer. Living in the Pacific Northwest means that a fender gets installed on every test bike, and this tool is the fastest way that I've found to flush cut the ends of zip ties. Overkill? Most likely, since nail clippers can be used to achieve the same result, but I like the heft of the tread cutter and the shape feels better in my hand.
![photo]()
You can buy wall-mounted wheel holders for around £15, but they don't hold the bike securely enough for this purpose. This design holds the bike perfectly upright because the vertical two-by-fours are just the right width apart (63 mm) to hold 2.4-2.5" tires tightly; plus, they extend a full 110 mm away from the wall so the wheel is held over a large vertical distance, not just at one point level with the hub. This means the bike doesn't flop to one side while I'm working on it.
It's literally two parallel big bits of wood screwed onto two small bits of wood, which are screwed into a stud behind the wall. Yet it's proven very handy not just for setting up and measuring bikes, but also as a place to put a bike while I make space for it elsewhere, or even for holding the bike steady while I mount or unmount my two-year-old from her Shotgun seat.
![photo]()
![photo]()
Boy oh boy, there are few such sweet remedies to the aching pain of managing a bunch of children both at home and at work than printing out Star Wars figurines and bottle holders. The unbridled joy of getting absolutely razzed on Tim Horton's coffee at 6 PM before listening to my favorite Brian Adams CD and cracking on with an 8-hour shift long into the early hours is hard to beat.
I'm an artist, and these glorified choking hazards are my art. Leonardo had the Mona Lisa, I have this nifty inline One Up pump holder.
Needless to say, we all have a tool or two that's become our favorite over the years. For some, it's a high-end, precision instrument, while for others it's a crude yet efficient item that gets the job done.
I've had this set of Wera L-Keys for about 7 years now, and they've probably been used almost every day over that span. Any inscription on them has long worn off, but luckily the colors are so ingrained in my mind there's never a hesitation as to which one to grab. The ball end is critical, and these have a clever little retention element that holds the bolt you're working with on the end of the key, so you can free up your other hand. The short side has "hex-plus" technology, which just means they're better at not stripping out poor tolerance bolts.
Dario DiGiulio
Position: Tech Editor & Safety Squinter
Favorite tool: Wera L-Keys
Honorable mention: Coast G20 Inspection Beam
Position: Tech Editor & Safety Squinter
Favorite tool: Wera L-Keys
Honorable mention: Coast G20 Inspection Beam

Clicky stick.
Excellent for peering into all the nooks and crannies.
Honorable mention goes to the gift of sight. In this case, that sight is enhanced/provided by this Coast inspection beam, which is basically a flashlight with no focal adjustment and a very small flat circular beam. It's a great help when fishing cables through frames, setting up brakes, and when hunting for that goddamn tiny bolt that fell on the ground. I picked this up fairly recently, and it's quickly become a key piece in my dark and wonderful garage shop.
Second honorable of course goes to Knipex pliers, but as you'll see in Henry's bit below, that's far from a brave opinion.
Firstly, before I start, I want to say that the Knipex pliers are to bike mechanics what soya-pumpkin-spiced lattes are to Taylor Swift fans as they take awful Instagram photos in Starbucks, unburdened by their parent's restrictive data plan for the first time and really able to upload the dullery in a staggering-high-definition-tedium-infused-shitbox-sideshow. We get it, you can crimp cables. It's not a lightsaber.
Henry Quinney
Position: Tech Editor & Kettle Supervisor
Favorite tool: Bodged hose clamp
Honorable mention: Tiny tape measure
Position: Tech Editor & Kettle Supervisor
Favorite tool: Bodged hose clamp
Honorable mention: Tiny tape measure
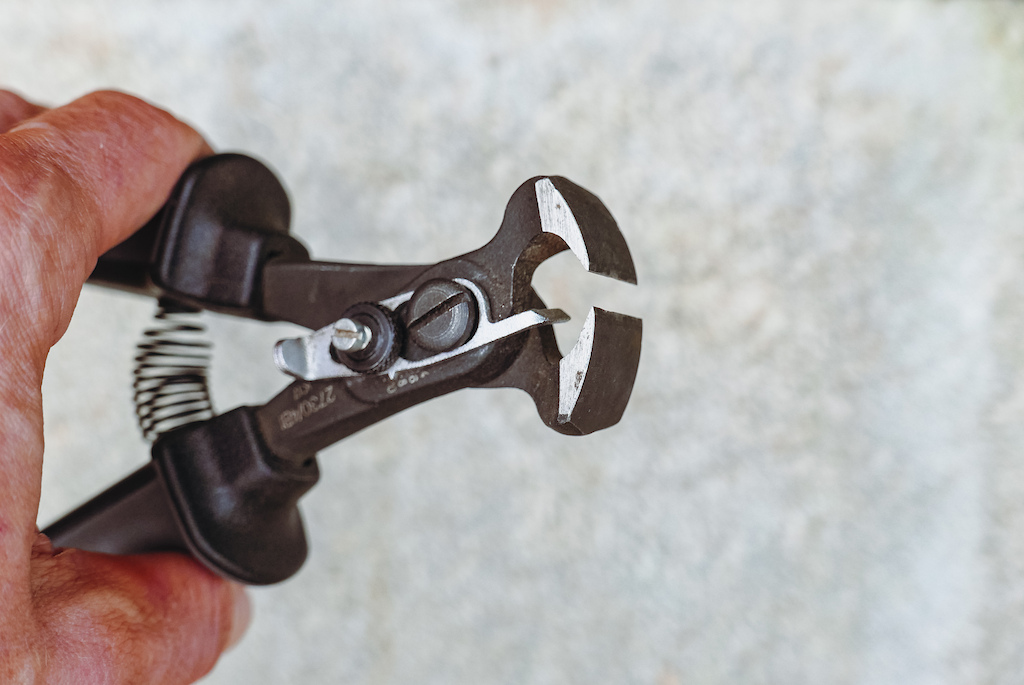
The Shimano bleed blocks, just simply bonded into place
I love cable routing - there, I said it.
I've fallen foul of this myself, undoubtedly. But I'm a silly boy with lots of growing up to do. Instead, I present to you something shonkier, worse looking and far less useful - the HQ-high-tech hose clamps. The result of bonded premium plastic and 20 minutes with a hacksaw, hammer, and chisel.
These clamps, always at the right size to clamp the hose, make aligning and straightening hoses an absolute breeze and can help you get cleaner and less cluttered cables, all while avoiding frames or headtubes with just the lightest of twists. In fact, until SRAM brought out their haywire line of brakes, they could make any front end look sharp and tidy. But alas, there are limits to this tool's power.
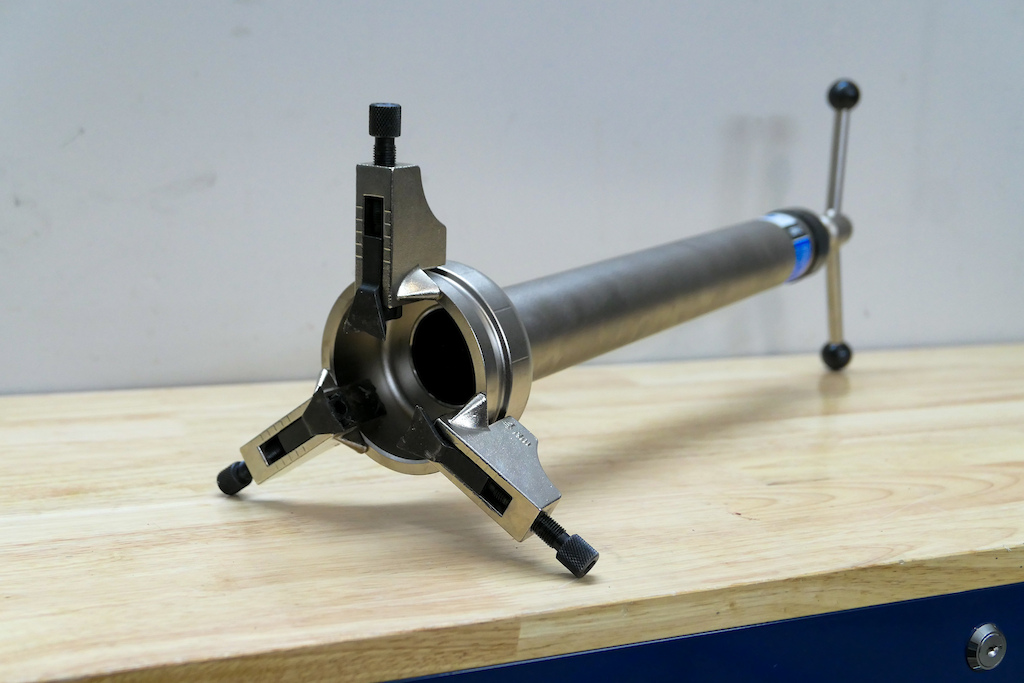
If you aren’t using a headset with the ingenious split crown race, or a fork that features an integrated one, like Ohlins' first generation 36 RXF used (that comes with its own set of problems, but I applaud them for simplifying the installation process), then you’ll need a set of unique tools to install and remove that crucial little part.
Seasoned (or even partially seasoned) mountain bike home mechanics certainly know how to wield a hammer and flat-bladed screwdriver, but there’s a certain satisfaction that comes along with using the correct tool for the job. Park Tool's Adjustable Crown Race Puller (CRP2) is one of those seldom-used pieces of equipment that does what it says on the tin.
Seasoned (or even partially seasoned) mountain bike home mechanics certainly know how to wield a hammer and flat-bladed screwdriver, but there’s a certain satisfaction that comes along with using the correct tool for the job. Park Tool's Adjustable Crown Race Puller (CRP2) is one of those seldom-used pieces of equipment that does what it says on the tin.
Matt Beer
Position: Tech Editor & Dishwasher Loading Expert
Favorite tool: Park Tools CRP 2 - Park Tools Crown Race Puller
Honorable mention: RockShox Reverb double ended-barb
Position: Tech Editor & Dishwasher Loading Expert
Favorite tool: Park Tools CRP 2 - Park Tools Crown Race Puller
Honorable mention: RockShox Reverb double ended-barb
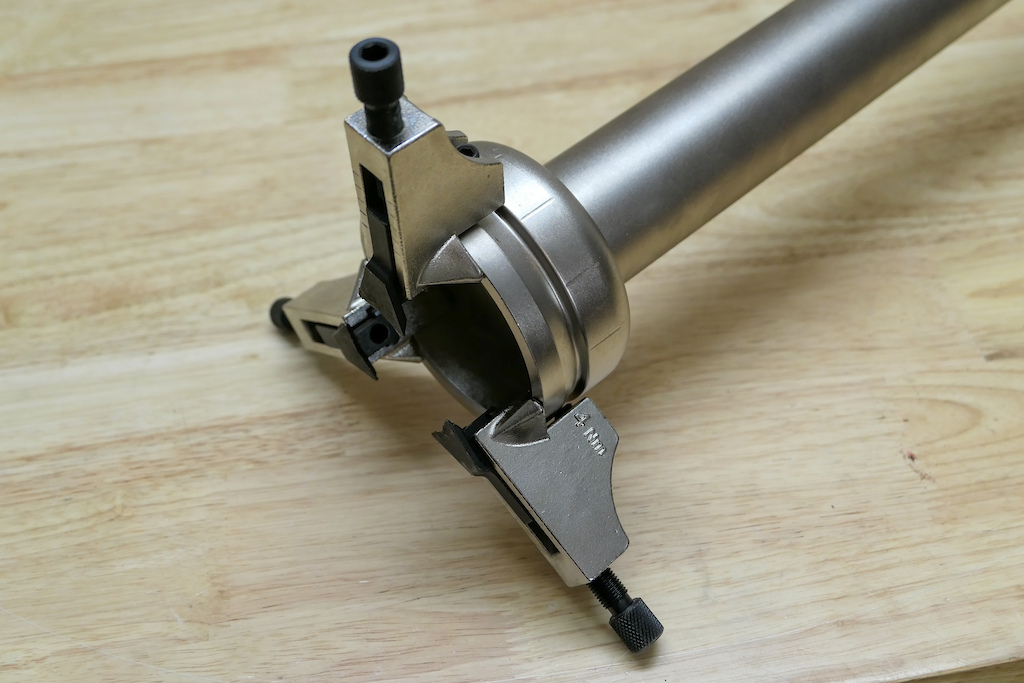
Park has included gradients and torque settings too.
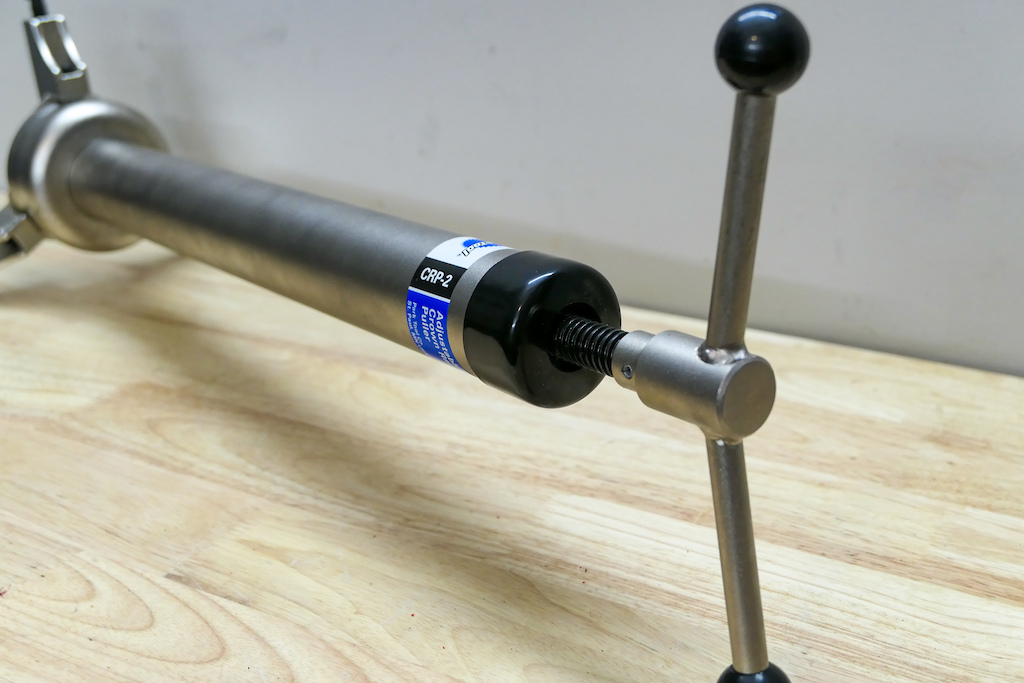
Ok, it's not going to fit in your weekend tool box, but for the home mechanic, this can be a lifesaver.

Honorable mention: the RockShox Reverb double ended-barb. The small but mighty widget attaches new cable housing or hydraulic lines, as it was originally intended for, to the existing one already routed through your frame - no need for fishing inside your frame with flashlights and dental picks.
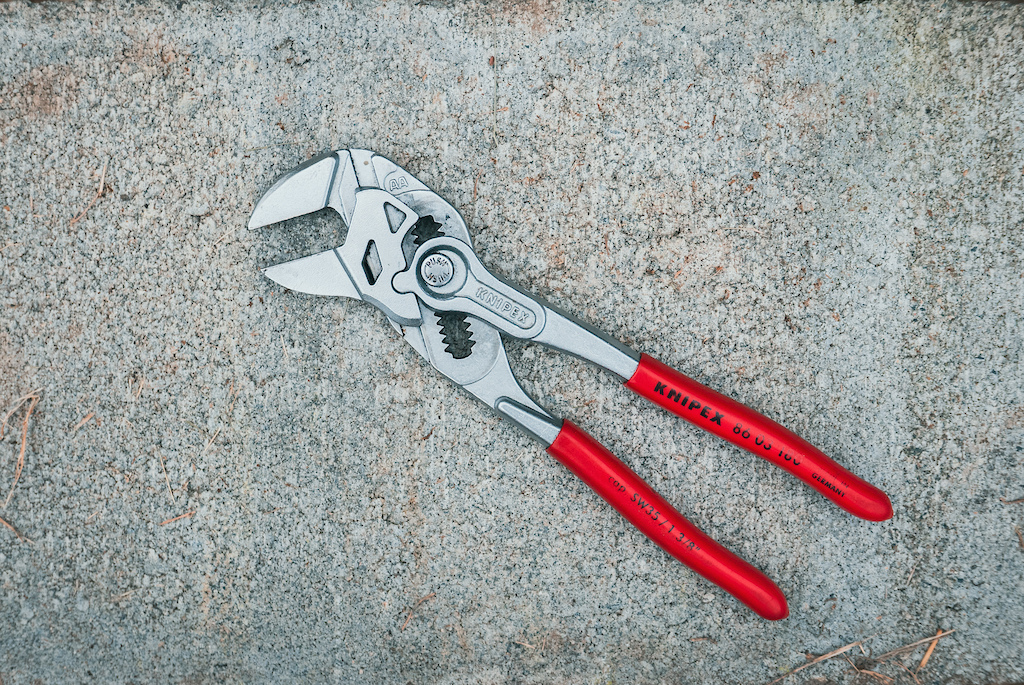
Apparently it's not cool to like Knipex pliers anymore. Good thing I stopped worrying about being cool years ago, so I can still include them as one of my favorite tools. Plus, they're definitely more useful than Henry's vice grip and super glue abomination....
Yes, Knipex pliers are super handy for crimping cable ends, but that's becoming a little less common now that more and more bikes are showing up with battery-powered-everything. These days I'm most likely to use them to open up the top cap of a fork to add or remove a volume spacer when I don't feel like digging for the right size socket, or to loosen a compression nut when swapping brake lines.
Yes, Knipex pliers are super handy for crimping cable ends, but that's becoming a little less common now that more and more bikes are showing up with battery-powered-everything. These days I'm most likely to use them to open up the top cap of a fork to add or remove a volume spacer when I don't feel like digging for the right size socket, or to loosen a compression nut when swapping brake lines.
Mike Kazimer
Position: Managing Tech Editor, Nap Enthusiast
Favorite tool: Knipex pliers
Honorable mention: Schwalbe / Unior tread cutter
Position: Managing Tech Editor, Nap Enthusiast
Favorite tool: Knipex pliers
Honorable mention: Schwalbe / Unior tread cutter
Unior's tread cutter also works great as a way to quickly trim zip ties.
Honorable mention goes to these Schwalbe-branded tire tread cutters that are manufactured by Unior. They do work to cut down mud spikes or do other tire modifications – there's even a depth gauge to make sure every cut is the same height – but I've only done that a couple of times. Instead, I use them as a zip-tie trimmer. Living in the Pacific Northwest means that a fender gets installed on every test bike, and this tool is the fastest way that I've found to flush cut the ends of zip ties. Overkill? Most likely, since nail clippers can be used to achieve the same result, but I like the heft of the tread cutter and the shape feels better in my hand.
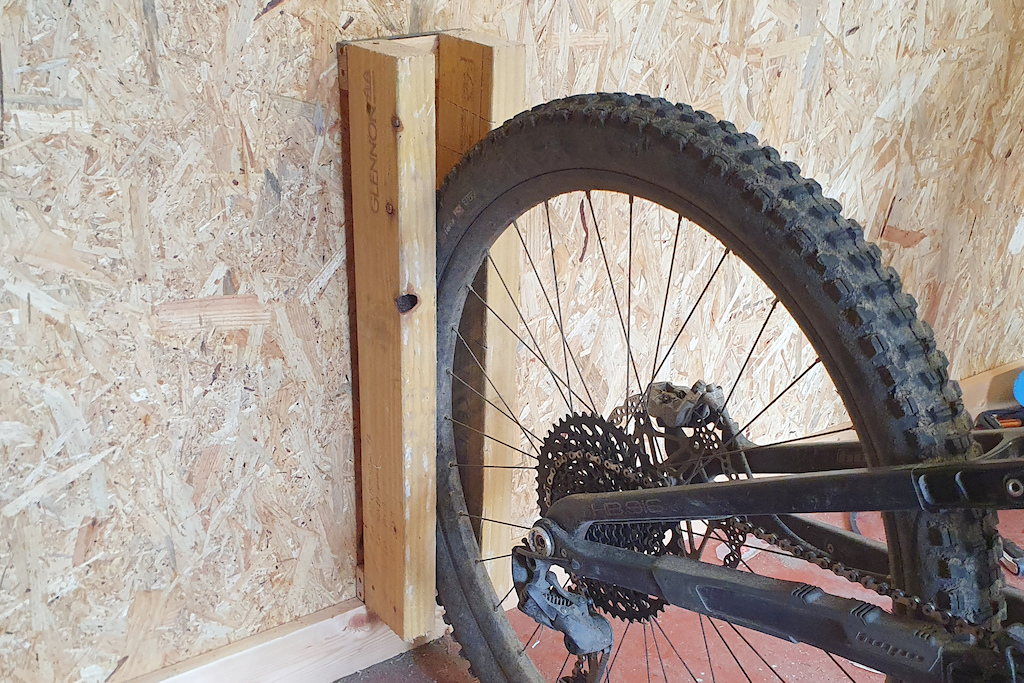
I feel a bit silly throwing this in alongside the list of beautifully built tools on this list, but my hastily improvised wall stand has proved surprisingly useful. I threw it together soon after moving into my new workshop/bike store with some bits of scrap timber I had lying around. The idea is to keep the bike secure and upright to make it easier to work on things like setting brake lever angle, handlebar roll or measuring frame geometry - tasks that require the bike to be level, so a conventional workstand won't do.
Seb Stott
Position: Tech Editor, Food Waste Disposal Unit
Favorite tool: Bodged bike stand
Honorable mention: Cheap plastic calipers
Position: Tech Editor, Food Waste Disposal Unit
Favorite tool: Bodged bike stand
Honorable mention: Cheap plastic calipers
You can buy wall-mounted wheel holders for around £15, but they don't hold the bike securely enough for this purpose. This design holds the bike perfectly upright because the vertical two-by-fours are just the right width apart (63 mm) to hold 2.4-2.5" tires tightly; plus, they extend a full 110 mm away from the wall so the wheel is held over a large vertical distance, not just at one point level with the hub. This means the bike doesn't flop to one side while I'm working on it.
It's literally two parallel big bits of wood screwed onto two small bits of wood, which are screwed into a stud behind the wall. Yet it's proven very handy not just for setting up and measuring bikes, but also as a place to put a bike while I make space for it elsewhere, or even for holding the bike steady while I mount or unmount my two-year-old from her Shotgun seat.

Honorable mention: a set of plastic calipers is the only accurate way to measure sag without worrying about scratching the stanchion. They also cost very little, even after replacing the broken battery cover with electrical tape.

I think this is what he does.
Brian is taking some well-deserved time off this week, so I (Henry) thought I'd fill in for him. Brian loves printing things. I don't know why, nobody does, but it's best not to ask questions. To do Brian justice, I'm now going to write as if I were him.
Brian Park
Position: Big boss and 3D Printing Authority
Favorite tool: This thing, presumably
Honorable mention: HP Inkjet
Position: Big boss and 3D Printing Authority
Favorite tool: This thing, presumably
Honorable mention: HP Inkjet
Boy oh boy, there are few such sweet remedies to the aching pain of managing a bunch of children both at home and at work than printing out Star Wars figurines and bottle holders. The unbridled joy of getting absolutely razzed on Tim Horton's coffee at 6 PM before listening to my favorite Brian Adams CD and cracking on with an 8-hour shift long into the early hours is hard to beat.
I'm an artist, and these glorified choking hazards are my art. Leonardo had the Mona Lisa, I have this nifty inline One Up pump holder.
Author Info:

 Member since Feb 1, 2009
Must Read This Week
Sign Up for the Pinkbike Newsletter - All the Biggest, Most Interesting Stories in your Inbox
PB Newsletter Signup
WOW.
just wow...
In normal use, combined with a P&K Lie spoke wrench, they are good for holding a spoke to stop it from twisting when dealing with seized nipples (or building a wheel with straight pull spokes. I've heard people say that they mark spokes when doing this, but mine never have).
They can be good for pressing in bearings in awkward locations.
Yesterday I opened up an AXS Reverb top collar to grease it. Better than an adjustable wrench and no need to go and purchase the correct sized wrench.
The day before I used mine at home to remove the plastic shelf studs in my bedroom closet!
I think Henry is just a tool hipster who tries to true wheels with clothes pegs
- Unscrewing actuator on dropper post
- Undoing fork top caps
- Adjusting hubs with wrench flats
- Adjusting threaded headsets
- Holding the yellow blocks on Henry's tool to hold hydraulic hoses including while cutting them with a utility knife
- Pressing eyelet bushings in
- Pressing bearings in (sometimes)
- Holding bladed spokes while truing
- As a nipple wrench (small ones ideally)
- Small ones work for holding old school road calipers straight while tightening fixing bolts
- Value core tool
- alternative to crowfoot wrench for damper work
- Rotor truing
- bent cassette tooth fixing (rare)
- As an adjustable travel wrench of things with nuts (like my kids bikes)
- Fixed cups on adjustable bottom brackets
- There are some dropper posts with wrench flats on the collar
I think you have a good point on the eyelet pushing and some of the others, I think they'd work great for those...
Tools are only as good as the tool using them
To your point, I can see a corroded alum nipple have Knipex pliers being used, and that could certainly be a use case for them.
The bike was already a creaking, wobbling jallopy by the time he finished that trip, but it proves that determination is all you need to survive a weekend.
Brake lines usually come god-awful long, so this is a quick way to clamp the line, cut it to length, and install the barb without thinking too hard about it. Its simple enough to do without this "hack", but man that is such a cool hack I wish I had thought of it.
www.youtube.com/watch?v=xsSdFO89_rU
I used to do it the same way, clamping the hose with the blocks. But once you buy the tool, trust me, you won't go back.
jagwire.com/products/tools/needle-driver
razor blades $1
park tool race puller $270
Caption says "for the home mechanic, this can be a lifesaver." Seriously? Does ANY home mechanic own this $300 tool? Don't get me wrong, I'd love to have access to this rather than stacking razor blades, but not at $300 for use 2X/year.
Usually the math I do for tools like this is, "How many $10 - $20 trips to the LBS would it take me to pay for one of these and how long is that going to take?"
In the case of this one, the answer is "Decades on the low end, maybe never on the high end.", and I just bodge it myself somehow, or take my fork down to the LBS. I am going to have to look up this razor blade method though, 'cause now I'm curious.
The exception to that is a wheel truing stand and a few related tools I bought decades ago 'cause I wanted to learn to build wheels. I've only ever built 2 or 3 sets, and occasionally use it for truing, but still consider it money well spent.
Maybe some people are *really* wedded to the idea of doing *all* the work themselves, but those people are probably going to try the razor blade hack or something, and those that are going to a shop would rather just bring their fork in and have it done there, rather than have to make a second trip to return a rented tool.
People like to ascribe a lot of talent and care to people who work at a bike shop for minimum wage or just above.
I'm not saying good techs don't exist, but people tend to minimize how much of a crapshoot it can be taking bikes into shops for anything but basic maintenance.
For a shop, it's just an extra hassle w/o enough profit to make it worthwhile.
For the DIY home mechanic, they want to *avoid* a trip to a shop and an add'l charge for the job, and are probably going to just figure out another way (razorblades, table knife, screwdriver etc.). The number of people who really want to do everything themselves, but would also make a special trip to a shop to rent a single-purpose tool, for which a reasonable DIY workaround exists, must be vanishingly small.
As an aside: To my mind the best model for the DIY home mechanic, who doesn't have a lot of space to work or tools is the CoOp model, where a volunteer run shop has tools, space to work, and experienced volunteers on hand to help out the less experienced, and one can pay a small fee for tool usage and bench/workstand space to go work on their bikes. We used to have one of those locally, and I would occasionally pop by to do a job that I didn't have the right tool for, and drop a $5 or $10 in the donation box. Unfortunately they are no longer open.
www.amazon.com/dp/B0CBP57WMC/ref=sspa_mw_detail_2?ie=UTF8&psc=1&sp_csd=d2lkZ2V0TmFtZT1zcF9waG9uZV9kZXRhaWwyp13NParams
And no one clarified. If you clamp the line, tight enough, you can turn it so it’s not going all wonky where ever it loop dee loops itself to- usually as you torque down the compression nut.
Those yellow blocks come in all kinds of shimano garbage. But the vice grip is the secret weapon, even without epoxy ….
The Knob Gobbler?!
It’s too good
They also work really well!
Thanks!
As a bonus I feel MUCH more comfortable applying higher amounts of torque on stuff like a DUB crank bolt or a pedal with the better wrenches.
Stainless does look shiny, and will stay looking 'newer' for longer, but it's also (marginally) softer, but nowhere near as soft as the aluminium that bike bolts are made of. If you were working with steel bolts, buy the black ones. If you live near the sea (coastal air): buy the stainless ones. Otherwise buy which colour you like :-D
Wera says on the back of their packaging the stainless set is for industries where the tool can't show any signs of _surface_ rust (eg. aerospace).
I held both sets in my hands before buying and ended up going with the bright mild steel set (the 'black' ones), just because I liked the colour and live a long way from the beach. HTH.
grab a general purpose plier, grab that extra plastic that you want to cut off by flush with the flat point end of the hammer, plier, I mean plier, and twist. Roll that little thingy. just that.
www.youtube.com/watch?v=HMqZ2PPOLik
You don't have to have a "hot take" on every single subject Henry. We will still read and enjoy your content if you're not being edgy.
The "XS" 100mm wrench can do all the same bike related work and is small enough to carry while riding. It lacks grip covers though.
Ooooh Matron!!
Do you remember the same with world cup teams wrenchers?
Maybe I should sell a crown race splitter.... % 5 hacksaw blade..... foe $300.... hmn.......